
Instruction Manual
Page 1
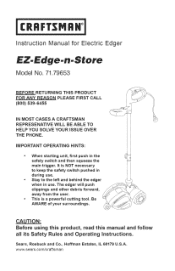
... and Operating Instructions. The edger will push • clippings and other debris forward, away from the user. Instruction Manual for Electric Edger EZ.Edge.n.Store Model No. 71.79653 BEFORE RETURNING THIS PRODUCT FOR ANY REASON PLEASE FIRST CALL (800) 539-6455 IN MOST CASES A CRAFTSMAN REPRESENATIVE WILL BE ABLE TO HELP YOU SOLVE YOUR ISSUE OVER THE PHONE. www.sears.com/craftsman It is a powerful cutting tool.
... and Operating Instructions. The edger will push • clippings and other debris forward, away from the user. Instruction Manual for Electric Edger EZ.Edge.n.Store Model No. 71.79653 BEFORE RETURNING THIS PRODUCT FOR ANY REASON PLEASE FIRST CALL (800) 539-6455 IN MOST CASES A CRAFTSMAN REPRESENATIVE WILL BE ABLE TO HELP YOU SOLVE YOUR ISSUE OVER THE PHONE. www.sears.com/craftsman It is a powerful cutting tool.

Instruction Manual
Page 2
WARNING: Some dust created by using power tools contains chemicals known to the state of California to cause cancer and birth defects or other reproductive harm.
WARNING: Some dust created by using power tools contains chemicals known to the state of California to cause cancer and birth defects or other reproductive harm.
Instruction Manual
Page 3
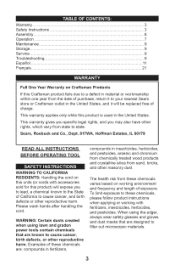
Warranty ... 3 Safety Instructions 3 Assembly ... 6 Operation 7 Maintenance 9 Storage ... 9 Service ... 9 Troubleshooting 9 Espa_ol ... 11 Fran£;ais ... 21 Full One Year Warranty on Craftsman Products If this Craftsman product fails due to a defect in material or workmanship within one year from the date of purchase, return it to your nearest Sears store or Craftsman outlet in the United States, and it wilt be replaced free of California to cause...
Warranty ... 3 Safety Instructions 3 Assembly ... 6 Operation 7 Maintenance 9 Storage ... 9 Service ... 9 Troubleshooting 9 Espa_ol ... 11 Fran£;ais ... 21 Full One Year Warranty on Craftsman Products If this Craftsman product fails due to a defect in material or workmanship within one year from the date of purchase, return it to your nearest Sears store or Craftsman outlet in the United States, and it wilt be replaced free of California to cause...
Instruction Manual
Page 4
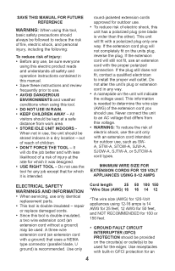
... proper wall outlet. Never connect the unit to an AC voltage that differs from work area. MINIMUM WIRE SIZE FOR EXTENSION CORDS FOR 120 VOLT APPLIANCES USING 0-12 AMPS ELECTRICAL SAFETY WARNINGS AND iNFORMATiON Cord length 25 50 100 150 *Wire Size(AWG) 16 16 14 12 = When servicing, use only identical replacement parts. * This tool is double-insulated - It will fit with a ground) that for which it is...
... proper wall outlet. Never connect the unit to an AC voltage that differs from work area. MINIMUM WIRE SIZE FOR EXTENSION CORDS FOR 120 VOLT APPLIANCES USING 0-12 AMPS ELECTRICAL SAFETY WARNINGS AND iNFORMATiON Cord length 25 50 100 150 *Wire Size(AWG) 16 16 14 12 = When servicing, use only identical replacement parts. * This tool is double-insulated - It will fit with a ground) that for which it is...
Instruction Manual
Page 5
... use the next heavier size line gauge. Check for cuts, nicks, or cracks in line voltage that is turned off position when plugging in . Be sure work area is in the off . If you are not sure what cord size to operate unit safely. * USE SAFETY GLASSES - Repair or replace cords if any buried electrical or other persons and pets when using the edger. * STAY CLEAR OF BLADE...
... use the next heavier size line gauge. Check for cuts, nicks, or cracks in line voltage that is turned off position when plugging in . Be sure work area is in the off . If you are not sure what cord size to operate unit safely. * USE SAFETY GLASSES - Repair or replace cords if any buried electrical or other persons and pets when using the edger. * STAY CLEAR OF BLADE...
Instruction Manual
Page 6
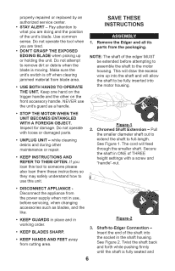
... front accessory handle. Keep one hand on the trigger handle and the other maintenance or repair. • KEEP INSTRUCTIONS AND REFER TO THEM OFTEN. Do not operate with a screw and "handle"-nut. * DISCONNECT APPLIANCE = Disconnect the appliance from cuttinga_a. 6 Fij.ig.rue -2 Shaft-to full-length. secommon senseD. youaretired. EDGING BLADE when picking up into * USE BOTH HANDS TO OPERATE the motor housing. This wilt draw the excess wire...
... front accessory handle. Keep one hand on the trigger handle and the other maintenance or repair. • KEEP INSTRUCTIONS AND REFER TO THEM OFTEN. Do not operate with a screw and "handle"-nut. * DISCONNECT APPLIANCE = Disconnect the appliance from cuttinga_a. 6 Fij.ig.rue -2 Shaft-to full-length. secommon senseD. youaretired. EDGING BLADE when picking up into * USE BOTH HANDS TO OPERATE the motor housing. This wilt draw the excess wire...
Instruction Manual
Page 7
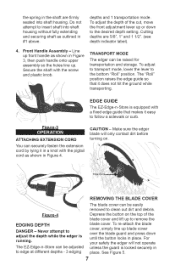
... pigtail cord as shown in place. For your safety the edger will not operate unless the guard is running. CAUTION - Depress the button on . \\ \ REMOVING THE BLADE COVER Fj_ure-4 EDGING DEPTH DANGER - The "Roll" position raises the edge guide so that makes it does not hit the ground while transporting. Secure the shaft with the screw and plastic knob. To adjust the depth of the blade cover...
... pigtail cord as shown in place. For your safety the edger will not operate unless the guard is running. CAUTION - Depress the button on . \\ \ REMOVING THE BLADE COVER Fj_ure-4 EDGING DEPTH DANGER - The "Roll" position raises the edge guide so that makes it does not hit the ground while transporting. Secure the shaft with the screw and plastic knob. To adjust the depth of the blade cover...
Instruction Manual
Page 8
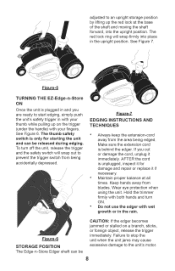
...'s motor. The thumb safety switch is unplugged, inspect it for starting the unit and can be released during edging. To turn ON. * Do not use the edger with wet growth or in with your fingers. Fi=_ure-7 EDGING INSTRUCTIONS TECHNIQUES AND * Always keep the extension-cord away from blades. Wear eye protection when using the unit. AFTER the cord is only for damage and repair or replace...
...'s motor. The thumb safety switch is unplugged, inspect it for starting the unit and can be released during edging. To turn ON. * Do not use the edger with wet growth or in with your fingers. Fi=_ure-7 EDGING INSTRUCTIONS TECHNIQUES AND * Always keep the extension-cord away from blades. Wear eye protection when using the unit. AFTER the cord is only for damage and repair or replace...
Instruction Manual
Page 9
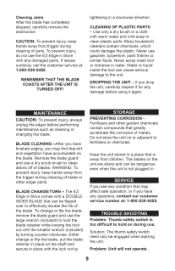
... metals. O® Problem: Thumb safety switch is too difficult to the unit. Never spray-wash tool or immerse in a clockwise direction. Either change or flip the blade, remove the blade guard and use the large wrench (included) to hold on the unit are sharp and can cause serious damage to hold the blade retainer while loosing the lock nut with the lock nut by turning counter-clockwise. If...
... metals. O® Problem: Thumb safety switch is too difficult to the unit. Never spray-wash tool or immerse in a clockwise direction. Either change or flip the blade, remove the blade guard and use the large wrench (included) to hold on the unit are sharp and can cause serious damage to hold the blade retainer while loosing the lock nut with the lock nut by turning counter-clockwise. If...
Instruction Manual
Page 10
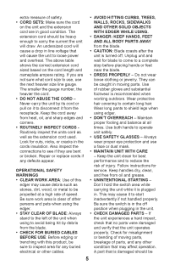
...working properly and is firmly seated in the "on Page 3 of this and at[ your other product manua[s online. , Get answers from our team of the connections are properly made between the unit, the extension cord, and the recepacle. NEED MORE HELP? *i%)u'llfind the answer and a more on managemyhomeocom :: • Find this manual... concerning proper extension cord wire size. for free! 10 Please refer to use a heavier gauge (AWG) extension cord. Insure the blade guard is in place. Problem: Motor seems to be running slow Solution: You may need to the information...
...working properly and is firmly seated in the "on Page 3 of this and at[ your other product manua[s online. , Get answers from our team of the connections are properly made between the unit, the extension cord, and the recepacle. NEED MORE HELP? *i%)u'llfind the answer and a more on managemyhomeocom :: • Find this manual... concerning proper extension cord wire size. for free! 10 Please refer to use a heavier gauge (AWG) extension cord. Insure the blade guard is in place. Problem: Motor seems to be running slow Solution: You may need to the information...

Instruction Manual
Page 31
NEEMDORP.E_ i ° Findthisand aU yourotherproductmanuatsonline. • Geat nswefrosmourteamofhomee×perts. • Geat personatimzeadintenapntcae_foryouhr ome. • Find information and tools to help with home projects.
NEEMDORP.E_ i ° Findthisand aU yourotherproductmanuatsonline. • Geat nswefrosmourteamofhomee×perts. • Geat personatimzeadintenapntcae_foryouhr ome. • Find information and tools to help with home projects.

Instruction Manual
Page 32
Sears, Roebuck and Co., Hoffman Estates, IL 60179 U.S.A. www.sears.com/craftsman
Sears, Roebuck and Co., Hoffman Estates, IL 60179 U.S.A. www.sears.com/craftsman


