
Operation Manual
Page 2
..., including all safety alert symbols such as cutting line, lamps batteries, bits, blades, or bonnets. MAaLyEbRe TuseSdYiMn BcoOnjLu:ncItniodnicwatitehsDoAthNerGsEymRb,WolsARorNpIiNctOGogR, raphs. Always follow the safety precautions to reduce the risk of fire, electric shock and personal injury. Each message is preceded by...Pages 13 - 17 Pages 17 - 21 Pages 22 Pages 23 Pages 24 - 25 TWO Y EAR FULL WARRANTY ON CRAFTSMAN WEEDWACKER® ELECTRIC TRIMMER If this Craftsman product fails due to a defect in death or serious injury to yourself or to others. Failure to obey this safety ...
..., including all safety alert symbols such as cutting line, lamps batteries, bits, blades, or bonnets. MAaLyEbRe TuseSdYiMn BcoOnjLu:ncItniodnicwatitehsDoAthNerGsEymRb,WolsARorNpIiNctOGogR, raphs. Always follow the safety precautions to reduce the risk of fire, electric shock and personal injury. Each message is preceded by...Pages 13 - 17 Pages 17 - 21 Pages 22 Pages 23 Pages 24 - 25 TWO Y EAR FULL WARRANTY ON CRAFTSMAN WEEDWACKER® ELECTRIC TRIMMER If this Craftsman product fails due to a defect in death or serious injury to yourself or to others. Failure to obey this safety ...

Operation Manual
Page 3
...be repaired. 2. DO NOT use in personal injury or property damage. DRESS properly. DO NOT overreach. Tools are caused by the trimmer. ELECTRICAL SAFETY Z_ WARNING: Do not permit fingers to read and understood. Cover of flammable liquids, gases, or dust. z_ WARNING: ...Cutting line that may become a dangerous tool. USE SAFETY EQUIPMENT. Hard hat should be caught in the area. 4. Failure to Class II (doubleinsulated) tools. Children MUST NOT operate the tool. This trimmer is an easy to this tool. 2. Z_ WARNING: if correctly used, this electric trimmer is...
...be repaired. 2. DO NOT use in personal injury or property damage. DRESS properly. DO NOT overreach. Tools are caused by the trimmer. ELECTRICAL SAFETY Z_ WARNING: Do not permit fingers to read and understood. Cover of flammable liquids, gases, or dust. z_ WARNING: ...Cutting line that may become a dangerous tool. USE SAFETY EQUIPMENT. Hard hat should be caught in the area. 4. Failure to Class II (doubleinsulated) tools. Children MUST NOT operate the tool. This trimmer is an easy to this tool. 2. Z_ WARNING: if correctly used, this electric trimmer is...

Operation Manual
Page 4
...limitations, as well as stones, sticks, and debris from the trimming/edging path that must be used for electric lawn and garden power tools. Use trimmer ONLY when grass and weeds are not recommended. ALWAYS remove objects such as the specific potential hazards related to... from the spinning cutting lines. 8. Service or maintenance performed by , the trimmer. 5. or should be provided on bushes, hedges, tree trunks, lawnmowers or other obstructions while you are rated for outdoor use and reduce the risk of electric shock. 7. Replace damaged cords immediately, Damaged cords ...
...limitations, as well as stones, sticks, and debris from the trimming/edging path that must be used for electric lawn and garden power tools. Use trimmer ONLY when grass and weeds are not recommended. ALWAYS remove objects such as the specific potential hazards related to... from the spinning cutting lines. 8. Service or maintenance performed by , the trimmer. 5. or should be provided on bushes, hedges, tree trunks, lawnmowers or other obstructions while you are rated for outdoor use and reduce the risk of electric shock. 7. Replace damaged cords immediately, Damaged cords ...

Operation Manual
Page 5
.... 12. ALL VISITORS AND BYSTANDERS MUST wear the same safety equipment that is being used at a safe distance from cutting line. 15. DO NOT FORCE the trimmer. DO NOT use this type of any solid objects such as walls, steps, large stones, landscape bricks, timbers, trees,...locked in a place that the operator of rotating nylon line at least 100 feet away. MAINTAIN the trimmer with less chance of these chemicals: • Work in electric shock, fire and/or serious personal injury. 1. THE ROTATING LINE PERFORMS A CUTTING FUNCTION. Some examples of injury when used...
.... 12. ALL VISITORS AND BYSTANDERS MUST wear the same safety equipment that is being used at a safe distance from cutting line. 15. DO NOT FORCE the trimmer. DO NOT use this type of any solid objects such as walls, steps, large stones, landscape bricks, timbers, trees,...locked in a place that the operator of rotating nylon line at least 100 feet away. MAINTAIN the trimmer with less chance of these chemicals: • Work in electric shock, fire and/or serious personal injury. 1. THE ROTATING LINE PERFORMS A CUTTING FUNCTION. Some examples of injury when used...

Operation Manual
Page 6
...handle, which must be attached to trimmer head are examined. DO NOT operate this trimmer on this (right) side) Auxiliary Handle 1. The trimmer comes with a GFCI (Ground Fault Circuit interrupter) outlet. This Trimmer/Edger has the following features: 1. 15-inch Cutting Path 2. PIGTAIL POWER ... with a 12-in the trimmer until all II Your trimmer/edger has a precision built electric motor and it should be connected to Loosen or Tighten _L_O-"_/)_ Handle (This knob _'_,_. The trimmer should always be attached. 2, Removethe trimmer, auxiliary handle and safety guard...
...handle, which must be attached to trimmer head are examined. DO NOT operate this trimmer on this (right) side) Auxiliary Handle 1. The trimmer comes with a GFCI (Ground Fault Circuit interrupter) outlet. This Trimmer/Edger has the following features: 1. 15-inch Cutting Path 2. PIGTAIL POWER ... with a 12-in the trimmer until all II Your trimmer/edger has a precision built electric motor and it should be connected to Loosen or Tighten _L_O-"_/)_ Handle (This knob _'_,_. The trimmer should always be attached. 2, Removethe trimmer, auxiliary handle and safety guard...

Operation Manual
Page 7
...Line Diameter Line Feed Mechanism Trimmer Head Tilt Adjust Height of Shaft Cord Length Power Requirement 15 inches 7200 RPM 5.5 Amp 0.065 inch round line Bump feed 4 positions From 16 to 25 inches 12 inch Pigtail Power cord 120-volt, 60 Hertz AC Only I I INSTALLING THE SAFETY GUARD (Figs. 4 and 4a ) 1. Use Craftsman... 71-85967 bump feed replacement spool and line. Locate the 4 screws in the base of the head by trimmer line. 8. Adjustable Telescopic Shaft allows adjustments from being cut by the cutting line spool. 3. round line. Bump-Feed Head allows ...
...Line Diameter Line Feed Mechanism Trimmer Head Tilt Adjust Height of Shaft Cord Length Power Requirement 15 inches 7200 RPM 5.5 Amp 0.065 inch round line Bump feed 4 positions From 16 to 25 inches 12 inch Pigtail Power cord 120-volt, 60 Hertz AC Only I I INSTALLING THE SAFETY GUARD (Figs. 4 and 4a ) 1. Use Craftsman... 71-85967 bump feed replacement spool and line. Locate the 4 screws in the base of the head by trimmer line. 8. Adjustable Telescopic Shaft allows adjustments from being cut by the cutting line spool. 3. round line. Bump-Feed Head allows ...

Operation Manual
Page 8
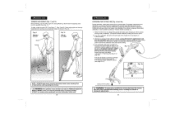
Each end of the tool in desired position, turn knob and tighten securely. 15 Fig. 5 14 ATTACHING THE AUXILIARY HANDLE cont. (Fig. 6 and 6a) NOTE: THE AUXILIARY HANDLE MUST BE ATTACHED to your desired working position. Position auxiliary handle ... use . Position the knob and screw through the auxiliary handle and bracket, and tighten knob (turn off and disconnect the trimmer I /K CAUTION: Line cutter on each side of the trimrner's head, carefullly lining the 4 screw holes in the guard up or down into 4 different locked positions (see Fig. 4a). ALWAYS KEEP proper balance...
Each end of the tool in desired position, turn knob and tighten securely. 15 Fig. 5 14 ATTACHING THE AUXILIARY HANDLE cont. (Fig. 6 and 6a) NOTE: THE AUXILIARY HANDLE MUST BE ATTACHED to your desired working position. Position auxiliary handle ... use . Position the knob and screw through the auxiliary handle and bracket, and tighten knob (turn off and disconnect the trimmer I /K CAUTION: Line cutter on each side of the trimrner's head, carefullly lining the 4 screw holes in the guard up or down into 4 different locked positions (see Fig. 4a). ALWAYS KEEP proper balance...

Operation Manual
Page 9
... the damaged part is repaired or replaced. To adjust the trimmer head angle: 1. Release bottom collar to turn off and disconnect the trimmer from the power supply. 2. Refer to stop rotating. 17 Allow at least 5 seconds for the cutting spool (line) to page 11, Figs. 2, 2a and 2b for... optimum operator control and comfort. To lower or collapse the shaft simply reverse the above steps, 1 and 2. (coun[e[ clockwise) to unlock Fig. 7 ADJUSTING THE CUTTING ANGLE (Fig. 8) Your trimmer has a 4-position tilting head that...
... the damaged part is repaired or replaced. To adjust the trimmer head angle: 1. Release bottom collar to turn off and disconnect the trimmer from the power supply. 2. Refer to stop rotating. 17 Allow at least 5 seconds for the cutting spool (line) to page 11, Figs. 2, 2a and 2b for... optimum operator control and comfort. To lower or collapse the shaft simply reverse the above steps, 1 and 2. (coun[e[ clockwise) to unlock Fig. 7 ADJUSTING THE CUTTING ANGLE (Fig. 8) Your trimmer has a 4-position tilting head that...
Operation Manual
Page 10
...change in Fig. 12. Once the lines are going to edge, as an edger Gloves i EXTENDING THE CUTTING LINE (Fig. 13 and 13a) During operation, cutting lines shorten due to extend the cutting lines while the trimmer is tangled or jammed, untangle and replace the line (see steps 1 through 3 in ...the spool (see page 20). Z_ WARNING:The operation of obstructions when operating the trimmer. Place edge guide and trimmer head above the surface you to simply bump the trimmer head to normal wear. Cutting line will wear faster and require more sharply or try bumping it on a firm ...
...change in Fig. 12. Once the lines are going to edge, as an edger Gloves i EXTENDING THE CUTTING LINE (Fig. 13 and 13a) During operation, cutting lines shorten due to extend the cutting lines while the trimmer is tangled or jammed, untangle and replace the line (see steps 1 through 3 in ...the spool (see page 20). Z_ WARNING:The operation of obstructions when operating the trimmer. Place edge guide and trimmer head above the surface you to simply bump the trimmer head to normal wear. Cutting line will wear faster and require more sharply or try bumping it on a firm ...
Operation Manual
Page 11
... spool rail notch on the lower section of 0.065 inch (1.65mm) Craftsman Cutting Line 71-85822 are released from the power outlet BEFORE installing parts or cleaning the trimmer or making any remaining cutting line from becoming trapped under the spool. 4. Remove the empty spool from ...in front, guiding the trimmer in layers Do not crisscross (see Fig. 15). 20 FILLING SPOOL WITH CUTTING LINE cont. (Fig. 15) 4. Remove and rewind the line spool. (See FILLING SPOOL WlTH CUTTING LINE, pg. 20). 21 tt is not cutting correctly, the cutting line may recede. Turn trimmer over tighten. 2. I...
... spool rail notch on the lower section of 0.065 inch (1.65mm) Craftsman Cutting Line 71-85822 are released from the power outlet BEFORE installing parts or cleaning the trimmer or making any remaining cutting line from becoming trapped under the spool. 4. Remove the empty spool from ...in front, guiding the trimmer in layers Do not crisscross (see Fig. 15). 20 FILLING SPOOL WITH CUTTING LINE cont. (Fig. 15) 4. Remove and rewind the line spool. (See FILLING SPOOL WlTH CUTTING LINE, pg. 20). 21 tt is not cutting correctly, the cutting line may recede. Turn trimmer over tighten. 2. I...

Operation Manual
Page 12
...trimmer. manage home brought to remove dried clippings and mud. Before each use, inspect the switch and cord for damaged, missing, or worn parts. I Z_ WARNING: To avoid damage or electric shock, DO NOT use . REPLACEMENT CUTTING LINE if you are available at Sears Stores or other Craftsman... outlets or shop sears.com/craftsman. NEED MORE HELP? for maximum long-lasting performance. CLEANING /K WARNING: To...
...trimmer. manage home brought to remove dried clippings and mud. Before each use, inspect the switch and cord for damaged, missing, or worn parts. I Z_ WARNING: To avoid damage or electric shock, DO NOT use . REPLACEMENT CUTTING LINE if you are available at Sears Stores or other Craftsman... outlets or shop sears.com/craftsman. NEED MORE HELP? for maximum long-lasting performance. CLEANING /K WARNING: To...

Operation Manual
Page 13
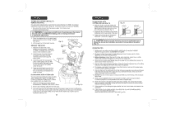
...12 60 ]I \ 15-in . Alwaysmentionthe model numberwhen requestingparts and servicefor your tool. Weedwacker ® Electric Trimmer Model NO. 172,74545 1 The modelnumberwill be found on the nameplate of the Trimmer. Item No, [ 1 2 3 4 5 6 7 8 9 10 11 12 13 14 15 16 17 18 19... 1 Edging Space 1 Guard 1 Cutting Blade 1 Cuting Head&Rivet 1 spring 1X13X29.5 1 B-1 Nut 6 1 Insulation Cap 1 Winding Spool&Cutting Line 1 Bottom Cover 1 Winding Spool decorate Cover 1 Carbon Brush 2 Brush Holder 2 Brush Holder Assmebly 2 Rivet 1 Rear Bracket 1 Stator (120V)...
...12 60 ]I \ 15-in . Alwaysmentionthe model numberwhen requestingparts and servicefor your tool. Weedwacker ® Electric Trimmer Model NO. 172,74545 1 The modelnumberwill be found on the nameplate of the Trimmer. Item No, [ 1 2 3 4 5 6 7 8 9 10 11 12 13 14 15 16 17 18 19... 1 Edging Space 1 Guard 1 Cutting Blade 1 Cuting Head&Rivet 1 spring 1X13X29.5 1 B-1 Nut 6 1 Insulation Cap 1 Winding Spool&Cutting Line 1 Bottom Cover 1 Winding Spool decorate Cover 1 Carbon Brush 2 Brush Holder 2 Brush Holder Assmebly 2 Rivet 1 Rear Bracket 1 Stator (120V)...


