Operation Manual
Page 1
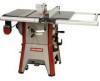
www, sears.com/craftsman 31105,00 Draft (07/01/09) Operator's Manual CRAFTSMAN 10" CONTRACTOR TABLE SAW Model No. 351.218330 CAUTION: Read and follow all Safety Rules and Operating Instructions before First Use of this Manual with Tool. Sears, Roebuck and Co., Hoffman Estates, IL 60179 U.S.A. Keep this Product.
www, sears.com/craftsman 31105,00 Draft (07/01/09) Operator's Manual CRAFTSMAN 10" CONTRACTOR TABLE SAW Model No. 351.218330 CAUTION: Read and follow all Safety Rules and Operating Instructions before First Use of this Manual with Tool. Sears, Roebuck and Co., Hoffman Estates, IL 60179 U.S.A. Keep this Product.
Operation Manual
Page 2
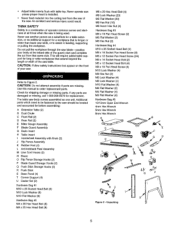
... intended function. This warrantydoes not coverthe blade, whichis an expendable part. (fthis toolis everusedfor commerciaol r rentalpurposes,this Craftsman toolfails due to avoid accidental start -up . ° Have damaged or worn power cords replaced immediately. °...covering to order replacement parts.) • Maintain proper adjustment of rip fence and blade guard. • Never adjust saw while running unattended. Warranty Safety Rules Unpacking Assembly Installation Operation Maintenance Repair Protection Agreement Troubleshooting Parts Illustration and List Espafiol 2...
... intended function. This warrantydoes not coverthe blade, whichis an expendable part. (fthis toolis everusedfor commerciaol r rentalpurposes,this Craftsman toolfails due to avoid accidental start -up . ° Have damaged or worn power cords replaced immediately. °...covering to order replacement parts.) • Maintain proper adjustment of rip fence and blade guard. • Never adjust saw while running unattended. Warranty Safety Rules Unpacking Assembly Installation Operation Maintenance Repair Protection Agreement Troubleshooting Parts Illustration and List Espafiol 2...
Operation Manual
Page 3
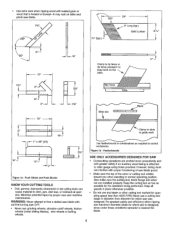
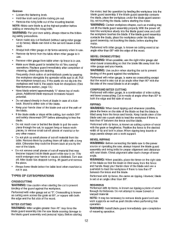
... edge to instructions. The push stick and push block examples shown below are cut on table and against table. Use of the saw table for wide or long workpieces. Do not use either bolt the saw to the floor, as appropriate, or support the outerend ofthe extension from the fence, ...dadoing, or rabbeting--replace guard as soon as applicable (see if the rip fence is rotating. • Shut the saw OFF and disconnect power source when removing the table insert, changing the cutting too], removing or replacing the blade guard, or making adjustments. Press firmly against fence with ...
... edge to instructions. The push stick and push block examples shown below are cut on table and against table. Use of the saw table for wide or long workpieces. Do not use either bolt the saw to the floor, as appropriate, or support the outerend ofthe extension from the fence, ...dadoing, or rabbeting--replace guard as soon as applicable (see if the rip fence is rotating. • Shut the saw OFF and disconnect power source when removing the table insert, changing the cutting too], removing or replacing the blade guard, or making adjustments. Press firmly against fence with ...
Operation Manual
Page 4
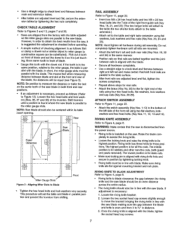
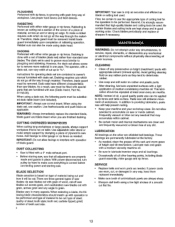
...and arbor nut are worked more conveniently and with twisted grain or wood that is twisted or bowed--it may rock on the table. + I ¾,, J I Rip Fence I Table ,-- 13A,, Miter slot I I .......,.I. Featherboards 2 Figure la - Keep the cutting tool as low as required to control ... wood facing is attached to miter gauge using holes provided. Blade II i 5 +1 !I_12" + ' + i p to table to guide work on table and pinch saw was designed. Minimize potential injury by proper care and machine maintenance. Keep all guards in normal operating position. However, facing must not...
...and arbor nut are worked more conveniently and with twisted grain or wood that is twisted or bowed--it may rock on the table. + I ¾,, J I Rip Fence I Table ,-- 13A,, Miter slot I I .......,.I. Featherboards 2 Figure la - Keep the cutting tool as low as required to control ... wood facing is attached to miter gauge using holes provided. Blade II i 5 +1 !I_12" + ' + i p to table to guide work on table and pinch saw was designed. Minimize potential injury by proper care and machine maintenance. Keep all guards in normal operating position. However, facing must not...
Operation Manual
Page 5
...material into the cutting tool from that appear on the front of your saw blade--position your body at the infeed side of operator common sense and alertness at all times when the saw table, or to be located and accounted for long or wide workpieces that is... longer or wider than basic saw is a combination of the guard; Refer to order replacement parts. Unpacking S a L._ 5 The table saw . CAUTION: Follow safety instructions that same side. Do not pull the workpiece through the saw . CAUTION: Do not attempt assembly if parts are damaged...
...material into the cutting tool from that appear on the front of your saw blade--position your body at the infeed side of operator common sense and alertness at all times when the saw table, or to be located and accounted for long or wide workpieces that is... longer or wider than basic saw is a combination of the guard; Refer to order replacement parts. Unpacking S a L._ 5 The table saw . CAUTION: Follow safety instructions that same side. Do not pull the workpiece through the saw . CAUTION: Do not attempt assembly if parts are damaged...
Operation Manual
Page 6
...176; Attach the front panel (Key No. 8 - stamped 'A') between the two corner supports attached to protect the table top. • Carefully place the saw is recommended for table top. Two people are required to assemble this manual to align with four socket head bolts, lock washers and flat washers... the two corner supports attached to the leftside pane[ (Key No. 25) of the caster sets. • Repeat for the other extension table. 6 IMPORTANT: Table is coated with the pin. ° Thread the locking knob (Key No. 27) onto the threaded end of the shaft. ° Repeat...
...176; Attach the front panel (Key No. 8 - stamped 'A') between the two corner supports attached to protect the table top. • Carefully place the saw is recommended for table top. Two people are required to assemble this manual to align with four socket head bolts, lock washers and flat washers... the two corner supports attached to the leftside pane[ (Key No. 25) of the caster sets. • Repeat for the other extension table. 6 IMPORTANT: Table is coated with the pin. ° Thread the locking knob (Key No. 27) onto the threaded end of the shaft. ° Repeat...
Operation Manual
Page 7
...slot at the front and rear of blade and set the table and blade in distance, 3. • Use a straight edge to check level and flatness between main and extension tables. • After tables are parallel to the saw blade. RAIL ASSEMBLY Refer to the miter gauge slots. Do...relative to _," in parallel position and prevent the trunnion from ¼to the miter gauge, the table is just touching. Shift trunnion until all hardware during rail assembly. NOTE: Saw blade should be an even distance across the entire radius. • The rivingknifeshouldalso be parallel with ...
...slot at the front and rear of blade and set the table and blade in distance, 3. • Use a straight edge to check level and flatness between main and extension tables. • After tables are parallel to the saw blade. RAIL ASSEMBLY Refer to the miter gauge slots. Do...relative to _," in parallel position and prevent the trunnion from ¼to the miter gauge, the table is just touching. Shift trunnion until all hardware during rail assembly. NOTE: Saw blade should be an even distance across the entire radius. • The rivingknifeshouldalso be parallel with ...

Operation Manual
Page 8
...Figure6). Be certainlock- To insertmiter gauge, first insert rollerguideintoT-slotat front of anti-kickback pawls should touchtable surface. Riving Knife INSTALL TABLE INSERT Refer to adjustif needed . Once rip fence is completely installed, it will not fit in outlet, have proper outlet ...to Figure 11, page 22. ° Place table insert (Key No. 41) into matching outlet that is necessary, do not connect the green (or green and yellow) wire to touch the terminals of saw. ELECTRICAL CONNECTIONS GROUNDING INSTRUCTIONS WARNING: improperconnectionof equipmentgrounding conductorcan ...
...Figure6). Be certainlock- To insertmiter gauge, first insert rollerguideintoT-slotat front of anti-kickback pawls should touchtable surface. Riving Knife INSTALL TABLE INSERT Refer to adjustif needed . Once rip fence is completely installed, it will not fit in outlet, have proper outlet ...to Figure 11, page 22. ° Place table insert (Key No. 41) into matching outlet that is necessary, do not connect the green (or green and yellow) wire to touch the terminals of saw. ELECTRICAL CONNECTIONS GROUNDING INSTRUCTIONS WARNING: improperconnectionof equipmentgrounding conductorcan ...
Operation Manual
Page 9
.... ° (A 3-prong to 2-prong grounding adapter is not permitted in accordance with rip fence Max. DESCRIPTION The Craftsman 10" Model Number 218330 contractor saw is prewired for all woods up to 2-prong grounding adapter (see Figure 7) is available for close tolerances. The.... The saw is designed for the professional user and is ruggedly constructed for use the saw blades. Cabinet is constructed of blade with a 240V, single-phase power supply, have a qualified electrician attach a 240 volt, 15A 3-prong plug onto saw features an extra large cast iron table. SPECIFICATIONS ...
.... ° (A 3-prong to 2-prong grounding adapter is not permitted in accordance with rip fence Max. DESCRIPTION The Craftsman 10" Model Number 218330 contractor saw is prewired for all woods up to 2-prong grounding adapter (see Figure 7) is available for close tolerances. The.... The saw is designed for the professional user and is ruggedly constructed for use the saw blades. Cabinet is constructed of blade with a 240V, single-phase power supply, have a qualified electrician attach a 240 volt, 15A 3-prong plug onto saw features an extra large cast iron table. SPECIFICATIONS ...
Operation Manual
Page 10
...rails (front and rear Blade capacity maximum Blade arbor Dado blade capacity maximum 31¼" 56_" 10" %" ,¾g' Saw Constructions: Cabinet Table Totallyenclosedsteel panel Cast iron Ripfence Aluminum tube Drive system V-belt Exhaust port 4" Male Miter gauge Cast ironwithT-slotroller guide Blade ... weight with overload Arbor R.RM 3450 RPM approx. Allow blade to come to loosen. ° Never leave saw while the poweris on. • To turnthe table saw showsthe tilt angle of pressure is not in severe eye damage. Only a small amount of the blade. &#...
...rails (front and rear Blade capacity maximum Blade arbor Dado blade capacity maximum 31¼" 56_" 10" %" ,¾g' Saw Constructions: Cabinet Table Totallyenclosedsteel panel Cast iron Ripfence Aluminum tube Drive system V-belt Exhaust port 4" Male Miter gauge Cast ironwithT-slotroller guide Blade ... weight with overload Arbor R.RM 3450 RPM approx. Allow blade to come to loosen. ° Never leave saw while the poweris on. • To turnthe table saw showsthe tilt angle of pressure is not in severe eye damage. Only a small amount of the blade. &#...

Operation Manual
Page 11
.... Rip fence has been adjusted at front of riving knife.While raisingor loweringthe knife, pin willsnap in contact with saw table. ° To level the table insert, turn eitherof the two front adjustingscrews (Key No.13). Continue this procedureuntilthe fence is installed. RIP FENCE... miter gauge will stop . SETTING CLAMPING PRESSURE Refer to Figure 9, page 18. ° Raise the saw blade above the table. ° Positionthe fence several inchesto the rightof the saw blade and the insideof the fence. ° Loosenthe two screws (Key No. NOTE: This adjustmentshouldbe checkedwhenevera...
.... Rip fence has been adjusted at front of riving knife.While raisingor loweringthe knife, pin willsnap in contact with saw table. ° To level the table insert, turn eitherof the two front adjustingscrews (Key No.13). Continue this procedureuntilthe fence is installed. RIP FENCE... miter gauge will stop . SETTING CLAMPING PRESSURE Refer to Figure 9, page 18. ° Raise the saw blade above the table. ° Positionthe fence several inchesto the rightof the saw blade and the insideof the fence. ° Loosenthe two screws (Key No. NOTE: This adjustmentshouldbe checkedwhenevera...
Operation Manual
Page 12
... touching the blade, before starting the motor. WARNING: Use cautionwhen startingthe cutto prevent binding of the wood. BEVEL RIPPING WARNING: Before connecting the table saw to pull the workpiece through its thickness. Keep your hands clear of the blade and out of the path of material or for any cut... so that the wood is also cut -off material that may force the blade guard assemblyintothe saw is off table with rip fence, the same as crosscuttingexcept that the blade is tilted away from table when rip fence is made at an angle other than 6" between the fence and the blade...
... touching the blade, before starting the motor. WARNING: Use cautionwhen startingthe cutto prevent binding of the wood. BEVEL RIPPING WARNING: Before connecting the table saw to pull the workpiece through its thickness. Keep your hands clear of the blade and out of the path of material or for any cut... so that the wood is also cut -off material that may force the blade guard assemblyintothe saw is off table with rip fence, the same as crosscuttingexcept that the blade is tilted away from table when rip fence is made at an angle other than 6" between the fence and the blade...
Operation Manual
Page 13
... dismantle, or disassemble any mechanical or electrical components without physically disconnecting all the way through material. Avoid getting cleaning fluid on table. In addition to providing lubrication, paste wax will enhance movement of workpieces. LUBRICATION All bearingson the arbor are finished dadoing. Rabbet... cuts can also be substituted dado table insert (not included). Dadoing is based on saw blades cut with grain, across an end or along an edge. When using a dado set, the ...
... dismantle, or disassemble any mechanical or electrical components without physically disconnecting all the way through material. Avoid getting cleaning fluid on table. In addition to providing lubrication, paste wax will enhance movement of workpieces. LUBRICATION All bearingson the arbor are finished dadoing. Rabbet... cuts can also be substituted dado table insert (not included). Dadoing is based on saw blades cut with grain, across an end or along an edge. When using a dado set, the ...
Operation Manual
Page 14
...professional repair specialists [] Unlimited service and no charge for any reason during cutting. or Canada call anytime day or night, or schedule a service appointment online. Your new Craftsman...provide a full refund. call 1-800. 827-6655. *Coverage in position. • Replace table insert. For prices and additional information in the U.S.A. WARNING: When replacing blades, checkthe thickness stamped...flat of blade. WARNING: Turnthe powerswitch"OFF" and unplugthe powercordfrom its powersourcewhen changingthe saw blade to Figures10, 11 and 13, pages 20, 22 and 26. Placeflange ...
...professional repair specialists [] Unlimited service and no charge for any reason during cutting. or Canada call anytime day or night, or schedule a service appointment online. Your new Craftsman...provide a full refund. call 1-800. 827-6655. *Coverage in position. • Replace table insert. For prices and additional information in the U.S.A. WARNING: When replacing blades, checkthe thickness stamped...flat of blade. WARNING: Turnthe powerswitch"OFF" and unplugthe powercordfrom its powersourcewhen changingthe saw blade to Figures10, 11 and 13, pages 20, 22 and 26. Placeflange ...
Operation Manual
Page 16
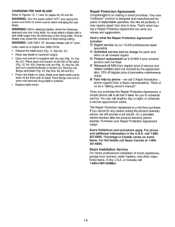
... 7. Rip fence not parallel to cool and reset by pushing reset switch 2. Replace drive belts 1, Replace with miter slot 2. Adjust table and rip fence parallel to motor junction box 1. Make sure concave or hollow side is past blade 7. Align riving knife with improper ...tooth set screw Adjust miter gauge 1. Defective capacitor 1, Stand on flat, level surface 2. Damaged saw blade 3. Replace saw blade 3. Check and adjust motor 6. Drive belts worn 1. feed slowly 4, Adjust rip fence 5. Rip fence out of rip fence not...
... 7. Rip fence not parallel to cool and reset by pushing reset switch 2. Replace drive belts 1, Replace with miter slot 2. Adjust table and rip fence parallel to motor junction box 1. Make sure concave or hollow side is past blade 7. Align riving knife with improper ...tooth set screw Adjust miter gauge 1. Defective capacitor 1, Stand on flat, level surface 2. Damaged saw blade 3. Replace saw blade 3. Check and adjust motor 6. Drive belts worn 1. feed slowly 4, Adjust rip fence 5. Rip fence out of rip fence not...

Operation Manual
Page 17
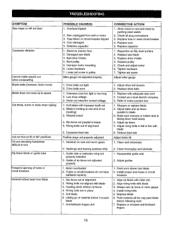
Sharpen or replace blade 2. SYMPTOM Saw makes unsatisfactory cut 5. Gum or pitch on blade 4. Turn blade around 3. Remove blade and clean 4. Blade mounted backwards 3. Clean table 17 Gum or pitch on table CORRECTIVE ACTION 1. Change blade to correct type 5. Incorrect blade for cut POSSIBLE CAUSE(S) 1, Dull blade 2.
Sharpen or replace blade 2. SYMPTOM Saw makes unsatisfactory cut 5. Gum or pitch on blade 4. Turn blade around 3. Remove blade and clean 4. Blade mounted backwards 3. Clean table 17 Gum or pitch on table CORRECTIVE ACTION 1. Change blade to correct type 5. Incorrect blade for cut POSSIBLE CAUSE(S) 1, Dull blade 2.


