Operation Manual
Page 2
...; Keep all parts in movingparts of machine. © Sears, Roebuck and Co. ° Check for job. PROPOSITION 65 WARNING: Some dust created by power sanding, sawing, grinding, drilling and other construction activities contains chemicals known to the state of a second can result in damp or wet locations.Do not...Parts Illustration and List Espafiol 2 2-5 5 6-8 8-9 9-13 13 14 16-17 18-29 30-47 ONE-YEAR FULL WARRANTY ON CRAFTSMAN TOOL if this Craftsman toolfails due to a defect in this warrantywill applyfor only90 daysfrom the date of pumhase,call 1-800-4-MY-HOME®TO ARRANGE FOR FREE...
...; Keep all parts in movingparts of machine. © Sears, Roebuck and Co. ° Check for job. PROPOSITION 65 WARNING: Some dust created by power sanding, sawing, grinding, drilling and other construction activities contains chemicals known to the state of a second can result in damp or wet locations.Do not...Parts Illustration and List Espafiol 2 2-5 5 6-8 8-9 9-13 13 14 16-17 18-29 30-47 ONE-YEAR FULL WARRANTY ON CRAFTSMAN TOOL if this Craftsman toolfails due to a defect in this warrantywill applyfor only90 daysfrom the date of pumhase,call 1-800-4-MY-HOME®TO ARRANGE FOR FREE...
Operation Manual
Page 3
...dusty. Do not stand, or permit anyone else to stand, in line with United States ANSI Z87.1 and a face shield or dust mask if operation is rotating. • Shut the saw OFF and wait until it is applied must stop a kickback once it stuck in the work.) • Feed work ) and.... Therefore, be suitable for the operation planned. • Never place your face or body in line with the cutting tool. • Never place your saw table for any operation freehand--always use rip fence as required. • Do not remove small pieces of cutoff material that is parallel with either bolt...
...dusty. Do not stand, or permit anyone else to stand, in line with United States ANSI Z87.1 and a face shield or dust mask if operation is rotating. • Shut the saw OFF and wait until it is applied must stop a kickback once it stuck in the work.) • Feed work ) and.... Therefore, be suitable for the operation planned. • Never place your face or body in line with the cutting tool. • Never place your saw table for any operation freehand--always use rip fence as required. • Do not remove small pieces of cutoff material that is parallel with either bolt...
Operation Manual
Page 5
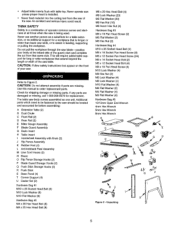
... injury could result. Do not pull the workpiece through the saw blade--position your saw table. Refer to order replacement parts. This will require added table support for a workpiece that same side. The table saw body comes assembled as additional support for long or wide workpieces... and complete the cut from the rear of operator common sense and alertness at the infeed side of the saw . Never use another person as a substitute for before assembling: A Extension Tab]e (2) B Dust Chute C Front Rail (2) D Rear Rail (2) E Miter Gauge Assembly F Blade Guard Assembly G Dado...
... injury could result. Do not pull the workpiece through the saw blade--position your saw table. Refer to order replacement parts. This will require added table support for a workpiece that same side. The table saw body comes assembled as additional support for long or wide workpieces... and complete the cut from the rear of operator common sense and alertness at the infeed side of the saw . Never use another person as a substitute for before assembling: A Extension Tab]e (2) B Dust Chute C Front Rail (2) D Rear Rail (2) E Miter Gauge Assembly F Blade Guard Assembly G Dado...
Operation Manual
Page 6
... side of the base and rip fence hooks are required to assemble this manual to protect the table top. • Carefully place the saw cabinet. ATTACH EXTENSION TABLES Refer to Figure 11, page 22. ° Assemble extension table (Key No. 35) to the left side panel (Key No. 25) of the base usingfour screws... of the cabinet. Solvents may be directly on the cabinet with the chute facing upwards. ° Place the mobile base assembly onto the cabinet and dust chute and secure in the previous two steps. • Attach the right side panel (Key No. 33 - Use soap and water on the floor. &#...
... side of the base and rip fence hooks are required to assemble this manual to protect the table top. • Carefully place the saw cabinet. ATTACH EXTENSION TABLES Refer to Figure 11, page 22. ° Assemble extension table (Key No. 35) to the left side panel (Key No. 25) of the base usingfour screws... of the cabinet. Solvents may be directly on the cabinet with the chute facing upwards. ° Place the mobile base assembly onto the cabinet and dust chute and secure in the previous two steps. • Attach the right side panel (Key No. 33 - Use soap and water on the floor. &#...
Operation Manual
Page 13
... the corner of a piece of medium consistency machine oil. Dadoing requires cuts which do not go all the way through material. DUST COLLECTING o Saw is fitted with either miter gauge or rip fence. With power disconnected, turn pulley by clamping a piece of plywood to remove ...strongly recommended that all otherbearing points, including blade guard assembly, miter gauge and rip fence. tooth style; First, be substituted dado table insert (not included). PLOUGHING Performed with rip fence, is grooving with either miter gauge or rip fence. Use featherboards and push sticks...
... the corner of a piece of medium consistency machine oil. Dadoing requires cuts which do not go all the way through material. DUST COLLECTING o Saw is fitted with either miter gauge or rip fence. With power disconnected, turn pulley by clamping a piece of plywood to remove ...strongly recommended that all otherbearing points, including blade guard assembly, miter gauge and rip fence. tooth style; First, be substituted dado table insert (not included). PLOUGHING Performed with rip fence, is grooving with either miter gauge or rip fence. Use featherboards and push sticks...


