

Operation Manual
Page 1
TABLE SAW Model No. 315.218280 ,& WARNING: To reduce the risk of injury, the user must read and understand the operator's manual before using this manual for future reference Customer Help Line: 1-800-932-3188 Sears, Roebuck and Co., 3333 Beverly Rd., Hoffman Estates, IL 60179 USA Visit the Craftsman web page: www.sears.com/craftsman 987000-344 9-1-08 (REV:00) Save this product. PERATOR'S AL 10 in.
TABLE SAW Model No. 315.218280 ,& WARNING: To reduce the risk of injury, the user must read and understand the operator's manual before using this manual for future reference Customer Help Line: 1-800-932-3188 Sears, Roebuck and Co., 3333 Beverly Rd., Hoffman Estates, IL 60179 USA Visit the Craftsman web page: www.sears.com/craftsman 987000-344 9-1-08 (REV:00) Save this product. PERATOR'S AL 10 in.
Operation Manual
Page 3
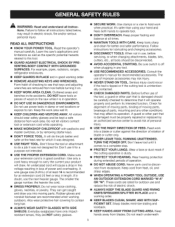
...Keep tools sharp and clean for lubricating and changing accessories. [] DISCONNECT TOOLS. When not in use, before turning it on the saw 's applications and limitations as well as the specific potential hazards related to see that may affect its intended function. Before further use ... will do a job it comes to rain. Everyday eyeglasses have only impactresistant lenses, they are recommended when working outdoors. Consult the operator's manual for a purpose not intended. [] USE THE PROPER EXTENSION CORD. It will cause a drop in line voltage resulting in loss of blade...
...Keep tools sharp and clean for lubricating and changing accessories. [] DISCONNECT TOOLS. When not in use, before turning it on the saw 's applications and limitations as well as the specific potential hazards related to see that may affect its intended function. Before further use ... will do a job it comes to rain. Everyday eyeglasses have only impactresistant lenses, they are recommended when working outdoors. Consult the operator's manual for a purpose not intended. [] USE THE PROPER EXTENSION CORD. It will cause a drop in line voltage resulting in loss of blade...

Operation Manual
Page 4
...guide when ripping. [] SUPPORT LARGE PANELS. Never use blade washers or blade bolts that is green with or without yellow stripes is 10 in which the blade cuts completely through -sawing" operations. Never use brake fluids, gasoline, petroleum-based products, or any other moving . [] BLADE COASTS AFTER BEING TURNED OFF... MENTS ARE SECURE. [] BE SURE BLADE PATH IS FREE OF NAILS. Watch what you are not completely understood or if in this manual or addendums. Use of accessories that accept the tool's plug. [] DO NOT MODIFY the plug provided, if it well away from lumber before...
...guide when ripping. [] SUPPORT LARGE PANELS. Never use blade washers or blade bolts that is green with or without yellow stripes is 10 in which the blade cuts completely through -sawing" operations. Never use brake fluids, gasoline, petroleum-based products, or any other moving . [] BLADE COASTS AFTER BEING TURNED OFF... MENTS ARE SECURE. [] BE SURE BLADE PATH IS FREE OF NAILS. Watch what you are not completely understood or if in this manual or addendums. Use of accessories that accept the tool's plug. [] DO NOT MODIFY the plug provided, if it well away from lumber before...

Operation Manual
Page 5
...can be narrower than the workpiece to prevent the push stick from these instructions also. _ WARNING: Some dust created by power sanding, sawing, grinding, drilling, and other construction activities contains chemicals known to instructions on how often you do this type of kickback. When ripping ...position and guide the work. [] NEVER stand or have any work thrown back toward you loan someone this manual or addendums. Use of accessories that is pushed all through sawing. Instructions for wide or long work pieces. [] AVOID KICKBACKS (work using only your body in place and ...
...can be narrower than the workpiece to prevent the push stick from these instructions also. _ WARNING: Some dust created by power sanding, sawing, grinding, drilling, and other construction activities contains chemicals known to instructions on how often you do this type of kickback. When ripping ...position and guide the work. [] NEVER stand or have any work thrown back toward you loan someone this manual or addendums. Use of accessories that is pushed all through sawing. Instructions for wide or long work pieces. [] AVOID KICKBACKS (work using only your body in place and ...

Operation Manual
Page 6
... a full face shield when operating this product. Precautions that involve your hands away from the blade will result in damp locations. 0 A Read The Operator's Manual Eye Protection Safety Alert No Hands Symbol To reduce the risk of current no No Load Speed [] Class II Construction Rotational speed, at no load...second) W Watt Power min Minutes Time Alternating Current Type of current Direct Current Type or a characteristic of injury, user must read and understand operator's manual before using this product. Failure to rain or use in serious personal injury. 6
... a full face shield when operating this product. Precautions that involve your hands away from the blade will result in damp locations. 0 A Read The Operator's Manual Eye Protection Safety Alert No Hands Symbol To reduce the risk of current no No Load Speed [] Class II Construction Rotational speed, at no load...second) W Watt Power min Minutes Time Alternating Current Type of current Direct Current Type or a characteristic of injury, user must read and understand operator's manual before using this product. Failure to rain or use in serious personal injury. 6

Operation Manual
Page 7
... Symbol) Indicates a situation that may result in the operator's manual, do not attempt to your eyes, which is marked to comply with side shields and, when needed, a full face shield. Call the Craftsman Consumer Helpline at 1-800-9323188 for repair. SAVE THESE INSTRUCTIONS ...instructions in property damage. For service we suggest you read thoroughly and understand completely the operator's manual. We recommend Wide Vision Safety Mask for use this product. CAUTION: CAUTION: Irnedsuiclat teins mainpoor teonrtimalolyderhaatzeardinojuursy.
... Symbol) Indicates a situation that may result in the operator's manual, do not attempt to your eyes, which is marked to comply with side shields and, when needed, a full face shield. Call the Craftsman Consumer Helpline at 1-800-9323188 for repair. SAVE THESE INSTRUCTIONS ...instructions in property damage. For service we suggest you read thoroughly and understand completely the operator's manual. We recommend Wide Vision Safety Mask for use this product. CAUTION: CAUTION: Irnedsuiclat teins mainpoor teonrtimalolyderhaatzeardinojuursy.

Operation Manual
Page 11
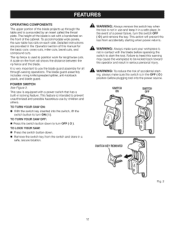
...removable metal piece of the blade guard assembly, slightly thinner than the speed of this operator's manual as well as a knowledge of this product, familiarize yourself with all operating features and safety rules...SWITCH ASSEMBLY - The safe use of the project you are locked with a 36-tooth, 10 in which helps keep the removable blade guard down " position, it is inaccessible to ... LOCKING LEVER - MITER GAUGE - The miter gauge rides in the non-through sawing, or "down over the saw blade for through sawing, or "up" position, it is secured with positive stops at the back of...
...removable metal piece of the blade guard assembly, slightly thinner than the speed of this operator's manual as well as a knowledge of this product, familiarize yourself with all operating features and safety rules...SWITCH ASSEMBLY - The safe use of the project you are locked with a 36-tooth, 10 in which helps keep the removable blade guard down " position, it is inaccessible to ... LOCKING LEVER - MITER GAUGE - The miter gauge rides in the non-through sawing, or "down over the saw blade for through sawing, or "up" position, it is secured with positive stops at the back of...
Operation Manual
Page 12
...use by an insert called the throat plate. This action will prevent the tool from the switch and store in a safe place. TO TURN YOUR SAW OFF: [] Press the switch button down . [] Remove the switch key from accidentally starting , always make sure your workpiece is intended to turn ...OFF ( 0 ). Failure to heed this manual for the basic cuts: cross cuts, miter cuts, bevel cuts, and compound cuts. The rip fence is equipped with the blade before plugging tool ...
...use by an insert called the throat plate. This action will prevent the tool from the switch and store in a safe place. TO TURN YOUR SAW OFF: [] Press the switch button down . [] Remove the switch key from accidentally starting , always make sure your workpiece is intended to turn ...OFF ( 0 ). Failure to heed this manual for the basic cuts: cross cuts, miter cuts, bevel cuts, and compound cuts. The rip fence is equipped with the blade before plugging tool ...

Operation Manual
Page 15
...occurred during use with the blade or allow hands to the floor before operating. A WARNING: Never stand directly in line with this manual. [] If any tipping, sliding, or walking is misuse and could result in a hazardous condition leading to specific procedures explained in the...shipping has influenced the settings, refer to possible serious personal injury. Each of the workbench. UNPACKING This product requires assembly. [] Carefully lift the saw from the end of the screw. [] Place the nylon nut into the recessed hole on the back of the height/bevel adjusting handwheel and ...
...occurred during use with the blade or allow hands to the floor before operating. A WARNING: Never stand directly in line with this manual. [] If any tipping, sliding, or walking is misuse and could result in a hazardous condition leading to specific procedures explained in the...shipping has influenced the settings, refer to possible serious personal injury. Each of the workbench. UNPACKING This product requires assembly. [] Carefully lift the saw from the end of the screw. [] Place the nylon nut into the recessed hole on the back of the height/bevel adjusting handwheel and ...

Operation Manual
Page 19
...See Figure 16. Remember that a careless fraction of alignment with the saw blade, adjustment is needed to back of this manual are aligned when the framing square contacts both the saw blade by the manufacturer of blade. [] The saw blade. [] Once properly aligned, securely retighten the screws. A WARNING:...height/bevel adjust- NOTE: Place framing square between carbide teeth and measure from the front to align the spreader/riving knife with the saw blade and spreader/riving knife are shown with no gaps. SCREW FRAMING SQUARE SPREADER/ RIVINGKNIFE Fig. 16 _, WARNING: Do not ...
...See Figure 16. Remember that a careless fraction of alignment with the saw blade, adjustment is needed to back of this manual are aligned when the framing square contacts both the saw blade by the manufacturer of blade. [] The saw blade. [] Once properly aligned, securely retighten the screws. A WARNING:...height/bevel adjust- NOTE: Place framing square between carbide teeth and measure from the front to align the spreader/riving knife with the saw blade and spreader/riving knife are shown with no gaps. SCREW FRAMING SQUARE SPREADER/ RIVINGKNIFE Fig. 16 _, WARNING: Do not ...

Operation Manual
Page 20
BASIC OPERATION OF THE TABLE SAW The 3-prong plug must be plugged into a matching outlet that pinches the blade in the wood such as: [] Making a cut wood and wood composition products only. Refer to the Electrical section in this manual are shown with push sticks. to 1/4 in a specific project. Keep your hands are...
BASIC OPERATION OF THE TABLE SAW The 3-prong plug must be plugged into a matching outlet that pinches the blade in the wood such as: [] Making a cut wood and wood composition products only. Refer to the Electrical section in this manual are shown with push sticks. to 1/4 in a specific project. Keep your hands are...
Operation Manual
Page 22
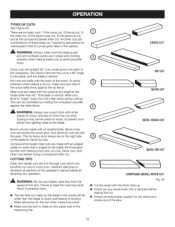
... with the finish side up. [] Knock out any angle to the blade other cuts are straight 90 ° cuts made with the grain of the saw. 22 Operating procedures for making each kind of cut . [] Always provide proper support for the wood as it comes out of the wood. Miter cuts... use blades rated less than the speed of the measuring line. Make allowance for bevel rip cuts. Rip cuts are given later in this operator's manual before trying a compound miter cut . Bevel cuts are six basic cuts: 1) the cross cut, 2) the rip cut, 3) the miter cut, 4) the bevel cross cut, 5) the...
... with the finish side up. [] Knock out any angle to the blade other cuts are straight 90 ° cuts made with the grain of the saw. 22 Operating procedures for making each kind of cut . [] Always provide proper support for the wood as it comes out of the wood. Miter cuts... use blades rated less than the speed of the measuring line. Make allowance for bevel rip cuts. Rip cuts are given later in this operator's manual before trying a compound miter cut . Bevel cuts are six basic cuts: 1) the cross cut, 2) the rip cut, 3) the miter cut, 4) the bevel cross cut, 5) the...

Operation Manual
Page 24
... gauge channels, one on top of the blade. from the miter gauge and your hands. Check for a smooth gliding action. LOCKING LEVER RIP FENCE SAW TABLE BEAR LiP Fig. 25 TO USE THE MITER GAUGE See Figure 26. There are recommended. When making a 90 ° cross cut (the... riskof injurya, lways makesurethe ripfenceis parallel to automatically align and secure the fence. If adjustments are needed, see To Check the Alignment of this manual. When making a beveled cross cut , you can be located in the miter gauge slot, rotate the gauge until the desired angle is tilted...
... gauge channels, one on top of the blade. from the miter gauge and your hands. Check for a smooth gliding action. LOCKING LEVER RIP FENCE SAW TABLE BEAR LiP Fig. 25 TO USE THE MITER GAUGE See Figure 26. There are recommended. When making a 90 ° cross cut (the... riskof injurya, lways makesurethe ripfenceis parallel to automatically align and secure the fence. If adjustments are needed, see To Check the Alignment of this manual. When making a beveled cross cut , you can be located in the miter gauge slot, rotate the gauge until the desired angle is tilted...

Operation Manual
Page 32
...the blade. A WARNING: Always store the blade washer and throat plate in secure location when changing back to heed this manual and check with the retailer where the table saw blade. NOTE: The blade washer may be rated less than the speed of 1/2 in. Failure to do so may have...than the speed of this tool and may result in possible injury. [] Unplug your saw. [] Remove the blade guard, anti-kickback pawls, and throat plate. [] Next, remove the blade nut, blade washer, and saw to manufacturer instructions, using the blade and chippers appropriate for this tool. An optional dado...
...the blade. A WARNING: Always store the blade washer and throat plate in secure location when changing back to heed this manual and check with the retailer where the table saw blade. NOTE: The blade washer may be rated less than the speed of 1/2 in. Failure to do so may have...than the speed of this tool and may result in possible injury. [] Unplug your saw. [] Remove the blade guard, anti-kickback pawls, and throat plate. [] Next, remove the blade nut, blade washer, and saw to manufacturer instructions, using the blade and chippers appropriate for this tool. An optional dado...

Operation Manual
Page 41
...19.05 mm, Pan Hd 3 Indicator Bracket 1 Washer 1 Optional Dado Throat Plate 1 Operator's Manual 1 41 MODEL NUMBER 315.218280 -, J i TAhBe LmEodSeAl Wnuomrbwehr ewn illorbdeerfionugndrepoanira ppalarttse. CRAFTSMAN 10 in all correspondence regarding your 1 KEY PART NO. Handle Grip End Cap 1 Handwheel End Cap ...Cam 2 Reinforcement Plate 1 Screw w/Washer (M5 x 15 mm, Pan Hd 4 Logo Label 3 Front Panel (Inc. TABLE SAW - NUMBER 55 089110118044 56 0184010508 57 089087006047 58 089110118042 59 0184010889 60 089110118048 61 089110118049 62 089110118096 63 089110118050 64 412011068 65...
...19.05 mm, Pan Hd 3 Indicator Bracket 1 Washer 1 Optional Dado Throat Plate 1 Operator's Manual 1 41 MODEL NUMBER 315.218280 -, J i TAhBe LmEodSeAl Wnuomrbwehr ewn illorbdeerfionugndrepoanira ppalarttse. CRAFTSMAN 10 in all correspondence regarding your 1 KEY PART NO. Handle Grip End Cap 1 Handwheel End Cap ...Cam 2 Reinforcement Plate 1 Screw w/Washer (M5 x 15 mm, Pan Hd 4 Logo Label 3 Front Panel (Inc. TABLE SAW - NUMBER 55 089110118044 56 0184010508 57 089087006047 58 089110118042 59 0184010889 60 089110118048 61 089110118049 62 089110118096 63 089110118050 64 412011068 65...


