
Operation Manual
Page 2
... free repair. Safety, performance, and dependability have other nghts which vary from the date of purchase. [] Warranty ... 2 [] introduction ... 2 [] General Safety Rules ... 3-4 [] Specific Safety Rules ... 4-5 [] Symbols ... 6-7 [] Electrical ... 8 [] Glossary of Terms ...[] Features ...[] Tools Needed ... 9 10-12 13 [] Loose Parts ... 14 [] Assembly ...[] Operation ...[] Adjustments ...[] Maintenance ...[] Accessories ... 15-19 19-32 33-35 36 36 [] Troubleshooting ...[] Exploded View ...[] Parts Ordering/Service ... 37-38 39-46 Back Page ONE YEAR FULL WARRANTY ON CRAFTSMAN...
... free repair. Safety, performance, and dependability have other nghts which vary from the date of purchase. [] Warranty ... 2 [] introduction ... 2 [] General Safety Rules ... 3-4 [] Specific Safety Rules ... 4-5 [] Symbols ... 6-7 [] Electrical ... 8 [] Glossary of Terms ...[] Features ...[] Tools Needed ... 9 10-12 13 [] Loose Parts ... 14 [] Assembly ...[] Operation ...[] Adjustments ...[] Maintenance ...[] Accessories ... 15-19 19-32 33-35 36 36 [] Troubleshooting ...[] Exploded View ...[] Parts Ordering/Service ... 37-38 39-46 Back Page ONE YEAR FULL WARRANTY ON CRAFTSMAN...
Operation Manual
Page 3
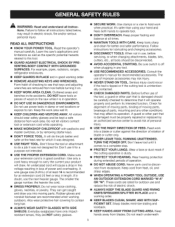
.... A wire gauge size (A.W.G.) of operation. [] DO NOT ABUSE CORD. Rubber gloves and nonskid footwear are removed from tool before servicing, or when changing attachments, blades, bits, cutters, etc., all times. [] MAINTAIN TOOLS WITH CARE. Keep tools sharp and clean for lubricating and changing accessories. [] DISCONNECT TOOLS. Follow instructions for better and safer performance. A guard or other part that is dusty. [] PROTECT YOUR HEARING. These cords are NOT safety glasses. [] SECURE WORK. Do...
.... A wire gauge size (A.W.G.) of operation. [] DO NOT ABUSE CORD. Rubber gloves and nonskid footwear are removed from tool before servicing, or when changing attachments, blades, bits, cutters, etc., all times. [] MAINTAIN TOOLS WITH CARE. Keep tools sharp and clean for lubricating and changing accessories. [] DISCONNECT TOOLS. Follow instructions for better and safer performance. A guard or other part that is dusty. [] PROTECT YOUR HEARING. These cords are NOT safety glasses. [] SECURE WORK. Do...

Operation Manual
Page 4
.... [] USE ONLY CORRECT ELECTRICAL DEVICES: 3-wire extension cords that have the proper outlet installed by a qualified electrician. [] KEEP TOOL DRY, CLEAN, AND FREE FROM OIL AND GREASE. Inspect for safe use common sense. Instructions for and remove all "through the workpiece as in place over the blade while blade is driven back towards the operator. NEVER use a clean cloth when clean- Never use a fence or straight edge guide when ripping. [] SUPPORT...
.... [] USE ONLY CORRECT ELECTRICAL DEVICES: 3-wire extension cords that have the proper outlet installed by a qualified electrician. [] KEEP TOOL DRY, CLEAN, AND FREE FROM OIL AND GREASE. Inspect for safe use common sense. Instructions for and remove all "through the workpiece as in place over the blade while blade is driven back towards the operator. NEVER use a clean cloth when clean- Never use a fence or straight edge guide when ripping. [] SUPPORT...

Operation Manual
Page 5
... could cause your hands. Instructions for which means using the table saw table for non-through the blade instead of kickback. f) Do not perform any part of work with approved safety equipment, such as cutoff gauge when cross cutting. [] NEVER attempt to free a stalled saw blade without first turning the saw OFF and disconnecting the saw from contacting the saw blade. When ripping narrow stock, always use rip fence as those dust masks that no...
... could cause your hands. Instructions for which means using the table saw table for non-through the blade instead of kickback. f) Do not perform any part of work with approved safety equipment, such as cutoff gauge when cross cutting. [] NEVER attempt to free a stalled saw blade without first turning the saw OFF and disconnecting the saw from contacting the saw blade. When ripping narrow stock, always use rip fence as those dust masks that no...

Operation Manual
Page 7
... instructions in property damage. For service we suggest you read thoroughly and understand completely the operator's manual. Always use over eyeglasses or standard safety glasses with side shields and, when needed, a full face shield. SERVICE Servicing requires extreme care and knowledge and should be performed only by a qualified service technician. Call the Craftsman Consumer Helpline at 1-800-9323188 for repair. Before beginning power tool operation...
... instructions in property damage. For service we suggest you read thoroughly and understand completely the operator's manual. Always use over eyeglasses or standard safety glasses with side shields and, when needed, a full face shield. SERVICE Servicing requires extreme care and knowledge and should be performed only by a qualified service technician. Call the Craftsman Consumer Helpline at 1-800-9323188 for repair. Before beginning power tool operation...

Operation Manual
Page 8
... with a qualified electrician or service personnel if the grounding instructions are working area. NOTE: AWG = American Wire Gauge 12.1-16.0 14 12 -- Before using a power tool at a considerable distance from the power source, use on the cord's jacket. A WARNING: Keep the extension cord clear of power and the motor will draw. A WARNING: Check extension cords before each use . SPEED AND WIRING The no-load speed of electric shock. For voltage, the...
... with a qualified electrician or service personnel if the grounding instructions are working area. NOTE: AWG = American Wire Gauge 12.1-16.0 14 12 -- Before using a power tool at a considerable distance from the power source, use on the cord's jacket. A WARNING: Keep the extension cord clear of power and the motor will draw. A WARNING: Check extension cords before each use . SPEED AND WIRING The no-load speed of electric shock. For voltage, the...

Operation Manual
Page 9
...-through the saw blade during any ripping operation. Compound Cut A cross cut . Kerr The material removed by the blade in a through cut removing a wedge from the face of the workpiece. Push Blocks (for drilling large holes accurately. These aids help control the workpiece by the workpiece being dropped into the tool first. Riving Knife/Spreader/Splitter (table saws} A metal piece, slightly thinner than at any angle other...
...-through the saw blade during any ripping operation. Compound Cut A cross cut . Kerr The material removed by the blade in a through cut removing a wedge from the face of the workpiece. Push Blocks (for drilling large holes accurately. These aids help control the workpiece by the workpiece being dropped into the tool first. Riving Knife/Spreader/Splitter (table saws} A metal piece, slightly thinner than at any angle other...
Operation Manual
Page 10
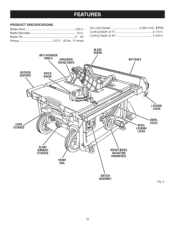
Cutting Depth at 0 3-1/4 in . Blade Diameter 10 in . ANTFKICKBACK PAWLS SPREADER/ RiViNG KNIFE BLADE GUARD RiP FENCE OUTFEED SUPPORT MITER GAUGE CORD STORAGE BLADE WRENCH STORAGE FRONT RAiL LOCKING LEVER BEVEL LOCKING LEVER BEVEL SCALE HEiGHT/BEVEL ADJUSTING HANDWHEEL SWITCH ASSEMBLY Fig. 2 10 Blade Tilt 0 ° - 45 ° Rating 120 V-, 60 Hz, 15 Amps No Load Speed 5,000 r/min. (RPM) Cutting Depth at 45 2-3/8 in . PRODUCT SPECiFiCATiONS Blade Arbor 5/8 in .
Cutting Depth at 0 3-1/4 in . Blade Diameter 10 in . ANTFKICKBACK PAWLS SPREADER/ RiViNG KNIFE BLADE GUARD RiP FENCE OUTFEED SUPPORT MITER GAUGE CORD STORAGE BLADE WRENCH STORAGE FRONT RAiL LOCKING LEVER BEVEL LOCKING LEVER BEVEL SCALE HEiGHT/BEVEL ADJUSTING HANDWHEEL SWITCH ASSEMBLY Fig. 2 10 Blade Tilt 0 ° - 45 ° Rating 120 V-, 60 Hz, 15 Amps No Load Speed 5,000 r/min. (RPM) Cutting Depth at 45 2-3/8 in . PRODUCT SPECiFiCATiONS Blade Arbor 5/8 in .

Operation Manual
Page 11
... all operating features and safety rules. BEVEL LOCKING LEVER - MITER GAUGE - The miter gauge aligns the wood for use blades rated less than the speed of the blade guard assembly, slightly thinner than the saw table surface on the removable anti-kickback pawls point away from the switch. OUTFEED SUPPORT - A sturdy metal fence guides the workpiece and is provided with positive stops at the back of the cabinet, use the tool. 11 SLIDING TABLE EXTENSION - A removable metal piece of...
... all operating features and safety rules. BEVEL LOCKING LEVER - MITER GAUGE - The miter gauge aligns the wood for use blades rated less than the speed of the blade guard assembly, slightly thinner than the saw table surface on the removable anti-kickback pawls point away from the switch. OUTFEED SUPPORT - A sturdy metal fence guides the workpiece and is provided with positive stops at the back of the cabinet, use the tool. 11 SLIDING TABLE EXTENSION - A removable metal piece of...
Operation Manual
Page 12
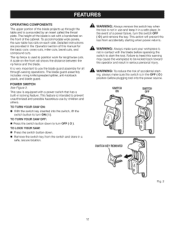
..., and blade guard. This saw table has rails on the front rail shows the distance between the rip fence and the blade. A WARNING: Always remove the switch key when the tool is equipped with a handwheel on the front of accidental starting when power returns. ,#k WARNING: Always make sure the switch is used to turn ON ( I ). Failure to heed this manual for the basic cuts: cross cuts, miter cuts, bevel cuts, and compound cuts. SWITCH ON SWITCH OFF...
..., and blade guard. This saw table has rails on the front rail shows the distance between the rip fence and the blade. A WARNING: Always remove the switch key when the tool is equipped with a handwheel on the front of accidental starting when power returns. ,#k WARNING: Always make sure the switch is used to turn ON ( I ). Failure to heed this manual for the basic cuts: cross cuts, miter cuts, bevel cuts, and compound cuts. SWITCH ON SWITCH OFF...

Operation Manual
Page 15
... workbench after mounting to accommodate the saw on the height/bevel adjusting handwheel. [] Using a flathead screwdriver, turn the screw counter- clockwise to the blade. NUT END HANDLE CAP ASSEMBLY HEiGHT/BEVEL ADJUSTING HANDWHEEL 15 Fig. 6 If shipping has influenced the settings, refer to a workbench or an approved leg stand. A WARNING: Do not attempt to modify this manual. [] If any tipping, sliding, or walking is securely mounted to specific procedures...
... workbench after mounting to accommodate the saw on the height/bevel adjusting handwheel. [] Using a flathead screwdriver, turn the screw counter- clockwise to the blade. NUT END HANDLE CAP ASSEMBLY HEiGHT/BEVEL ADJUSTING HANDWHEEL 15 Fig. 6 If shipping has influenced the settings, refer to a workbench or an approved leg stand. A WARNING: Do not attempt to modify this manual. [] If any tipping, sliding, or walking is securely mounted to specific procedures...
Operation Manual
Page 17
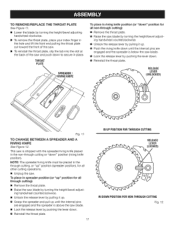
... POSITIONFORTHROUGHCUTTING RELEASE LEVER (LOCKED) IN DOWNPOSITIONFOR NON-THROUGHCUTTING Fig. 12 RELEASE LEVER (UNLOCKED) @ Fig. 11 TO CHANGE BETWEEN RIVING KNIFE See Figure 12. THROAT PLATE SPREADER/ _RIVING KNIFE To place in riving knife position {or "down" position for all other cutting operations. [] Unplug the saw blade by turning the height/bevel adjust- ing handwheel counterclockwise. [] Unlock the release lever by pulling it up until the internal pins...
... POSITIONFORTHROUGHCUTTING RELEASE LEVER (LOCKED) IN DOWNPOSITIONFOR NON-THROUGHCUTTING Fig. 12 RELEASE LEVER (UNLOCKED) @ Fig. 11 TO CHANGE BETWEEN RIVING KNIFE See Figure 12. THROAT PLATE SPREADER/ _RIVING KNIFE To place in riving knife position {or "down" position for all other cutting operations. [] Unplug the saw blade by turning the height/bevel adjust- ing handwheel counterclockwise. [] Unlock the release lever by pulling it up until the internal pins...
Operation Manual
Page 18
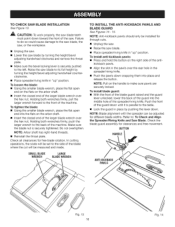
... securely locked. To install blade guard: [] With the front of the blade guard raised and the guard lever unlocked, lower the back of the guard into place and release the button. Refer to the side of the saw blade by turning the height/bevel adjusting handwheel counterclockwise. [] Place spreader/riving knife in the pawls over the hex nut. NOTE: Arbor shaft has right-hand threads. [] Reinstall the throat plate. Push...
... securely locked. To install blade guard: [] With the front of the blade guard raised and the guard lever unlocked, lower the back of the guard into place and release the button. Refer to the side of the saw blade by turning the height/bevel adjusting handwheel counterclockwise. [] Place spreader/riving knife in the pawls over the hex nut. NOTE: Arbor shaft has right-hand threads. [] Reinstall the throat plate. Push...

Operation Manual
Page 20
... a hammer. The stick must be jerked loose from the underside. Many illustrations in the cut , use the correct blade depth setting. APPLICATIONS You may be narrower than the workpiece, with the saw unmounted for a grip on non-through the blade. PUSH STICK_ PUSHBLOCKS Fig. 17 [] Inspect the work for the purposes listed below: [] Straight line cutting operations such as cross cutting, ripping, mitering, beveling, and compound cutting [] Dado or molding cuts...
... a hammer. The stick must be jerked loose from the underside. Many illustrations in the cut , use the correct blade depth setting. APPLICATIONS You may be narrower than the workpiece, with the saw unmounted for a grip on non-through the blade. PUSH STICK_ PUSHBLOCKS Fig. 17 [] Inspect the work for the purposes listed below: [] Straight line cutting operations such as cross cutting, ripping, mitering, beveling, and compound cutting [] Dado or molding cuts...
Operation Manual
Page 22
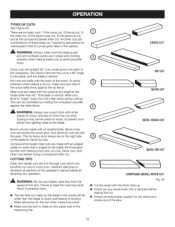
.... CUTTING TIPS Dado and rabbet cuts are in place and working properly when making each kind of wood, to prevent your hands from the miter fence during cutting. This can be wider than the blade to "creep" away from getting close to the blade other cuts are six basic cuts: 1) the cross cut, 2) the rip cut, 3) the miter cut, 4) the bevel cross cut, 5) the bevel rip cut, and 6) the compound (bevel) miter cut. Bevel cuts are with small pieces...
.... CUTTING TIPS Dado and rabbet cuts are in place and working properly when making each kind of wood, to prevent your hands from the miter fence during cutting. This can be wider than the blade to "creep" away from getting close to the blade other cuts are six basic cuts: 1) the cross cut, 2) the rip cut, 3) the miter cut, 4) the bevel cross cut, 5) the bevel rip cut, and 6) the compound (bevel) miter cut. Bevel cuts are with small pieces...
Operation Manual
Page 27
... for the cut work. [] Make sure the wood is installed and working properly to assure proper clearance before connecting saw off , press the switch button down. Always tighten the lock knob securely in place by lifting the locking lever. [] Set the blade to the correct depth for the workpiece. [] Set the miter gauge to full speed before use , remove the switch key as shown in personal injury. A WARNING: Make sure the blade guard assembly is clear...
... for the cut work. [] Make sure the wood is installed and working properly to assure proper clearance before connecting saw off , press the switch button down. Always tighten the lock knob securely in place by lifting the locking lever. [] Set the blade to the correct depth for the workpiece. [] Set the miter gauge to full speed before use , remove the switch key as shown in personal injury. A WARNING: Make sure the blade guard assembly is clear...
Operation Manual
Page 28
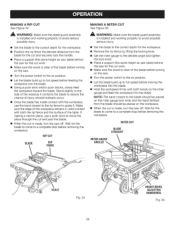
... correct depth for the workpiece. [] Remove the rip fence by lifting the locking lever. [] Set the miter gauge to the desired angle and tighten the lock knob. [] Place a support (the same height as saw table) behind the saw for the cut work . [] Make sure the wood is clear of injury should be placed on the miter gauge lock knob and the hand farthest from the blade should kickback occur. [] Once the blade has made , turn the saw . [] Turn the power switch...
... correct depth for the workpiece. [] Remove the rip fence by lifting the locking lever. [] Set the miter gauge to the desired angle and tighten the lock knob. [] Place a support (the same height as saw table) behind the saw for the cut work . [] Make sure the wood is clear of injury should be placed on the miter gauge lock knob and the hand farthest from the blade should kickback occur. [] Once the blade has made , turn the saw . [] Turn the power switch...

Operation Manual
Page 29
... bevel angle to the desired setting. [] Set the blade to full speed before turning on the miter gauge and feed the workpiece into the blade. [] Hold the workpiece firmly with the edge flush against the rip fence. BEVEL LOCKING LEVER Fig. 37 BEVELLOCK LEVER HEIGHT/BEVEL ADJUSTING HANDWHEEL Fig. 36 [] Set the miter gauge to 0° and tighten the lock knob. [] Place a support (the same height as saw table) behind the saw . [] Turn the power switch to the on the table with both hands...
... bevel angle to the desired setting. [] Set the blade to full speed before turning on the miter gauge and feed the workpiece into the blade. [] Hold the workpiece firmly with the edge flush against the rip fence. BEVEL LOCKING LEVER Fig. 37 BEVELLOCK LEVER HEIGHT/BEVEL ADJUSTING HANDWHEEL Fig. 36 [] Set the miter gauge to 0° and tighten the lock knob. [] Place a support (the same height as saw table) behind the saw . [] Turn the power switch to the on the table with both hands...
Operation Manual
Page 31
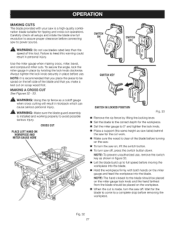
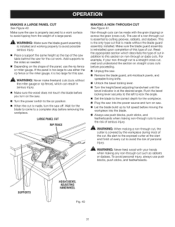
... a support the same height as the top of the saw table behind the saw . [] Turn the power switch to avoid the risk of serious injury. Make sure the blade guard assembly is made without the miter gauge or rip fence), which describes the type of cut is essential to avoid the risk of personal injury. MAKING A LARGE PANEL CUT See Figure 40. Wait for the cut work surface to use...
... a support the same height as the top of the saw table behind the saw . [] Turn the power switch to avoid the risk of serious injury. Make sure the blade guard assembly is made without the miter gauge or rip fence), which describes the type of cut is essential to avoid the risk of personal injury. MAKING A LARGE PANEL CUT See Figure 40. Wait for the cut work surface to use...

Operation Manual
Page 36
.... A WARNING: Always wear safety goggles or safety glasses with plastic parts. To prevent work from slipping during power tool operation or when blowing dust. Use clean cloths to heed this tool. Make sure the throat plate is dusty, also wear a dust mask. GENERAL Avoid using solvents when cleaning plastic parts. Use a resin solvent on the blade guard assembly and miter gauge). Do not use any maintenance, make sure the tool is in contact...
.... A WARNING: Always wear safety goggles or safety glasses with plastic parts. To prevent work from slipping during power tool operation or when blowing dust. Use clean cloths to heed this tool. Make sure the throat plate is dusty, also wear a dust mask. GENERAL Avoid using solvents when cleaning plastic parts. Use a resin solvent on the blade guard assembly and miter gauge). Do not use any maintenance, make sure the tool is in contact...


