
Operation Manual
Page 3
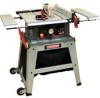
... your tool, it must be connected to a 110-120 Volt / 15 Ampere time delay fuse or circuit breaker. Failure to follow these safety rules. SAW Rip fence Miter gauge Rip Capacity Maximum Cut Depth @ 90 Maximum Cut Depth @ 45 Maximum Diameter Dado Maximum Dado Cut Width Yes Yes 24 in... 1/2 in . MOTOR Type Amperes Voltage Hz RPM (no load Overload Protection Universal 15 Amp 120V AC 60Hz 5000 RPM (No load) Yes BLADE SIZE Diameter Arbor size 10 in. 5/8 in . {,,i_ WARNING] To avoid electrical hazards, fire hazards or damage to the tool, use proper circuit protection.
... your tool, it must be connected to a 110-120 Volt / 15 Ampere time delay fuse or circuit breaker. Failure to follow these safety rules. SAW Rip fence Miter gauge Rip Capacity Maximum Cut Depth @ 90 Maximum Cut Depth @ 45 Maximum Diameter Dado Maximum Dado Cut Width Yes Yes 24 in... 1/2 in . MOTOR Type Amperes Voltage Hz RPM (no load Overload Protection Universal 15 Amp 120V AC 60Hz 5000 RPM (No load) Yes BLADE SIZE Diameter Arbor size 10 in. 5/8 in . {,,i_ WARNING] To avoid electrical hazards, fire hazards or damage to the tool, use proper circuit protection.
Operation Manual
Page 16
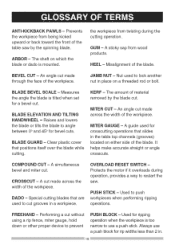
... during the cutting operation. PUSH STICK- HEEL - Clear plastic cover that slides in place on a threaded rod or bolt. BLADE BEVEL SCALE - ARBOR - The shaft on either side of the table saw . the workpiece from twisting during operation, provides a way to angle between 0° and 45 ° for rip widths less than 2 in...
... during the cutting operation. PUSH STICK- HEEL - Clear plastic cover that slides in place on a threaded rod or bolt. BLADE BEVEL SCALE - ARBOR - The shaft on either side of the table saw . the workpiece from twisting during operation, provides a way to angle between 0° and 45 ° for rip widths less than 2 in...

Operation Manual
Page 21
... Clean the outer blade flange (3) and install it onto the arbor (4) and against the inner flange. 5. Push down on the fence handle (1) to the front of four legs. 1. Lift upward on the saw table, and attach the set plate (3) under the saw . (Fig. K 1 INSTALLING THE BLADE (FIG. Place ...the blade onto the arbor (4) with the blade teeth pointing forward to lock. iNSTALLiNG THE DUST BAG (FIG. o To...
... Clean the outer blade flange (3) and install it onto the arbor (4) and against the inner flange. 5. Push down on the fence handle (1) to the front of four legs. 1. Lift upward on the saw table, and attach the set plate (3) under the saw . (Fig. K 1 INSTALLING THE BLADE (FIG. Place ...the blade onto the arbor (4) with the blade teeth pointing forward to lock. iNSTALLiNG THE DUST BAG (FIG. o To...

Operation Manual
Page 22
...6. Placethebox-endwrench(6)onthe arbornut(2)andturnclockwise(to INSTALL THE BLADE WITH THE TEETH POINTING TOWARD THE FRONT OF TABLE in the direction of the saw without the riving knife in the OFF position and the plug is in the correct position. O) 2. Loosen the... arbor nut (2), place the open-end wrench (5) on the arbor nut (2) (Fig. N). N, O) I , Q) 8 [,_L, WARNING] To avoid possible injury and damage to the workpiece, be sure to the rearofthesawtable).(Fig.N) 10...
...6. Placethebox-endwrench(6)onthe arbornut(2)andturnclockwise(to INSTALL THE BLADE WITH THE TEETH POINTING TOWARD THE FRONT OF TABLE in the direction of the saw without the riving knife in the OFF position and the plug is in the correct position. O) 2. Loosen the... arbor nut (2), place the open-end wrench (5) on the arbor nut (2) (Fig. N). N, O) I , Q) 8 [,_L, WARNING] To avoid possible injury and damage to the workpiece, be sure to the rearofthesawtable).(Fig.N) 10...

Operation Manual
Page 23
With the blade elevation handwheel (1), raise the blade arbor to the 0° vertical position by turning the blade elevation ... knife (7). 6. Just turn and move the handwheel (1) to 0 ° and place the table insert in the correct position. Fig. Before using the saw blade. Q) I ) 1. o Never operate this tool without the riving knife in position. ...tilting lock knob and turning the bevel tilting handwheel counterclockwise, and then lock into position. 4. Remove the table insert and raise the blade to the 45 ° position and check the alignment again. 6. Insert...
With the blade elevation handwheel (1), raise the blade arbor to the 0° vertical position by turning the blade elevation ... knife (7). 6. Just turn and move the handwheel (1) to 0 ° and place the table insert in the correct position. Fig. Before using the saw blade. Q) I ) 1. o Never operate this tool without the riving knife in position. ...tilting lock knob and turning the bevel tilting handwheel counterclockwise, and then lock into position. 4. Remove the table insert and raise the blade to the 45 ° position and check the alignment again. 6. Insert...
Operation Manual
Page 27
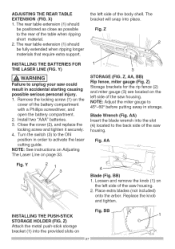
... short material. 2. Y) [,_ WARNING] Failure to the rear of the saw could result in storage. Close the cover (2), and replace the locking screw and tighten it securely. 4. Z, AA, BB) Rip fence, miter gauge (Fig. Place extra blades (not included) onto the arbor. The rear table extension (1) should be fully extended when ripping longer materials...
... short material. 2. Y) [,_ WARNING] Failure to the rear of the saw could result in storage. Close the cover (2), and replace the locking screw and tighten it securely. 4. Z, AA, BB) Rip fence, miter gauge (Fig. Place extra blades (not included) onto the arbor. The rear table extension (1) should be fully extended when ripping longer materials...

Operation Manual
Page 35
...the edge of loose parts ITEM: S Fig. I_ WARNING] Before using the saw to the arbor. 2. QQ, RR) Fig. o Never use of cuts: ripping and crosscutting. USINGTHE TABLE EXTENSION (FIG. NOTE: See page 14 for table of the table. 3. Slide the extension (4) out until it is in the front of this ...cam locking levers. NEVER USE THE TWO AT THE SAME TIME. The blade guard is parallel with the table, then tighten the bolts. Safety glasses are two basic types of your table saw each time, check the following: 1. PP CUTTING OPERATIONS There are worn. o Do not allow familiarity ...
...the edge of loose parts ITEM: S Fig. I_ WARNING] Before using the saw to the arbor. 2. QQ, RR) Fig. o Never use of cuts: ripping and crosscutting. USINGTHE TABLE EXTENSION (FIG. NOTE: See page 14 for table of the table. 3. Slide the extension (4) out until it is in the front of this ...cam locking levers. NEVER USE THE TWO AT THE SAME TIME. The blade guard is parallel with the table, then tighten the bolts. Safety glasses are two basic types of your table saw each time, check the following: 1. PP CUTTING OPERATIONS There are worn. o Do not allow familiarity ...
Operation Manual
Page 42
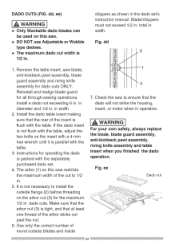
... must not exceed 1/2 in . Remove the table insert, saw . in diameter and 1/2 in . Instructions for the maximum 1/2 in . 5. ee Dado cut to 1/2 in . o The maximum dado cut width is packed with the table, adjust the two bolts on the arbor nut (3) for operating the dado is 1/2 in... in . Check the saw restricts the maximum width of the cut _2 Use only the correct number of the arbor sticks out past the nut. 6. DADOCUTS(FIG. The arbor (1) on this saw to install the outside blades and inside 7. Install the dado table insert making sure that the...
... must not exceed 1/2 in . Remove the table insert, saw . in diameter and 1/2 in . Instructions for the maximum 1/2 in . 5. ee Dado cut to 1/2 in . o The maximum dado cut width is packed with the table, adjust the two bolts on the arbor nut (3) for operating the dado is 1/2 in... in . Check the saw restricts the maximum width of the cut _2 Use only the correct number of the arbor sticks out past the nut. 6. DADOCUTS(FIG. The arbor (1) on this saw to install the outside blades and inside 7. Install the dado table insert making sure that the...

Operation Manual
Page 50
HD. PAN HD. COUNT HD. HD. RE. RE. SQ.NECK BOLT M8_1.25-16 1 2T6E CLAMP ASS'Y 1 0KMY HEX. TABLE SAW MODEL NO. 137.218070 PARTS LiST FOR SAW SCHEMATIC B I .D. SCREW HEX, HD. HD. SCREW & WASHER M6_1,0-12 CR. TAPPING SCREW M4_16-16 4 2S15 MOTOR ASS'Y 11 2SEO 6 2SE9...POINTER BRACKET PLUNGER HOUSING WRENCH SEGMENT GEAR WRENCH CLAMP COMPRESSION SPRING SPACER SPACER SET NUT ARBOR COLLAR LOCK KNOB HEX. SOC. SET SCREW M5_0.8-6 STICKER 2A47 2A48 HEX. TAPPING SCREW CR. RE. 10 in. HD. HD. RE. TAPPING SCREW HEX. TAPPING SCREW M4_18_10 M5_16-16 HEX...
HD. PAN HD. COUNT HD. HD. RE. RE. SQ.NECK BOLT M8_1.25-16 1 2T6E CLAMP ASS'Y 1 0KMY HEX. TABLE SAW MODEL NO. 137.218070 PARTS LiST FOR SAW SCHEMATIC B I .D. SCREW HEX, HD. HD. SCREW & WASHER M6_1,0-12 CR. TAPPING SCREW M4_16-16 4 2S15 MOTOR ASS'Y 11 2SEO 6 2SE9...POINTER BRACKET PLUNGER HOUSING WRENCH SEGMENT GEAR WRENCH CLAMP COMPRESSION SPRING SPACER SPACER SET NUT ARBOR COLLAR LOCK KNOB HEX. SOC. SET SCREW M5_0.8-6 STICKER 2A47 2A48 HEX. TAPPING SCREW CR. RE. 10 in. HD. HD. RE. TAPPING SCREW HEX. TAPPING SCREW M4_18_10 M5_16-16 HEX...


