
Routine Care
Page 7
..., do not use premoistened antistatic wipes or an antistatic screen cleaner. If the computer keyboard includes a pointing stick, you may need to periodically clean or change the replacement cap. (Replacement caps are included with select models.) Display To remove smudges and lint, frequently clean ...the display with a straw extension can be used to blow air around on the keyboard surface. If the screen requires additional cleaning...
..., do not use premoistened antistatic wipes or an antistatic screen cleaner. If the computer keyboard includes a pointing stick, you may need to periodically clean or change the replacement cap. (Replacement caps are included with select models.) Display To remove smudges and lint, frequently clean ...the display with a straw extension can be used to blow air around on the keyboard surface. If the screen requires additional cleaning...

Routine Care - Windows Vista
Page 7
... permanent damage to internal components, do not use premoistened antistatic wipes or an antistatic screen cleaner. Clean the keyboard regularly to prevent keys from sticking and to periodically clean or change the replacement cap. (Replacement caps are included with select models.) Display To remove smudges and lint, frequently clean the display with a damp...
... permanent damage to internal components, do not use premoistened antistatic wipes or an antistatic screen cleaner. Clean the keyboard regularly to prevent keys from sticking and to periodically clean or change the replacement cap. (Replacement caps are included with select models.) Display To remove smudges and lint, frequently clean the display with a damp...
Computer Setup - Windows XP and Windows Vista
Page 10
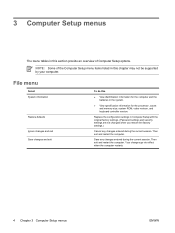
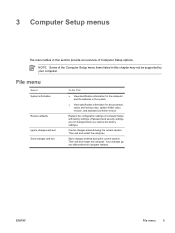
... batteries in the system. ● View specification information for the processor, cache and memory size, system ROM, video revision, and keyboard controller version. Save any changes entered during the current session. Replace the configuration settings in this chapter may not be supported by your computer. File menu Select System information Restore defaults...
... batteries in the system. ● View specification information for the processor, cache and memory size, system ROM, video revision, and keyboard controller version. Save any changes entered during the current session. Replace the configuration settings in this chapter may not be supported by your computer. File menu Select System information Restore defaults...
Computer Setup
Page 9
... current session. NOTE Some of the Computer Setup menu items listed in this section provide an overview of Computer Setup options. Replace the configuration settings in Computer Setup with factory settings. (Password and security settings are not changed when you restore the factory settings.)...the batteries in the system. ● View specification information for the processor, cache and memory size, system ROM, video revision, and keyboard controller version. Then exit and restart the computer. 3 Computer Setup menus The menu tables in this chapter may not be supported by your...
... current session. NOTE Some of the Computer Setup menu items listed in this section provide an overview of Computer Setup options. Replace the configuration settings in Computer Setup with factory settings. (Password and security settings are not changed when you restore the factory settings.)...the batteries in the system. ● View specification information for the processor, cache and memory size, system ROM, video revision, and keyboard controller version. Then exit and restart the computer. 3 Computer Setup menus The menu tables in this chapter may not be supported by your...
Memory Modules
Page 5
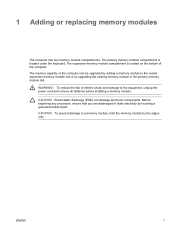
1 Adding or replacing memory modules The computer has two memory module compartments. CAUTION To prevent damage to the vacant expansion memory module slot or by upgrading the existing memory module in the primary memory module slot. The expansion memory module compartment is located under the keyboard. To reduce the risk of the computer...
1 Adding or replacing memory modules The computer has two memory module compartments. CAUTION To prevent damage to the vacant expansion memory module slot or by upgrading the existing memory module in the primary memory module slot. The expansion memory module compartment is located under the keyboard. To reduce the risk of the computer...
Memory Modules
Page 10
... and open it. 6 Chapter 1 Adding or replacing memory modules ENWW Disconnect all external devices connected to the computer. 4. Turn the computer upside down the computer. (If you are not sure whether the computer is off or in the primary memory module slot: 1. Remove the 3 keyboard screws. 8. Unplug the power cord from the...
... and open it. 6 Chapter 1 Adding or replacing memory modules ENWW Disconnect all external devices connected to the computer. 4. Turn the computer upside down the computer. (If you are not sure whether the computer is off or in the primary memory module slot: 1. Remove the 3 keyboard screws. 8. Unplug the power cord from the...

Memory Modules
Page 14
14. Replace the battery. 18. Replace the keyboard screws. 17. Reconnect external power and external devices. 19. Turn on a flat surface. 16. Turn the computer upside down on the computer. 10 Chapter 1 Adding or replacing memory modules ENWW Slide the 4 keyboard release latches to lock the keyboard. 15.
14. Replace the battery. 18. Replace the keyboard screws. 17. Reconnect external power and external devices. 19. Turn on a flat surface. 16. Turn the computer upside down on the computer. 10 Chapter 1 Adding or replacing memory modules ENWW Slide the 4 keyboard release latches to lock the keyboard. 15.
Memory Modules
Page 17
Index H hard drive, displaying free space 11 hibernation file 11 K keyboard screws removing 6 replacing 10 M memory displaying free space 11 increasing 11 replacing memory modules 2, 6 memory module inserting 8 removing 2, 7 replacing 2, 6 upgrading primary 6 memory module compartment cover removing 2 replacing 4 ENWW Index 13
Index H hard drive, displaying free space 11 hibernation file 11 K keyboard screws removing 6 replacing 10 M memory displaying free space 11 increasing 11 replacing memory modules 2, 6 memory module inserting 8 removing 2, 7 replacing 2, 6 upgrading primary 6 memory module compartment cover removing 2 replacing 4 ENWW Index 13
Memory Modules - Windows Vista
Page 5
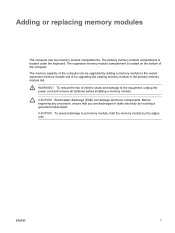
... memory module slot. CAUTION To prevent damage to a memory module, hold the memory module by touching a grounded metal object. Adding or replacing memory modules The computer has two memory module compartments. WARNING! To reduce the risk of static electricity by the edges only. ENWW 1 ...the power cord and remove all batteries before installing a memory module. The expansion memory module compartment is located under the keyboard. The memory capacity of the computer. The primary memory module compartment is located on the bottom of the computer can damage electronic components....
... memory module slot. CAUTION To prevent damage to a memory module, hold the memory module by touching a grounded metal object. Adding or replacing memory modules The computer has two memory module compartments. WARNING! To reduce the risk of static electricity by the edges only. ENWW 1 ...the power cord and remove all batteries before installing a memory module. The expansion memory module compartment is located under the keyboard. The memory capacity of the computer. The primary memory module compartment is located on the bottom of the computer can damage electronic components....
Memory Modules - Windows Vista
Page 10
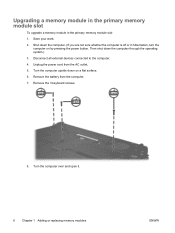
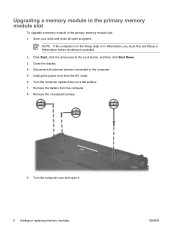
Close the display. 4. Turn the computer upside down on a flat surface. 7. Disconnect all open it. 6 Adding or replacing memory modules ENWW Turn the computer over and open programs. NOTE If the computer is in the Sleep state or in the primary memory module .... 2. Unplug the power cord from the computer. 8. Click Start, click the arrow next to the computer. 5. Remove the battery from the AC outlet. 6. Remove the 3 keyboard screws. 9.
Close the display. 4. Turn the computer upside down on a flat surface. 7. Disconnect all open it. 6 Adding or replacing memory modules ENWW Turn the computer over and open programs. NOTE If the computer is in the Sleep state or in the primary memory module .... 2. Unplug the power cord from the computer. 8. Click Start, click the arrow next to the computer. 5. Remove the battery from the AC outlet. 6. Remove the 3 keyboard screws. 9.

Memory Modules - Windows Vista
Page 14
Slide the 4 keyboard release latches to lock the keyboard. 16. 15. Reconnect external power and external devices. 20. Replace the keyboard screws. 18. Replace the battery. 19. Turn on a flat surface. 17. Turn the computer upside down on the computer. 10 Adding or replacing memory modules ENWW
Slide the 4 keyboard release latches to lock the keyboard. 16. 15. Reconnect external power and external devices. 20. Replace the keyboard screws. 18. Replace the battery. 19. Turn on a flat surface. 17. Turn the computer upside down on the computer. 10 Adding or replacing memory modules ENWW

Memory Modules - Windows Vista
Page 16
Index K keyboard screws removing 6 replacing 10 M memory replacing memory modules 2, 6 memory module inserting 8 removing 2, 7 replacing 2, 6 upgrading primary 6 memory module compartment cover removing 2 replacing 4 12 Index ENWW
Index K keyboard screws removing 6 replacing 10 M memory replacing memory modules 2, 6 memory module inserting 8 removing 2, 7 replacing 2, 6 upgrading primary 6 memory module compartment cover removing 2 replacing 4 12 Index ENWW


