End User License Agreement
Page 1
... internet and was originally licensed for CONDITIONS OF THIS EULA. You do not have Software Product into Your Computer's AGREE TO ALL TERMS AND temporary memory (RAM) for use the Software Product on more than one computer. Other software may contain a EULA in its suppliers reserve all or any Software Product... OF THIS EULA. You may use on a single computer ("Your Computer"). You may load the Software ON THE CONDITION THAT YOU Product into the local memory or storage device of Rights.
... internet and was originally licensed for CONDITIONS OF THIS EULA. You do not have Software Product into Your Computer's AGREE TO ALL TERMS AND temporary memory (RAM) for use the Software Product on more than one computer. Other software may contain a EULA in its suppliers reserve all or any Software Product... OF THIS EULA. You may use on a single computer ("Your Computer"). You may load the Software ON THE CONDITION THAT YOU Product into the local memory or storage device of Rights.
HP USB Digital Drive
Page 2
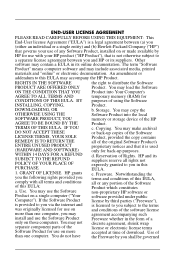
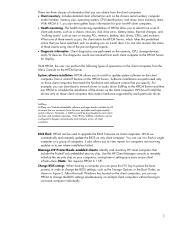
You can be included. The Digital Drive can purchase one (in various storage capacities) from any computer that is a pocket-sized SD (Secure Digital) memory drive for storing and transferring files such as digital pictures, music, video, and data. However, you will need an SD memory card to operate the Digital Drive. An SD memory card 2 may not be used with any HP authorized reseller. User Guide 1 The HP USB Digital Drive 1 is running Microsoft Windows XP Home, Windows XP Pro, or Windows 2000.
You can be included. The Digital Drive can purchase one (in various storage capacities) from any computer that is a pocket-sized SD (Secure Digital) memory drive for storing and transferring files such as digital pictures, music, video, and data. However, you will need an SD memory card to operate the Digital Drive. An SD memory card 2 may not be used with any HP authorized reseller. User Guide 1 The HP USB Digital Drive 1 is running Microsoft Windows XP Home, Windows XP Pro, or Windows 2000.
HP USB Digital Drive
Page 3
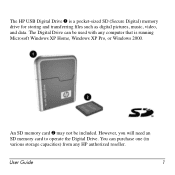
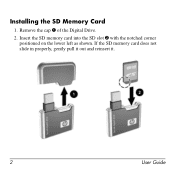
Installing the SD Memory Card 1. Remove the cap 1 of the Digital Drive. 2. If the SD memory card does not slide in properly, gently pull it out and reinsert it. 2 User Guide Insert the SD memory card into the SD slot 2 with the notched corner positioned on the lower left as shown.
Installing the SD Memory Card 1. Remove the cap 1 of the Digital Drive. 2. If the SD memory card does not slide in properly, gently pull it out and reinsert it. 2 User Guide Insert the SD memory card into the SD slot 2 with the notched corner positioned on the lower left as shown.
HP USB Digital Drive
Page 10
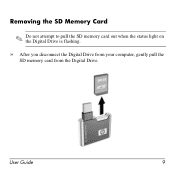
Removing the SD Memory Card ✎ Do not attempt to pull the SD memory card out when the status light on the Digital Drive is flashing. » After you disconnect the Digital Drive from your computer, gently pull the SD memory card from the Digital Drive. User Guide 9
Removing the SD Memory Card ✎ Do not attempt to pull the SD memory card out when the status light on the Digital Drive is flashing. » After you disconnect the Digital Drive from your computer, gently pull the SD memory card from the Digital Drive. User Guide 9
HP Client Manager 6.1
Page 3
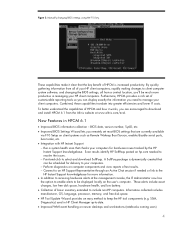
... clients: Identify and inventory HP client computers that our customers have specified, such as the chassis serial number, computer model number, memory size, operating system, CPU identification, and many more secure client infrastructure. Change BIOS settings: When booting a computer you specify. Software... of HPCM allow you to change the BIOS settings, such as the Storage Options or the Boot Order, as new or missing PCs, memory, battery, disk drives, CPUs, and monitors. There are Web-downloadable software packages made available by each particular driver. For example,...
... clients: Identify and inventory HP client computers that our customers have specified, such as the chassis serial number, computer model number, memory size, operating system, CPU identification, and many more secure client infrastructure. Change BIOS settings: When booting a computer you specify. Software... of HPCM allow you to change the BIOS settings, such as the Storage Options or the Boot Order, as new or missing PCs, memory, battery, disk drives, CPUs, and monitors. There are Web-downloadable software packages made available by each particular driver. For example,...
HP Client Manager 6.1
Page 4
...a rich set most BIOS settings that can display exactly the information you 'll be displayed locally on newer desktops and workstations (notebooks coming soon) 4 A SoftPaq package is increased productivity. Scan results identify HP SoftPaqs posted on computer components and view reports of... HPCM and how it clear that checks your computers. - Information collected includes manufacturer, OS, language, processor, memory, and free disk space. • HP Tool Update Wizard provides an easy method to resolve the issues. - BIOS date, version ...
...a rich set most BIOS settings that can display exactly the information you 'll be displayed locally on newer desktops and workstations (notebooks coming soon) 4 A SoftPaq package is increased productivity. Scan results identify HP SoftPaqs posted on computer components and view reports of... HPCM and how it clear that checks your computers. - Information collected includes manufacturer, OS, language, processor, memory, and free disk space. • HP Tool Update Wizard provides an easy method to resolve the issues. - BIOS date, version ...
HP Client Manager 6.1
Page 8
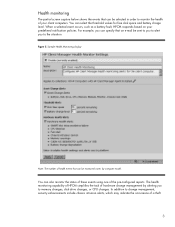
You can be monitored varies by alerting you to memory changes, disk drive changes, or CPU changes. Figure 5. Sample Health Monitoring display Note: The number of the pre-configured reports. For example, you to the ...
You can be monitored varies by alerting you to memory changes, disk drive changes, or CPU changes. Figure 5. Sample Health Monitoring display Note: The number of the pre-configured reports. For example, you to the ...
HP Client Manager 6.1
Page 9
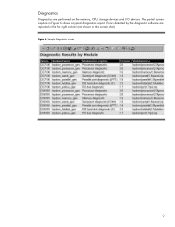
Figure 6. Sample Diagnostics screen 9 Diagnostics Diagnostics are reported in the far right column (not shown in Figure 6 shows a typical diagnostics report. The partial screen capture in this screen shot). Errors detected by the diagnostic software are performed on the memory, CPU, storage devices and I/O devices.
Figure 6. Sample Diagnostics screen 9 Diagnostics Diagnostics are reported in the far right column (not shown in Figure 6 shows a typical diagnostics report. The partial screen capture in this screen shot). Errors detected by the diagnostic software are performed on the memory, CPU, storage devices and I/O devices.

Hardware-Software Guide
Page 6
Contents 6 PC Cards What Is a PC Card 6-1 Insertion 6-2 Removal 6-3 7 SD Cards What Is an SD Card 7-1 Insertion 7-2 Removal 7-3 8 Memory Modules What Is a Memory Module 8-1 Expansion Memory Module Slot 8-2 Primary Memory Module Slot 8-6 Hibernation File 8-11 9 USB Devices What Is USB 9-1 USB Device Connection 9-2 Operating System and Software 9-2 USB Legacy Support 9-3 10 Modem and Networking Internal ...
Contents 6 PC Cards What Is a PC Card 6-1 Insertion 6-2 Removal 6-3 7 SD Cards What Is an SD Card 7-1 Insertion 7-2 Removal 7-3 8 Memory Modules What Is a Memory Module 8-1 Expansion Memory Module Slot 8-2 Primary Memory Module Slot 8-6 Hibernation File 8-11 9 USB Devices What Is USB 9-1 USB Device Connection 9-2 Operating System and Software 9-2 USB Legacy Support 9-3 10 Modem and Networking Internal ...

Hardware-Software Guide
Page 22
Ejects PC Cards from the PC Card slot. Accepts smart cards. Hardware and Software Guide 1-12 Connects USB 1.1- and 2.0-compliant devices to the notebook using a standard USB cable. Accepts SD (Secure Digital) Memory Cards. Component 5 PC Card slot 6 PC Card eject button 7 Smart card reader 8 SD Card slot 9 USB port Component ID Description Supports optional Type I or Type II PC Cards.
Ejects PC Cards from the PC Card slot. Accepts smart cards. Hardware and Software Guide 1-12 Connects USB 1.1- and 2.0-compliant devices to the notebook using a standard USB cable. Accepts SD (Secure Digital) Memory Cards. Component 5 PC Card slot 6 PC Card eject button 7 Smart card reader 8 SD Card slot 9 USB port Component ID Description Supports optional Type I or Type II PC Cards.

Hardware-Software Guide
Page 23
.... (Continued) Hardware and Software Guide 1-13 Component ID Bottom Components The following illustration and table identify and describe the components on the bottom of the notebook . Component Description 1 Primary battery bay Holds the primary battery pack. 2 Primary battery locking latch Secures the primary battery pack into the battery bay. 3 Travel battery...
.... (Continued) Hardware and Software Guide 1-13 Component ID Bottom Components The following illustration and table identify and describe the components on the bottom of the notebook . Component Description 1 Primary battery bay Holds the primary battery pack. 2 Primary battery locking latch Secures the primary battery pack into the battery bay. 3 Travel battery...

Hardware-Software Guide
Page 27
... the modem has been approved for use . The Service Tag label is included with the notebook. ■ Service Tag-Provides the product name, product number (P/N), and serial number (S/N) of the memory compartment cover. ■ Wireless certification labels-Some notebook models include an optional WLAN device and/or an optional Bluetooth® device. This...
... the modem has been approved for use . The Service Tag label is included with the notebook. ■ Service Tag-Provides the product name, product number (P/N), and serial number (S/N) of the memory compartment cover. ■ Wireless certification labels-Some notebook models include an optional WLAN device and/or an optional Bluetooth® device. This...

Hardware-Software Guide
Page 32
... not leave your work before initiating standby is not usually necessary but is a recommended precaution. ■ When the notebook is cleared. When you resume from standby, your work is saved in random access memory (RAM) and the screen is in standby, the power/standby lights blink. Standby reduces power to the screen... not in use each setting. Refer to "Initiating Standby, Hibernation or Shutdown" in standby for details about when to an external power source. Connect the notebook to use . They can be initiated by the system. When standby is initiated, your...
... not leave your work before initiating standby is not usually necessary but is a recommended precaution. ■ When the notebook is cleared. When you resume from standby, your work is saved in random access memory (RAM) and the screen is in standby, the power/standby lights blink. Standby reduces power to the screen... not in use each setting. Refer to "Initiating Standby, Hibernation or Shutdown" in standby for details about when to an external power source. Connect the notebook to use . They can be initiated by the system. When standby is initiated, your...
Hardware-Software Guide
Page 33
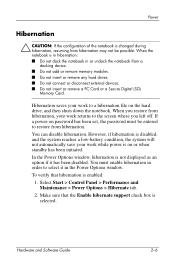
...Hardware and Software Guide 2-6 Make sure that hibernation is not displayed as an option if it in or undock the notebook from a docking device. ■ Do not add or remove memory modules. ■ Do not insert or remove any hard drives. ■ Do not connect or disconnect external ...devices. ■ Do not insert or remove a PC Card or a Secure Digital (SD) Memory Card. Hibernation saves your work while power is on or when standby has been initiated. Select Start > Control Panel > Performance and...
...Hardware and Software Guide 2-6 Make sure that hibernation is not displayed as an option if it in or undock the notebook from a docking device. ■ Do not add or remove memory modules. ■ Do not insert or remove any hard drives. ■ Do not connect or disconnect external ...devices. ■ Do not insert or remove a PC Card or a Secure Digital (SD) Memory Card. Hibernation saves your work while power is on or when standby has been initiated. Select Start > Control Panel > Performance and...

Hardware-Software Guide
Page 68
..., the external monitor display, and a simultaneous display on both the notebook and the monitor. To exit standby, press the power button to initiate standby. When standby is initiated, your work is saved in random access memory (RAM), the screen is cleared, and power is connected to the external monitor connector or the...
..., the external monitor display, and a simultaneous display on both the notebook and the monitor. To exit standby, press the power button to initiate standby. When standby is initiated, your work is saved in random access memory (RAM), the screen is cleared, and power is connected to the external monitor connector or the...

Hardware-Software Guide
Page 110
... conform to the standard specifications of the Personal Computer Memory Card International Association (PCMCIA). ■ The notebook supports 32-bit (CardBus) and 16-bit PC Cards. ■ The notebook is equipped with your PC Card to install device drivers: ■ Install only the device drivers for some PC Cards, do not install any of support for...
... conform to the standard specifications of the Personal Computer Memory Card International Association (PCMCIA). ■ The notebook supports 32-bit (CardBus) and 16-bit PC Cards. ■ The notebook is equipped with your PC Card to install device drivers: ■ Install only the device drivers for some PC Cards, do not install any of support for...

Hardware-Software Guide
Page 114
Hardware and Software Guide 7-1 Secure Digital (SD) Memory Cards are removable thumbnail-sized flash storage devices that provide a convenient method of storing data and sharing it with other devices such as PDAs, cameras, and SD-equipped PCs. 7 SD Cards What Is an SD Card?
Hardware and Software Guide 7-1 Secure Digital (SD) Memory Cards are removable thumbnail-sized flash storage devices that provide a convenient method of storing data and sharing it with other devices such as PDAs, cameras, and SD-equipped PCs. 7 SD Cards What Is an SD Card?

Hardware-Software Guide
Page 117
... upgrading the existing memory module in the primary memory module slot. A memory module is located under the keyboard. The primary memory module compartment is inserted into a memory slot. A memory module, sometimes called a memory card, is located on the notebook. The expansion memory module compartment is a narrow, printed circuit board that holds memory chips. The memory capacity of the notebook can be opened...
... upgrading the existing memory module in the primary memory module slot. A memory module is located under the keyboard. The primary memory module compartment is inserted into a memory slot. A memory module, sometimes called a memory card, is located on the notebook. The expansion memory module compartment is a narrow, printed circuit board that holds memory chips. The memory capacity of the notebook can be opened...

Hardware-Software Guide
Page 118
... off or in the expansion memory module slot: 1. Turn the notebook upside down the notebook through the operating system. 2. Disconnect the notebook from external power. 4. Memory Modules Expansion Memory Module Slot To add or upgrade a memory module in hibernation, turn the notebook on by pressing the power button to the notebook. 3. Shut down the notebook. Disconnect all external devices connected...
... off or in the expansion memory module slot: 1. Turn the notebook upside down the notebook through the operating system. 2. Disconnect the notebook from external power. 4. Memory Modules Expansion Memory Module Slot To add or upgrade a memory module in hibernation, turn the notebook on by pressing the power button to the notebook. 3. Shut down the notebook. Disconnect all external devices connected...

Hardware-Software Guide
Page 119
Hardware and Software Guide 8-3 Memory Modules 8. Grasp the edges of the module and gently pull the module out of the module 1. (The module tilts upward.) b. To protect a memory module after removal, place it : a. Pull away the retention clips on each side of the memory slot 2. If there is a memory module in the memory slot, remove it in an electrostatic-safe container.
Hardware and Software Guide 8-3 Memory Modules 8. Grasp the edges of the module and gently pull the module out of the module 1. (The module tilts upward.) b. To protect a memory module after removal, place it : a. Pull away the retention clips on each side of the memory slot 2. If there is a memory module in the memory slot, remove it in an electrostatic-safe container.


