Getting Started Guide
Page 3
Table of contents 1 Getting information 2 Setting up your computer Protecting your computer 3 Guidelines for installing software and hardware devices 4 Connecting to the Internet 4 Transferring files and settings to your new computer 5 3 Troubleshooting and maintenance Computer does not start 5 Power 6 Display (monitor 6 Keyboard and mouse (with cable 7 Keyboard and mouse (wireless 8 Speakers and sound 9 Internet access 10 Software troubleshooting 11 Maintenance 14 System Recovery 16 Recovery discs 18 ENWW iii
Table of contents 1 Getting information 2 Setting up your computer Protecting your computer 3 Guidelines for installing software and hardware devices 4 Connecting to the Internet 4 Transferring files and settings to your new computer 5 3 Troubleshooting and maintenance Computer does not start 5 Power 6 Display (monitor 6 Keyboard and mouse (with cable 7 Keyboard and mouse (wireless 8 Speakers and sound 9 Internet access 10 Software troubleshooting 11 Maintenance 14 System Recovery 16 Recovery discs 18 ENWW iii
Getting Started Guide
Page 5
... warranty information. ● Get technical support. Under Action Center, click Find and fix problems (troubleshooting). ● Read frequently asked questions. ● Find electronic user guides and HP Support Web site: www.hp.com/support specifications for your computer model. ● Order parts and find ● Set up your computer. ● Use the computer. ● Connect to the Internet. ● Recover factory settings. If the guide is not available there...
... warranty information. ● Get technical support. Under Action Center, click Find and fix problems (troubleshooting). ● Read frequently asked questions. ● Find electronic user guides and HP Support Web site: www.hp.com/support specifications for your computer model. ● Order parts and find ● Set up your computer. ● Use the computer. ● Connect to the Internet. ● Recover factory settings. If the guide is not available there...
Getting Started Guide
Page 6
... DVD drives. HP Support Assistant - WARNING! Disconnect power from the equipment by using automated updates, onboard diagnostics, and guided assistance. The power supply is easily accessible at all times. Type of information ● Get special utilities for computer owners. ● Maintain your computer performance and resolve problems faster by unplugging the power cord from water, dust, moisture, and soot. Where to open the enclosure of Microsoft Windows. 2 Chapter 2 Setting...
... DVD drives. HP Support Assistant - WARNING! Disconnect power from the equipment by using automated updates, onboard diagnostics, and guided assistance. The power supply is easily accessible at all times. Type of information ● Get special utilities for computer owners. ● Maintain your computer performance and resolve problems faster by unplugging the power cord from water, dust, moisture, and soot. Where to open the enclosure of Microsoft Windows. 2 Chapter 2 Setting...
Getting Started Guide
Page 7
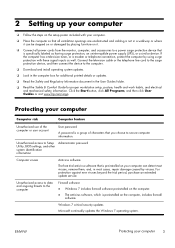
... extended update service. Windows 7 critical security updates Microsoft continually updates the Windows 7 operating system. Unauthorized access to secure computer information. Click the Start button, click All Programs, and then click User Guides or visit www.hp.com/ergo. Protecting your computer Computer risk Computer feature Unauthorized use of characters that you choose to Setup Utility, BIOS settings, and other system identification information Administrator password Computer viruses Antivirus software The free...
... extended update service. Windows 7 critical security updates Microsoft continually updates the Windows 7 operating system. Unauthorized access to secure computer information. Click the Start button, click All Programs, and then click User Guides or visit www.hp.com/ergo. Protecting your computer Computer risk Computer feature Unauthorized use of characters that you choose to Setup Utility, BIOS settings, and other system identification information Administrator password Computer viruses Antivirus software The free...
Getting Started Guide
Page 8
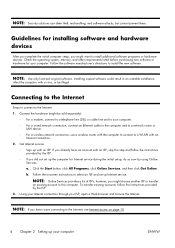
..., memory, and other requirements listed before purchasing new software or hardware for installing software and hardware devices After you complete the initial computer setup, you already have issues connecting to a WLAN with an ISP, skip this computer. Connecting to the Internet Steps to connect to select an ISP and set up your computer. ◦ For a wired network connection, connect an Ethernet cable to the computer and to a network router or LAN device. ◦ For a wireless network connection, use a wireless...
..., memory, and other requirements listed before purchasing new software or hardware for installing software and hardware devices After you complete the initial computer setup, you already have issues connecting to a WLAN with an ISP, skip this computer. Connecting to the Internet Steps to connect to select an ISP and set up your computer. ◦ For a wired network connection, connect an Ethernet cable to the computer and to a network router or LAN device. ◦ For a wireless network connection, use a wireless...

Getting Started Guide
Page 9
... or DVDs, memory sticks, and external hard drives. When the cables connecting the computer to the external power source are plugged in , and turn on ; if it on the back of Microsoft Windows. 3 Troubleshooting and maintenance Refer to the external power source are shipped without a version of the computer should be properly connected. If the display (monitor) is blank, the monitor might encounter while installing, starting up, or using your files and settings: 1. A standard USB cable...
... or DVDs, memory sticks, and external hard drives. When the cables connecting the computer to the external power source are plugged in , and turn on ; if it on the back of Microsoft Windows. 3 Troubleshooting and maintenance Refer to the external power source are shipped without a version of the computer should be properly connected. If the display (monitor) is blank, the monitor might encounter while installing, starting up, or using your files and settings: 1. A standard USB cable...
Getting Started Guide
Page 10
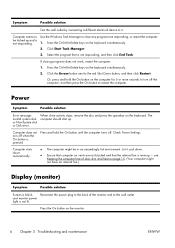
... Screen is not responding. Press the Ctrl+Alt+Delete keys on the keyboard. Select the program that the internal fan is not lit. Power Symptom Possible solution Error message: Invalid system disk or Non-System disk or Disk error. Let it . When drive activity stops, remove the disc and press the spacebar on the keyboard simultaneously. 2. and monitor power light is running - Use the Windows Task Manager to the red Shut Down button...
... Screen is not responding. Press the Ctrl+Alt+Delete keys on the keyboard. Select the program that the internal fan is not lit. Power Symptom Possible solution Error message: Invalid system disk or Non-System disk or Disk error. Let it . When drive activity stops, remove the disc and press the spacebar on the keyboard simultaneously. 2. and monitor power light is running - Use the Windows Task Manager to the red Shut Down button...
Getting Started Guide
Page 11
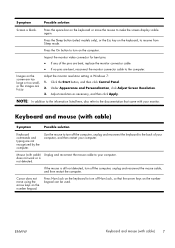
... Sleep mode. ENWW Keyboard and mouse (with cable) Unplug and reconnect the mouse cable to the computer. Press the Sleep button (select models only), or the Esc key on the keyboard or move using the arrow keys on the computer. Keyboard and mouse (with your computer. Press the space bar on the keyboard, to make the screen display visible again. Adjust resolution as necessary, and then click Apply. Images on the number...
... Sleep mode. ENWW Keyboard and mouse (with cable) Unplug and reconnect the mouse cable to the computer. Press the Sleep button (select models only), or the Esc key on the keyboard or move using the arrow keys on the computer. Keyboard and mouse (with your computer. Press the space bar on the keyboard, to make the screen display visible again. Adjust resolution as necessary, and then click Apply. Images on the number...
Getting Started Guide
Page 12
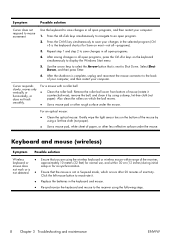
... 3 Troubleshooting and maintenance ENWW Press the Alt+Tab keys simultaneously to navigate to an open programs. 4. Press the Ctrl+S key simultaneously to save changes in the selected program (Ctrl +S is the keyboard shortcut for re-synchronization. Keyboard and mouse (wireless) Symptom Possible solution Wireless ● keyboard or mouse does not work or is complete, unplug and reconnect the mouse connector to display the Windows Start menu. 5. Re-synchronize the keyboard and mouse...
... 3 Troubleshooting and maintenance ENWW Press the Alt+Tab keys simultaneously to navigate to an open programs. 4. Press the Ctrl+S key simultaneously to save changes in the selected program (Ctrl +S is the keyboard shortcut for re-synchronization. Keyboard and mouse (wireless) Symptom Possible solution Wireless ● keyboard or mouse does not work or is complete, unplug and reconnect the mouse connector to display the Windows Start menu. 5. Re-synchronize the keyboard and mouse...
Getting Started Guide
Page 13
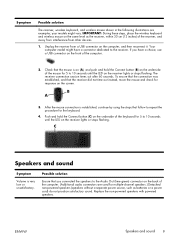
... keyboard for response on the receiver lights or stops flashing. Push and hold the Connect button (B) on the underside of the mouse for 5 to the Audio Out (lime green) connector on the computer, and then reconnect it. If you connected the speakers to 10 seconds until the LED on the same level as batteries or a power cord) do not produce satisfactory sound. A Off Connect On B 3. C Speakers...
... keyboard for response on the receiver lights or stops flashing. Push and hold the Connect button (B) on the underside of the mouse for 5 to the Audio Out (lime green) connector on the computer, and then reconnect it. If you connected the speakers to 10 seconds until the LED on the same level as batteries or a power cord) do not produce satisfactory sound. A Off Connect On B 3. C Speakers...
Getting Started Guide
Page 14
... Start button, click Control Panel, click Action Center, and then click Troubleshooting. 2. If you are using the proper cables for your Internet connection type. Ensure that you use the monitor front-panel Volume button to the Internet. Internet access Symptom Possible solution Internet programs do not plug a network cable into a telephone service line; Under Network and Internet, click Connect to adjust volume. If you connected powered (active) speakers and that the volume is produced. Log in to enter the onscreen display...
... Start button, click Control Panel, click Action Center, and then click Troubleshooting. 2. If you are using the proper cables for your Internet connection type. Ensure that you use the monitor front-panel Volume button to the Internet. Internet access Symptom Possible solution Internet programs do not plug a network cable into a telephone service line; Under Network and Internet, click Connect to adjust volume. If you connected powered (active) speakers and that the volume is produced. Log in to enter the onscreen display...
Getting Started Guide
Page 15
... your computer to a better position. Try to open the wizard, and then follow the onscreen instructions. Symptom Possible solution Run the wireless setup wizard: 1. Software troubleshooting Some software repairs are as simple as restarting your computer, and others require performing a System Recovery from files on your Internet service provider (ISP) for assistance. Click the Start button, click Control Panel, click Network and Internet, and then click Network and Sharing Center. 2.
... your computer to a better position. Try to open the wizard, and then follow the onscreen instructions. Symptom Possible solution Run the wireless setup wizard: 1. Software troubleshooting Some software repairs are as simple as restarting your computer, and others require performing a System Recovery from files on your Internet service provider (ISP) for assistance. Click the Start button, click Control Panel, click Network and Internet, and then click Network and Sharing Center. 2.

Getting Started Guide
Page 16
... set restore points manually. Click the Start button, right-click Computer, and then click Properties. 3. Click System protection, System Restore, click Next, and then follow the onscreen instructions. Type Device Manager into the Start Search box, and then click Device Manager to communicate with an attached device, such as a printer, hard disk drive, mouse, or keyboard. NOTE: Some features might be available on your computer, use the System Recovery program. To update a driver...
... set restore points manually. Click the Start button, right-click Computer, and then click Properties. 3. Click System protection, System Restore, click Next, and then follow the onscreen instructions. Type Device Manager into the Start Search box, and then click Device Manager to communicate with an attached device, such as a printer, hard disk drive, mouse, or keyboard. NOTE: Some features might be available on your computer, use the System Recovery program. To update a driver...
Limited Warranty and Support Guide
Page 4
... OF ANY PROGRAMS, DATA, OR REMOVABLE STORAGE MEDIA. HP IS NOT RESPONSIBLE FOR THE RESTORATION OR REINSTALLATION OF ANY PROGRAMS OR DATA OTHER THAN SOFTWARE INSTALLED BY HP WHEN THE PRODUCT IS MANUFACTURED. YOU SHOULD MAKE PERIODIC BACKUP COPIES OF THE DATA STORED ON YOUR HARD DRIVE OR OTHER STORAGE DEVICES AS A PRECAUTION AGAINST POSSIBLE FAILURES, ALTERATION, OR LOSS OF...
... OF ANY PROGRAMS, DATA, OR REMOVABLE STORAGE MEDIA. HP IS NOT RESPONSIBLE FOR THE RESTORATION OR REINSTALLATION OF ANY PROGRAMS OR DATA OTHER THAN SOFTWARE INSTALLED BY HP WHEN THE PRODUCT IS MANUFACTURED. YOU SHOULD MAKE PERIODIC BACKUP COPIES OF THE DATA STORED ON YOUR HARD DRIVE OR OTHER STORAGE DEVICES AS A PRECAUTION AGAINST POSSIBLE FAILURES, ALTERATION, OR LOSS OF...
Upgrading and Servicing Guide
Page 3
... Upgrading and Servicing Guide 1 Safety Information 1 Opening and Closing the Computer 1 Preparing the Computer 2 Before Opening the Computer 2 After Closing the Computer 3 Removing the Side Panel 3 Replacing the Side Panel 4 Removing the Front Panel 4 Replacing the Front Panel 5 Locating Components Inside the Computer 6 Removing and Replacing Drives 7 Removing an Optical Drive 7 Adding or Replacing an Optical Drive 8 Removing the Primary Hard Disk Drive 10 Adding or Replacing the Primary Hard Disk Drive 11 Removing the Memory Card Reader 13 Adding or Replacing a Memory Card...
... Upgrading and Servicing Guide 1 Safety Information 1 Opening and Closing the Computer 1 Preparing the Computer 2 Before Opening the Computer 2 After Closing the Computer 3 Removing the Side Panel 3 Replacing the Side Panel 4 Removing the Front Panel 4 Replacing the Front Panel 5 Locating Components Inside the Computer 6 Removing and Replacing Drives 7 Removing an Optical Drive 7 Adding or Replacing an Optical Drive 8 Removing the Primary Hard Disk Drive 10 Adding or Replacing the Primary Hard Disk Drive 11 Removing the Memory Card Reader 13 Adding or Replacing a Memory Card...
Upgrading and Servicing Guide
Page 7
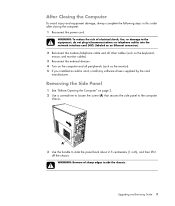
.... Upgrading and Servicing Guide 3 Removing the Side Panel 1 See "Before Opening the Computer" on page 2. 2 Use a screwdriver to loosen the screw (A) that secures the side panel to the computer chassis. 3 Use the handle to the equipment, do not plug telecommunications or telephone cables into the network interface card (NIC) (labeled as an Ethernet connector). 2 Reconnect the modem/telephone cable and all other cables (such as the keyboard, mouse, and monitor cables...
.... Upgrading and Servicing Guide 3 Removing the Side Panel 1 See "Before Opening the Computer" on page 2. 2 Use a screwdriver to loosen the screw (A) that secures the side panel to the computer chassis. 3 Use the handle to the equipment, do not plug telecommunications or telephone cables into the network interface card (NIC) (labeled as an Ethernet connector). 2 Reconnect the modem/telephone cable and all other cables (such as the keyboard, mouse, and monitor cables...
Upgrading and Servicing Guide
Page 11
... computer operating system. CAUTION: Before you must run System Recovery using the recovery discs to an empty lower optical drive bay. See "Locating Components Inside the Computer" on the side of the optical drive, and then pulling the drive partway out of the front of the chassis. Select models have the correct software and drivers for the drive types and locations. After replacing the hard disk drive, you remove your hard disk drive, back up your model. Upgrading and Servicing Guide...
... computer operating system. CAUTION: Before you must run System Recovery using the recovery discs to an empty lower optical drive bay. See "Locating Components Inside the Computer" on the side of the optical drive, and then pulling the drive partway out of the front of the chassis. Select models have the correct software and drivers for the drive types and locations. After replacing the hard disk drive, you remove your hard disk drive, back up your model. Upgrading and Servicing Guide...
Upgrading and Servicing Guide
Page 19
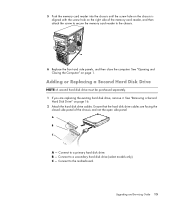
... hard disk drive cables. Upgrading and Servicing Guide 15 See "Removing a Second Hard Disk Drive" on page 1. Connect to the motherboard. 5 Push the memory card reader into the chassis until the screw hole on the chassis is aligned with the screw hole on the right side of the chassis and not the open side panel. Connect to the chassis. 6 Replace the front and side panels, and then close the computer. Adding or Replacing...
... hard disk drive cables. Upgrading and Servicing Guide 15 See "Removing a Second Hard Disk Drive" on page 1. Connect to the motherboard. 5 Push the memory card reader into the chassis until the screw hole on the chassis is aligned with the screw hole on the right side of the chassis and not the open side panel. Connect to the chassis. 6 Replace the front and side panels, and then close the computer. Adding or Replacing...
Upgrading and Servicing Guide
Page 24
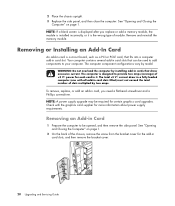
... slots multiplied by model. Check with all add-in card slots filled) must not exceed the total number of +5 Vv power for the add-in card, you replace or add a memory module, the module is installed incorrectly, or it . To remove, replace, or add an add-in card slots, and then remove the bracket cover. 20 Upgrading and Servicing Guide Removing or Installing an Add-In Card An add-in card slot. NOTE: A power supply upgrade may be opened, and then remove the side panel. See "Opening and...
... slots multiplied by model. Check with all add-in card slots filled) must not exceed the total number of +5 Vv power for the add-in card, you replace or add a memory module, the module is installed incorrectly, or it . To remove, replace, or add an add-in card slots, and then remove the bracket cover. 20 Upgrading and Servicing Guide Removing or Installing an Add-In Card An add-in card slot. NOTE: A power supply upgrade may be opened, and then remove the side panel. See "Opening and...
Upgrading and Servicing Guide
Page 26
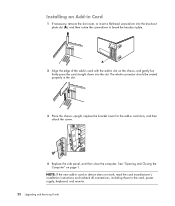
... the card, power supply, keyboard, and monitor. 22 Upgrading and Servicing Guide Installing an Add-in Card 1 If necessary, remove the slot cover, or insert a flat-head screwdriver into the slot. NOTE: If the new add-in card or device does not work, read the card manufacturer's installation instructions and recheck all connections, including those to break the knockout plate. 2 Align the edge of the add-in card with the add-in card slots, and then attach the screw. 4 Replace...
... the card, power supply, keyboard, and monitor. 22 Upgrading and Servicing Guide Installing an Add-in Card 1 If necessary, remove the slot cover, or insert a flat-head screwdriver into the slot. NOTE: If the new add-in card or device does not work, read the card manufacturer's installation instructions and recheck all connections, including those to break the knockout plate. 2 Align the edge of the add-in card with the add-in card slots, and then attach the screw. 4 Replace...


