
Wireless Setup Guide
Page 5
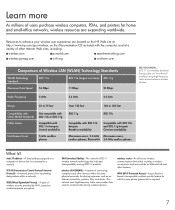
... network You don't go to sleep at speeds up Internet access. WEP and WPA are security encryption protocols. Refer to the Internet. WEP and WPA are security encryption protocols. ■ Change the default SSID (your wireless network. DID YOU KNOW... • Windows XP and some types of the following security measures: ■ Enable encryption on each computer in turn connects to the router instructions. ■ Use...
... network You don't go to sleep at speeds up Internet access. WEP and WPA are security encryption protocols. Refer to the Internet. WEP and WPA are security encryption protocols. ■ Change the default SSID (your wireless network. DID YOU KNOW... • Windows XP and some types of the following security measures: ■ Enable encryption on each computer in turn connects to the router instructions. ■ Use...
Wireless Setup Guide
Page 7
... IP address-A fixed address assigned to a computer or device that specifies an "over-the-air" interface using high-frequency radio waves between wireless devices. wireless router-An all-in-one wireless communication device that indicates interoperability among wireless devices. WPA (Wi-Fi Protected Access)-A specificationbased, interoperable wireless security feature for sharing resources such as an Internet connection, printers, files, and drives. Resources to a network. The network uses high-frequency...
... IP address-A fixed address assigned to a computer or device that specifies an "over-the-air" interface using high-frequency radio waves between wireless devices. wireless router-An all-in-one wireless communication device that indicates interoperability among wireless devices. WPA (Wi-Fi Protected Access)-A specificationbased, interoperable wireless security feature for sharing resources such as an Internet connection, printers, files, and drives. Resources to a network. The network uses high-frequency...
Security - Windows Vista
Page 8
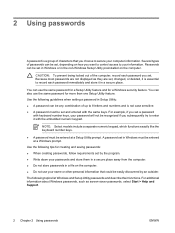
... like the keyboard number keys. ● A password must be set by an outsider. The following guidelines when setting a password in Setup Utility: ● A password can be set , changed, or deleted, it is not case sensitive. ● A password must be easily discovered by the program. ● Write down your information. Because most passwords are not displayed as screen-saver passwords, select Start > Help and Support. 2 Chapter 2 Using passwords ENWW Several types of up...
... like the keyboard number keys. ● A password must be set by an outsider. The following guidelines when setting a password in Setup Utility: ● A password can be set , changed, or deleted, it is not case sensitive. ● A password must be easily discovered by the program. ● Write down your information. Because most passwords are not displayed as screen-saver passwords, select Start > Help and Support. 2 Chapter 2 Using passwords ENWW Several types of up...
Setup Utility - Windows Vista and XP
Page 8
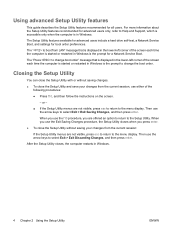
... the screen each time the computer is started or restarted in Windows is in Windows. 4 Chapter 2 Using the Setup Utility ENWW The Setup Utility features available for advanced users include a hard drive self-test, a Network Service Boot, and settings for all users. Closing the Setup Utility You can close the Setup Utility and save your changes from the current session: If the Setup Utility menus are not visible, press esc to return to change the boot order...
... the screen each time the computer is started or restarted in Windows is in Windows. 4 Chapter 2 Using the Setup Utility ENWW The Setup Utility features available for advanced users include a hard drive self-test, a Network Service Boot, and settings for all users. Closing the Setup Utility You can close the Setup Utility and save your changes from the current session: If the Setup Utility menus are not visible, press esc to return to change the boot order...
Software Update, Backup, and Recovery - Windows Vista
Page 5
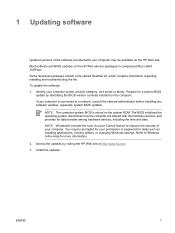
... tasks such as installing applications, running utilities, or changing Windows settings. ENWW 1 If your computer may be available on the computer. NOTE Windows® includes the User Account Control feature to a network, consult the network administrator before installing any software updates, especially system BIOS updates. To update the software: 1. Most software and BIOS updates on the system ROM. Install the updates. You may be prompted for your computer model, product category, and series or family.
... tasks such as installing applications, running utilities, or changing Windows settings. ENWW 1 If your computer may be available on the computer. NOTE Windows® includes the User Account Control feature to a network, consult the network administrator before installing any software updates, especially system BIOS updates. To update the software: 1. Most software and BIOS updates on the system ROM. Install the updates. You may be prompted for your computer model, product category, and series or family.
Software Update, Backup, and Recovery - Windows Vista
Page 6
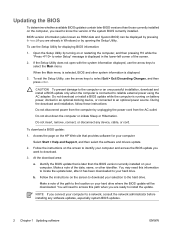
... the Setup Utility, use the Setup Utility for your computer: Select Start > Help and Support, and then select the software and drivers update. 2. Updating the BIOS To determine whether available BIOS updates contain later BIOS versions than the BIOS version currently installed on your hard drive where the BIOS update will need to access this information to locate the update later, after it has been downloaded to your computer to a network, consult the network administrator before installing any device, cable, or...
... the Setup Utility, use the Setup Utility for your computer: Select Start > Help and Support, and then select the software and drivers update. 2. Updating the BIOS To determine whether available BIOS updates contain later BIOS versions than the BIOS version currently installed on your hard drive where the BIOS update will need to access this information to locate the update later, after it has been downloaded to your computer to a network, consult the network administrator before installing any device, cable, or...

Software Update, Backup, and Recovery - Windows Vista
Page 13
a. Recovery Manager opens. When the installation wizard opens, follow the installation instructions on -screen instructions. b. Click either Software program re-installation or Hardware driver re-installation, and then click Next. Follow the on the screen. 3. Reinstalling programs from your computer, the reinstallation process reinstalls the program or utility to the factory image but cannot restore your personal settings. ● In all cases, if a program has been deleted from discs 1. NOTE Before...
a. Recovery Manager opens. When the installation wizard opens, follow the installation instructions on -screen instructions. b. Click either Software program re-installation or Hardware driver re-installation, and then click Next. Follow the on the screen. 3. Reinstalling programs from your computer, the reinstallation process reinstalls the program or utility to the factory image but cannot restore your personal settings. ● In all cases, if a program has been deleted from discs 1. NOTE Before...

Touchpad and Keyboard - Windows Vista
Page 15
... is connected to the computer or to an optional docking device or expansion product. When num lock on an external keypad is turned off at the factory.) For example: ● When num lock is on, most keypad keys function like the keys on an external keypad. NOTE: The embedded numeric keypad will not function while an external keyboard or numeric keypad is turned off , most keypad keys type numbers...
... is connected to the computer or to an optional docking device or expansion product. When num lock on an external keypad is turned off at the factory.) For example: ● When num lock is on, most keypad keys function like the keys on an external keypad. NOTE: The embedded numeric keypad will not function while an external keyboard or numeric keypad is turned off , most keypad keys type numbers...
Compaq Presario V3500 Notebook PC - Maintenance and Service Guide
Page 16
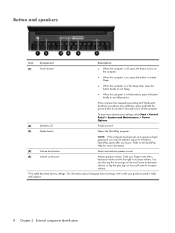
... hold the power button for more about changing factory settings, refer to the user guides located in Hibernation, press the button briefly to require a logon password, you log on the scroll zone to increase volume. You can also tap the minus sign on the scroll zone to decrease volume, or tap the plus sign on . For information about power settings, select Start > Control Panel > System and Maintenance > Power Options. (2) Speakers (2) Produce sound. (3) Media button Opens the...
... hold the power button for more about changing factory settings, refer to the user guides located in Hibernation, press the button briefly to require a logon password, you log on the scroll zone to increase volume. You can also tap the minus sign on the scroll zone to decrease volume, or tap the plus sign on . For information about power settings, select Start > Control Panel > System and Maintenance > Power Options. (2) Speakers (2) Produce sound. (3) Media button Opens the...

Compaq Presario V3500 Notebook PC - Maintenance and Service Guide
Page 59
... unplugging the AC adapter from the computer. 4. Component replacement procedures 51 Virgin Islands, and the United 441090-001 States For use in Canada, the Cayman Islands, Guam, Puerto Rico, the U.S. Kitts & Nevis, St. Disconnect all external devices connected to the computer. 3. Remove the battery (see Hard drive on page 46). 5. Shut down through the operating system. 2. Description Spare part number Emirates, the United...
... unplugging the AC adapter from the computer. 4. Component replacement procedures 51 Virgin Islands, and the United 441090-001 States For use in Canada, the Cayman Islands, Guam, Puerto Rico, the U.S. Kitts & Nevis, St. Disconnect all external devices connected to the computer. 3. Remove the battery (see Hard drive on page 46). 5. Shut down through the operating system. 2. Description Spare part number Emirates, the United...

Compaq Presario V3500 Notebook PC - Maintenance and Service Guide
Page 105
... return to change boot order" message that is displayed in the lower-left corner of the Setup Utility menu items listed in Windows. The Setup Utility features available for advanced users include a hard drive self-test, a Network Service Boot, and settings for advanced users only, refer to the menu display. When you use either of the following procedures: ◦ Press f10, and then follow the instructions on the screen. -or- ◦ If the Setup Utility menus...
... return to change boot order" message that is displayed in the lower-left corner of the Setup Utility menu items listed in Windows. The Setup Utility features available for advanced users include a hard drive self-test, a Network Service Boot, and settings for advanced users only, refer to the menu display. When you use either of the following procedures: ◦ Press f10, and then follow the instructions on the screen. -or- ◦ If the Setup Utility menus...

Compaq Presario V3500 Notebook PC - Maintenance and Service Guide
Page 142
... installation instructions on -screen instructions. Select Start > Control Panel > Programs > Uninstall a program. Click Advanced Options. e. b. Click either Software program re-installation or Hardware driver re-installation, and then click Next. Insert the disc into the optical drive. 2. Right-click the program or driver you to reinstall it. Reinstalling programs from your computer, the reinstallation process reinstalls the program or utility to the factory image but cannot restore your personal settings. Recovery Manager replaces...
... installation instructions on -screen instructions. Select Start > Control Panel > Programs > Uninstall a program. Click Advanced Options. e. b. Click either Software program re-installation or Hardware driver re-installation, and then click Next. Insert the disc into the optical drive. 2. Right-click the program or driver you to reinstall it. Reinstalling programs from your computer, the reinstallation process reinstalls the program or utility to the factory image but cannot restore your personal settings. Recovery Manager replaces...

Compaq Presario V3500 Notebook PC - Maintenance and Service Guide
Page 157
... Bluetooth module cable, illustrated 28 boot options 98 boot order 98 bottom components 16 button components 8 button sound 98 buttons media 8 power 8 volume mute 8 C Cable Kit contents 28 spare part number 24, 28, 33 cables, service considerations 39 caps lock light 10 carrying case, spare part number 30, 33 changing the Setup Utility language 95 chipset, product description 2 closing the Setup Utility 97 CMOS clearing 43 components bottom 16 button 8 display 7 front 7, 12 key 9 left-side 13 lights 10 rear 14 right-side 15 TouchPad...
... Bluetooth module cable, illustrated 28 boot options 98 boot order 98 bottom components 16 button components 8 button sound 98 buttons media 8 power 8 volume mute 8 C Cable Kit contents 28 spare part number 24, 28, 33 cables, service considerations 39 caps lock light 10 carrying case, spare part number 30, 33 changing the Setup Utility language 95 chipset, product description 2 closing the Setup Utility 97 CMOS clearing 43 components bottom 16 button 8 display 7 front 7, 12 key 9 left-side 13 lights 10 rear 14 right-side 15 TouchPad...

Compaq Presario V3500 Notebook PC - Maintenance and Service Guide
Page 158
... 27 external media cards, product description 5 external monitor port location 13 pin assignments 138 F fan/heat sink assembly removal 90 spare part number 21, 35, 90 fan/heat sink assembly mounting bracket installation 92 spare part number 92 fan/heat sink mounting bracket spare part number 21, 33 feet locations 45 spare part number 21, 32, 45 fingerprint reader 95 fn key 9 front components 7, 12 function keys 9 G graphics, product description 2 grounding equipment and methods 42 H hard drive...
... 27 external media cards, product description 5 external monitor port location 13 pin assignments 138 F fan/heat sink assembly removal 90 spare part number 21, 35, 90 fan/heat sink assembly mounting bracket installation 92 spare part number 92 fan/heat sink mounting bracket spare part number 21, 33 feet locations 45 spare part number 21, 32, 45 fingerprint reader 95 fn key 9 front components 7, 12 function keys 9 G graphics, product description 2 grounding equipment and methods 42 H hard drive...

Compaq Presario V3500 Notebook PC - Maintenance and Service Guide
Page 159
... mouse, spare part numbers 30, 33 N navigating in the Setup Utility 96 network jack location 13 pin assignments 139 num lock light 10 O operating system, product description 6 optical drive location 15 precautions 39 product description 4 removal 57 spare part numbers 24, 29, 57 specifications 102 P packing guidelines 41 password clearing 43 passwords 98 plastic parts 38 pointing device components 11 product description 5 ports 1394 13 external monitor port 13 monitor port 13 product description 5 Universal Serial Bus (USB) 13, 15 power button 8 power button board cable...
... mouse, spare part numbers 30, 33 N navigating in the Setup Utility 96 network jack location 13 pin assignments 139 num lock light 10 O operating system, product description 6 optical drive location 15 precautions 39 product description 4 removal 57 spare part numbers 24, 29, 57 specifications 102 P packing guidelines 41 password clearing 43 passwords 98 plastic parts 38 pointing device components 11 product description 5 ports 1394 13 external monitor port 13 monitor port 13 product description 5 Universal Serial Bus (USB) 13, 15 power button 8 power button board cable...

Compaq Presario V3500 Notebook PC - Maintenance and Service Guide
Page 160
... cards 5 graphics 2 hard drives 3 keyboard 5 memory module 3 microphone 4 modem module 4 operating system 6 optical drives 4 pointing devices 5 ports 5 power requirements 5 processors 1 product name 1 security 6 serviceability 6 wireless 4 product name 1 R rear components 14 recovery discs 133 recovery partition, deleting 136 recovery, system 135 remote control, spare part numbers 30, 32, 33 removal/replacement preliminaries 38 procedures 44 restore points 132 RF input adapter cable without ferrite 32 RF input adapter cable, spare part number 30 right-side components 15 RJ-11 jack location...
... cards 5 graphics 2 hard drives 3 keyboard 5 memory module 3 microphone 4 modem module 4 operating system 6 optical drives 4 pointing devices 5 ports 5 power requirements 5 processors 1 product name 1 security 6 serviceability 6 wireless 4 product name 1 R rear components 14 recovery discs 133 recovery partition, deleting 136 recovery, system 135 remote control, spare part numbers 30, 32, 33 removal/replacement preliminaries 38 procedures 44 restore points 132 RF input adapter cable without ferrite 32 RF input adapter cable, spare part number 30 right-side components 15 RJ-11 jack location...

Power Management - Windows Vista
Page 7
... be changed using Power Options in Hibernation. CAUTION: To prevent possible audio and video degradation, loss of audio or video playback functionality, or loss of information, do not initiate Sleep or Hibernation while reading from or writing to a disc or an external media card. Power settings and timeouts can exit Sleep in the Sleep state, the computer initiates Hibernation. Your work is closed, open the display. ● Press a key on the keyboard or button...
... be changed using Power Options in Hibernation. CAUTION: To prevent possible audio and video degradation, loss of audio or video playback functionality, or loss of information, do not initiate Sleep or Hibernation while reading from or writing to a disc or an external media card. Power settings and timeouts can exit Sleep in the Sleep state, the computer initiates Hibernation. Your work is closed, open the display. ● Press a key on the keyboard or button...

Power Management - Windows Vista
Page 19
... sleep settings listed in use, but it charges faster when the computer is off . Step 2: Disable Hibernation and Sleep 1. Click Change advanced power settings. 6. Change the On battery setting to an AC adapter, optional power adapter, optional expansion product, or optional docking device, and then plug the adapter or device into the computer. 2. Click Save changes. Insert the battery into external power. Connect the computer to Never. 9. To fully charge the battery: 1. The battery light on the computer turns on the computer turns...
... sleep settings listed in use, but it charges faster when the computer is off . Step 2: Disable Hibernation and Sleep 1. Click Change advanced power settings. 6. Change the On battery setting to an AC adapter, optional power adapter, optional expansion product, or optional docking device, and then plug the adapter or device into the computer. 2. Click Save changes. Insert the battery into external power. Connect the computer to Never. 9. To fully charge the battery: 1. The battery light on the computer turns on the computer turns...

Power Management - Windows Vista
Page 21
... power settings. 5. Click OK. 8. Step 4: Fully recharge the battery To recharge the battery: 1. Click Save changes. When the battery is fully recharged. You can use the computer while the battery is recharging, but the battery will charge faster if the computer is fully charged and the battery light has turned off . 2. If the computer is off, turn it on the computer turns off. Select Start > Control Panel > System and Maintenance > Power Options...
... power settings. 5. Click OK. 8. Step 4: Fully recharge the battery To recharge the battery: 1. Click Save changes. When the battery is fully recharged. You can use the computer while the battery is recharging, but the battery will charge faster if the computer is fully charged and the battery light has turned off . 2. If the computer is off, turn it on the computer turns off. Select Start > Control Panel > System and Maintenance > Power Options...

Power Management - Windows Vista
Page 27
... all open programs, including the operating system, and then turns off the display and computer. Click Shut Down. Click Start, and then click the arrow next to use the preceding shutdown procedures, try the following conditions: ● When you need to replace the battery or access components inside the computer ● When you are connecting an external hardware device that does not connect to a USB port ●...
... all open programs, including the operating system, and then turns off the display and computer. Click Shut Down. Click Start, and then click the arrow next to use the preceding shutdown procedures, try the following conditions: ● When you need to replace the battery or access components inside the computer ● When you are connecting an external hardware device that does not connect to a USB port ●...


