
Wireless Setup Guide
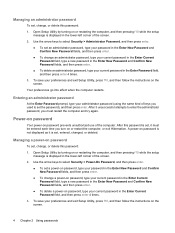
Page 3
... the pieces of the wireless button and light varies by opening your router manufacturer for technical assistance. Ensure that the computer is connected to AC power during this information in the "My Network Settings" table on /off button.
... the pieces of the wireless button and light varies by opening your router manufacturer for technical assistance. Ensure that the computer is connected to AC power during this information in the "My Network Settings" table on /off button.
Backup and Recovery - Windows Vista
Page 8
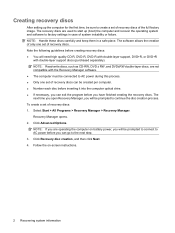
Note the following guidelines before you have finished creating the recovery discs. Recovery Manager opens. 2. Follow the on battery power, you will be created per computer. ● Number each disc before inserting it into the computer optical drive. ● If necessary, you can exit... the program before you can be prompted to connect to AC power before creating recovery discs: ● You will be connected to AC power during this process. ● Only one set of recovery discs: 1. The recovery discs are used to start up ...
Note the following guidelines before you have finished creating the recovery discs. Recovery Manager opens. 2. Follow the on battery power, you will be created per computer. ● Number each disc before inserting it into the computer optical drive. ● If necessary, you can exit... the program before you can be prompted to connect to AC power before creating recovery discs: ● You will be connected to AC power during this process. ● Only one set of recovery discs: 1. The recovery discs are used to start up ...
Drives - Windows Vista
Page 8
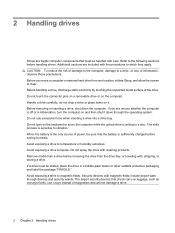
... Sleep, and allow the screen to which they apply. CAUTION: To reduce the risk of damage to the computer, damage to a drive, or loss of power, be sure that the battery is sensitive to magnetic fields. Avoid exposing a drive to vibration.
... Sleep, and allow the screen to which they apply. CAUTION: To reduce the risk of damage to the computer, damage to a drive, or loss of power, be sure that the battery is sensitive to magnetic fields. Avoid exposing a drive to vibration.

Drives - Windows Vista
Page 14
...information loss or an unresponsive system: Shut down the computer before removing the hard drive from the computer (2). 8 Chapter 5 Replacing the hard drive Unplug the power cord from the computer. 7. Remove the battery from the AC outlet. 5. With the hard drive bay toward you are not sure whether the computer is...hard drive while the computer is off or in Hibernation. Disconnect all external devices connected to the computer. 4. Then shut down on by pressing the power button. If you , loosen the 2 hard drive cover screws (1). 8. Shut down the computer and close the display. 3.
...information loss or an unresponsive system: Shut down the computer before removing the hard drive from the computer (2). 8 Chapter 5 Replacing the hard drive Unplug the power cord from the computer. 7. Remove the battery from the AC outlet. 5. With the hard drive bay toward you are not sure whether the computer is...hard drive while the computer is off or in Hibernation. Disconnect all external devices connected to the computer. 4. Then shut down on by pressing the power button. If you , loosen the 2 hard drive cover screws (1). 8. Shut down the computer and close the display. 3.
Memory Modules - Windows Vista
Page 7
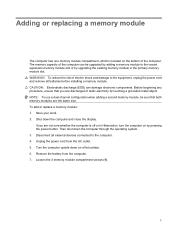
...computer on by upgrading the existing memory module in the primary memory module slot. Disconnect all external devices connected to the equipment, unplug the power cord and remove all batteries before installing a memory module. Turn the computer upside down on the bottom of the computer can damage electronic ...configuration when adding a second memory module, be upgraded by adding a memory module to the vacant expansion memory module slot or by pressing the power button. Unplug the power cord from the computer. 7. Remove the battery from the AC outlet. 5. WARNING!
...computer on by upgrading the existing memory module in the primary memory module slot. Disconnect all external devices connected to the equipment, unplug the power cord and remove all batteries before installing a memory module. Turn the computer upside down on the bottom of the computer can damage electronic ...configuration when adding a second memory module, be upgraded by adding a memory module to the vacant expansion memory module slot or by pressing the power button. Unplug the power cord from the computer. 7. Remove the battery from the AC outlet. 5. WARNING!
Memory Modules - Windows Vista
Page 10
15. Reconnect external power and external devices. 16. Turn on the computer. 4 Adding or replacing a memory module
15. Reconnect external power and external devices. 16. Turn on the computer. 4 Adding or replacing a memory module
Notebook Tour - Windows Vista
Page 10
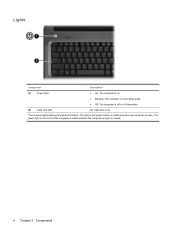
The power light on the front of the computer is visible whether the computer is open or closed. 4 Chapter 2 Components The light on . *The 2 power lights display the same information. Lights Component Description (1) Power light* ● On: The computer is on. ● Blinking: The computer is in the Sleep state. ● Off: The computer is off or in Hibernation. (2) Caps lock light On: Caps lock is on the power button is visible only when the computer is open .
The power light on the front of the computer is visible whether the computer is open or closed. 4 Chapter 2 Components The light on . *The 2 power lights display the same information. Lights Component Description (1) Power light* ● On: The computer is on. ● Blinking: The computer is in the Sleep state. ● Off: The computer is off or in Hibernation. (2) Caps lock light On: Caps lock is on the power button is visible only when the computer is open .
Notebook Tour - Windows Vista
Page 11
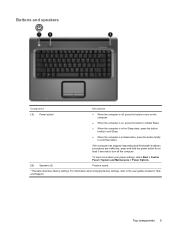
... to turn off the computer. If the computer has stopped responding and Windows® shutdown procedures are ineffective, press and hold the power button for at least 5 seconds to turn on the computer. ● When the computer is on, press the button to initiate... When the computer is in the Sleep state, press the button briefly to exit Hibernation. For information about your power settings, select Start > Control Panel > System and Maintenance > Power Options. (2) Speakers (2) Produce sound. *This table describes factory settings. To learn more about changing factory settings...
... to turn off the computer. If the computer has stopped responding and Windows® shutdown procedures are ineffective, press and hold the power button for at least 5 seconds to turn on the computer. ● When the computer is on, press the button to initiate... When the computer is in the Sleep state, press the button briefly to exit Hibernation. For information about your power settings, select Start > Control Panel > System and Maintenance > Power Options. (2) Speakers (2) Produce sound. *This table describes factory settings. To learn more about changing factory settings...
Notebook Tour - Windows Vista
Page 13
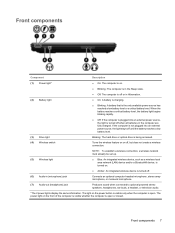
... When the battery reaches a critical battery level, the battery light begins blinking rapidly. ● Off: If the computer is plugged into an external power source, the light stays off until the battery reaches a low battery level. (3) Drive light Blinking: The hard drive or optical drive is being ...; Blue: An integrated wireless device, such as a wireless local area network (LAN) device and/or a Bluetooth® device, is turned on the power button is visible only when the computer is open or closed. The light on . ● Amber: An integrated wireless device is turned off. (6) ...
... When the battery reaches a critical battery level, the battery light begins blinking rapidly. ● Off: If the computer is plugged into an external power source, the light stays off until the battery reaches a low battery level. (3) Drive light Blinking: The hard drive or optical drive is being ...; Blue: An integrated wireless device, such as a wireless local area network (LAN) device and/or a Bluetooth® device, is turned on the power button is visible only when the computer is open or closed. The light on . ● Amber: An integrated wireless device is turned off. (6) ...
Notebook Tour - Windows Vista
Page 15
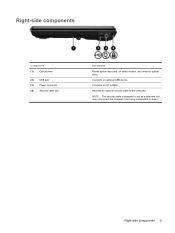
NOTE: The security cable is designed to the computer. Attaches an optional security cable to act as a deterrent, but may not prevent the computer from being mishandled or stolen. Connects an AC adapter. Connects an optional USB device. Right-side components 9 Right-side components Component (1) Optical drive (2) USB port (3) Power connector (4) Security cable slot Description Reads optical discs and, on select models, also writes to optical discs.
NOTE: The security cable is designed to the computer. Attaches an optional security cable to act as a deterrent, but may not prevent the computer from being mishandled or stolen. Connects an AC adapter. Connects an optional USB device. Right-side components 9 Right-side components Component (1) Optical drive (2) USB port (3) Power connector (4) Security cable slot Description Reads optical discs and, on select models, also writes to optical discs.
Notebook Tour - Windows Vista
Page 20
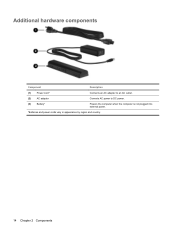
Additional hardware components Component Description (1) Power cord* Connects an AC adapter to an AC outlet. (2) AC adapter Converts AC power to DC power. (3) Battery* Powers the computer when the computer is not plugged into external power. *Batteries and power cords vary in appearance by region and country. 14 Chapter 2 Components
Additional hardware components Component Description (1) Power cord* Connects an AC adapter to an AC outlet. (2) AC adapter Converts AC power to DC power. (3) Battery* Powers the computer when the computer is not plugged into external power. *Batteries and power cords vary in appearance by region and country. 14 Chapter 2 Components
Notebook Tour - Windows Vista
Page 22
... light, identifying 7 battery release latch, identifying 11 battery, identifying 14 bays battery 11, 15 hard drive 11 Bluetooth label 15 buttons power 5 TouchPad 3 TouchPad on/off 3 C camera, identifying 12 caps lock light, identifying 4 Certificate of Authenticity label 15 compartments memory module... 11 components additional hardware 14 bottom 11 display 12 front 7 left-side 10 rear 8 right-side 9 top 3 connector, power 9 cord, power 14 D Digital Media Slot light, identifying 10 Digital Media Slot, identifying 10 display switch, identifying 12 drive light, identifying 7 E esc...
... light, identifying 7 battery release latch, identifying 11 battery, identifying 14 bays battery 11, 15 hard drive 11 Bluetooth label 15 buttons power 5 TouchPad 3 TouchPad on/off 3 C camera, identifying 12 caps lock light, identifying 4 Certificate of Authenticity label 15 compartments memory module... 11 components additional hardware 14 bottom 11 display 12 front 7 left-side 10 rear 8 right-side 9 top 3 connector, power 9 cord, power 14 D Digital Media Slot light, identifying 10 Digital Media Slot, identifying 10 display switch, identifying 12 drive light, identifying 7 E esc...
Notebook Tour - Windows Vista
Page 23
... Product Key 15 optical drive, identifying 9 U USB ports 10 USB ports, identifying 9 V vents, identifying 8, 11 P ports external monitor 10 USB 9, 10 power button, identifying 5 power connector, identifying 9 power cord, identifying 14 power lights, identifying 4, 7 Product Key 15 product name and number, computer 15 R regulatory information modem approval label 15 regulatory label 15 wireless certification...
... Product Key 15 optical drive, identifying 9 U USB ports 10 USB ports, identifying 9 V vents, identifying 8, 11 P ports external monitor 10 USB 9, 10 power button, identifying 5 power connector, identifying 9 power cord, identifying 14 power lights, identifying 4, 7 Product Key 15 product name and number, computer 15 R regulatory information modem approval label 15 regulatory label 15 wireless certification...
Pointing Devices and Keyboard - Windows Vista
Page 12
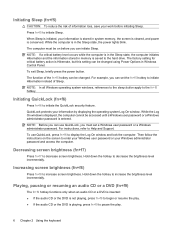
... the computer is in the Sleep state, the computer initiates Hibernation and the information stored in system memory, the screen is cleared, and power is saved to increase the brightness level incrementally. For example, you can set a Windows user password or a Windows administrator password. When ... play . 6 Chapter 2 Using the keyboard While the Log On window is displayed, the computer cannot be changed using Power Options in the Sleep state, the power lights blink. Decreasing screen brightness (fn+f7) Press fn+f7 to increase screen brightness. To exit Sleep, briefly press ...
... the computer is in the Sleep state, the computer initiates Hibernation and the information stored in system memory, the screen is cleared, and power is saved to increase the brightness level incrementally. For example, you can set a Windows user password or a Windows administrator password. When ... play . 6 Chapter 2 Using the keyboard While the Log On window is displayed, the computer cannot be changed using Power Options in the Sleep state, the power lights blink. Decreasing screen brightness (fn+f7) Press fn+f7 to increase screen brightness. To exit Sleep, briefly press ...

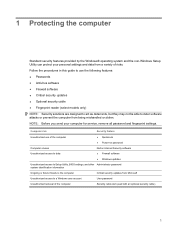
Security - Windows Vista
Page 5
... computer 2 Using passwords Setting passwords in Windows ...3 Setting passwords in Setup Utility ...3 Administrator password ...3 Managing an administrator password 4 Entering an administrator password 4 Power-on password ...4 Managing a power-on password 4 Entering a power-on password 5 3 Using antivirus software 4 Using firewall software 5 Installing critical security updates 6 Installing an optional security cable 7 Using the fingerprint reader (select...
... computer 2 Using passwords Setting passwords in Windows ...3 Setting passwords in Setup Utility ...3 Administrator password ...3 Managing an administrator password 4 Entering an administrator password 4 Power-on password ...4 Managing a power-on password 4 Entering a power-on password 5 3 Using antivirus software 4 Using firewall software 5 Installing critical security updates 6 Installing an optional security cable 7 Using the fingerprint reader (select...
Security - Windows Vista
Page 7
... protect your computer for service, remove all password and fingerprint settings. Follow the procedures in this guide to use of the computer ● QuickLock ● Power-on password Computer viruses Unauthorized access to data Norton Internet Security software ● Firewall software ● Windows updates Unauthorized access to Setup Utility, BIOS settings...
... protect your computer for service, remove all password and fingerprint settings. Follow the procedures in this guide to use of the computer ● QuickLock ● Power-on password Computer viruses Unauthorized access to data Norton Internet Security software ● Firewall software ● Windows updates Unauthorized access to Setup Utility, BIOS settings...

Security - Windows Vista
Page 9
... also protects access to the computer contents. ● After this password is not interchangeable with an administrator password set , you access the computer. Power-on password* CAUTION: If you forget your password and store it must be entered each of these steps: 1. Protects the computer by requiring ...a Windows user account. NOTE: This password cannot be entered each time you access Setup Utility. Initiate QuickLock by entering your power-on password, you set , entered, changed, or deleted. CAUTION: If you forget your Windows user or administrator password.
... also protects access to the computer contents. ● After this password is not interchangeable with an administrator password set , you access the computer. Power-on password* CAUTION: If you forget your password and store it must be entered each of these steps: 1. Protects the computer by requiring ...a Windows user account. NOTE: This password cannot be entered each time you access Setup Utility. Initiate QuickLock by entering your power-on password, you set , entered, changed, or deleted. CAUTION: If you forget your Windows user or administrator password.
Security - Windows Vista
Page 10
...when the computer restarts. Managing an administrator password To set, change , or delete this password: 1. After this password: 1. A power-on the screen. Managing a power-on password To set, change , or delete this password is displayed in the lower-left corner of keys you used to enter the...), and then press enter. After 3 unsuccessful attempts to set , it is displayed in the lower-left corner of the computer. Power-on password Your power-on password, type your current password in the Enter Password field, and then press enter 4 times. 3. Use the arrow keys ...
...when the computer restarts. Managing an administrator password To set, change , or delete this password: 1. After this password: 1. A power-on the screen. Managing a power-on password To set, change , or delete this password is displayed in the lower-left corner of keys you used to enter the...), and then press enter. After 3 unsuccessful attempts to set , it is displayed in the lower-left corner of the computer. Power-on password Your power-on password, type your current password in the Enter Password field, and then press enter 4 times. 3. Use the arrow keys ...
Security - Windows Vista
Page 11
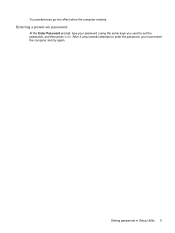
After 3 unsuccessful attempts to set the password), and then press enter. Setting passwords in Setup Utility 5 Your preferences go into effect when the computer restarts. Entering a power-on password At the Enter Password prompt, type your password (using the same keys you used to enter the password, you must restart the computer and try again.
After 3 unsuccessful attempts to set the password), and then press enter. Setting passwords in Setup Utility 5 Your preferences go into effect when the computer restarts. Entering a power-on password At the Enter Password prompt, type your password (using the same keys you used to enter the password, you must restart the computer and try again.
Security - Windows Vista
Page 20
... password 5 entering an administrator password 4 F fingerprint reader 10 fingerprint reader location 11 firewall software 7 M managing a power-on password 4 managing an administrator password 4 P passwords administrator 3 power-on 4 set in Setup Utility 3 set in Windows 3 power-on password entering 5 managing 4 Q QuickLock 3 R registering fingerprints 12 S security features 1 passwords 2 security cable 9 Setup Utility passwords set in 3 software...
... password 5 entering an administrator password 4 F fingerprint reader 10 fingerprint reader location 11 firewall software 7 M managing a power-on password 4 managing an administrator password 4 P passwords administrator 3 power-on 4 set in Setup Utility 3 set in Windows 3 power-on password entering 5 managing 4 Q QuickLock 3 R registering fingerprints 12 S security features 1 passwords 2 security cable 9 Setup Utility passwords set in 3 software...


