
Drives - Windows 7
Page 14
...5. Turn the computer upside down the computer through the operating system. Remove the 3 screws that secure the hard drive to the computer. 4. Unplug the power cord from the computer. 7. Lift the hard drive cover away from the hard drive bay. To remove the hard drive: 1. Then shut down on , ...in the Sleep state, or in Hibernation, turn the computer on by pressing the power button. Do not remove the hard drive while the computer is off or in Hibernation. Disconnect all external devices connected to the computer (1). 10...
...5. Turn the computer upside down the computer through the operating system. Remove the 3 screws that secure the hard drive to the computer. 4. Unplug the power cord from the computer. 7. Lift the hard drive cover away from the hard drive bay. To remove the hard drive: 1. Then shut down on , ...in the Sleep state, or in Hibernation, turn the computer on by pressing the power button. Do not remove the hard drive while the computer is off or in Hibernation. Disconnect all external devices connected to the computer (1). 10...
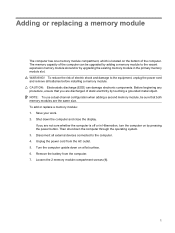
Memory Modules - Windows Vista and Windows 7
Page 7
Shut down the computer through the operating system. 3. Unplug the power cord from the computer. 7. Remove the battery from the AC outlet. 5. WARNING! Then shut down the computer and close the display. Disconnect all batteries before installing...electricity by touching a grounded metal object. Turn the computer upside down on the bottom of electric shock and damage to the equipment, unplug the power cord and remove all external devices connected to the vacant expansion memory module slot and/or by upgrading the existing memory module in Hibernation, turn the...
Shut down the computer through the operating system. 3. Unplug the power cord from the computer. 7. Remove the battery from the AC outlet. 5. WARNING! Then shut down the computer and close the display. Disconnect all batteries before installing...electricity by touching a grounded metal object. Turn the computer upside down on the bottom of electric shock and damage to the equipment, unplug the power cord and remove all external devices connected to the vacant expansion memory module slot and/or by upgrading the existing memory module in Hibernation, turn the...

Notebook Tour - Windows 7
Page 20
Additional hardware components Component Description (1) Power cord* Connects an AC adapter to an AC outlet. (2) AC adapter Converts AC power to DC power. (3) Battery* Powers the computer when the computer is not plugged into external power. *Batteries and power cords vary in appearance by region and country. 14 Chapter 2 Components
Additional hardware components Component Description (1) Power cord* Connects an AC adapter to an AC outlet. (2) AC adapter Converts AC power to DC power. (3) Battery* Powers the computer when the computer is not plugged into external power. *Batteries and power cords vary in appearance by region and country. 14 Chapter 2 Components
Notebook Tour - Windows 7
Page 22
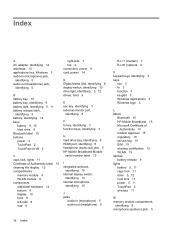
..., identifying 5, 11 battery release latch, identifying 9 battery, identifying 14 bays battery 9, 15 hard drive 9 Bluetooth label 15 buttons power 4 TouchPad 2 TouchPad on/off 2 C caps lock, lights 11 Certificate of Authenticity label 15 cleaning the display 12 compartments memory module... 9 WLAN module 9 components additional hardware 14 bottom 9 display 10 front 5 left-side 8 rear 6 right-side 7 top 2 connectors, power 8 cord, power 14 D Digital Media Slot, identifying 8 display switch, identifying 10 drive light, identifying 5, 12 drives, hard 9 E esc key, identifying 3 external...
..., identifying 5, 11 battery release latch, identifying 9 battery, identifying 14 bays battery 9, 15 hard drive 9 Bluetooth label 15 buttons power 4 TouchPad 2 TouchPad on/off 2 C caps lock, lights 11 Certificate of Authenticity label 15 cleaning the display 12 compartments memory module... 9 WLAN module 9 components additional hardware 14 bottom 9 display 10 front 5 left-side 8 rear 6 right-side 7 top 2 connectors, power 8 cord, power 14 D Digital Media Slot, identifying 8 display switch, identifying 10 drive light, identifying 5, 12 drives, hard 9 E esc key, identifying 3 external...
Notebook Tour - Windows 7
Page 23
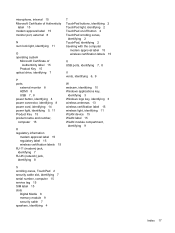
... light, identifying 11 O operating system Microsoft Certificate of Authenticity label 15 Product Key 15 optical drive, identifying 7 P ports external monitor 8 HDMI 8 USB 7, 8 power button, identifying 4 power connector, identifying 8 power cord, identifying 14 power light, identifying 5, 11 Product Key 15 product name and number, computer 15 R regulatory information modem approval label 15 regulatory label 15 wireless...
... light, identifying 11 O operating system Microsoft Certificate of Authenticity label 15 Product Key 15 optical drive, identifying 7 P ports external monitor 8 HDMI 8 USB 7, 8 power button, identifying 4 power connector, identifying 8 power cord, identifying 14 power light, identifying 5, 11 Product Key 15 product name and number, computer 15 R regulatory information modem approval label 15 regulatory label 15 wireless...

Software Update - Windows Vista and Windows 7
Page 6
... while the computer is selected, BIOS and other identifier. During the download and installation, follow these instructions: Do not disconnect power from the computer by unplugging the power cord from the AC outlet. At the download area, follow these steps: a. While the "Press the ESC key for Startup Menu..." message is later than those currently installed on the computer, you want to an optional power source. Do not shut ...
... while the computer is selected, BIOS and other identifier. During the download and installation, follow these instructions: Do not disconnect power from the computer by unplugging the power cord from the AC outlet. At the download area, follow these steps: a. While the "Press the ESC key for Startup Menu..." message is later than those currently installed on the computer, you want to an optional power source. Do not shut ...
Wireless (Select Models Only) - Windows 7
Page 18
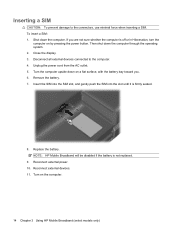
...the computer. 4. NOTE: HP Mobile Broadband will be disabled if the battery is firmly seated. 8. Reconnect external devices. 11. Turn on by pressing the power button. If you . 6. To insert a SIM: 1. Close the display. 3. Turn the computer upside down on a flat surface, with the battery bay... SIM. Remove the battery. 7. Replace the battery. Then shut down the computer. Shut down the computer through the operating system. 2. Unplug the power cord from the AC outlet. 5. Insert the SIM into the SIM slot, and gently push the SIM into the slot until it is not replaced. ...
...the computer. 4. NOTE: HP Mobile Broadband will be disabled if the battery is firmly seated. 8. Reconnect external devices. 11. Turn on by pressing the power button. If you . 6. To insert a SIM: 1. Close the display. 3. Turn the computer upside down on a flat surface, with the battery bay... SIM. Remove the battery. 7. Replace the battery. Then shut down the computer. Shut down the computer through the operating system. 2. Unplug the power cord from the AC outlet. 5. Insert the SIM into the SIM slot, and gently push the SIM into the slot until it is not replaced. ...
Wireless (Select Models Only) - Windows 7
Page 19
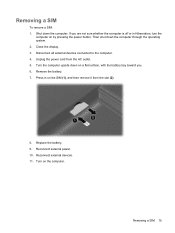
... remove it from the AC outlet. 5. Press in Hibernation, turn the computer on the computer. Turn on by pressing the power button. Remove the battery. 7. Removing a SIM To remove a SIM: 1. Reconnect external power. 10. Removing a SIM 15 Reconnect external devices. 11. Close the display. 3. Shut down the computer through the operating system...
... remove it from the AC outlet. 5. Press in Hibernation, turn the computer on the computer. Turn on by pressing the power button. Remove the battery. 7. Removing a SIM To remove a SIM: 1. Reconnect external power. 10. Removing a SIM 15 Reconnect external devices. 11. Close the display. 3. Shut down the computer through the operating system...

Power Management - Windows 7
Page 23
... a 3-pin attachment plug on the computer. 2. To reduce the risk of the power cord into the power connector (1) on the power cord, plug the cord into the AC adapter (2). 3. Connecting the AC adapter 19 To connect the computer to the equipment: Plug the power cord into an AC outlet that is an important safety feature. Plug the AC...
... a 3-pin attachment plug on the computer. 2. To reduce the risk of the power cord into the power connector (1) on the power cord, plug the cord into the AC adapter (2). 3. Connecting the AC adapter 19 To connect the computer to the equipment: Plug the power cord into an AC outlet that is an important safety feature. Plug the AC...

