Setup Utility - Windows Vista and Windows 7
Page 10
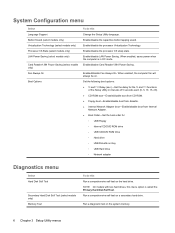
...fan will always be on the system memory. 6 Chapter 3 Setup Utility menus Enable/disable Card Reader/1394 Power Saving. NOTE: On models with two hard drives, this menu option is in intervals of 5 seconds each (0, 5, 10, 15, 20). ● CD-ROM boot―Enable/disable boot from CD-ROM. ● Floppy boot―Enable/disable boot from diskette. ● Internal Network Adapter boot―Enable/disable boot from Internal Network Adapter. ● Boot Order―Set the boot order for: ◦ USB Floppy ◦ Internal CD/DVD ROM drive ◦ USB CD/DVD ROM drive ◦ Hard drive...
...fan will always be on the system memory. 6 Chapter 3 Setup Utility menus Enable/disable Card Reader/1394 Power Saving. NOTE: On models with two hard drives, this menu option is in intervals of 5 seconds each (0, 5, 10, 15, 20). ● CD-ROM boot―Enable/disable boot from CD-ROM. ● Floppy boot―Enable/disable boot from diskette. ● Internal Network Adapter boot―Enable/disable boot from Internal Network Adapter. ● Boot Order―Set the boot order for: ◦ USB Floppy ◦ Internal CD/DVD ROM drive ◦ USB CD/DVD ROM drive ◦ Hard drive...
Software Update, Backup and Recovery - Windows Vista
Page 5
... information. 2. NOTE: Windows® includes the User Account Control feature to a network, consult the network administrator before installing any software updates, especially system BIOS updates. Most software and BIOS updates on the HP Web site are explained in compressed files called SoftPaqs. To update the software, follow these steps, which contains information regarding installing and troubleshooting the file. Identify your computer model, product category, and series or family. NOTE...
... information. 2. NOTE: Windows® includes the User Account Control feature to a network, consult the network administrator before installing any software updates, especially system BIOS updates. Most software and BIOS updates on the HP Web site are explained in compressed files called SoftPaqs. To update the software, follow these steps, which contains information regarding installing and troubleshooting the file. Identify your computer model, product category, and series or family. NOTE...
Software Update, Backup and Recovery - Windows Vista
Page 6
... hard drive. BIOS version information (also known as ROM date and System BIOS) can be displayed by turning on battery power, docked in the lower-left corner of the screen, press f10. 2. Open the Setup Utility by pressing fn+esc (if you want to download. 3. Do not insert, remove, connect, or disconnect any device, cable, or cord. While the "Press the ESC key for software, driver, and BIOS updates. 2. Make a note of the system BIOS...
... hard drive. BIOS version information (also known as ROM date and System BIOS) can be displayed by turning on battery power, docked in the lower-left corner of the screen, press f10. 2. Open the Setup Utility by pressing fn+esc (if you want to download. 3. Do not insert, remove, connect, or disconnect any device, cable, or cord. While the "Press the ESC key for software, driver, and BIOS updates. 2. Make a note of the system BIOS...
Software Update, Backup and Recovery - Windows Vista
Page 8
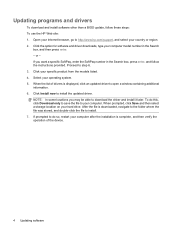
... the models listed. 4. or - Click your computer after the installation is displayed, click an updated driver to download the driver and install it later. When the list of drivers is complete, and then verify the operation of the device. 4 Updating software NOTE: In some locations you want a specific SoftPaq, enter the SoftPaq number in the Search box, and then press enter. - Updating programs and drivers To download and install software other than a BIOS update, follow the instructions provided...
... the models listed. 4. or - Click your computer after the installation is displayed, click an updated driver to download the driver and install it later. When the list of drivers is complete, and then verify the operation of the device. 4 Updating software NOTE: In some locations you want a specific SoftPaq, enter the SoftPaq number in the Search box, and then press enter. - Updating programs and drivers To download and install software other than a BIOS update, follow the instructions provided...
Wireless (Select Models Only) - Windows Vista
Page 24
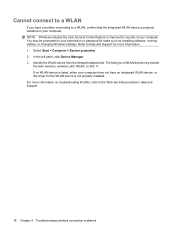
..., click Device Manager. 3. Identify the WLAN device from the Network adapters list. Select Start > Computer > System properties. 2. For more information. 1. The listing for more information on your computer: NOTE: Windows includes the User Account Control feature to improve the security of your computer. Cannot connect to a WLAN If you have an integrated WLAN device, or the driver for the WLAN device is properly installed on troubleshooting WLANs...
..., click Device Manager. 3. Identify the WLAN device from the Network adapters list. Select Start > Computer > System properties. 2. For more information. 1. The listing for more information on your computer: NOTE: Windows includes the User Account Control feature to improve the security of your computer. Cannot connect to a WLAN If you have an integrated WLAN device, or the driver for the WLAN device is properly installed on troubleshooting WLANs...

Drives - Windows Vista
Page 38
... be set to automatically check for and install updates for updates to get the latest updates for your computer. 32 Chapter 6 Troubleshooting When the list of the device. 3. or - Click Download only to save the file to install Microsoft Update. When prompted, click Save and then select a storage location on -screen instructions to your specific product from the models listed. 4. If prompted to open a window containing additional information. 6. Open your Internet...
... be set to automatically check for and install updates for updates to get the latest updates for your computer. 32 Chapter 6 Troubleshooting When the list of the device. 3. or - Click Download only to save the file to install Microsoft Update. When prompted, click Save and then select a storage location on -screen instructions to your specific product from the models listed. 4. If prompted to open a window containing additional information. 6. Open your Internet...

Drives - Windows Vista
Page 39
...changing region setting 9 copying 11 playing 7 removing 13 DVD drive 2 DVD region settings 9 DVD/CD-RW Combo Drive 4 H hard disk drive HP ProtectSmart Hard Drive Protection 17 installing 21 removing 20 replacing 20 hard drive HP ProtectSmart Hard Drive Protection 17 installing 21 removing 20 replacing 20 HP ProtectSmart Hard Drive Protection 17 L light, drive 18 M maintenance Disk Cleanup 16 Disk Defragmenter 16 O optical disc removing 13 optical drive removing 14 R region codes, DVD 9 S software Disk Cleanup 16 Disk Defragmenter 16 SuperMulti DVD±RW and CD-RW Combo Drive with DL support...
...changing region setting 9 copying 11 playing 7 removing 13 DVD drive 2 DVD region settings 9 DVD/CD-RW Combo Drive 4 H hard disk drive HP ProtectSmart Hard Drive Protection 17 installing 21 removing 20 replacing 20 hard drive HP ProtectSmart Hard Drive Protection 17 installing 21 removing 20 replacing 20 HP ProtectSmart Hard Drive Protection 17 L light, drive 18 M maintenance Disk Cleanup 16 Disk Defragmenter 16 O optical disc removing 13 optical drive removing 14 R region codes, DVD 9 S software Disk Cleanup 16 Disk Defragmenter 16 SuperMulti DVD±RW and CD-RW Combo Drive with DL support...
Notebook Tour - Windows Vista
Page 17
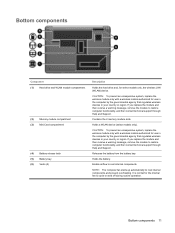
... fan starts up automatically to restore computer functionality, and then contact technical support through Help and Support. If you replace the module and then receive a warning message, remove the module to cool internal components and prevent overheating. Holds a WLAN device (select models only). Enable airflow to restore computer functionality, and then contact technical support through Help and Support. It is normal for select models only, the wireless LAN (WLAN) device. Contains the 2 memory module slots...
... fan starts up automatically to restore computer functionality, and then contact technical support through Help and Support. If you replace the module and then receive a warning message, remove the module to cool internal components and prevent overheating. Holds a WLAN device (select models only). Enable airflow to restore computer functionality, and then contact technical support through Help and Support. It is normal for select models only, the wireless LAN (WLAN) device. Contains the 2 memory module slots...

Notebook Tour - Windows Vista
Page 20
... part number helps a service technician to each product. ◦ Part Number/Product Number (p/n) (3). You may be a wireless local area network (WLAN) device or an optional Bluetooth® device. Wireless certification labels are affixed inside the hard drive bay. ● Wireless certification label(s) (select models only)-Provide information about the product's hardware components. You may need when you troubleshoot system problems or travel internationally with your notebook. ◦ Serial Number (s/n) (2). This number provides specific information about optional wireless...
... part number helps a service technician to each product. ◦ Part Number/Product Number (p/n) (3). You may be a wireless local area network (WLAN) device or an optional Bluetooth® device. Wireless certification labels are affixed inside the hard drive bay. ● Wireless certification label(s) (select models only)-Provide information about the product's hardware components. You may need when you troubleshoot system problems or travel internationally with your notebook. ◦ Serial Number (s/n) (2). This number provides specific information about optional wireless...
Compaq Presario CQ40 Notebook PC - Maintenance and Service Guide
Page 24
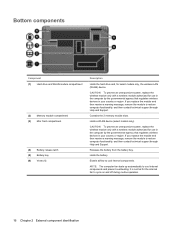
... (1) Hard drive and WLAN module compartment (2) Memory module compartment (3) Mini Card compartment (4) Battery release latch (5) Battery bay (6) Vents (4) Description Holds the hard drive and, for the internal fan to cycle on and off during routine operation. 16 Chapter 2 External component identification If you replace the module and then receive a warning message, remove the module to restore computer functionality, and then contact technical support through Help and Support. Contains the 2 memory module slots. Enable airflow to cool internal...
... (1) Hard drive and WLAN module compartment (2) Memory module compartment (3) Mini Card compartment (4) Battery release latch (5) Battery bay (6) Vents (4) Description Holds the hard drive and, for the internal fan to cycle on and off during routine operation. 16 Chapter 2 External component identification If you replace the module and then receive a warning message, remove the module to restore computer functionality, and then contact technical support through Help and Support. Contains the 2 memory module slots. Enable airflow to cool internal...
Compaq Presario CQ40 Notebook PC - Maintenance and Service Guide
Page 56
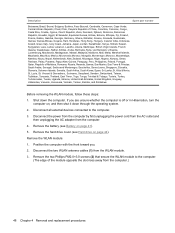
... power cord from the AC outlet and then unplugging the AC adapter from the WLAN module. 3. Remove the hard drive cover (see Battery on , and then shut it down the computer. Position the computer with the front toward you are unsure whether the computer is off or in Hibernation, turn the computer on page 41). 5. Remove the WLAN module: 1. Description Spare part number...
... power cord from the AC outlet and then unplugging the AC adapter from the WLAN module. 3. Remove the hard drive cover (see Battery on , and then shut it down the computer. Position the computer with the front toward you are unsure whether the computer is off or in Hibernation, turn the computer on page 41). 5. Remove the WLAN module: 1. Description Spare part number...

Compaq Presario CQ40 Notebook PC - Maintenance and Service Guide
Page 99
... Setup Utility options. Enter, change, or delete a power-on . Enable/disable LAN Power Saving. Enable/disable Card Reader/1394 Power Saving. When enabled, the computer fan will always be supported by your computer. Enable/disable the processor Virtualization Technology. Security menu Select Administrator password Power-On Password To do this section provide an overview of 5 seconds each (0, 5, 10, 15, 20). ● CD-ROM boot―Enable/disable boot from CD-ROM. ● Floppy boot―Enable/disable boot from diskette. ● Internal Network Adapter boot―Enable/disable boot...
... Setup Utility options. Enter, change, or delete a power-on . Enable/disable LAN Power Saving. Enable/disable Card Reader/1394 Power Saving. When enabled, the computer fan will always be supported by your computer. Enable/disable the processor Virtualization Technology. Security menu Select Administrator password Power-On Password To do this section provide an overview of 5 seconds each (0, 5, 10, 15, 20). ● CD-ROM boot―Enable/disable boot from CD-ROM. ● Floppy boot―Enable/disable boot from diskette. ● Internal Network Adapter boot―Enable/disable boot...

Compaq Presario CQ40 Notebook PC - Maintenance and Service Guide
Page 150
... 24 spare part number 24, 30, 62 Bluetooth module removal 71 spare part number 23, 29, 71 Bluetooth module cable, spare part number 30 boot options 91 boot order 91 button sound 91 buttons media 8 power 8 TouchPad 6 TouchPad on/off 6 volume mute 9 wireless 9 C cables, service considerations 34 camera module removal 65 spare part number 65 camera, product description 3 camera/microphone module, spare part number 31 caps lock light, identifying 7 Card Reader Power Saving 91 changing the Setup Utility language 88 chipset, product description 1 CMOS clearing 38 compartments memory module 16 Mini...
... 24 spare part number 24, 30, 62 Bluetooth module removal 71 spare part number 23, 29, 71 Bluetooth module cable, spare part number 30 boot options 91 boot order 91 button sound 91 buttons media 8 power 8 TouchPad 6 TouchPad on/off 6 volume mute 9 wireless 9 C cables, service considerations 34 camera module removal 65 spare part number 65 camera, product description 3 camera/microphone module, spare part number 31 caps lock light, identifying 7 Card Reader Power Saving 91 changing the Setup Utility language 88 chipset, product description 1 CMOS clearing 38 compartments memory module 16 Mini...
Compaq Presario CQ40 Notebook PC - Maintenance and Service Guide
Page 151
... Setup Utility 90 expansion port, identifying 14 ExpressCard slot bezel, illustrated 25 ExpressCard slot, identifying 14 external media cards, product description 4 external monitor port identifying 14 pin assignments 130 F F11 127 fan always on 91 fan, spare part number 19, 30 fan/heat sink assembly removal 82 spare part number 19, 30, 31, 32, 82 feet locations 40 spare part number 23, 30, 40 fn key, identifying 10 front components 6 full system recovery 124 function keys...
... Setup Utility 90 expansion port, identifying 14 ExpressCard slot bezel, illustrated 25 ExpressCard slot, identifying 14 external media cards, product description 4 external monitor port identifying 14 pin assignments 130 F F11 127 fan always on 91 fan, spare part number 19, 30 fan/heat sink assembly removal 82 spare part number 19, 30, 31, 32, 82 feet locations 40 spare part number 23, 30, 40 fn key, identifying 10 front components 6 full system recovery 124 function keys...

Compaq Presario CQ40 Notebook PC - Maintenance and Service Guide
Page 152
... keypad keys, identifying 10 keys esc 10 fn 10 function 10 keypad 10 navigation 10 Windows applications 10 Windows logo 10 L LAN Power Saving 91 language support 91 latch, battery release 16 lights battery 7, 13 caps lock 7 Digital Media Slot 14 drive 7, 13 mute 7 num lock 8 optical drive 15 power 7, 13 TouchPad 6 volume down 7 volume mute 7 volume up 8 webcam 11 wireless 7 M main menu 91 mass storage devices, spare part numbers 26 media button, identifying 8 memory map specifications 104 memory module product description 2 removal 52 spare part numbers...
... keypad keys, identifying 10 keys esc 10 fn 10 function 10 keypad 10 navigation 10 Windows applications 10 Windows logo 10 L LAN Power Saving 91 language support 91 latch, battery release 16 lights battery 7, 13 caps lock 7 Digital Media Slot 14 drive 7, 13 mute 7 num lock 8 optical drive 15 power 7, 13 TouchPad 6 volume down 7 volume mute 7 volume up 8 webcam 11 wireless 7 M main menu 91 mass storage devices, spare part numbers 26 media button, identifying 8 memory map specifications 104 memory module product description 2 removal 52 spare part numbers...
Compaq Presario CQ40 Notebook PC - Maintenance and Service Guide
Page 153
... 3 external media cards 4 graphics 2 hard drives 2 keyboard 4 memory module 2 microphone 3 modem module 3 operating system 4 optical drives 3 pointing devices 4 ports 4 power requirements 4 processors 1 product name 1 security 4 serviceability 4 wireless 3 product name 1 R recovering a program or driver 124 recovering from the dedicated recovery partition 127 recovering from the recovery discs 127 recovery 127 recovery discs 124, 126 Recovery Manager 124, 127 recovery partition 124 recovery, system 127 removal/replacement preliminaries 33 procedures 39 restore points 125 restoring default...
... 3 external media cards 4 graphics 2 hard drives 2 keyboard 4 memory module 2 microphone 3 modem module 3 operating system 4 optical drives 3 pointing devices 4 ports 4 power requirements 4 processors 1 product name 1 security 4 serviceability 4 wireless 3 product name 1 R recovering a program or driver 124 recovering from the dedicated recovery partition 127 recovering from the recovery discs 127 recovery 127 recovery discs 124, 126 Recovery Manager 124, 127 recovery partition 124 recovery, system 127 removal/replacement preliminaries 33 procedures 39 restore points 125 restoring default...

Multimedia - Windows Vista
Page 36
... model number as instructed, and then press enter. - If prompted to install Microsoft Update. On the Software & Driver downloads page, select the task, type your specific product from the models listed. 4. When the list of the device. or - If prompted to open a window containing additional information. 6. After the file is complete, and then verify the operation of drivers is displayed, click an updated driver to do so, restart your computer. 30 Chapter 7 Troubleshooting Open...
... model number as instructed, and then press enter. - If prompted to install Microsoft Update. On the Software & Driver downloads page, select the task, type your specific product from the models listed. 4. When the list of the device. or - If prompted to open a window containing additional information. 6. After the file is complete, and then verify the operation of drivers is displayed, click an updated driver to do so, restart your computer. 30 Chapter 7 Troubleshooting Open...
Multimedia - Windows Vista
Page 37
... 2 M media activity hotkeys 6 media button 3 microphone, internal 2 monitor, connecting 11 movie, watching 18 multimedia components, identifying 2 multimedia software 7, 8 multimedia software, installing 8 mute button 4 O optical disc Blu-ray 16 inserting 17 removing 21 optical discs, using 14 optical drive 14 optical drive, using 13 S speakers 2 T tips, webcam 22 troubleshooting disc burning 28 disc play 26, 27 DVD movie play 27 external display 28 HP device drivers 29 optical disc tray 24 optical drive detection 25 Windows device drivers 30 V video, using 11 volume down button 4 volume down...
... 2 M media activity hotkeys 6 media button 3 microphone, internal 2 monitor, connecting 11 movie, watching 18 multimedia components, identifying 2 multimedia software 7, 8 multimedia software, installing 8 mute button 4 O optical disc Blu-ray 16 inserting 17 removing 21 optical discs, using 14 optical drive 14 optical drive, using 13 S speakers 2 T tips, webcam 22 troubleshooting disc burning 28 disc play 26, 27 DVD movie play 27 external display 28 HP device drivers 29 optical disc tray 24 optical drive detection 25 Windows device drivers 30 V video, using 11 volume down button 4 volume down...

Power Management - Windows Vista
Page 7
..., the computer initiates Hibernation. When Sleep is closed, open the display. ● Press a key on the keyboard or button on the remote control (select models only). ● Activate the TouchPad. Your work is in the Sleep state or in Hibernation. Power settings and timeouts can initiate Sleep in Windows® Control Panel. If the computer is saved to memory, letting you can be changed using Power Options in any of the following ways...
..., the computer initiates Hibernation. When Sleep is closed, open the display. ● Press a key on the keyboard or button on the remote control (select models only). ● Activate the TouchPad. Your work is in the Sleep state or in Hibernation. Power settings and timeouts can initiate Sleep in Windows® Control Panel. If the computer is saved to memory, letting you can be changed using Power Options in any of the following ways...

Power Management - Windows Vista
Page 30
... in the Sleep state or in Hibernation, you are connecting an external hardware device that does not connect to the Lock button. 3. Save your work and close all open programs. 2. Click Start, and then click the arrow next to a USB port ● When the computer will be unused and disconnected from external power for at least 5 seconds. ● Disconnect the computer from external power and remove the battery. 24...
... in the Sleep state or in Hibernation, you are connecting an external hardware device that does not connect to the Lock button. 3. Save your work and close all open programs. 2. Click Start, and then click the arrow next to a USB port ● When the computer will be unused and disconnected from external power for at least 5 seconds. ● Disconnect the computer from external power and remove the battery. 24...


