End User License Agreement
Page 1
BY purposes of the Freeware by you shall be governed DOWNLOADING, OR b. IF YOU DO NOT ACCEPT THESE LICENSE TERMS, YOUR SOLE REMEDY IS TO RETURN THE ENTIRE UNUSED PRODUCT (HARDWARE AND SOFTWARE) WITHIN 14 DAYS ... the Software Product, provided the copy contains all or any Software Product, installed on a single computer ("Your Computer"). You may not separate component parts of download. HP and its online documentation. Storage. HP grants you the following rights provided you comply with your use of any portion of the Software Product...
BY purposes of the Freeware by you shall be governed DOWNLOADING, OR b. IF YOU DO NOT ACCEPT THESE LICENSE TERMS, YOUR SOLE REMEDY IS TO RETURN THE ENTIRE UNUSED PRODUCT (HARDWARE AND SOFTWARE) WITHIN 14 DAYS ... the Software Product, provided the copy contains all or any Software Product, installed on a single computer ("Your Computer"). You may not separate component parts of download. HP and its online documentation. Storage. HP grants you the following rights provided you comply with your use of any portion of the Software Product...
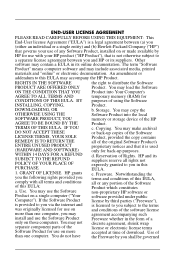
Wireless Setup Guide
Page 2
...No action required. WPA-PSK Pass phrase required. (Wi-Fi Protected Access-Preshared Key) 1 Create pass phrase. 2 Record pass phrase 3 Download the latest WPA update for "WPA." 2 The instructions in this booklet. During router configuration, use the table below to add wireless capability.... key provided. Your Internet connection should be operational before you can buy a wireless-enabled notebook, you begin the procedures in this information. TIP: You can buy a wireless PC Card to record this booklet are for wireless computers using Microsoft® Windows® XP...
...No action required. WPA-PSK Pass phrase required. (Wi-Fi Protected Access-Preshared Key) 1 Create pass phrase. 2 Record pass phrase 3 Download the latest WPA update for "WPA." 2 The instructions in this booklet. During router configuration, use the table below to add wireless capability.... key provided. Your Internet connection should be operational before you can buy a wireless-enabled notebook, you begin the procedures in this information. TIP: You can buy a wireless PC Card to record this booklet are for wireless computers using Microsoft® Windows® XP...
Maintenance and Service Guide
Page 53
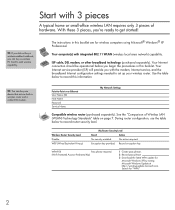
Download the notebook series service package from the floppy drive. 6. When you see the HP logo, press esc to display the boot menu, then boot from the Partnership ... Replacement 2-23 Removing the Display Assembly NOTE: After replacing the display assembly or motherboard, you connect the grounding strap to reprogram the EEPROM on the notebook. 5. Plug in the floppy drive. If the unit has no internal floppy drive, connect a USB floppy drive. 4. Select the option to update the display/LCD...
Download the notebook series service package from the floppy drive. 6. When you see the HP logo, press esc to display the boot menu, then boot from the Partnership ... Replacement 2-23 Removing the Display Assembly NOTE: After replacing the display assembly or motherboard, you connect the grounding strap to reprogram the EEPROM on the notebook. 5. Plug in the floppy drive. If the unit has no internal floppy drive, connect a USB floppy drive. 4. Select the option to update the display/LCD...

Maintenance and Service Guide
Page 79
...the motherboard. Turn on the new motherboard using the Service Utility floppy disk. 1. When the HP logo appears (on the floppy disk. 1. Download the notebook service package from the floppy disk. 5. Plug in the package's Readme file. 2. When prompted, type A for the automatic update option. ... 3. Insert the Service Utilities floppy disk in display or the external monitor), press esc to HP Pavilion 4x00, HP Compaq nx9005 and nx9000, Compaq Evo Notebook N1050v and N1010v, and Compaq Presario 2100 and 1100 models. This stores the current system data from the boot menu. 6.
...the motherboard. Turn on the new motherboard using the Service Utility floppy disk. 1. When the HP logo appears (on the floppy disk. 1. Download the notebook service package from the floppy disk. 5. Plug in the package's Readme file. 2. When prompted, type A for the automatic update option. ... 3. Insert the Service Utilities floppy disk in display or the external monitor), press esc to HP Pavilion 4x00, HP Compaq nx9005 and nx9000, Compaq Evo Notebook N1050v and N1010v, and Compaq Presario 2100 and 1100 models. This stores the current system data from the boot menu. 6.

Maintenance and Service Guide
Page 81
... 2-51 This stores the current system data from the old motherboard on the new motherboard using the Service Utility floppy disk. 1. Download the notebook service package from the Partnership Web site (see page vii), and create a Service Utilities floppy disk as described in the floppy drive...serial number before you replace the motherboard. Plug in display or the external monitor), press esc to HP Pavilion 5x00, HP Compaq nx9010, HP nx9008, and Compaq Presario 2500 models. Turn on either the built-in an AC adapter. 3. NOTE: This section applies only to display the boot ...
... 2-51 This stores the current system data from the old motherboard on the new motherboard using the Service Utility floppy disk. 1. Download the notebook service package from the Partnership Web site (see page vii), and create a Service Utilities floppy disk as described in the floppy drive...serial number before you replace the motherboard. Plug in display or the external monitor), press esc to HP Pavilion 5x00, HP Compaq nx9010, HP nx9008, and Compaq Presario 2500 models. Turn on either the built-in an AC adapter. 3. NOTE: This section applies only to display the boot ...

Maintenance and Service Guide
Page 85
... antenna PCAs are replacing the CPU module, you must use the Service Utilities floppy disk to update the display/LCD identification stored on the motherboard. Download the notebook Series service package from the floppy drive. 6. When you see page vii), and create a Service Utilities floppy disk as described in the bottom case... new display. 1. If you are held in place by the clips in the package's Readme file. 2. Select the option to reprogram the EEPROM on the notebook. 5. Plug in the floppy drive. Insert the Service Utilities floppy disk in an AC adapter. 3.
... antenna PCAs are replacing the CPU module, you must use the Service Utilities floppy disk to update the display/LCD identification stored on the motherboard. Download the notebook Series service package from the floppy drive. 6. When you see page vii), and create a Service Utilities floppy disk as described in the bottom case... new display. 1. If you are held in place by the clips in the package's Readme file. 2. Select the option to reprogram the EEPROM on the notebook. 5. Plug in the floppy drive. Insert the Service Utilities floppy disk in an AC adapter. 3.

Maintenance and Service Guide
Page 87
..., and if present, the docking port cover from the old serial label, and then print the new label on a PC connected to the new bottom case. 2. Installing a New Serial Number Label Download the latest version of Serial Number Label Service Manual Removal and Replacement 2-57 The latest version includes fields for warranty...
..., and if present, the docking port cover from the old serial label, and then print the new label on a PC connected to the new bottom case. 2. Installing a New Serial Number Label Download the latest version of Serial Number Label Service Manual Removal and Replacement 2-57 The latest version includes fields for warranty...
Maintenance and Service Guide
Page 89
... to connect to the Internet. 5. Connect the AC adapter to reset the notebook. Connect any programs that appear. Select Update, > Download New > OK. When the process completes, press the power button to the notebook. 4. Service Manual Removal and Replacement 2-59 Update the notebook's BIOS as follows: 1. BIOS updates are provided with the updates. If...
... to connect to the Internet. 5. Connect the AC adapter to reset the notebook. Connect any programs that appear. Select Update, > Download New > OK. When the process completes, press the power button to the notebook. 4. Service Manual Removal and Replacement 2-59 Update the notebook's BIOS as follows: 1. BIOS updates are provided with the updates. If...

Maintenance and Service Guide
Page 90
Turn on at all, do not have a BIOS floppy disk, download the package from the BIOS floppy disk. NOTE: If the notebook will not boot from the BIOS floppy disk: a. NOTE: If you plugged in the Service and Support Library. Unplug the AC adapter. c. Release Fn+B.... sure to boot from the BIOS floppy disk, try plugging the boot-block jumper into the notebook's parallel port. Plug in the floppy disk drive. 2. Boot-Block Jumper 2-60 Removal and Replacement Service Manual b. If necessary, download the latest BIOS version and reprogram the BIOS IC. 1 13 14 25 Figure 2-41....
Turn on at all, do not have a BIOS floppy disk, download the package from the BIOS floppy disk. NOTE: If the notebook will not boot from the BIOS floppy disk: a. NOTE: If you plugged in the Service and Support Library. Unplug the AC adapter. c. Release Fn+B.... sure to boot from the BIOS floppy disk, try plugging the boot-block jumper into the notebook's parallel port. Plug in the floppy disk drive. 2. Boot-Block Jumper 2-60 Removal and Replacement Service Manual b. If necessary, download the latest BIOS version and reprogram the BIOS IC. 1 13 14 25 Figure 2-41....

Maintenance and Service Guide
Page 110
... Causes Check TCP/IP setup in another AC adapter, if available. Check SSID, channel, and encryption settings. Restart notebook. In Device Manager, refresh device list and check for damaged coaxial cables or connectors. Download current drivers from card manufacturer's Web site Make sure AC adapter has correct power rating. Check for conflicts...
... Causes Check TCP/IP setup in another AC adapter, if available. Check SSID, channel, and encryption settings. Restart notebook. In Device Manager, refresh device list and check for damaged coaxial cables or connectors. Download current drivers from card manufacturer's Web site Make sure AC adapter has correct power rating. Check for conflicts...

Maintenance and Service Guide
Page 112
... e-Diagtools for troubleshooting and repairing the notebook: • Notebook e-Diagtools diagnostic program (below) • Power-on self-test (page 3-20) • Sycard PCCtest 450 PC card (page 3-26) • ...Windows Management Instrumentation (page 3-27) • BIOS Setup utility (page 3-27) e-Diagtools Diagnostic Program The hardware diagnostic programs provide two levels of e-Diagtools. 1. Diagnostic Tools This section describes the following procedure describes how to run e-Diagtools. The notebook reboots when you exit the program so drivers can download...
... e-Diagtools for troubleshooting and repairing the notebook: • Notebook e-Diagtools diagnostic program (below) • Power-on self-test (page 3-20) • Sycard PCCtest 450 PC card (page 3-26) • ...Windows Management Instrumentation (page 3-27) • BIOS Setup utility (page 3-27) e-Diagtools Diagnostic Program The hardware diagnostic programs provide two levels of e-Diagtools. 1. Diagnostic Tools This section describes the following procedure describes how to run e-Diagtools. The notebook reboots when you exit the program so drivers can download...

Maintenance and Service Guide
Page 124
... Windows, if it can be used To install the WMI preloaded on the notebook's hard disk or can be downloaded from http://wwwhpcom/toptools (the contents are working or if they are the same in the notebook, and possibly whether any of WMI (group and attribute definitions): select Start ...Agent > HP Toptools Help Uninstalling the WMI Package 1. Using WMI For a complete description of how to use WMI, see the following documentation provided with the notebook: • A readme.txt file: select Start > Programs > Hewlett-Packard > HP Toptools Agent > Read me • A Windows online help file ...
... Windows, if it can be used To install the WMI preloaded on the notebook's hard disk or can be downloaded from http://wwwhpcom/toptools (the contents are working or if they are the same in the notebook, and possibly whether any of WMI (group and attribute definitions): select Start ...Agent > HP Toptools Help Uninstalling the WMI Package 1. Using WMI For a complete description of how to use WMI, see the following documentation provided with the notebook: • A readme.txt file: select Start > Programs > Hewlett-Packard > HP Toptools Agent > Read me • A Windows online help file ...
Maintenance and Service Guide
Page 127
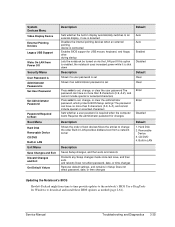
..., and remains in LAN provides diskless boot from time to time provide updates to the notebook's BIOS Use e-DiagTools for changes Enter Enter Disabled Description Shows the order of boot devices Move the entries to download and install these BIOS updates as needed (page 2-61). CD/DVD 4. Service Manual ... device is connected Enables BIOS support for USB mouse, keyboard, and floppy drive during startup Lets the notebook be turned on via the LAN port If this option is enabled, the notebook uses increased power while it is shut down Description Shows if a user password is set Shows if ...
..., and remains in LAN provides diskless boot from time to time provide updates to the notebook's BIOS Use e-DiagTools for changes Enter Enter Disabled Description Shows the order of boot devices Move the entries to download and install these BIOS updates as needed (page 2-61). CD/DVD 4. Service Manual ... device is connected Enables BIOS support for USB mouse, keyboard, and floppy drive during startup Lets the notebook be turned on via the LAN port If this option is enabled, the notebook uses increased power while it is shut down Description Shows if a user password is set Shows if ...

Service Manual
Page 96
... sure they are parallel with the display assembly hinges. If the unit has no internal floppy drive, connect a USB floppy drive. 4. Download the notebook series service package from the floppy drive. 6. When you must use the Service Utilities floppy disk to reprogram the EEPROM on the motherboard ...for the new display. 1. Select the option to update the display/LCD identification stored on the notebook. 5. Reassembly Notes Important After replacing the display assembly or motherboard, you see the HP logo, press ESC to display the boot menu,...
... sure they are parallel with the display assembly hinges. If the unit has no internal floppy drive, connect a USB floppy drive. 4. Download the notebook series service package from the floppy drive. 6. When you must use the Service Utilities floppy disk to reprogram the EEPROM on the motherboard ...for the new display. 1. Select the option to update the display/LCD identification stored on the notebook. 5. Reassembly Notes Important After replacing the display assembly or motherboard, you see the HP logo, press ESC to display the boot menu,...

Service Manual
Page 121
... to display the boot menu, then choose Removable Device and boot from the floppy disk. 5. Required Equipment • #1 Phillips screwdriver. Download the notebook service package from the Partnership Web site (see page vii), and create a Service Utilities floppy disk as described in the EEPROM on the...-in display or the external monitor), press Esc to HP Pavilion 4300, 4200, and 4100, HP nx9005 and nx9000, Compaq Evo Notebook N1050 and N1010, and Compaq Presario 2100 and 1100 models. When the HP logo appears (on the notebook. This stores the current system data from the boot menu. 6.
... to display the boot menu, then choose Removable Device and boot from the floppy disk. 5. Required Equipment • #1 Phillips screwdriver. Download the notebook service package from the Partnership Web site (see page vii), and create a Service Utilities floppy disk as described in the EEPROM on the...-in display or the external monitor), press Esc to HP Pavilion 4300, 4200, and 4100, HP nx9005 and nx9000, Compaq Evo Notebook N1050 and N1010, and Compaq Presario 2100 and 1100 models. When the HP logo appears (on the notebook. This stores the current system data from the boot menu. 6.
Service Manual
Page 123
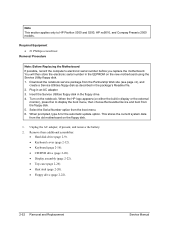
... logo appears (on either the built-in display or the external monitor), press Esc to HP Pavilion 5300 and 5200, HP nx9010, and Compaq Presario 2500 models. This stores the current system data from the floppy disk. 5. You will then store the electronic serial number in the package's Readme file... Procedure Note: Before Replacing the Motherboard If possible, record the computer's electronic serial number before you replace the motherboard. Download the notebook service package from the boot menu. 6. Note This section applies only to display the boot menu, then choose Removable Device ...
... logo appears (on either the built-in display or the external monitor), press Esc to HP Pavilion 5300 and 5200, HP nx9010, and Compaq Presario 2500 models. This stores the current system data from the floppy disk. 5. You will then store the electronic serial number in the package's Readme file... Procedure Note: Before Replacing the Motherboard If possible, record the computer's electronic serial number before you replace the motherboard. Download the notebook service package from the boot menu. 6. Note This section applies only to display the boot menu, then choose Removable Device ...

Service Manual
Page 128
Turn on the notebook. 5. Select the option to update the display/LCD identification stored on the motherboard. • If you are held in place by the clips in the ... boot. Bending any EMI spring could cause a motherboard short. Note: Reprogramming the BIOS IC A new BIOS IC contains only enough basic programming to enable the notebook to the mini-PCI card. Service Manual Removal and Replacement 2-57 Reassembly Notes Important After replacing the display assembly or motherboard, you must also replace...
Turn on the notebook. 5. Select the option to update the display/LCD identification stored on the motherboard. • If you are held in place by the clips in the ... boot. Bending any EMI spring could cause a motherboard short. Note: Reprogramming the BIOS IC A new BIOS IC contains only enough basic programming to enable the notebook to the mini-PCI card. Service Manual Removal and Replacement 2-57 Reassembly Notes Important After replacing the display assembly or motherboard, you must also replace...

Service Manual
Page 130
... the Partnership Web site (see page vii) under Support/Service in Taiwan Figure 2-35. Follow the "Reassembly Notes" on a PC connected to the new bottom case. 2. Installing a New Serial Number Label Download the latest version of Serial Number Label Service Manual Removal and Replacement 2-59 Open a new document based on plain white...
... the Partnership Web site (see page vii) under Support/Service in Taiwan Figure 2-35. Follow the "Reassembly Notes" on a PC connected to the new bottom case. 2. Installing a New Serial Number Label Download the latest version of Serial Number Label Service Manual Removal and Replacement 2-59 Open a new document based on plain white...
Service Manual
Page 132
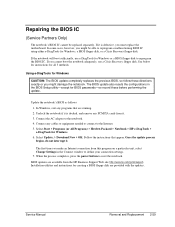
... site (www.hp.com/go/bizsupport). Connect the AC adapter to reset the notebook. Click Start > Programs (or All Programs) > Hewlett-Packard > Notebook > HP e-DiagTools > e-DiagTools for creating a BIOS floppy disk are provided with the updates. Click Update, select Download New and click OK. Using e-DiagTools for Windows Caution The BIOS update completely...
... site (www.hp.com/go/bizsupport). Connect the AC adapter to reset the notebook. Click Start > Programs (or All Programs) > Hewlett-Packard > Notebook > HP e-DiagTools > e-DiagTools for creating a BIOS floppy disk are provided with the updates. Click Update, select Download New and click OK. Using e-DiagTools for Windows Caution The BIOS update completely...

Service Manual
Page 133
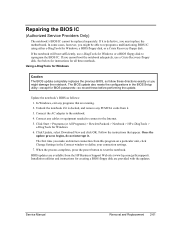
...the wiring diagram below. 3. Plug in the floppy disk drive. 2. If necessary, download the latest BIOS version and reprogram the BIOS IC. 1 13 14 25 Figure 2-38. The program does not verify the notebook model, so you do the following to use the correct BIOS floppy disk for the..., do not have a BIOS floppy disk, download the package from the BIOS floppy disk, try plugging the boot-block jumper into the notebook's parallel port. If the notebook does not turn on the notebook and allow it to make sure it before the notebook automatically reboots. 4. b. Boot-Block Jumper 2-...
...the wiring diagram below. 3. Plug in the floppy disk drive. 2. If necessary, download the latest BIOS version and reprogram the BIOS IC. 1 13 14 25 Figure 2-38. The program does not verify the notebook model, so you do the following to use the correct BIOS floppy disk for the..., do not have a BIOS floppy disk, download the package from the BIOS floppy disk, try plugging the boot-block jumper into the notebook's parallel port. If the notebook does not turn on the notebook and allow it to make sure it before the notebook automatically reboots. 4. b. Boot-Block Jumper 2-...


