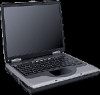
End User License Agreement
Page 2
.... To use the original Software Product that HP and its suppliers and are owned by HP or its affiliates may not reverse engineer, decompile, or disassemble the Software Product, except and only to the extent that the right to the This EULA is effective unless terminated or rejected. entirely by the...
Maintenance and Service Guide
Page 3
Contents Introduction...vii Product Information...1-1 Features ...1-8 Operation...1-14 Specifications ...1-18 Internal Design...1-24 Removal and Replacement 2-1 Disassembly Flowchart ...2-3 Removing the Battery ...2-4 Removing an SDRAM Module...2-5 Removing the Wireless LAN Mini PCI Card 2-7 Removing the Hard Disk Drive...2-9 Recovering the Factory Software...2-11 ...
Maintenance and Service Guide
Page 4
Bottom View...1-10 Figure 1-4. Disassembly Flow...2-3 Figure 2-2. Removing the Battery ...2-4 Figure 2-3. Removing the Speaker Assembly 2-15 Figure 2-12. Removing the Floppy Drive 2-35 Figure 2-24. Removing the Motherboard 2-51 Figure 2-35. Back View ...1-9 Figure 1-3. Front View...1-11 Figure 1-5. Back View ...1-12 Figure 1-6. Resetting the Notebook ...1-17 Figure 1-8. Removing the Hard Disk Drive 2-9 Figure...
Maintenance and Service Guide
Page 33
Disassembly Flow Service Manual Removal and Replacement 2-3 Disassembly Flowchart The following diagram shows the general "path" you will use when disassembling the notebook to access any particular component. Figure 2-1.
Service Manual
Page 3
Contents Product Information...1-1 Features ...1-48 Operation ...1-54 Specifications ...1-58 Internal Design ...1-64 Removal and Replacement 2-1 Disassembly Flowchart ...2-3 Removing the Battery...2-4 Removing a SDRAM Module...2-5 Removing the Wireless LAN Mini-PCI Card 2-7 Removing the Hard Disk Drive...2-9 Replacing Small Parts ...2-11 Removing the ...
Service Manual
Page 4
...the Floppy Drive 2-33 Figure 2-23. Removing the I/R PCA 2-37 Figure 2-25. Removing the CPU Module 2-45 Figure 2-29. Disassembly Flow ...2-3 Figure 2-2. Removing the Battery ...2-4 Figure 2-3. Removing the Audio PCA 2-39 Figure 2-26. Removing the RJ11/1394 Connector Module... Bottom View ...1-50 Figure 1-4. Front View ...1-51 Figure 1-5. Back View...1-52 Figure 1-6. Bottom View ...1-53 Figure 1-7. Resetting the Notebook 1-57 Figure 1-8. Replaceable Module Diagram 1-64 Figure 2-1. Removing the Hard Disk Drive 2-9 Figure 2-8. Removing the Keyboard Cover 2-13 Figure...
Service Manual
Page 74
Disassembly Flow Service Manual Removal and Replacement 2-3 Disassembly Flowchart The following diagram shows the general "path" you will use when disassembling the notebook to access any particular component. Figure 2-1.
HP Pavilion & Compaq Presario Notebook PC - Service Manual
Page 3
... Product Information...1-1 Features ...1-15 Operation ...1-18 Turning the Notebook On and Off 1-18 Checking the Status of the Notebook 1-19 Using Fn Hot Keys ...1-20 Resetting the Notebook ...1-21 Specifications ...1-22 Internal Design ...1-27 Removal and Replacement 2-1 Disassembly Flowchart ...2-3 Removing the Battery (User-Replaceable 2-4 Removing ... 3-5 Diagnostic Tools ...3-18 e-Diagtools Diagnostic Program 3-18 Power-On Self-Test ...3-19 Sycard PCCtest 450/460 PC Card (Optional 3-25 Windows Management Instrumentation (WMI 3-26 BIOS Setup Utility ...3-26 Service Manual iii
HP Pavilion & Compaq Presario Notebook PC - Service Manual
Page 4
... the Notebook 1-21 Figure 1-5. Removing the Hard Disk Drive 2-7 Figure 2-6. Removing the Hard Disk Drive Tray 2-8 Figure 2-7. Removing the Speaker Assembly 2-12 Figure 2-9. Removing the Top Case 2-21 Figure 2-14. Removing the Heatsink (with Fan 2-26 Figure 2-17. Removing the CPU Module 2-29 Figure 2-18. Removing a PCMCIA Door 2-35 Figure 2-22. Disassembly...
HP Pavilion & Compaq Presario Notebook PC - Service Manual
Page 37
Disassembly Flow Service Manual Removal and Replacement 2-3 Disassembly Flowchart The following diagram shows the general "path" you will use when disassembling the notebook to access any particular component. Figure 2-1.
Reference Guide
Page 2
... must be authorized by Macrovision Corporation and is " without warranty of certain U.S. Compaq Notebook Series Reference Guide First Edition (December 2002) Reference Number: 2100/2500/N1050v Part Number: 311069-001 ii Reference Guide and/or other rights owners. Reverse engineering or disassembly is subject to change without notice. Notice © 2002 Hewlett-Packard Company...
Reference Guide
Page 104
... the battery pack if the ambient temperature exceeds 45 °C (113 °F). • Replace only with the notebook are certified as a Class 1 laser devices according to touch the battery contacts. • Do not disassemble the battery. If you come in fire or water. • Handle a damaged or leaking battery with soap and...
Startup Guide Compaq Notebook Series
Page 2
... in the express limited warranty statements accompanying such products. HP shall not be construed as is" without warranty of their respective companies. Reverse engineering or disassembly is intended for technical or editorial errors or omissions contained herein. Notice © 2003 Hewlett-Packard Development Company, L.P. Use of this copyright protection technology must...
Startup Guide Compaq Notebook Series
Page 104
... battery, contact your battery pack, do not allow a metal object to touch the battery contacts. • Do not disassemble the battery. Laser safety The CD-ROM and DVD drives used with the notebook are no serviceable parts inside. Department of Health and Human Services (DHHS) Radiation Performance Standard and International Standards IEC...