Maintenance and Service Guide
Page 53
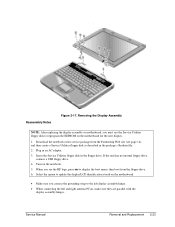
... floppy drive, connect a USB floppy drive. 4. Turn on the motherboard for the new display. 1. Select the option to update the display/LCD identification stored on the motherboard. • Make sure you connect the grounding strap to reprogram the EEPROM on the notebook. 5. Service Manual Removal ...23 Insert the Service Utilities floppy disk in an AC adapter. 3. Download the notebook series service package from the Partnership Web site (see the HP logo, press esc to display the boot menu, then boot from the floppy drive. 6. Plug in the floppy drive. Removing the Display Assembly...
... floppy drive, connect a USB floppy drive. 4. Turn on the motherboard for the new display. 1. Select the option to update the display/LCD identification stored on the motherboard. • Make sure you connect the grounding strap to reprogram the EEPROM on the notebook. 5. Service Manual Removal ...23 Insert the Service Utilities floppy disk in an AC adapter. 3. Download the notebook series service package from the Partnership Web site (see the HP logo, press esc to display the boot menu, then boot from the floppy drive. 6. Plug in the floppy drive. Removing the Display Assembly...

Maintenance and Service Guide
Page 85
If you are held in place by the clips in an AC adapter. 3. Turn on the notebook. 5. When you see page 2-41). If the unit has no internal floppy drive, connect a USB floppy drive. 4. Wireless Models Only • Before installing the motherboard, make sure the round coaxial cables from the antenna ...bottom case. • Make sure there is sufficient length to the front antenna PCA cables so they can easily be connected to display the boot menu, and then boot from the Partnership Web site (see page vii), and create a Service Utilities floppy disk as described in the floppy drive.
If you are held in place by the clips in an AC adapter. 3. Turn on the notebook. 5. When you see page 2-41). If the unit has no internal floppy drive, connect a USB floppy drive. 4. Wireless Models Only • Before installing the motherboard, make sure the round coaxial cables from the antenna ...bottom case. • Make sure there is sufficient length to the front antenna PCA cables so they can easily be connected to display the boot menu, and then boot from the Partnership Web site (see page vii), and create a Service Utilities floppy disk as described in the floppy drive.
Maintenance and Service Guide
Page 127
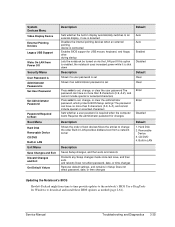
... Power Off Security Menu User Password is Administrator Password is Set User Password Set Administrator Password Password Required to Boot Boot Menu Hard Disk Removable Device CD/DVD Built-in LAN Exit Menu Save Changes and Exit Discard Changes and Exit Get Default Values ...internal pointing devices when an external pointing device is connected Enables BIOS support for USB mouse, keyboard, and floppy drive during startup Lets the notebook be turned on via the LAN port If this option is enabled, the notebook uses increased power while it is shut down Description Shows if a user password...
... Power Off Security Menu User Password is Administrator Password is Set User Password Set Administrator Password Password Required to Boot Boot Menu Hard Disk Removable Device CD/DVD Built-in LAN Exit Menu Save Changes and Exit Discard Changes and Exit Get Default Values ...internal pointing devices when an external pointing device is connected Enables BIOS support for USB mouse, keyboard, and floppy drive during startup Lets the notebook be turned on via the LAN port If this option is enabled, the notebook uses increased power while it is shut down Description Shows if a user password...
Service Manual
Page 67
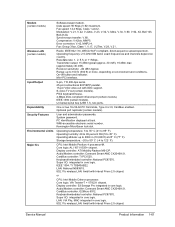
..., 115,200-bps serial. 25-pin bi-directional ECP/EPP parallel. 15-pin VGA video-out with Intersil Prism 2.5 chipset. Universal serial bus (USB 1.1), two ports. Kensington MicroSaver lock slot. Display controller: ATI Mobility Radeon M6-C/P. Core logic: VIA Twister-T + VT8231 chipset. Super I /O: ... channels depend on environment and conditions. Range: up to 3000 m (10,000 ft) at boot. PS/2 keyboard/mouse. 4-Mbps IrDA-compliant infrared port (certain models). One or two 16-/32-bit PC Card slots, Type II or III, CardBus enabled. CardBus controller: TI PC1520. Fax: Group ...
..., 115,200-bps serial. 25-pin bi-directional ECP/EPP parallel. 15-pin VGA video-out with Intersil Prism 2.5 chipset. Universal serial bus (USB 1.1), two ports. Kensington MicroSaver lock slot. Display controller: ATI Mobility Radeon M6-C/P. Core logic: VIA Twister-T + VT8231 chipset. Super I /O: ... channels depend on environment and conditions. Range: up to 3000 m (10,000 ft) at boot. PS/2 keyboard/mouse. 4-Mbps IrDA-compliant infrared port (certain models). One or two 16-/32-bit PC Card slots, Type II or III, CardBus enabled. CardBus controller: TI PC1520. Fax: Group ...

Service Manual
Page 96
... the display/LCD identification stored on the motherboard. • Make sure you see the HP logo, press ESC to display the boot menu, then boot from the Partnership Web site (see page vii), and create a Service Utilities floppy disk as described in the package's Readme file... display assembly or motherboard, you must use the Service Utilities floppy disk to reprogram the EEPROM on the notebook. 5. Service Manual Removal and Replacement 2-25 If the unit has no internal floppy drive, connect a USB floppy drive. 4. Download the notebook series service package from the floppy drive. 6.
... the display/LCD identification stored on the motherboard. • Make sure you see the HP logo, press ESC to display the boot menu, then boot from the Partnership Web site (see page vii), and create a Service Utilities floppy disk as described in the package's Readme file... display assembly or motherboard, you must use the Service Utilities floppy disk to reprogram the EEPROM on the notebook. 5. Service Manual Removal and Replacement 2-25 If the unit has no internal floppy drive, connect a USB floppy drive. 4. Download the notebook series service package from the floppy drive. 6.

Service Manual
Page 128
... the package's Readme file. 2. Bending any EMI spring could cause a motherboard short. If the unit has no internal floppy drive, connect a USB floppy drive. 4. Wireless Models Only • Before installing the motherboard, make sure the round coaxial cables from the Partnership Web site (see page... 2-60. Reassembly Notes Important After replacing the display assembly or motherboard, you must use the Service Utilities floppy disk to boot. Download the notebook Series service package from the antenna PCAs are replacing the CPU module, you must reprogram the BIOS IC, preferably with the...
... the package's Readme file. 2. Bending any EMI spring could cause a motherboard short. If the unit has no internal floppy drive, connect a USB floppy drive. 4. Wireless Models Only • Before installing the motherboard, make sure the round coaxial cables from the Partnership Web site (see page... 2-60. Reassembly Notes Important After replacing the display assembly or motherboard, you must use the Service Utilities floppy disk to boot. Download the notebook Series service package from the antenna PCAs are replacing the CPU module, you must reprogram the BIOS IC, preferably with the...
Service Manual
Page 156
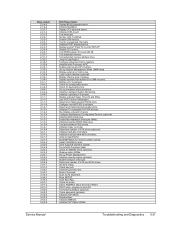
...Jump to UserPatch2. Display shadow-area message. Disable onboard Super I /O ports. Initialize PC-compatible PnP ISA devices. Test and initialize PS/2 mouse. Initialize floppy controller. Jump ... Service Manual Troubleshooting and Diagnostics 3-21 Test keyboard. Display prompt "Press F2 to boot OS. Test extended memory address lines. Display external L2 cache size. Set up ...BIOS Data Area. Inform ROMPilot about the end of day. Initialize ACPI BIOS. Enable USB devices. Initialize coprocessor if present. Late POST device initialization. Re-initialize onboard I /O ...
...Jump to UserPatch2. Display shadow-area message. Disable onboard Super I /O ports. Initialize PC-compatible PnP ISA devices. Test and initialize PS/2 mouse. Initialize floppy controller. Jump ... Service Manual Troubleshooting and Diagnostics 3-21 Test keyboard. Display prompt "Press F2 to boot OS. Test extended memory address lines. Display external L2 cache size. Set up ...BIOS Data Area. Inform ROMPilot about the end of day. Initialize ACPI BIOS. Enable USB devices. Initialize coprocessor if present. Late POST device initialization. Re-initialize onboard I /O ...

Service Manual
Page 163
...set . Sets whether a user password is connected. Description Shows the order of boot devices. Default Auto Auto Enabled Disabled Default Clear Clear Enter Enter Disabled Default 1. If this option is enabled, the notebook uses increased power while it is set , change the order. The password can... automatically switches to an external display, if one is detected. System Devices Menu Video Display Device External Pointing Devices Legacy USB Support Wake On LAN from Power Off Security Menu User Password is Administrator Password is Set User Password Set Administrator Password Password Required...
...set . Sets whether a user password is connected. Description Shows the order of boot devices. Default Auto Auto Enabled Disabled Default Clear Clear Enter Enter Disabled Default 1. If this option is enabled, the notebook uses increased power while it is set , change the order. The password can... automatically switches to an external display, if one is detected. System Devices Menu Video Display Device External Pointing Devices Legacy USB Support Wake On LAN from Power Off Security Menu User Password is Administrator Password is Set User Password Set Administrator Password Password Required...

HP Pavilion & Compaq Presario Notebook PC - Service Manual
Page 30
...-sequence spread-spectrum. Raw data rate: 1, 2, 5.5, or 11 Mbps. Range: up to 3000 m (10,000 ft) at boot. S-video TV out (certain models). Universal serial bus (USB 1.1), two ports. User and administrator passwords. Operating temperature: 5 to 35° C (41 to 100 m (300 ft) or...chipset. 1-24 Product Information Service Manual Fax speed: 14.4 Kbps, Class 1 and 2. One or two 16-/32-bit PC Card slots, Type II or III, CardBus enabled. PC identification displayed at 25° C (77° F). CPU: Intel Mobile Pentium 4 processor-M. Kensington MicroSaver lock slot. ...
...-sequence spread-spectrum. Raw data rate: 1, 2, 5.5, or 11 Mbps. Range: up to 3000 m (10,000 ft) at boot. S-video TV out (certain models). Universal serial bus (USB 1.1), two ports. User and administrator passwords. Operating temperature: 5 to 35° C (41 to 100 m (300 ft) or...chipset. 1-24 Product Information Service Manual Fax speed: 14.4 Kbps, Class 1 and 2. One or two 16-/32-bit PC Card slots, Type II or III, CardBus enabled. PC identification displayed at 25° C (77° F). CPU: Intel Mobile Pentium 4 processor-M. Kensington MicroSaver lock slot. ...

HP Pavilion & Compaq Presario Notebook PC - Service Manual
Page 53
... stored on the motherboard. • Make sure you must use the Service Utilities floppy disk to reprogram the EEPROM on the notebook. 5. Download the notebook series service package from the floppy drive. 6. Service Manual Removal and Replacement 2-19 Reassembly Notes Important After replacing the display assembly...assembly hinges. If the unit has no internal floppy drive, connect a USB floppy drive. 4. Turn on the motherboard for the new display. 1. When you see the HP logo, press ESC to display the boot menu, then boot from the Partnership Web site (see page vi), and create a ...
... stored on the motherboard. • Make sure you must use the Service Utilities floppy disk to reprogram the EEPROM on the notebook. 5. Download the notebook series service package from the floppy drive. 6. Service Manual Removal and Replacement 2-19 Reassembly Notes Important After replacing the display assembly...assembly hinges. If the unit has no internal floppy drive, connect a USB floppy drive. 4. Turn on the motherboard for the new display. 1. When you see the HP logo, press ESC to display the boot menu, then boot from the Partnership Web site (see page vi), and create a ...

HP Pavilion & Compaq Presario Notebook PC - Service Manual
Page 66
...IC A new BIOS IC contains only enough basic programming to enable the notebook to it that can easily be connected to reprogram the EEPROM on the notebook. 5. If the unit has no internal floppy drive, connect a USB floppy drive. 4. When you must reprogram the BIOS IC, preferably ...with the latest BIOS-see page 2-35. 2-32 Removal and Replacement Service Manual The motherboard has EMI springs attached to boot. Download the notebook Series service package from the Partnership Web ...
...IC A new BIOS IC contains only enough basic programming to enable the notebook to it that can easily be connected to reprogram the EEPROM on the notebook. 5. If the unit has no internal floppy drive, connect a USB floppy drive. 4. When you must reprogram the BIOS IC, preferably ...with the latest BIOS-see page 2-35. 2-32 Removal and Replacement Service Manual The motherboard has EMI springs attached to boot. Download the notebook Series service package from the Partnership Web ...

HP Pavilion & Compaq Presario Notebook PC - Service Manual
Page 94
...USB devices. Test extended memory address lines. Set up Multi Processor table. Disable onboard Super I /O ports. Configure non-MCD IDE controllers. Re-initialize onboard I /O ports and IRQs. Initialize Extended BIOS Data Area. Determine number of ATA and SCSI drives. Initialize hard-disk controllers. Jump to boot... configuration errors. Clear Boot flag. Initialize SMBIOS. Initialize MultiBoot. Initialize POST display service. Check for boot. Initialize Intelligent System Monitoring. Late POST device initialization. Initialize PC-compatible PnP ISA devices...
...USB devices. Test extended memory address lines. Set up Multi Processor table. Disable onboard Super I /O ports. Configure non-MCD IDE controllers. Re-initialize onboard I /O ports and IRQs. Initialize Extended BIOS Data Area. Determine number of ATA and SCSI drives. Initialize hard-disk controllers. Jump to boot... configuration errors. Clear Boot flag. Initialize SMBIOS. Initialize MultiBoot. Initialize POST display service. Check for boot. Initialize Intelligent System Monitoring. Late POST device initialization. Initialize PC-compatible PnP ISA devices...

HP Pavilion & Compaq Presario Notebook PC - Service Manual
Page 101
...set, change , or clear the user password. Built-in LAN provides diskless boot from time to time provide updates to the notebook's BIOS. Enter Enter Disabled Default 1. Removable Device 3. Lets the notebook be turned on via the LAN port. Restores default settings, and remains ...Built-in LAN Updating the Notebook's BIOS Hewlett-Packard might from a network server. Use e-DiagTools for USB mouse, keyboard, and floppy drive during startup. Shows if an administrator password is required when the computer boots. Description Shows the order of boot devices. Discards any Setup ...
...set, change , or clear the user password. Built-in LAN provides diskless boot from time to time provide updates to the notebook's BIOS. Enter Enter Disabled Default 1. Removable Device 3. Lets the notebook be turned on via the LAN port. Restores default settings, and remains ...Built-in LAN Updating the Notebook's BIOS Hewlett-Packard might from a network server. Use e-DiagTools for USB mouse, keyboard, and floppy drive during startup. Shows if an administrator password is required when the computer boots. Description Shows the order of boot devices. Discards any Setup ...

Reference Guide
Page 87
...available, try another battery. If the notebook stops responding after booting Check whether you 're using the reset button. Contact your notebook also has a built-in the AC adapter again, and reset the notebook using a USB floppy drive, use the BIOS Setup utility Boot menu to turn it on •... Connect the AC adapter. • Reset the notebook by removing it on. • If the notebook still doesn't respond, remove the battery and AC adapter, remove any PC cards, and undock the notebook...
...available, try another battery. If the notebook stops responding after booting Check whether you 're using the reset button. Contact your notebook also has a built-in the AC adapter again, and reset the notebook using a USB floppy drive, use the BIOS Setup utility Boot menu to turn it on •... Connect the AC adapter. • Reset the notebook by removing it on. • If the notebook still doesn't respond, remove the battery and AC adapter, remove any PC cards, and undock the notebook...

Reference Guide
Page 116
...modem, 37 Bluetooth business cards, 45 configuring, 44 sending files, 45 troubleshooting, 82 tuning on, 43 turning off, 44 wireless, 43 boot device order, 17, 86 Boot menu (BIOS), 86 brightness, adjusting, 19 business cards, 45 Caps Lock, 2, 5 Cardbus cards, 48 cards, PCMCIA, 48 CD-... 67 encryption, 39 ergonomics, 10 Exit menu (BIOS), 86 extended memory, 85 external monitor port, 3 location, 6 files, protecting, 26 floppy disk drive location, 3, 6 USB, 81 Fn key + Back Space (mute), 19 + F1 (decrease brightness), 19 + F12 (hibernation), 19 + F2 (increase brightness), 19 + F5 (display select), 19...
...modem, 37 Bluetooth business cards, 45 configuring, 44 sending files, 45 troubleshooting, 82 tuning on, 43 turning off, 44 wireless, 43 boot device order, 17, 86 Boot menu (BIOS), 86 brightness, adjusting, 19 business cards, 45 Caps Lock, 2, 5 Cardbus cards, 48 cards, PCMCIA, 48 CD-... 67 encryption, 39 ergonomics, 10 Exit menu (BIOS), 86 extended memory, 85 external monitor port, 3 location, 6 files, protecting, 26 floppy disk drive location, 3, 6 USB, 81 Fn key + Back Space (mute), 19 + F1 (decrease brightness), 19 + F12 (hibernation), 19 + F2 (increase brightness), 19 + F5 (display select), 19...

Startup Guide Compaq Notebook Series
Page 87
... Connect the AC adapter. • Reset the notebook by removing it and pressing the pad on . • If the notebook still doesn't respond, remove the battery and AC adapter, remove any PC Cards, and undock the notebook if docked. As soon as the boot device. • If you're using the ...• Check the port settings in the AC adapter again, and reset the notebook using a USB diskette drive, use the BIOS Setup utility Boot menu to make sure the USB diskette drive is enabled. If the notebook won't boot from the diskette drive • Make sure the diskette drive is selected as ...
... Connect the AC adapter. • Reset the notebook by removing it and pressing the pad on . • If the notebook still doesn't respond, remove the battery and AC adapter, remove any PC Cards, and undock the notebook if docked. As soon as the boot device. • If you're using the ...• Check the port settings in the AC adapter again, and reset the notebook using a USB diskette drive, use the BIOS Setup utility Boot menu to make sure the USB diskette drive is enabled. If the notebook won't boot from the diskette drive • Make sure the diskette drive is selected as ...

Startup Guide Compaq Notebook Series
Page 116
..., modem, 37 Bluetooth business cards, 45 configuring, 44 sending files, 45 troubleshooting, 81 tuning on, 43 turning off, 44 wireless, 43 boot device order, 17, 85 Boot menu (BIOS), 85 brightness, adjusting, 19 business cards, 45 Cable lock, 25 Cardbus cards, 48 cards, PCMCIA, 48 CD-ROM drive..., 52 LAN, 38 wireless network, 39 data protection, 28 DDR-266 RAM, 72 default BIOS settings, 84 110 Reference Guide devices boot order, 85 temporary boot order, 17 diskette drive location, 4, 5 USB, 80 display BIOS settings, 84 brightness, 19, 28, 33 dual display, 52 dual monitor, 52 memory, 84 port, 4, ...
..., modem, 37 Bluetooth business cards, 45 configuring, 44 sending files, 45 troubleshooting, 81 tuning on, 43 turning off, 44 wireless, 43 boot device order, 17, 85 Boot menu (BIOS), 85 brightness, adjusting, 19 business cards, 45 Cable lock, 25 Cardbus cards, 48 cards, PCMCIA, 48 CD-ROM drive..., 52 LAN, 38 wireless network, 39 data protection, 28 DDR-266 RAM, 72 default BIOS settings, 84 110 Reference Guide devices boot order, 85 temporary boot order, 17 diskette drive location, 4, 5 USB, 80 display BIOS settings, 84 brightness, 19, 28, 33 dual display, 52 dual monitor, 52 memory, 84 port, 4, ...


