Resolving Start Up and No Boot Problems Checklist
Page 2
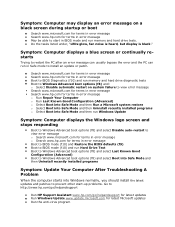
Symptom: Computer displays a blue screen or continually restarts Trying to restart the PC after an error message can usually bypass the error and the PC can run memory and hard drive tests. Do the tasks listed under, "LEDs glow, fan noise is heard, but display is black." ... and select Boot into Safe Mode and then Uninstall recently installed programs Symptom: Update Your Computer After Troubleshooting A Problem When the computer starts into Windows normally, you should install the latest updates and patches to prevent other start in BIOS mode and run in error message o Search www.hp....
Symptom: Computer displays a blue screen or continually restarts Trying to restart the PC after an error message can usually bypass the error and the PC can run memory and hard drive tests. Do the tasks listed under, "LEDs glow, fan noise is heard, but display is black." ... and select Boot into Safe Mode and then Uninstall recently installed programs Symptom: Update Your Computer After Troubleshooting A Problem When the computer starts into Windows normally, you should install the latest updates and patches to prevent other start in BIOS mode and run in error message o Search www.hp....

Getting Started - Windows 7
Page 2
... (hardware and software) within 14 days for requesting a full refund of the computer, please contact your sole remedy is a trademark of your computer. Microsoft and Windows are common to change without notice. The information contained herein is a trademark owned by Hewlett-Packard Company under license. Second Edition: June 2010 First Edition...
... (hardware and software) within 14 days for requesting a full refund of the computer, please contact your sole remedy is a trademark of your computer. Microsoft and Windows are common to change without notice. The information contained herein is a trademark owned by Hewlett-Packard Company under license. Second Edition: June 2010 First Edition...
Getting Started - Windows 7
Page 5
... 14 Identifying the QuickWeb control icons 14 Identifying the QuickWeb LaunchBar icons 14 Identifying the QuickWeb notification icons 15 Configuring the network ...17 Starting Microsoft Windows ...17 Turning HP QuickWeb on and off ...17 4 Networking Using an Internet service provider (ISP 19 Connecting to a wireless network ...19 Connecting to an existing...
... 14 Identifying the QuickWeb control icons 14 Identifying the QuickWeb LaunchBar icons 14 Identifying the QuickWeb notification icons 15 Configuring the network ...17 Starting Microsoft Windows ...17 Turning HP QuickWeb on and off ...17 4 Networking Using an Internet service provider (ISP 19 Connecting to a wireless network ...19 Connecting to an existing...
Getting Started - Windows 7
Page 6
... a system recovery ...38 Recovering using the dedicated recovery partition (select models only 38 Recovering using the recovery discs 39 Backing up your information ...39 Using Windows Backup and Restore 39 Using system restore points 40 When to create restore points 40 Create a system restore point 40 Restore to a previous date and...
... a system recovery ...38 Recovering using the dedicated recovery partition (select models only 38 Recovering using the recovery discs 39 Backing up your information ...39 Using Windows Backup and Restore 39 Using system restore points 40 When to create restore points 40 Create a system restore point 40 Restore to a previous date and...

Getting Started - Windows 7
Page 12
...Scroll the page up or down, or when pressed in combination with the fn key. Keys Component (1) (2) (3) esc key fn key Windows logo key (4) Windows applications key (5) Arrow keys (6) Action keys Description Displays system information when pressed in combination with the fn key, move to know your computer...system functions. 6 Chapter 2 Getting to the beginning or end of the document. Displays a shortcut menu for items beneath the pointer. Displays the Windows Start menu. Execute frequently used system functions when pressed in combination with an arrow key or the esc key.
...Scroll the page up or down, or when pressed in combination with the fn key. Keys Component (1) (2) (3) esc key fn key Windows logo key (4) Windows applications key (5) Arrow keys (6) Action keys Description Displays system information when pressed in combination with the fn key, move to know your computer...system functions. 6 Chapter 2 Getting to the beginning or end of the document. Displays a shortcut menu for items beneath the pointer. Displays the Windows Start menu. Execute frequently used system functions when pressed in combination with an arrow key or the esc key.

Getting Started - Windows 7
Page 14
If the computer has stopped responding and Windows® shutdown procedures are ineffective, slide and hold the power switch for at least 4 seconds to the computer. RJ-45 (network) jack and Connects a network ...
If the computer has stopped responding and Windows® shutdown procedures are ineffective, slide and hold the power switch for at least 4 seconds to the computer. RJ-45 (network) jack and Connects a network ...

Getting Started - Windows 7
Page 18
QuickWeb allows you to access the following applications without the need to first start Windows. ● Web browser ● Chat ● Skype (select models only) ● Web e-mail ● Web calendar ● Music Player ● Photo Viewer NOTE: For additional ... operating system. NOTE: To turn on or turn off HP QuickWeb, refer to the QuickWeb software Help. 3 HP QuickWeb (select models only) After completing the Windows setup the first time you turn on page 17. 12 Chapter 3 HP QuickWeb (select models only) After you have enabled QuickWeb, the QuickWeb Home screen...
QuickWeb allows you to access the following applications without the need to first start Windows. ● Web browser ● Chat ● Skype (select models only) ● Web e-mail ● Web calendar ● Music Player ● Photo Viewer NOTE: For additional ... operating system. NOTE: To turn on or turn off HP QuickWeb, refer to the QuickWeb software Help. 3 HP QuickWeb (select models only) After completing the Windows setup the first time you turn on page 17. 12 Chapter 3 HP QuickWeb (select models only) After you have enabled QuickWeb, the QuickWeb Home screen...

Getting Started - Windows 7
Page 19
Turn on the QuickWeb timer and changing the timer settings, refer to launch an application. If you do not move your mouse, or press a key for 15 seconds, the computer starts Microsoft Windows. Starting HP QuickWeb 13 Click an icon on the QuickWeb Home screen to the HP QuickWeb software Help. NOTE: When the HP QuickWeb Home screen first appears, it displays an automatic timer above the Start Windows icon. Starting HP QuickWeb 1. The HP QuickWeb Home screen appears. 2. For more information on the computer.
Turn on the QuickWeb timer and changing the timer settings, refer to launch an application. If you do not move your mouse, or press a key for 15 seconds, the computer starts Microsoft Windows. Starting HP QuickWeb 13 Click an icon on the QuickWeb Home screen to the HP QuickWeb software Help. NOTE: When the HP QuickWeb Home screen first appears, it displays an automatic timer above the Start Windows icon. Starting HP QuickWeb 1. The HP QuickWeb Home screen appears. 2. For more information on the computer.

Getting Started - Windows 7
Page 20
... icons Icon Function Launches the Web browser. Launches Web e-mail so you to your e-mail account. Identifying the QuickWeb control icons Icon Function Launches the Windows operating system. You can view your recent e-mail, check for new e-mail, and configure your favorite Web sites. Launches Skype (select models only). Skype is...
... icons Icon Function Launches the Web browser. Launches Web e-mail so you to your e-mail account. Identifying the QuickWeb control icons Icon Function Launches the Windows operating system. You can view your recent e-mail, check for new e-mail, and configure your favorite Web sites. Launches Skype (select models only). Skype is...
Getting Started - Windows 7
Page 21
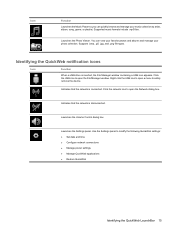
...can quickly browse and manage your photo collection. Supports .bmp, .gif, .jpg, and .png file types. Click the network icon to open the File Manager window. Launches the Settings panel. Click the USB icon to open a menu to modify the following QuickWeb settings: ● Set date and time ● Configure network... to safely remove the device. Launches the Photo Viewer. Identifying the QuickWeb notification icons Icon Function When a USB drive is inserted, the File Manager window containing a USB icon appears. Right-click the USB icon to open the Network dialog box.
...can quickly browse and manage your photo collection. Supports .bmp, .gif, .jpg, and .png file types. Click the network icon to open the File Manager window. Launches the Settings panel. Click the USB icon to open a menu to modify the following QuickWeb settings: ● Set date and time ● Configure network... to safely remove the device. Launches the Photo Viewer. Identifying the QuickWeb notification icons Icon Function When a USB drive is inserted, the File Manager window containing a USB icon appears. Right-click the USB icon to open the Network dialog box.

Getting Started - Windows 7
Page 23
... left of the QuickWeb LaunchBar. 3. The QuickWeb dialog box is displayed. 2. Configuring the network 17 Click the Settings icon in the Windows dialog box. Starting Microsoft Windows 1. The HP QuickWeb Home screen appears. 2. Click Yes in the system tray. 2. To start every time you must either wait...check box. Select the Status tab. 3. Turn on and off QuickWeb. NOTE: If QuickWeb has been activated, it will start Microsoft® Windows, you turn on setting up a wireless connection in the QuickWeb Home screen. To turn on page 17. Click OK. For more information on...
... left of the QuickWeb LaunchBar. 3. The QuickWeb dialog box is displayed. 2. Configuring the network 17 Click the Settings icon in the Windows dialog box. Starting Microsoft Windows 1. The HP QuickWeb Home screen appears. 2. Click Yes in the system tray. 2. To start every time you must either wait...check box. Select the Status tab. 3. Turn on and off QuickWeb. NOTE: If QuickWeb has been activated, it will start Microsoft® Windows, you turn on setting up a wireless connection in the QuickWeb Home screen. To turn on page 17. Click OK. For more information on...
Getting Started - Windows 7
Page 25
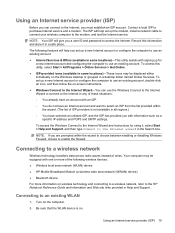
... Reference Guide and information and Web site links provided in Help and Support. Using an Internet service provider (ISP) Before you can use the Windows Connect to the Internet Wizard to connect to the Internet in any of these situations: ◦ You already have an account with an ISP.... it , select Start > Help and Support, and then type Connect to use an existing account, double-click an icon, and then follow the on the Windows desktop or grouped in the Search box. Record this utility, select Start > All Programs > Online Services > Get Online. ● ISP-provided icons (available...
... Reference Guide and information and Web site links provided in Help and Support. Using an Internet service provider (ISP) Before you can use the Windows Connect to the Internet Wizard to connect to the Internet in any of these situations: ◦ You already have an account with an ISP.... it , select Start > Help and Support, and then type Connect to use an existing account, double-click an icon, and then follow the on the Windows desktop or grouped in the Search box. Record this utility, select Start > All Programs > Online Services > Get Online. ● ISP-provided icons (available...
Getting Started - Windows 7
Page 28
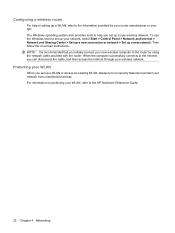
NOTE: It is recommended that you set up a new wireless network. The Windows operating system also provides tools to help in setting up a WLAN, refer to set up a WLAN or access an existing WLAN, always turn on -screen ... network, select Start > Control Panel > Network and Internet > Network and Sharing Center > Set up a new connection or network > Set up a new network. To use the Windows tools to the information provided by using the network cable provided with the router. When the computer successfully connects to the Internet, you set up...
NOTE: It is recommended that you set up a new wireless network. The Windows operating system also provides tools to help in setting up a WLAN, refer to set up a WLAN or access an existing WLAN, always turn on -screen ... network, select Start > Control Panel > Network and Internet > Network and Sharing Center > Set up a new connection or network > Set up a new network. To use the Windows tools to the information provided by using the network cable provided with the router. When the computer successfully connects to the Internet, you set up...
Getting Started - Windows 7
Page 29
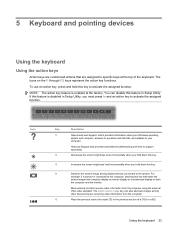
.... Help and Support also provides automated troubleshooting and links to your computer. Icon Key Description f1 Opens Help and Support, which provides information about your Windows operating system and computer, answers to questions and tutorials, and updates to support specialists. f5 Plays the previous track of an audio CD or the...
.... Help and Support also provides automated troubleshooting and links to your computer. Icon Key Description f1 Opens Help and Support, which provides information about your Windows operating system and computer, answers to questions and tutorials, and updates to support specialists. f5 Plays the previous track of an audio CD or the...

Getting Started - Windows 7
Page 31
.... Simply sliding your computer, and select Mouse settings. To access Mouse Properties, select Start > Devices and Printers. Setting pointing device preferences Use Mouse Properties in Windows® to the scroll zone does not activate the scrolling function.
.... Simply sliding your computer, and select Mouse settings. To access Mouse Properties, select Start > Devices and Printers. Setting pointing device preferences Use Mouse Properties in Windows® to the scroll zone does not activate the scrolling function.
Getting Started - Windows 7
Page 33
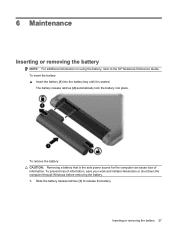
... is the sole power source for the computer can cause loss of information, save your work and initiate Hibernation or shut down the computer through Windows before removing the battery. 1. To prevent loss of information. To insert the battery: ▲ Insert the battery (1) into place. 6 Maintenance Inserting or removing the battery...
... is the sole power source for the computer can cause loss of information, save your work and initiate Hibernation or shut down the computer through Windows before removing the battery. 1. To prevent loss of information. To insert the battery: ▲ Insert the battery (1) into place. 6 Maintenance Inserting or removing the battery...
Getting Started - Windows 7
Page 44
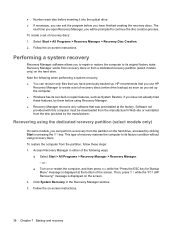
... "F11 (HP Recovery)" message is displayed at the factory. Follow the on the screen. 2. HP recommends that you have previously backed up the computer. ● Windows has its own built-in repair features, such as System Restore. or - ● Turn on -screen instructions. 38 Chapter 7 Backup and recovery The next time... into the optical drive. ● If necessary, you can perform a recovery from the partition on the hard drive. Access Recovery Manager in the Recovery Manager window. 3.
... "F11 (HP Recovery)" message is displayed at the factory. Follow the on the screen. 2. HP recommends that you have previously backed up the computer. ● Windows has its own built-in repair features, such as System Restore. or - ● Turn on -screen instructions. 38 Chapter 7 Backup and recovery The next time... into the optical drive. ● If necessary, you can perform a recovery from the partition on the hard drive. Access Recovery Manager in the Recovery Manager window. 3.
Getting Started - Windows 7
Page 45
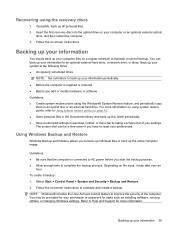
...points on page 40. ● Store personal files in the Documents library and back up this folder periodically. ● Save customized settings in a window, toolbar, or menu bar by taking a screen shot of the computer. To create a backup: 1. Depending on -screen instructions to an optional ... computer. 3. The screen shot can back up your permission or password for tasks such as installing software, running utilities, or changing Windows settings. Insert the first recovery disc into the optical drive on your preferences. Backing up your information You should back up all personal...
...points on page 40. ● Store personal files in the Documents library and back up this folder periodically. ● Save customized settings in a window, toolbar, or menu bar by taking a screen shot of the computer. To create a backup: 1. Depending on -screen instructions to an optional ... computer. 3. The screen shot can back up your permission or password for tasks such as installing software, running utilities, or changing Windows settings. Insert the first recovery disc into the optical drive on your preferences. Backing up your information You should back up all personal...
Getting Started - Windows 7
Page 48
.... This certificate is located inside the battery bay of your computer. The serial number label is located under the vanity cover of Authenticity-Contains the Windows® Product Key.
.... This certificate is located inside the battery bay of your computer. The serial number label is located under the vanity cover of Authenticity-Contains the Windows® Product Key.
Getting Started - Windows 7
Page 50
... 24 arrow keys, identifying 6 audio-in (microphone) jack, identifying 9 audio-out (headphone) jack, identifying 9 B backing up customized window, toolbar, and menu bar settings 39 personal files 39 battery bay 11 battery release latches 11 battery, replacing 27 buttons left TouchPad 4 ...using 19 J jacks audio-in (microphone) 9 audio-out (headphone) 9 RJ-45 (network) 8 K keys action 6 arrow 6 esc 6 fn 6 Windows applications 6 Windows logo 6 L labels Microsoft Certificate of Authenticity 42 regulatory 42 serial number 41 latches, battery release 11 lights AC adapter 9 caps lock 5 drive 9 mute ...
... 24 arrow keys, identifying 6 audio-in (microphone) jack, identifying 9 audio-out (headphone) jack, identifying 9 B backing up customized window, toolbar, and menu bar settings 39 personal files 39 battery bay 11 battery release latches 11 battery, replacing 27 buttons left TouchPad 4 ...using 19 J jacks audio-in (microphone) 9 audio-out (headphone) 9 RJ-45 (network) 8 K keys action 6 arrow 6 esc 6 fn 6 Windows applications 6 Windows logo 6 L labels Microsoft Certificate of Authenticity 42 regulatory 42 serial number 41 latches, battery release 11 lights AC adapter 9 caps lock 5 drive 9 mute ...


