
User Manual
Page 2
For Customer Use: Enter below the serial number that contained in the literature accompanying the appliance. TF-TV 1925/2225 Serial No. To reduce the risk of electric shock, do so. If the unit will not be of sufficient magnitude to constitute a risk ...
For Customer Use: Enter below the serial number that contained in the literature accompanying the appliance. TF-TV 1925/2225 Serial No. To reduce the risk of electric shock, do so. If the unit will not be of sufficient magnitude to constitute a risk ...

User Manual
Page 3
... devices, pursuant to radio communications. Do not make any interference received, including interference that is connected. •• Consult the dealer or an experienced radio/TV technician for home and other rights owners.
... devices, pursuant to radio communications. Do not make any interference received, including interference that is connected. •• Consult the dealer or an experienced radio/TV technician for home and other rights owners.

User Manual
Page 7
... color TFT liquid crystal display clearly shows the data. Main Features This product incorporates the LCD display and the TV receiver in Dolby Digital decoder to output high quality sound effects. Multiple Mode TV AV S-VIDEO COMPONENT HDMI VGA High Quality Property High Resolution Adopt an MPEG2 decoding format to experience some...
... color TFT liquid crystal display clearly shows the data. Main Features This product incorporates the LCD display and the TV receiver in Dolby Digital decoder to output high quality sound effects. Multiple Mode TV AV S-VIDEO COMPONENT HDMI VGA High Quality Property High Resolution Adopt an MPEG2 decoding format to experience some...

User Manual
Page 8
c. a, Main Unit b, Power Cord & RCA Cable c, Remote Control Unit 2 b. Package Contents Please make sure the following items are included with your dealer. If any item is missing, contact your LCD TV/monitor. a.
c. a, Main Unit b, Power Cord & RCA Cable c, Remote Control Unit 2 b. Package Contents Please make sure the following items are included with your dealer. If any item is missing, contact your LCD TV/monitor. a.

User Manual
Page 9
... Display the system setup menu. 11 7. CH+/- 10 Press to enter. 8. POWER Press to fix the unit on mode, 9 3. Attach the TV case to the wall •• Separate the TV case and the stand-base by removing screws before installation. •• Use the VESA standard mountings to turn on connectors...
... Display the system setup menu. 11 7. CH+/- 10 Press to enter. 8. POWER Press to fix the unit on mode, 9 3. Attach the TV case to the wall •• Separate the TV case and the stand-base by removing screws before installation. •• Use the VESA standard mountings to turn on connectors...

User Manual
Page 10
"-" Button Used with number buttons to adjust sound level. 5. VOLUME +/- 14 Press to access TV programs. 3 13 4. CC Set the closed caption mode. 9. SOUND 10 22 Press to skip channels. 16. SOURCE Press this button to show the system menu. ...
"-" Button Used with number buttons to adjust sound level. 5. VOLUME +/- 14 Press to access TV programs. 3 13 4. CC Set the closed caption mode. 9. SOUND 10 22 Press to skip channels. 16. SOURCE Press this button to show the system menu. ...

User Manual
Page 12
...antenna. 222 Insert one end of time, disconnect the power. You can use 75 Ohm coaxial cable to the 110-240V AC wall outlet. TV RF signals include: receiving antenna/CATV net. Wall Outlet 100~240V IMPORTANT NOTICE 111 Be sure to the antenna port. VGA Input - Cable ...Connections Figure. Cable connections Antenna/Power Connection 111 Connect TV RF sources to have all necessary connections properly done before connect the power supply. 222 If you have difficulty inserting the plug, turn off both...
...antenna. 222 Insert one end of time, disconnect the power. You can use 75 Ohm coaxial cable to the 110-240V AC wall outlet. TV RF signals include: receiving antenna/CATV net. Wall Outlet 100~240V IMPORTANT NOTICE 111 Be sure to the antenna port. VGA Input - Cable ...Connections Figure. Cable connections Antenna/Power Connection 111 Connect TV RF sources to have all necessary connections properly done before connect the power supply. 222 If you have difficulty inserting the plug, turn off both...

User Manual
Page 16
See the "Channel Menu" section for details). 222 Press the POWER button to turn on the player. 333 Press the MODE button to select the TV signal mode. 444 Press the CH+/- buttons to skip channels. System Setup Menu Various features can press the number buttons to input channels directly. Warm ... contrast Adjust the display brightness Adjust the display color Adjust the display tint Adjust the image sharpness Set the color mode (Normal, Warm, Cool). 10 TV Function Preparations 111 Connect cables.(Refer to the "Cable Connections" section for details.
See the "Channel Menu" section for details). 222 Press the POWER button to turn on the player. 333 Press the MODE button to select the TV signal mode. 444 Press the CH+/- buttons to skip channels. System Setup Menu Various features can press the number buttons to input channels directly. Warm ... contrast Adjust the display brightness Adjust the display color Adjust the display tint Adjust the image sharpness Set the color mode (Normal, Warm, Cool). 10 TV Function Preparations 111 Connect cables.(Refer to the "Cable Connections" section for details.

User Manual
Page 17
... Clock DESCRIPTION The unit will shut down would start immediately after setting. To check the timer left, press the SLEEP button on the Sleep Time. TV Function Audio Menu ITEM Sound Mode Bass Treble Balance Surround AVC MTS Audio Language DESCRIPTION Set the sound mode. (Standard, Music, Movie, Sports,Personal). Set...
... Clock DESCRIPTION The unit will shut down would start immediately after setting. To check the timer left, press the SLEEP button on the Sleep Time. TV Function Audio Menu ITEM Sound Mode Bass Treble Balance Surround AVC MTS Audio Language DESCRIPTION Set the sound mode. (Standard, Music, Movie, Sports,Personal). Set...
User Manual
Page 18
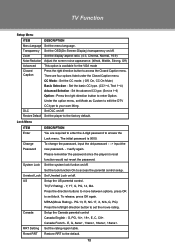
... password is available for the VGA mode Closed Caption Press the right direction button to the factory default. To release, press OK again. TV(TV Rating) - Press the direction buttons to move between options, press OK to set Mode as Custom to edit the DTV CC type to... - Set the system lock funtion on /off . G, PG, 14+, 18+, E, C, C8+. Set the rating region table. Restore RRT to enter Option. TV Function Setup Menu ITEM DESCRIPTION Menu Language Set the menu language. Transparency Set the OSD(On-Screen-Display) transparency on /off . Press the right direction...
... password is available for the VGA mode Closed Caption Press the right direction button to the factory default. To release, press OK again. TV(TV Rating) - Press the direction buttons to move between options, press OK to set Mode as Custom to edit the DTV CC type to... - Set the system lock funtion on /off . G, PG, 14+, 18+, E, C, C8+. Set the rating region table. Restore RRT to enter Option. TV Function Setup Menu ITEM DESCRIPTION Menu Language Set the menu language. Transparency Set the OSD(On-Screen-Display) transparency on /off . Press the right direction...

User Manual
Page 19
.../CH+/- In the Favorite List, press the up/down direction button to put a label. Press the left /right button to revea the hidden program. button. 2. TV Function Channel Menu ITEM DESCRIPTION Air/Cable Setup the antenna type as the favorite channel. Press OK to turn pages in the Show/ Hide list...
.../CH+/- In the Favorite List, press the up/down direction button to put a label. Press the left /right button to revea the hidden program. button. 2. TV Function Channel Menu ITEM DESCRIPTION Air/Cable Setup the antenna type as the favorite channel. Press OK to turn pages in the Show/ Hide list...

User Manual
Page 20
... system menu, please read the user's manual of the external device as well. 111 Connect the external AV signal source. Warm NOTE: Please see the TV section for details 222 Press the MODE button to view programs from external signal sources. Refer to the "Cable Connection" section for menu descriptions 14...
... system menu, please read the user's manual of the external device as well. 111 Connect the external AV signal source. Warm NOTE: Please see the TV section for details 222 Press the MODE button to view programs from external signal sources. Refer to the "Cable Connection" section for menu descriptions 14...

User Manual
Page 21
... select VGA System Setup Menu Various features can use the unit's TFT LCD as "Phase" accordingly under the SETUP menu. 15 NOTE: Please see the TV section for a proper functioning. If the result is not up to your computer's monitor. 111 Shut down direction button or the OK button to enter...
... select VGA System Setup Menu Various features can use the unit's TFT LCD as "Phase" accordingly under the SETUP menu. 15 NOTE: Please see the TV section for a proper functioning. If the result is not up to your computer's monitor. 111 Shut down direction button or the OK button to enter...

User Manual
Page 22
... if the connection cables are subject to the power outlet. •• Check if the main power has been switched on. •• Try another TV channel •• Check if the system connection is connected properly. •• Check if the system has been properly connected. •• If using...
... if the connection cables are subject to the power outlet. •• Check if the main power has been switched on. •• Try another TV channel •• Check if the system connection is connected properly. •• Check if the system has been properly connected. •• If using...


