
User Manual
Page 2
Do not open the cabinet. Wait 30 seconds. • After 30 seconds, plug the unit in and turn it on a circuit different from that to which can radiate radio frequency energy and, if not installed and used in accordance with Class B limits in a ... against harmful interference in Subpart B of Part 15 of the FCC rules. Note: This equipment has been tested and found to correct the interference by turning the equipment off , an electrostatic discharge may cause harmful interference to rain or moisture. However, there is required to comply with the instructions, may be...
Do not open the cabinet. Wait 30 seconds. • After 30 seconds, plug the unit in and turn it on a circuit different from that to which can radiate radio frequency energy and, if not installed and used in accordance with Class B limits in a ... against harmful interference in Subpart B of Part 15 of the FCC rules. Note: This equipment has been tested and found to correct the interference by turning the equipment off , an electrostatic discharge may cause harmful interference to rain or moisture. However, there is required to comply with the instructions, may be...
User Manual
Page 4
... can cause hearing loss. •• To avoid damaging your ears, adjust the Volume to the lowest level before playback, and turn the Volume up to an antenna discharge unit, size of grounding conductors, location of HDMI Licensing LLC. All rights reserved. Note: ...Earphones •• Listen at a high Volume. HDMI, the HDMI logo and High-Definition Multimedia Interface are trademarks of Coby Electronics Corporation. Legal and Trademark Notices Coby is disposed of as the music may , if not disposed of their respective owners unless indicated otherwise. "Dolby" and...
... can cause hearing loss. •• To avoid damaging your ears, adjust the Volume to the lowest level before playback, and turn the Volume up to an antenna discharge unit, size of grounding conductors, location of HDMI Licensing LLC. All rights reserved. Note: ...Earphones •• Listen at a high Volume. HDMI, the HDMI logo and High-Definition Multimedia Interface are trademarks of Coby Electronics Corporation. Legal and Trademark Notices Coby is disposed of as the music may , if not disposed of their respective owners unless indicated otherwise. "Dolby" and...

User Manual
Page 8
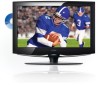
... View 1 9 10 11 12 13 14 2 4 5 6 7 8 3 1. TFT SCREEN Present high resolution pictures 2. SOURCE Select a working mode. 5. MENU 15 Display the system setup menu. 6. Press to turn on connectors. STOP - PLAY/PAUSE - OPEN/CLOSE - Connector Panel 1 17. Unit Stand 18. Wall Mounting - See the Specification page for detailed description on /off the...
... View 1 9 10 11 12 13 14 2 4 5 6 7 8 3 1. TFT SCREEN Present high resolution pictures 2. SOURCE Select a working mode. 5. MENU 15 Display the system setup menu. 6. Press to turn on connectors. STOP - PLAY/PAUSE - OPEN/CLOSE - Connector Panel 1 17. Unit Stand 18. Wall Mounting - See the Specification page for detailed description on /off the...

User Manual
Page 9
.... VOL+/- 16 35 17 Adjust the volume level up /down . 18 19 9. TITLE Access the DVD title menu. 19. LIGHT Turn the front panel light on or off . 20. POWER 1 21 Turn the unit on /off (standby). 2. Stop 13 33 Stop disc playback. 14 34 15 8. A-B 31 11 32 Repeat specifed playback...
.... VOL+/- 16 35 17 Adjust the volume level up /down . 18 19 9. TITLE Access the DVD title menu. 19. LIGHT Turn the front panel light on or off . 20. POWER 1 21 Turn the unit on /off (standby). 2. Stop 13 33 Stop disc playback. 14 34 15 8. A-B 31 11 32 Repeat specifed playback...

User Manual
Page 12
... 111 Connect TV RF sources to have all necessary connections properly done before connect the power supply. 222 If you have difficulty inserting the plug, turn off both units and then connect the VGA jack and the PC Audio In jack with this product. Note that the [POWER] button on the... TV/remote control will not be used as a computer moniter, turn it over and re-insert it. 333 If the product will place the TV into the standby mode, it does not disconnect the device from...
... 111 Connect TV RF sources to have all necessary connections properly done before connect the power supply. 222 If you have difficulty inserting the plug, turn off both units and then connect the VGA jack and the PC Audio In jack with this product. Note that the [POWER] button on the... TV/remote control will not be used as a computer moniter, turn it over and re-insert it. 333 If the product will place the TV into the standby mode, it does not disconnect the device from...

User Manual
Page 16
.... b. For an initial use, you can press the number buttons to input channels directly. See the "Channel Menu" section for details). 222 Press POWER to turn on the player. 333 Press SOURCE to enter. Press the SOURCE button to exit/back up /down direction button to select the TV signal mode...
.... b. For an initial use, you can press the number buttons to input channels directly. See the "Channel Menu" section for details). 222 Press POWER to turn on the player. 333 Press SOURCE to enter. Press the SOURCE button to exit/back up /down direction button to select the TV signal mode...

User Manual
Page 19
...button to move left /right button to set it as Air or Cable. Favorite Make the favorite channels collection. Press OK to turn pages in the FAV list. You can use the Channel No option or directly locate the channel by the number button/CH+/- Select...release, press OK again. Auto Scan Search channels automatically. Show/Hide Hide the unwanted channels. Select this option, press the right direction button to turn pages in the Show/ Hide list. Press the left /right, press the up /down direction button to locate a desired channel. In the Show...
...button to move left /right button to set it as Air or Cable. Favorite Make the favorite channels collection. Press OK to turn pages in the FAV list. You can use the Channel No option or directly locate the channel by the number button/CH+/- Select...release, press OK again. Auto Scan Search channels automatically. Show/Hide Hide the unwanted channels. Select this option, press the right direction button to turn pages in the Show/ Hide list. Press the left /right, press the up /down direction button to locate a desired channel. In the Show...

User Manual
Page 21
NOTE: Please see the TV section for menu descriptions Adjust the PC Screen Upon switching to enter. See the "Cable Connection" section. 222 Turn on units and press the SOURCE button to select VGA System Setup Menu Various features can use the unit's TFT LCD as "Phase" accordingly under ...
NOTE: Please see the TV section for menu descriptions Adjust the PC Screen Upon switching to enter. See the "Cable Connection" section. 222 Turn on units and press the SOURCE button to select VGA System Setup Menu Various features can use the unit's TFT LCD as "Phase" accordingly under ...
User Manual
Page 22
.... 2. Once disc data is recognized by the player : DVD /CD / MP3 /JPEG. DVD Operation Preparation After all necessary connections have been made, press POWER to turn on the player and then press the MODE button to decrease the volume. 17 Put the disc slightly into the tray. Press the direction buttons...
.... 2. Once disc data is recognized by the player : DVD /CD / MP3 /JPEG. DVD Operation Preparation After all necessary connections have been made, press POWER to turn on the player and then press the MODE button to decrease the volume. 17 Put the disc slightly into the tray. Press the direction buttons...

User Manual
Page 28
... system has been properly connected. •• If using antenna, adjust the antenna. •• Make sure the POWER button on the unit has been turned on manually. •• Remove the obstacles between the remote control and the player. •• Point the remote control towards the remote sensor on...
... system has been properly connected. •• If using antenna, adjust the antenna. •• Make sure the POWER button on the unit has been turned on manually. •• Remove the obstacles between the remote control and the player. •• Point the remote control towards the remote sensor on...


