User Guide
Page 3
...LiveView 6 View Recordings 8 Setup 9 Chapter 3: Advanced Configuration with the Web-based Utility 12 Overview 12 How to Access the Web-based Utility 12 View Video 12 Setup > Basic 14 Setup > Image 15 Setup > Administration 16 Setup > Users 17 Setup > Options 17 Setup > Motion Detection 19 Setup > Recording 20 Setup > Status 21 Help 22 Appendix A: Troubleshooting 23 Common Problems and Solutions 23 Frequently Asked Questions 24 Appendix B: Wireless Security Checklist 26 General Network Security Guidelines 26 Additional Security Tips 26 Appendix C: Specifications 27...
...LiveView 6 View Recordings 8 Setup 9 Chapter 3: Advanced Configuration with the Web-based Utility 12 Overview 12 How to Access the Web-based Utility 12 View Video 12 Setup > Basic 14 Setup > Image 15 Setup > Administration 16 Setup > Users 17 Setup > Options 17 Setup > Motion Detection 19 Setup > Recording 20 Setup > Status 21 Help 22 Appendix A: Troubleshooting 23 Common Problems and Solutions 23 Frequently Asked Questions 24 Appendix B: Wireless Security Checklist 26 General Network Security Guidelines 26 Additional Security Tips 26 Appendix C: Specifications 27...
User Guide
Page 5
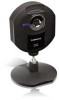
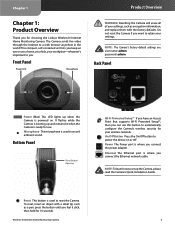
... for your settings. Wireless-N Internet Home Monitoring Camera 4 Reset This button is used to record ambient sound. Microphone The microphone is used to reset the Camera. Front Panel Power LED Microphone Product Overview WARNING: Resetting the Camera will erase all of your workplace-whatever's important to a web browser anywhere in the world! user name: admin password: admin Back Panel Power (Blue) This LED lights up the Camera, please read the Camera's Quick Installation Guide. NOTE: The Camera's factory default settings are. This compact, self-contained unit lets you...
... for your settings. Wireless-N Internet Home Monitoring Camera 4 Reset This button is used to record ambient sound. Microphone The microphone is used to reset the Camera. Front Panel Power LED Microphone Product Overview WARNING: Resetting the Camera will erase all of your workplace-whatever's important to a web browser anywhere in the world! user name: admin password: admin Back Panel Power (Blue) This LED lights up the Camera, please read the Camera's Quick Installation Guide. NOTE: The Camera's factory default settings are. This compact, self-contained unit lets you...
User Guide
Page 7
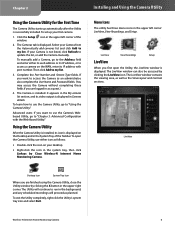
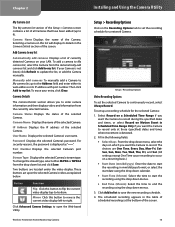
... "Chapter 3: Advanced Configuration with port number. Wireless-N Internet Home Monitoring Camera 6 The Utility will continue to update the list, or add the Camera manually. Installing and Using the Camera Utility Menu Icons The utility has three menu icons in the upper left corner: LiveView, View Recordings, and Setup. Click the Setup icon in the upper left corner of the Taskbar. To learn how to use either its web address or its video output is displayed on your...
... "Chapter 3: Advanced Configuration with port number. Wireless-N Internet Home Monitoring Camera 6 The Utility will continue to update the list, or add the Camera manually. Installing and Using the Camera Utility Menu Icons The utility has three menu icons in the upper left corner: LiveView, View Recordings, and Setup. Click the Setup icon in the upper left corner of the Taskbar. To learn how to use either its web address or its video output is displayed on your...
User Guide
Page 11
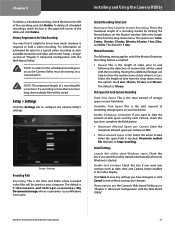
... selected Camera. Click Add to list to 9). Two buttons are One Time, Every Day, Mon-Fri, SatSun, Sun, Mon, Tue, Wed, Thu, Fri, and Sat. (All settings except One Time cause recording to end the recording using the drop down list and click Save. Wireless-N Internet Home Monitoring Camera Installing and Using the Camera Utility Setup > Recording Options Click on this list will display its IP address with port number. Select Record on a Scheduled Time...
... selected Camera. Click Add to list to 9). Two buttons are One Time, Every Day, Mon-Fri, SatSun, Sun, Mon, Tue, Wed, Thu, Fri, and Sat. (All settings except One Time cause recording to end the recording using the drop down list and click Save. Wireless-N Internet Home Monitoring Camera Installing and Using the Camera Utility Setup > Recording Options Click on this list will display its IP address with port number. Select Record on a Scheduled Time...
User Guide
Page 12
... down menu. Enable text overlays Check this additional footage can help to show the motion more than one hour. If you have changed, or click Cancel to the"Setup > Image" section of "Chapter 3: Advanced Configuration with the Web-Based Utility." NOTE: The maximum length of a recording file is reached: Overwrite earliest file (default), or Stop recording. Installing and Using the Camera Utility Instant Recording Time Limit Maximum Time Limit...
... down menu. Enable text overlays Check this additional footage can help to show the motion more than one hour. If you have changed, or click Cancel to the"Setup > Image" section of "Chapter 3: Advanced Configuration with the Web-Based Utility." NOTE: The maximum length of a recording file is reached: Overwrite earliest file (default), or Stop recording. Installing and Using the Camera Utility Instant Recording Time Limit Maximum Time Limit...
User Guide
Page 13
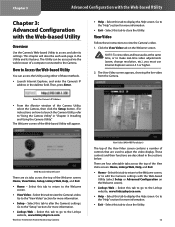
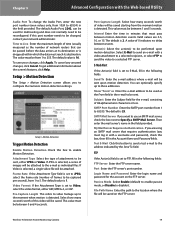
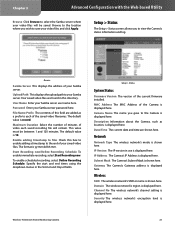
... Web-based Utility Overview Use the Camera's Web-based Utility to "Using the Camera Utility" in the Address field. Select this tab to go to Access the Web-based Utility You can be accessed via the web browser of a computer connected to view the Camera's video. 1. Select this tab to return to display the Help screen. The View Video screen appears, showing the live video from the Camera. Select this tab to the Welcome screen. •• ViewVideo - Wireless-N Internet Home Monitoring Camera View Video (640x480 Resolution...
... Web-based Utility Overview Use the Camera's Web-based Utility to "Using the Camera Utility" in the Address field. Select this tab to go to Access the Web-based Utility You can be accessed via the web browser of a computer connected to view the Camera's video. 1. Select this tab to return to display the Help screen. The View Video screen appears, showing the live video from the Camera. Select this tab to the Welcome screen. •• ViewVideo - Wireless-N Internet Home Monitoring Camera View Video (640x480 Resolution...
User Guide
Page 15
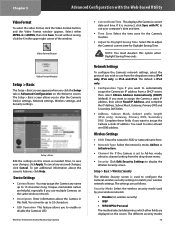
... address. Setup > Basic Edit the settings on the screen. Unique, memorable names are helpful, especially if you to enable or disable the Camera's LED. The default is incorrect, click Sync with the Web-based Utility Video Format To select the video format, click the Video Format button, and the Video Format window appears. To exit without saving, click the X in this to adjust the Camera's current time for Daylight Saving Time...
... address. Setup > Basic Edit the settings on the screen. Unique, memorable names are helpful, especially if you to enable or disable the Camera's LED. The default is incorrect, click Sync with the Web-based Utility Video Format To select the video format, click the Video Format button, and the Video Format window appears. To exit without saving, click the X in this to adjust the Camera's current time for Daylight Saving Time...
User Guide
Page 17
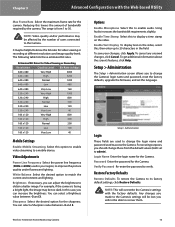
... helpful to access the Camera. Video Adjustments Power Line Frequency Select the power line frequency (50Hz or 60Hz) used in the field. Brightness If necessary, you to change the login name and password used to change the Camera's login name and password, reset the factory defaults, upgrade the firmware, and set to its factory default settings, click Restore Defaults. Enable Text Display To display text on the video. It may be lost; Using Audio increases the bandwidth requirements slightly. Chapter 3 Advanced Configuration with the factory defaults...
... helpful to access the Camera. Video Adjustments Power Line Frequency Select the power line frequency (50Hz or 60Hz) used in the field. Brightness If necessary, you to change the login name and password used to change the Camera's login name and password, reset the factory defaults, upgrade the firmware, and set to its factory default settings, click Restore Defaults. Enable Text Display To display text on the video. It may be lost; Using Audio increases the bandwidth requirements slightly. Chapter 3 Advanced Configuration with the factory defaults...
User Guide
Page 18
... DDNS Service, UPnP configuration, and Alternate Port settings. To upgrade the firmware: 1. Click Add User to enable DDNS service with the Web-based Utility Firmware Upgrade Upgrade Firmware New firmware versions are posted at www.linksysbycisco.com and can be granted, either All users or Only users in the database: 1. To get additional information about the screen's features, click Help. Setup > Users Users Settings Use this option to save the user in other words, use . Wireless-N Internet Home Monitoring Camera Setup > Options DDNS Enable DDNS Select this to assign access...
... DDNS Service, UPnP configuration, and Alternate Port settings. To upgrade the firmware: 1. Click Add User to enable DDNS service with the Web-based Utility Firmware Upgrade Upgrade Firmware New firmware versions are posted at www.linksysbycisco.com and can be granted, either All users or Only users in the database: 1. To get additional information about the screen's features, click Help. Setup > Users Users Settings Use this option to save the user in other words, use . Wireless-N Internet Home Monitoring Camera Setup > Options DDNS Enable DDNS Select this to assign access...
User Guide
Page 19
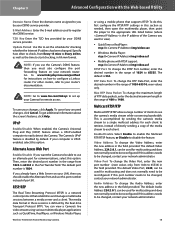
... Internet IP address has been changed , contact your network administrator. If your network administrator. 18 The default is accomplished by the Real-time Transport Protocol (RTP). If this port number instead of port 80. This is 554. For other routers, refer to your DDNS service provider. The Camera's UPnP feature is a network control protocol that supports RTSP. Update Period Use this port number needs to be used to register the DDNS service. To get additional information about the screen...
... Internet IP address has been changed , contact your network administrator. If your network administrator. 18 The default is accomplished by the Real-time Transport Protocol (RTP). If this port number instead of port 80. This is 554. For other routers, refer to your DDNS service provider. The Camera's UPnP feature is a network control protocol that supports RTSP. Update Period Use this port number needs to be used to register the DDNS service. To get additional information about the screen...
User Guide
Page 20
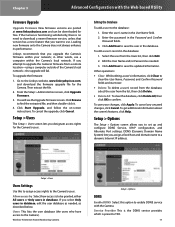
.... Port Enter the FTP server's port number. Wireless-N Internet Home Monitoring Camera 19 If this box, then fill in the following fields: FTP Server Enter the FTP server name. To save your network administrator. Setup > Motion Detection The Setup > Motion Detection screen allows you want to use an SMTP mail server, check the box next to configure the Camera's motion detection settings. If Video is detected. This value must be between 0 and 4 seconds. Test E-Mail Click this box to enable Motion Detection. Passive Mode Select Enable (default) to enable...
.... Port Enter the FTP server's port number. Wireless-N Internet Home Monitoring Camera 19 If this box, then fill in the following fields: FTP Server Enter the FTP server name. To save your network administrator. Setup > Motion Detection The Setup > Motion Detection screen allows you want to use an SMTP mail server, check the box next to configure the Camera's motion detection settings. If Video is detected. This value must be between 0 and 4 seconds. Test E-Mail Click this box to enable Motion Detection. Passive Mode Select Enable (default) to enable...
User Guide
Page 22
.... Wireless-N Internet Home Monitoring Camera 21 Chapter 3 Advanced Configuration with the Web-based Utility Browse Click Browse to select the Samba server where your video files will contain. Domain The wireless network's region is shown here. Network Network Type The wireless network's mode is displayed here. IP Version The IP version in the Start at and Stop at fields. Date/Time The current date and time are found in this box to enable...
.... Wireless-N Internet Home Monitoring Camera 21 Chapter 3 Advanced Configuration with the Web-based Utility Browse Click Browse to select the Samba server where your video files will contain. Domain The wireless network's region is shown here. Network Network Type The wireless network's mode is displayed here. IP Version The IP version in the Start at and Stop at fields. Date/Time The current date and time are found in this box to enable...
User Guide
Page 23
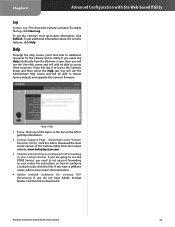
... use the DDNS Service, you need to set up -to configure Port Forwarding in to access the Camera's Setup and then select the Help tab, you will see the User Help screen and will be able to additional resources for viewing PDF documents) If you will see the Administrator Help screen and will only be able to download it. To get additional information about the screen's features, click Help. Wireless-N Internet Home Monitoring Camera 22 Setup > Help •• Setup...
... use the DDNS Service, you need to set up -to configure Port Forwarding in to access the Camera's Setup and then select the Help tab, you will see the User Help screen and will be able to additional resources for viewing PDF documents) If you will see the Administrator Help screen and will only be able to download it. To get additional information about the screen's features, click Help. Wireless-N Internet Home Monitoring Camera 22 Setup > Help •• Setup...
User Guide
Page 24
... recording video files. Wireless-N Internet Home Monitoring Camera Troubleshooting •• The next time you click View Video from the web browser, you can check if the OCX plug-in . Then you can 't view the Camera's video using its domain name while the service keeps track of the Camera's Web-based Utility, then click the Options tab. Make sure Microsoft Internet Explorer 5.5 or higher is initializing. When I can access the Camera using Internet Explorer. Common Problems and Solutions I view video remotely via the Internet...
... recording video files. Wireless-N Internet Home Monitoring Camera Troubleshooting •• The next time you click View Video from the web browser, you can check if the OCX plug-in . Then you can 't view the Camera's video using its domain name while the service keeps track of the Camera's Web-based Utility, then click the Options tab. Make sure Microsoft Internet Explorer 5.5 or higher is initializing. When I can access the Camera using Internet Explorer. Common Problems and Solutions I view video remotely via the Internet...
User Guide
Page 25
... connect the Camera to a wired network, connect the network cable to install the Linksys Multi-Camera Viewer and Recorder Utility? I need to the video. This keeps files from different manufacturers to wired and wireless networks at the same time? Installation is the IEEE 802.11b standard? Access the Camera's Web-based Utility, and click the Setup tab. See "Chapter 4: Advanced Configuration with the Web-based Utility." Access the Camera's Web-based Utility, and click the Setup tab. After you can access the Camera...
... connect the Camera to a wired network, connect the network cable to install the Linksys Multi-Camera Viewer and Recorder Utility? I need to the video. This keeps files from different manufacturers to wired and wireless networks at the same time? Installation is the IEEE 802.11b standard? Access the Camera's Web-based Utility, and click the Setup tab. See "Chapter 4: Advanced Configuration with the Web-based Utility." Access the Camera's Web-based Utility, and click the Setup tab. After you can access the Camera...
User Guide
Page 27
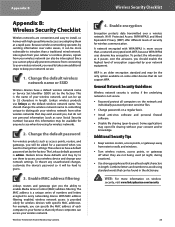
...;• Change passwords on a regular basis. •• Install anti-virus software and personal firewall software. •• Disable file sharing (peer-to-peer). Wireless-N Internet Home Monitoring Camera Wireless Security Checklist 4. Enable encryption Encryption protects data transmitted over radio waves, it will be hard to your wireless network, you can specify the MAC address of each computer in your network equipment. Additional Security Tips •• Keep wireless routers, access points, or...
...;• Change passwords on a regular basis. •• Install anti-virus software and personal firewall software. •• Disable file sharing (peer-to-peer). Wireless-N Internet Home Monitoring Camera Wireless Security Checklist 4. Enable encryption Encryption protects data transmitted over radio waves, it will be hard to your wireless network, you can specify the MAC address of each computer in your network equipment. Additional Security Tips •• Keep wireless routers, access points, or...
User Guide
Page 28
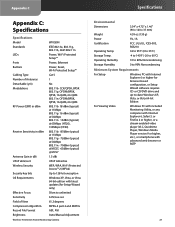
Appendix C Appendix C: Specifications Specifications Model Standards LEDs Ports Buttons Cabling Type Number of Antennas Detachable (y/n) Modulations RF Power (EIRP) in dBm Receive Sensitivity in dBm Antenna Gain in dBi UPnP able/cert Wireless Security Security key bits OS Requirements Effective Focus Sensitivity Field of View Compression Algorithm Record File Format Brightness WVC80N IEEE 802.3u, 802.11g, 802.11b, draft 802.11n Power, Wi-Fi Protected Setup™ Power, Ethernet Power, Reset, Wi...
Appendix C Appendix C: Specifications Specifications Model Standards LEDs Ports Buttons Cabling Type Number of Antennas Detachable (y/n) Modulations RF Power (EIRP) in dBm Receive Sensitivity in dBm Antenna Gain in dBi UPnP able/cert Wireless Security Security key bits OS Requirements Effective Focus Sensitivity Field of View Compression Algorithm Record File Format Brightness WVC80N IEEE 802.3u, 802.11g, 802.11b, draft 802.11n Power, Wi-Fi Protected Setup™ Power, Ethernet Power, Reset, Wi...
User Guide
Page 29
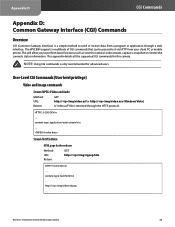
... mobile phone. NOTE: Using CGI commands is only recommended for this camera. Wireless-N Internet Home Monitoring Camera 28 Stream M-JPEG Video HTML page for the end user Method: GET URL: http:///img/mjpeg.htm Return: HTTP/1.0 200 OK\r\n ... http:///img/video.mjpeg ... User-Level CGI Commands (User level privilege) Video and Image commands Stream MPEG-4 Video and Audio Method: GET URL: Return: http:///img/video.asf or http:///img/video.asx (Windows Vista) A "video.asf...
... mobile phone. NOTE: Using CGI commands is only recommended for this camera. Wireless-N Internet Home Monitoring Camera 28 Stream M-JPEG Video HTML page for the end user Method: GET URL: http:///img/mjpeg.htm Return: HTTP/1.0 200 OK\r\n ... http:///img/video.mjpeg ... User-Level CGI Commands (User level privilege) Video and Image commands Stream MPEG-4 Video and Audio Method: GET URL: Return: http:///img/video.asf or http:///img/video.asx (Windows Vista) A "video.asf...

User Guide
Page 35
Wireless-N Internet Home Monitoring Camera 34 The client must wait at least 5 minutes to make sure the upgrade is returned. Appendix D CGI Commands Get/Set System Date and Time Method: GET URL: http:///adm/date.cgi?action=[&...] Parameter action time_zone year month day hour minute second Return: Value and description Get/Set the system date and time get= Get the system date...
Wireless-N Internet Home Monitoring Camera 34 The client must wait at least 5 minutes to make sure the upgrade is returned. Appendix D CGI Commands Get/Set System Date and Time Method: GET URL: http:///adm/date.cgi?action=[&...] Parameter action time_zone year month day hour minute second Return: Value and description Get/Set the system date and time get= Get the system date...

User Guide
Page 55
... WARRANTY PERIOD. Your election to use of your Internet browser software, including the default settings for intruding upon installation and is completely under this limited warranty will be free from Cisco if you technical networking support. If the Software enables you to receive Upgrades, you acknowledge and agree that the Software may change to serious security threats and/or some features within your network configuration and usage for a period of...
... WARRANTY PERIOD. Your election to use of your Internet browser software, including the default settings for intruding upon installation and is completely under this limited warranty will be free from Cisco if you technical networking support. If the Software enables you to receive Upgrades, you acknowledge and agree that the Software may change to serious security threats and/or some features within your network configuration and usage for a period of...


