User Guide
Page 2
... the Battery 8 Powering On the Phone 8 Powering Off the Phone 8 Installing the Phone 8 Choosing the Wireless IP Settings 12 Registering Your Phone 13 Chapter 3: Using Your WIP310 14 Making External Phone Calls 14 Receiving Phone Calls 14 Placing a Call on Hold 14 Ending a Call 15 Using the Speaker Phone 15 Muting Your...
... the Battery 8 Powering On the Phone 8 Powering Off the Phone 8 Installing the Phone 8 Choosing the Wireless IP Settings 12 Registering Your Phone 13 Chapter 3: Using Your WIP310 14 Making External Phone Calls 14 Receiving Phone Calls 14 Placing a Call on Hold 14 Ending a Call 15 Using the Speaker Phone 15 Muting Your...
User Guide
Page 3
Wireless-G IP Phone Table of Contents Changing the Backlight Setting 19 Setting the...24 Using Star Codes 24 Upgrading Your Phone Software 25 Performing a Factory Reset 25 Restarting the Phone 26 Chapter 5: Cisco SPA9000 Voice System Features 27 Picking Up a Call at a Specific Extension 27 Picking Up a Call at an ...a Group 27 Parking a Call 27 Retrieving Parked Calls 27 Using Paging 27 Using the Corporate Directory 28 Enabling the Cisco SPA9000 Key System 28 Appendix A: Troubleshooting 29 Appendix B: Specifications 30 Appendix C: Warranty Information 32 (to be updated 32...
Wireless-G IP Phone Table of Contents Changing the Backlight Setting 19 Setting the...24 Using Star Codes 24 Upgrading Your Phone Software 25 Performing a Factory Reset 25 Restarting the Phone 26 Chapter 5: Cisco SPA9000 Voice System Features 27 Picking Up a Call at a Specific Extension 27 Picking Up a Call at an ...a Group 27 Parking a Call 27 Retrieving Parked Calls 27 Using Paging 27 Using the Corporate Directory 28 Enabling the Cisco SPA9000 Key System 28 Appendix A: Troubleshooting 29 Appendix B: Specifications 30 Appendix C: Warranty Information 32 (to be updated 32...

User Guide
Page 4
Table of Contents Electric and Electronic Equipment (WEEE 39 Appendix E: Software License Agreement 43 Software in Linksys Products 43 Software Licenses 43 Wireless-G IP Phone iii
Table of Contents Electric and Electronic Equipment (WEEE 39 Appendix E: Software License Agreement 43 Software in Linksys Products 43 Software Licenses 43 Wireless-G IP Phone iii

User Guide
Page 5
.... This suite of products provides low-cost Internet telephony solutions, including an IP PBX (SPA9000) to provide business-class phone services, a line of products for choosing the Cisco WIP310 Wireless-G IP Phone. Introduction About This Guide Icon Descriptions While reading through the User Guide... Cisco Small Business Pro IP Phone Family The Cisco WIP310 IP phone is a description of these features, check with the Cisco SPA9000 Voice System to provide wireless IP phone service in front of the address. Below is part of the Cisco suite of wired IP phones, and the WIP310 wireless IP...
.... This suite of products provides low-cost Internet telephony solutions, including an IP PBX (SPA9000) to provide business-class phone services, a line of products for choosing the Cisco WIP310 Wireless-G IP Phone. Introduction About This Guide Icon Descriptions While reading through the User Guide... Cisco Small Business Pro IP Phone Family The Cisco WIP310 IP phone is a description of these features, check with the Cisco SPA9000 Voice System to provide wireless IP phone service in front of the address. Below is part of the Cisco suite of wired IP phones, and the WIP310 wireless IP...
User Guide
Page 6
... United States and certain other company. (0807R) Introduction Wireless-G IP Phone 2 and Access Registrar, Aironet, AsyncOS, Bringing the Meeting To You, Catalyst, CCDA, CCDP, CCIE, CCIP, CCNA, CCNP, CCSP, CCVP, Cisco, the Cisco Certified Internetwork Expert logo, Cisco IOS, Cisco Press, Cisco Systems, Cisco Systems Capital, the Cisco Systems logo, Cisco Unity, Collaboration Without Limitation, EtherFast, EtherSwitch, Event Center...
... United States and certain other company. (0807R) Introduction Wireless-G IP Phone 2 and Access Registrar, Aironet, AsyncOS, Bringing the Meeting To You, Catalyst, CCDA, CCDP, CCIE, CCIP, CCNA, CCNP, CCSP, CCVP, Cisco, the Cisco Certified Internetwork Expert logo, Cisco IOS, Cisco Press, Cisco Systems, Cisco Systems Capital, the Cisco Systems logo, Cisco Unity, Collaboration Without Limitation, EtherFast, EtherSwitch, Event Center...
User Guide
Page 7
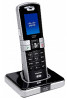
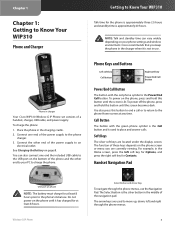
... navigate through the phone menus. 3 Connect the other end to your phone settings and wireless environment. Place the phone in charger Your Cisco WIP310 Wireless-G IP Phone set consists of the navigation pad. See Charging the Battery on the phone screen or menu you keep the phone in the middle... of a handset, charger, USB cable, and power supply. Cisco recommends that you are currently viewing. To power off the phone, press and hold this button to end a call or to return to Know Your WIP310 Phone and Charger Phone in the charging cradle. 2. Soft Keys The silver...
... navigate through the phone menus. 3 Connect the other end to your phone settings and wireless environment. Place the phone in charger Your Cisco WIP310 Wireless-G IP Phone set consists of the navigation pad. See Charging the Battery on the phone screen or menu you keep the phone in the middle... of a handset, charger, USB cable, and power supply. Cisco recommends that you are currently viewing. To power off the phone, press and hold this button to end a call or to return to Know Your WIP310 Phone and Charger Phone in the charging cradle. 2. Soft Keys The silver...

User Guide
Page 8
.... 2. Press Cancel to view the characters associated with your phone, connect a supported headset to the ITSP, or the phone has low power. Wireless-G IP Phone 4 Speaker Phone Keypad Entering Text When entering characters, press the Back soft key to the Home screen at a time. Press the Power/End Call...speaker symbol appears on the back of the phone. Headset Headset Jack To use . The phone is off and is in ready to Know Your WIP310 Phone Hardware Features Your phone includes a speaker phone and a headset port. The phone is located on the phone display when the speaker phone ...
.... 2. Press Cancel to view the characters associated with your phone, connect a supported headset to the ITSP, or the phone has low power. Wireless-G IP Phone 4 Speaker Phone Keypad Entering Text When entering characters, press the Back soft key to the Home screen at a time. Press the Power/End Call...speaker symbol appears on the back of the phone. Headset Headset Jack To use . The phone is off and is in ready to Know Your WIP310 Phone Hardware Features Your phone includes a speaker phone and a headset port. The phone is located on the phone display when the speaker phone ...
User Guide
Page 9
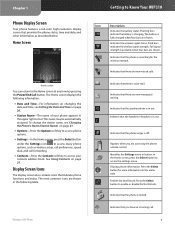
... there is in the upper right corner. In the Home screen, press the Select button to Know Your WIP310 Icon Description Indicates the battery status. The Home screen displays the following table. Wireless-G IP Phone Getting to access the settings menu. Indicates that the handset or headset is voice mail. Appears when...
... there is in the upper right corner. In the Home screen, press the Select button to Know Your WIP310 Icon Description Indicates the battery status. The Home screen displays the following table. Wireless-G IP Phone Getting to access the settings menu. Indicates that the handset or headset is voice mail. Appears when...
User Guide
Page 10
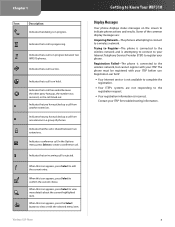
...more details about the current highlighted item. When this icon appears, press Select to view or edit the selected menu item. Wireless-G IP Phone Getting to indicate phone actions and results. Indicates that you have picked up a call from an extension in a group of ... conference call from another extension. Indicates that the call is on the screen to Know Your WIP310 Display Messages Your phone displays status messages on hold. Indicates that a call is shared between two WIP310 phones. Indicates that a call has ended because the other party hung up a call ....
...more details about the current highlighted item. When this icon appears, press Select to view or edit the selected menu item. Wireless-G IP Phone Getting to indicate phone actions and results. Indicates that you have picked up a call from an extension in a group of ... conference call from another extension. Indicates that the call is on the screen to Know Your WIP310 Display Messages Your phone displays status messages on hold. Indicates that a call is shared between two WIP310 phones. Indicates that a call has ended because the other party hung up a call ....
User Guide
Page 11
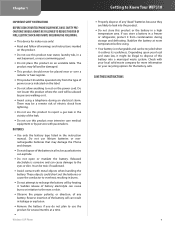
... product where the cord will be abused by persons walking on an unstable table. Stabilize the battery at a time. •• Wireless-G IP Phone Getting to Know Your WIP310 •• Properly dispose of the battery in the instruction manual. Depending upon your local and state law, it might be illegal to...
... product where the cord will be abused by persons walking on an unstable table. Stabilize the battery at a time. •• Wireless-G IP Phone Getting to Know Your WIP310 •• Properly dispose of the battery in the instruction manual. Depending upon your local and state law, it might be illegal to...

User Guide
Page 12
...battery needs to charge for at least 8 hours. NOTE: You can also charge the phone using the USB cable. Wireless-G IP Phone 8 Installing the Phone To use your Wireless-G IP Phone, you need to the phone's initial use when the Home screen appears (in the battery compartment. Connect to use ...the Power Adapter Insert the power adapter into the charger and then insert the adapter into the charger. Chapter 2 Chapter 2: Installing the WIP310 Installing the Battery Open the phone's back battery cover. Place the battery so that the metal contacts on the phone by pressing and holding...
...battery needs to charge for at least 8 hours. NOTE: You can also charge the phone using the USB cable. Wireless-G IP Phone 8 Installing the Phone To use your Wireless-G IP Phone, you need to the phone's initial use when the Home screen appears (in the battery compartment. Connect to use ...the Power Adapter Insert the power adapter into the charger and then insert the adapter into the charger. Chapter 2 Chapter 2: Installing the WIP310 Installing the Battery Open the phone's back battery cover. Place the battery so that the metal contacts on the phone by pressing and holding...
User Guide
Page 13
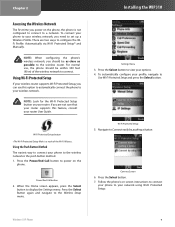
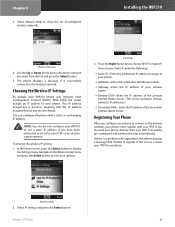
...appears, press the Select button to the wireless router. To automatically configure your profile, navigate to your network using Wi-Fi Protected Setup: Wireless-G IP Phone 9 Wi-Fi Protected Setup 5. Follow the phone's on-screen instructions to connect your phone to Use Wi-Fi Protected Setup and press ...Wi-Fi Protected Setup, you can use , the phone should be within 300 feet (90 m) of the Wi-Fi Alliance. Chapter 2 Installing the WIP310 Accessing the Wireless Network The first time you power on the phone, the phone is not configured to connect to your wireless network. To connect...
...appears, press the Select button to the wireless router. To automatically configure your profile, navigate to your network using Wi-Fi Protected Setup: Wireless-G IP Phone 9 Wi-Fi Protected Setup 5. Follow the phone's on-screen instructions to connect your phone to Use Wi-Fi Protected Setup and press ...Wi-Fi Protected Setup, you can use , the phone should be within 300 feet (90 m) of the Wi-Fi Alliance. Chapter 2 Installing the WIP310 Accessing the Wireless Network The first time you power on the phone, the phone is not configured to connect to your wireless network. To connect...
User Guide
Page 14
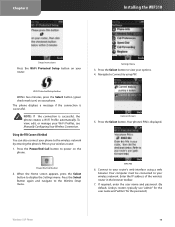
...to display the Settings menu. Navigate to the wireless network by using a web browser. To view, edit, or manage your phone. Enter the IP address of the wireless router in the browser toolbar. 7. If required, enter the user name and password. (By default, Linksys routers typically use... "admin" for the user name and "admin" for the password.) Wireless-G IP Phone 10 Chapter 2 Installing the WIP310 Setup Instructions Press the Wi-Fi Protected Setup button on your options. 4. Using the PIN Connect Method You can also connect ...
...to display the Settings menu. Navigate to the wireless network by using a web browser. To view, edit, or manage your phone. Enter the IP address of the wireless router in the browser toolbar. 7. If required, enter the user name and password. (By default, Linksys routers typically use... "admin" for the user name and "admin" for the password.) Wireless-G IP Phone 10 Chapter 2 Installing the WIP310 Setup Instructions Press the Wi-Fi Protected Setup button on your options. 4. Using the PIN Connect Method You can also connect ...
User Guide
Page 15
...router's web interface using a web browser. Your computer must be connected to generate the key). You either directly enter the WEP Wireless-G IP Phone Installing the WIP310 key, or enter a more easily remembered passphrase to your phone for other routers should be 1, 2, 3, or 4. •• ...View the Wireless tab or screen. A message appears if the connection is successful, the phone creates a Wi-Fi Profile automatically. Enter the IP address of security, you need to get this information. If required, enter the user name and password. (By default, Linksys routers typically ...
...router's web interface using a web browser. Your computer must be connected to generate the key). You either directly enter the WEP Wireless-G IP Phone Installing the WIP310 key, or enter a more easily remembered passphrase to your phone for other routers should be 1, 2, 3, or 4. •• ...View the Wireless tab or screen. A message appears if the connection is successful, the phone creates a Wi-Fi Profile automatically. Enter the IP address of security, you need to get this information. If required, enter the user name and password. (By default, Linksys routers typically ...

User Guide
Page 16
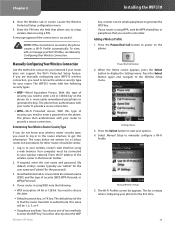
... know it. Scroll down and enter a profile name (such as "Home" or "Work") to identify the wireless router to connect. 5. Installing the WIP310 New Profile 2. Enter the name, or SSID, of the wireless router to which you want to which you are connecting. 4. Press the Select button... to turn Auto Connect on your network. Press the Left Arrow key to your router probably prevented its name from being shown. Wireless-G IP Phone New Profile Settings 3. Chapter 2 6. Routers Using Security If you know the name assigned to choose the type of available networks appears...
... know it. Scroll down and enter a profile name (such as "Home" or "Work") to identify the wireless router to connect. 5. Installing the WIP310 New Profile 2. Enter the name, or SSID, of the wireless router to which you want to which you are connecting. 4. Press the Select button... to turn Auto Connect on your network. Press the Left Arrow key to your router probably prevented its name from being shown. Wireless-G IP Phone New Profile Settings 3. Chapter 2 6. Routers Using Security If you know the name assigned to choose the type of available networks appears...
User Guide
Page 17
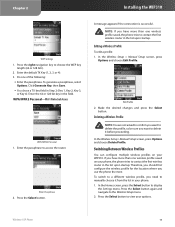
... list upon startup. Press the Select button again and navigate to delete it from the list in the list upon startup. Wireless-G IP Phone 13 Do one wireless profile saved on your phone, the phone tries to display the Settings menu. Press the Select button. ...; Enter the passphrase. Make the desired changes and press the Select button. Chapter 2 Installing the WIP310 WEP Settings 1. Switching Between Wireless Profiles You can configure multiple wireless profiles on your WIP310. If you use the phone the most. A message appears if the connection is successful. Press ...
... list upon startup. Press the Select button again and navigate to delete it from the list in the list upon startup. Wireless-G IP Phone 13 Do one wireless profile saved on your phone, the phone tries to display the Settings menu. Press the Select button. ...; Enter the passphrase. Make the desired changes and press the Select button. Chapter 2 Installing the WIP310 WEP Settings 1. Switching Between Wireless Profiles You can configure multiple wireless profiles on your WIP310. If you use the phone the most. A message appears if the connection is successful. Press ...
User Guide
Page 18
... the Home screen, press the Select button to do so by your ITSP for assistance. Installing the WIP310 Wireless Networks 4. NOTE: You should only configure your WIP310 to use a static IP address if you want from your ITSP, it should be pre-configured and perform this occurs, contact your... ITSP or by another support person. If you choose Static IP, enter the following: •• Static IP-Enter the permanent IP address to assign...
... the Home screen, press the Select button to do so by your ITSP for assistance. Installing the WIP310 Wireless Networks 4. NOTE: You should only configure your WIP310 to use a static IP address if you want from your ITSP, it should be pre-configured and perform this occurs, contact your... ITSP or by another support person. If you choose Static IP, enter the following: •• Static IP-Enter the permanent IP address to assign...
User Guide
Page 19
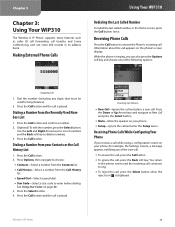
...delete numbers. 3. Press the Down or Up Arrow keys and navigate to answer the Phone's incoming call and enter the Setup menu. Wireless-G IP Phone 15 Dialing a Number from your Contacts or the Call History List 1. Press the Call button. Press the Call button. 2. Incoming Call...), a message appears notifying you can store 200 records in the Home screen, press the Call button twice. Chapter 3 Chapter 3: Using Your WIP310 The Wireless-G IP Phone supports many features such as caller ID, call forwarding, call . Information about the call , press the Select button when the reject icon...
...delete numbers. 3. Press the Down or Up Arrow keys and navigate to answer the Phone's incoming call and enter the Setup menu. Wireless-G IP Phone 15 Dialing a Number from your Contacts or the Call History List 1. Press the Call button. Press the Call button. 2. Incoming Call...), a message appears notifying you can store 200 records in the Home screen, press the Call button twice. Chapter 3 Chapter 3: Using Your WIP310 The Wireless-G IP Phone supports many features such as caller ID, call forwarding, call . Information about the call , press the Select button when the reject icon...
User Guide
Page 20
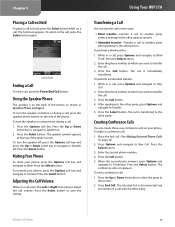
...shown in a call, press the Left or Right Arrow key to the call, press the Select button again. The conference call : 1. Wireless-G IP Phone 16 To return to adjust the call volume. To turn the speaker on . 2. Press the Select button. Adjusting the Call Volume While in...button to the other party to answer. •• Attended transfer-Transfer a call to another party without waiting for the other person. Using Your WIP310 Transferring a Call You can create three-way conference calls on page 4. To perform an attended transfer: 1. Press the Call button. 4. The call...
...shown in a call, press the Left or Right Arrow key to the call, press the Select button again. The conference call : 1. Wireless-G IP Phone 16 To return to adjust the call volume. To turn the speaker on . 2. Press the Select button. Adjusting the Call Volume While in...button to the other party to answer. •• Attended transfer-Transfer a call to another party without waiting for the other person. Using Your WIP310 Transferring a Call You can create three-way conference calls on page 4. To perform an attended transfer: 1. Press the Call button. 4. The call...

User Guide
Page 21
... History Use this feature off, follow steps 1 and 2, selecting DND Off. You can edit the information. Call History To view the call information). Wireless-G IP Phone Using Your WIP310 3. A small green phone icon appears above the Select button. 2. To save the number to contacts, send a message to the entry, then press the...
... History Use this feature off, follow steps 1 and 2, selecting DND Off. You can edit the information. Call History To view the call information). Wireless-G IP Phone Using Your WIP310 3. A small green phone icon appears above the Select button. 2. To save the number to contacts, send a message to the entry, then press the...


