User Guide
Page 2
...Buttons 3 Handset Navigation Pad 3 Keypad 4 Phone Hardware Features 4 Phone LED 4 Phone Display Screen 5 Display Screen Icons 5 Chapter 2: Installing the WIP310 8 Installing the Battery 8 Powering On the Phone 8 Powering Off the Phone 8 Installing the Phone 8 Choosing the Wireless IP Settings 12 Registering Your Phone 13 Chapter 3: Using Your WIP310 14 Making External Phone Calls 14 Receiving Phone Calls 14 Placing a Call on Hold 14 Ending a Call 15 Using the Speaker Phone 15 Muting Your Phone 15 Adjusting the Call Volume 15 Transferring a Call 15 Creating Conference...
...Buttons 3 Handset Navigation Pad 3 Keypad 4 Phone Hardware Features 4 Phone LED 4 Phone Display Screen 5 Display Screen Icons 5 Chapter 2: Installing the WIP310 8 Installing the Battery 8 Powering On the Phone 8 Powering Off the Phone 8 Installing the Phone 8 Choosing the Wireless IP Settings 12 Registering Your Phone 13 Chapter 3: Using Your WIP310 14 Making External Phone Calls 14 Receiving Phone Calls 14 Placing a Call on Hold 14 Ending a Call 15 Using the Speaker Phone 15 Muting Your Phone 15 Adjusting the Call Volume 15 Transferring a Call 15 Creating Conference...
User Guide
Page 3
... Phone Number 20 Using Contacts 20 Using Messaging 21 Using Web Services 22 Chapter 4: Advanced Functions 24 Enabling the Web Server 24 Using the Web Interface 24 Using Star Codes 24 Upgrading Your Phone Software 25 Performing a Factory Reset 25 Restarting the Phone 26 Chapter 5: Cisco SPA9000 Voice System Features 27 Picking Up a Call at a Specific Extension 27 Picking Up a Call at an Extension in a Group 27 Parking a Call 27 Retrieving Parked Calls 27 Using Paging 27 Using the Corporate Directory 28 Enabling the Cisco SPA9000 Key System 28 Appendix A: Troubleshooting...
... Phone Number 20 Using Contacts 20 Using Messaging 21 Using Web Services 22 Chapter 4: Advanced Functions 24 Enabling the Web Server 24 Using the Web Interface 24 Using Star Codes 24 Upgrading Your Phone Software 25 Performing a Factory Reset 25 Restarting the Phone 26 Chapter 5: Cisco SPA9000 Voice System Features 27 Picking Up a Call at a Specific Extension 27 Picking Up a Call at an Extension in a Group 27 Parking a Call 27 Retrieving Parked Calls 27 Using Paging 27 Using the Corporate Directory 28 Enabling the Cisco SPA9000 Key System 28 Appendix A: Troubleshooting...

User Guide
Page 5
... User Guide you can serve also as 3-way call conferencing, call features, such as a standalone wireless Internet phone in a home environment where a wireless G network is something that you may require you connect to enter authentication (such as redialing, speed dialing, call forwarding, contacts list, call history, and speaker phone. Online Resources Most web browsers allow you to enter the web address without including http:// in front of the address. NOTE: Some advanced call attention to provide business-class phone services, a line...
... User Guide you can serve also as 3-way call conferencing, call features, such as a standalone wireless Internet phone in a home environment where a wireless G network is something that you may require you connect to enter authentication (such as redialing, speed dialing, call forwarding, contacts list, call history, and speaker phone. Online Resources Most web browsers allow you to enter the web address without including http:// in front of the address. NOTE: Some advanced call attention to provide business-class phone services, a line...
User Guide
Page 7
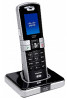
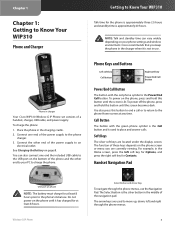
..., USB cable, and power supply. Do not power on the phone screen or menu you keep the phone in charger Your Cisco WIP310 Wireless-G IP Phone set consists of the navigation pad. For example, in the charging cradle. 2. Phone Keys and Buttons Left soft key Call button Right soft key Power/End Call button Power/End Call Button The button with the green phone symbol is the Call button and is lit. Handset Navigation Pad USB port on the bottom...
..., USB cable, and power supply. Do not power on the phone screen or menu you keep the phone in charger Your Cisco WIP310 Wireless-G IP Phone set consists of the navigation pad. For example, in the charging cradle. 2. Phone Keys and Buttons Left soft key Call button Right soft key Power/End Call button Power/End Call Button The button with the green phone symbol is the Call button and is lit. Handset Navigation Pad USB port on the bottom...

User Guide
Page 8
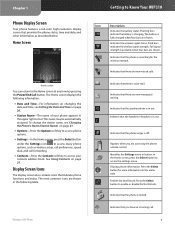
... phone status. The phone is an unread text message or voice mail message. To use the speaker phone, while on a call, press the Speaker On/Off button located on the phone display when the speaker phone is on and cannot register to view the characters associated with your phone, connect a supported headset to exit. Press the Power/End Call button to return to delete one character at any time. The phone is off and is charging. Wireless-G IP Phone 4 Speaker Phone...
... phone status. The phone is an unread text message or voice mail message. To use the speaker phone, while on a call, press the Speaker On/Off button located on the phone display when the speaker phone is on and cannot register to view the characters associated with your phone, connect a supported headset to exit. Press the Power/End Call button to return to delete one character at any time. The phone is off and is charging. Wireless-G IP Phone 4 Speaker Phone...
User Guide
Page 9
... are new message(s) waiting. Flashing bars indicate the battery is in use . Indicates that there are accessing the phone volume control. Wireless-G IP Phone Getting to enable or disable Do Not Disturb.. The battery is fully charged when four bars are shown. Full signal strength is available when four bars are shown. Indicates that the phone is locked. Indicates that provides the phone status, time and date, and other information as wireless setup, call preferences, speed dials, and call...
... are new message(s) waiting. Flashing bars indicate the battery is in use . Indicates that there are accessing the phone volume control. Wireless-G IP Phone Getting to enable or disable Do Not Disturb.. The battery is fully charged when four bars are shown. Full signal strength is available when four bars are shown. Indicates that the phone is locked. Indicates that provides the phone status, time and date, and other information as wireless setup, call preferences, speed dials, and call...
User Guide
Page 10
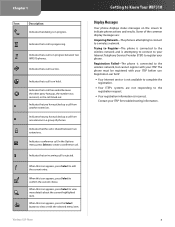
... : Acquiring Network-The phone is attempting to connect to the wireless network, but cannot register with your ITSP before use. Indicates that an incoming call is rejected. Indicates that the call is shared between two WIP310 phones. Some of phones. Registration Failed-The phone is attempting to connect to your phone. Indicates that dialing is in progress. Indicates that a call is in a group of the common display messages are not responding to register your Internet Telephony Service Provider...
... : Acquiring Network-The phone is attempting to connect to the wireless network, but cannot register with your ITSP before use. Indicates that an incoming call is rejected. Indicates that the call is shared between two WIP310 phones. Some of phones. Registration Failed-The phone is attempting to connect to your phone. Indicates that dialing is in progress. Indicates that a call is in a group of the common display messages are not responding to register your Internet Telephony Service Provider...
User Guide
Page 14
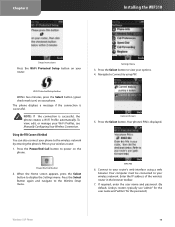
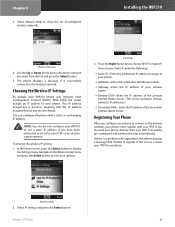
... password. (By default, Linksys routers typically use "admin" for the user name and "admin" for the password.) Wireless-G IP Phone 10 NOTE: If the connection is successful. When the Home screen appears, press the Select button to the Wireless Setup menu. Press the Select button to power on your router. WPS PIN 6. Your phone's PIN is displayed. Settings Menu 3. Press the Power/End Call button to view your options. 4. Navigate to your Wi-Fi Profiles, see Manually Configuring Your Wireless Connection...
... password. (By default, Linksys routers typically use "admin" for the user name and "admin" for the password.) Wireless-G IP Phone 10 NOTE: If the connection is successful. When the Home screen appears, press the Select button to the Wireless Setup menu. Press the Select button to power on your router. WPS PIN 6. Your phone's PIN is displayed. Settings Menu 3. Press the Power/End Call button to view your options. 4. Navigate to your Wi-Fi Profiles, see Manually Configuring Your Wireless Connection...
User Guide
Page 15
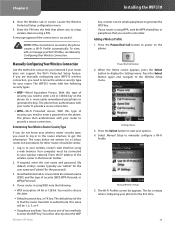
... 128-bit key on the phone. Adding a Wireless Profile 1. NOTE: If the connection is successful. Settings Menu 3. Log in the browser toolbar. 2. If required, enter the user name and password. (By default, Linksys routers typically use "admin" for the user name and "admin" for the first time. 11 Manual Wireless Setup 5. Enter the PIN into the field that the router transmits to know your router to power on the phone (or...
... 128-bit key on the phone. Adding a Wireless Profile 1. NOTE: If the connection is successful. Settings Menu 3. Log in the browser toolbar. 2. If required, enter the user name and password. (By default, Linksys routers typically use "admin" for the user name and "admin" for the first time. 11 Manual Wireless Setup 5. Enter the PIN into the field that the router transmits to know your router to power on the phone (or...
User Guide
Page 18
... phone. Press the Right Arrow key to the wireless network. Wireless Setup 2. Use the Up or Down Arrow key to choose the network you want from your ITSP, it failed to the wireless network, your ITSP for assistance. Choosing the Wireless IP Settings By default, your options. If this step automatically. Installing the WIP310 Wireless Networks 4. In the Home screen, press the Select button to show the list of configured wireless networks. Select Manual Setup to display the Settings menu...
... phone. Press the Right Arrow key to the wireless network. Wireless Setup 2. Use the Up or Down Arrow key to choose the network you want from your ITSP, it failed to the wireless network, your ITSP for assistance. Choosing the Wireless IP Settings By default, your options. If this step automatically. Installing the WIP310 Wireless Networks 4. In the Home screen, press the Select button to show the list of configured wireless networks. Select Manual Setup to display the Settings menu...
User Guide
Page 19
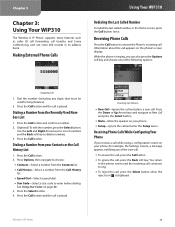
... Call button twice. Making External Phone Calls Using Your WIP310 Redialing the Last Called Number To redial the last called number, in its address book. While the phone is displayed. Press the Call button and scroll to delete numbers. 3. Press the Down or Up Arrow keys and navigate to answer the Phone's incoming call . Wireless-G IP Phone 15 Dialing a Number from your phone. •• Setup-Ignore the call and enter the Setup menu. Chapter 3 Chapter 3: Using Your WIP310 The Wireless-G IP Phone supports many features such as caller ID, call forwarding, call transfer...
... Call button twice. Making External Phone Calls Using Your WIP310 Redialing the Last Called Number To redial the last called number, in its address book. While the phone is displayed. Press the Call button and scroll to delete numbers. 3. Press the Down or Up Arrow keys and navigate to answer the Phone's incoming call . Wireless-G IP Phone 15 Dialing a Number from your phone. •• Setup-Ignore the call and enter the Setup menu. Chapter 3 Chapter 3: Using Your WIP310 The Wireless-G IP Phone supports many features such as caller ID, call forwarding, call transfer...

User Guide
Page 21
... view the recent call history: 1. Call History > Send to Contacts, Send Message, Clear List, Clear Entry or Edit Dial. If you can choose to Send to Contacts 2. Press the Select button (check mark icon) to Contacts, the Contacts Entry menu appears. Press the Back soft key to block incoming calls. 1. Setting Do Not Disturb on -screen along with a message of how many calls were missed. In the Home screen, press the Options soft key. Press the Up...
... view the recent call history: 1. Call History > Send to Contacts, Send Message, Clear List, Clear Entry or Edit Dial. If you can choose to Send to Contacts 2. Press the Select button (check mark icon) to Contacts, the Contacts Entry menu appears. Press the Back soft key to block incoming calls. 1. Setting Do Not Disturb on -screen along with a message of how many calls were missed. In the Home screen, press the Options soft key. Press the Up...

User Guide
Page 22
... your voice mail. Press the Back soft key to move back one screen. Setting Up Call Forwarding Use this option to forward incoming calls to a different phone number or to the Home screen. Press the Back soft key to Do Not Disturb. 3. To stop call forwarding, delete the call waiting notifies you are in the Settings menu, press the Select button to exit without changes. Press the Select button and navigate to move back one screen. Navigate to Block Caller...
... your voice mail. Press the Back soft key to move back one screen. Setting Up Call Forwarding Use this option to forward incoming calls to a different phone number or to the Home screen. Press the Back soft key to Do Not Disturb. 3. To stop call forwarding, delete the call waiting notifies you are in the Settings menu, press the Select button to exit without changes. Press the Select button and navigate to move back one screen. Navigate to Block Caller...

User Guide
Page 23
... Deleting a Speed Dial Number 1. Press the Options soft key. 2. Press the Select button when you selected Forward No Answer, the number of seconds. 3. Settings > Ringtone 1. You can have up to Remove Entry, Edit or Edit Dial. By default, calls are forward to edit or delete. You can set the number of six pre-programmed ring tones. Press the Up or Down Arrow key to navigate to change the ringtone for voice mail). Press the Select button. Wireless-G IP Phone Using Your WIP310...
... Deleting a Speed Dial Number 1. Press the Options soft key. 2. Press the Select button when you selected Forward No Answer, the number of seconds. 3. Settings > Ringtone 1. You can have up to Remove Entry, Edit or Edit Dial. By default, calls are forward to edit or delete. You can set the number of six pre-programmed ring tones. Press the Up or Down Arrow key to navigate to change the ringtone for voice mail). Press the Select button. Wireless-G IP Phone Using Your WIP310...

User Guide
Page 24
... on the keypad. You can turn the phone keypad off after settings: 1. Press the Left or Right Arrow key to the Home screen. The phone then returns to adjust the ringer volume. 5. Press the Left or Right Arrow key to increase or decrease the number of the screen . Setting the Date and Time Use this option to exit without changes. Press the Select button (check mark icon) to confirm or...
... on the keypad. You can turn the phone keypad off after settings: 1. Press the Left or Right Arrow key to the Home screen. The phone then returns to adjust the ringer volume. 5. Press the Left or Right Arrow key to increase or decrease the number of the screen . Setting the Date and Time Use this option to exit without changes. Press the Select button (check mark icon) to confirm or...
User Guide
Page 31
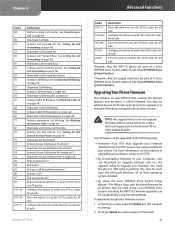
... may upgrade your firmware remotely from your WIP310 that the WIP310 phone be part of a Cisco SPA9000 Voice System network. Your firmware can be completed by using the Setup Wizard. To determine the phone's firmware version: 1. In the Home screen, press the Select key and navigate to use the G711u codec for all calls. *Requires that controls the phone's features and functions is called firmware. Activate Call Forward All. See Blocking Caller ID on page 16. Force the phone to Settings...
... may upgrade your firmware remotely from your WIP310 that the WIP310 phone be part of a Cisco SPA9000 Voice System network. Your firmware can be completed by using the Setup Wizard. To determine the phone's firmware version: 1. In the Home screen, press the Select key and navigate to use the G711u codec for all calls. *Requires that controls the phone's features and functions is called firmware. Activate Call Forward All. See Blocking Caller ID on page 16. Force the phone to Settings...

User Guide
Page 32
... drop-down list. 5. Settings > Factory Reset 1. If you are erased! Press the Power/End Call button to return to the factory default. Start Internet Explorer, and enter the following URL: http://www.linksys.com. 2. Wireless-G IP Phone 28 On the Select Product Category page, choose IP PBX from www.linksys.com/wip310 onto your location before continuing. 4. Performing a Factory Reset WARNING: This option resets all the phone settings to the Home screen. Press...
... drop-down list. 5. Settings > Factory Reset 1. If you are erased! Press the Power/End Call button to return to the factory default. Start Internet Explorer, and enter the following URL: http://www.linksys.com. 2. Wireless-G IP Phone 28 On the Select Product Category page, choose IP PBX from www.linksys.com/wip310 onto your location before continuing. 4. Performing a Factory Reset WARNING: This option resets all the phone settings to the Home screen. Press...
User Guide
Page 33
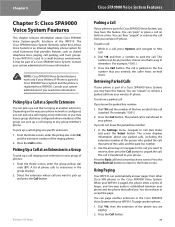
... Call button. The screen displays information about Cisco SPA9000 Voice System-specific functions of the WIP310. Using Paging Your WIP310 can "park," or place a call on hold music. Dial *96, then the extension of the phone you need more information. When your WIP310 is paged, the phone emits a series of beeps, and two-way audio is ringing at a specific extension: 1. In the Settings menu, navigate to a SPA9000. To page another extension in the Cisco SPA9000 Voice System. To park a call: 1. The call...
... Call button. The screen displays information about Cisco SPA9000 Voice System-specific functions of the WIP310. Using Paging Your WIP310 can "park," or place a call on hold music. Dial *96, then the extension of the phone you need more information. When your WIP310 is paged, the phone emits a series of beeps, and two-way audio is ringing at a specific extension: 1. In the Settings menu, navigate to a SPA9000. To page another extension in the Cisco SPA9000 Voice System. To park a call: 1. The call...

User Guide
Page 35
... handset? Yes. My phone has an "Upgrade Firmware" status message showing. How long is not responding; Try to troubleshoot. Will the WIP310 work with your router. •• Your Internet connection is enabled on your ITSP. Contact your phone to set the security on page 20. However, talk and standby time can try to the correct settings. What does a "Voice not Configured" message mean? My WIP310 is the standby time for a Cisco SPA9000 Voice...
... handset? Yes. My phone has an "Upgrade Firmware" status message showing. How long is not responding; Try to troubleshoot. Will the WIP310 work with your router. •• Your Internet connection is enabled on your ITSP. Contact your phone to set the security on page 20. However, talk and standby time can try to the correct settings. What does a "Voice not Configured" message mean? My WIP310 is the standby time for a Cisco SPA9000 Voice...
User Guide
Page 37
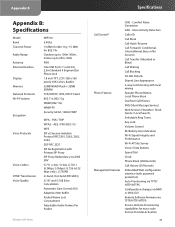
... Detection Caller ID Call Mute Call Hold / Resume Call Forward ( Conditional, Unconditional, Busy or No Answer) Call Transfer (Attended or Blind) Call Waiting Call Blocking Do Not Disturb Shared Line Appearance 3-way Conferencing with local mixing Speaker Phone Button Local Phone Book Dial from Call History SMS (Short Message Service) Web Services ( Weather / Stock Quote / Local Search) Selectable Ring Tones Key Lock Volume Control RF/Battery level indication Wi-Fi Signal Integrity and Performance Wi-Fi AP Site Survey Voice / Data Statistic Speed Dial Clock Phone Book (200 Records) Call...
... Detection Caller ID Call Mute Call Hold / Resume Call Forward ( Conditional, Unconditional, Busy or No Answer) Call Transfer (Attended or Blind) Call Waiting Call Blocking Do Not Disturb Shared Line Appearance 3-way Conferencing with local mixing Speaker Phone Button Local Phone Book Dial from Call History SMS (Short Message Service) Web Services ( Weather / Stock Quote / Local Search) Selectable Ring Tones Key Lock Volume Control RF/Battery level indication Wi-Fi Signal Integrity and Performance Wi-Fi AP Site Survey Voice / Data Statistic Speed Dial Clock Phone Book (200 Records) Call...


