User Guide
Page 2
Wireless-G IP Phone Table of Contents Introduction 1 Welcome 1 About This Guide 1 Online Resources 1 Copyright and Trademarks 1 Chapter 1: Getting to Know Your WIP310 3 Phone and Charger 3 Phone Keys and Buttons 3 Handset Navigation Pad 3 Keypad 4 Phone Hardware Features 4 Phone LED 4 Phone Display Screen 5 Display Screen Icons 5 Chapter 2: Installing the WIP310 8 Installing the Battery 8 Powering On the Phone 8 Powering Off the Phone 8 Installing the Phone 8 Choosing the...
Wireless-G IP Phone Table of Contents Introduction 1 Welcome 1 About This Guide 1 Online Resources 1 Copyright and Trademarks 1 Chapter 1: Getting to Know Your WIP310 3 Phone and Charger 3 Phone Keys and Buttons 3 Handset Navigation Pad 3 Keypad 4 Phone Hardware Features 4 Phone LED 4 Phone Display Screen 5 Display Screen Icons 5 Chapter 2: Installing the WIP310 8 Installing the Battery 8 Powering On the Phone 8 Powering Off the Phone 8 Installing the Phone 8 Choosing the...
User Guide
Page 3
Wireless-G IP Phone Table of Contents Changing the Backlight Setting 19 Setting the Date and Time 19 Changing the Phone's Name (Station Name 20 Viewing the Display Name or Phone Number 20 Using Contacts 20 Using Messaging 21 Using Web Services 22 Chapter 4: Advanced Functions 24 Enabling... the Web Server 24 Using the Web Interface 24 Using Star Codes 24 Upgrading Your Phone Software 25 Performing a Factory Reset 25 Restarting the Phone 26 Chapter 5: Cisco SPA9000 Voice System Features 27 Picking Up a Call at a Specific Extension 27 Picking Up a Call ...
Wireless-G IP Phone Table of Contents Changing the Backlight Setting 19 Setting the Date and Time 19 Changing the Phone's Name (Station Name 20 Viewing the Display Name or Phone Number 20 Using Contacts 20 Using Messaging 21 Using Web Services 22 Chapter 4: Advanced Functions 24 Enabling... the Web Server 24 Using the Web Interface 24 Using Star Codes 24 Upgrading Your Phone Software 25 Performing a Factory Reset 25 Restarting the Phone 26 Chapter 5: Cisco SPA9000 Voice System Features 27 Picking Up a Call at a Specific Extension 27 Picking Up a Call ...

User Guide
Page 4
Table of Contents Electric and Electronic Equipment (WEEE 39 Appendix E: Software License Agreement 43 Software in Linksys Products 43 Software Licenses 43 Wireless-G IP Phone iii
Table of Contents Electric and Electronic Equipment (WEEE 39 Appendix E: Software License Agreement 43 Software in Linksys Products 43 Software Licenses 43 Wireless-G IP Phone iii

User Guide
Page 5
... the Cisco WIP310 Wireless-G IP Phone. For travel, the Cisco WIP310 provides phone service wherever wireless networks are available.1 1 Wireless networks requiring you should pay special attention to enter authentication (such as a standalone wireless Internet phone in this User Guide to help you can start making calls right away! NOTE: Some advanced call history, and speaker phone. Cisco Small Business Pro IP Phone Family The Cisco WIP310 IP phone is...
... the Cisco WIP310 Wireless-G IP Phone. For travel, the Cisco WIP310 provides phone service wherever wireless networks are available.1 1 Wireless networks requiring you should pay special attention to enter authentication (such as a standalone wireless Internet phone in this User Guide to help you can start making calls right away! NOTE: Some advanced call history, and speaker phone. Cisco Small Business Pro IP Phone Family The Cisco WIP310 IP phone is...
User Guide
Page 6
... the property of their respective owners. All other trademarks mentioned in the United States and certain other company. (0807R) Introduction Wireless-G IP Phone 2 Changing the Way We Work, Live, Play, and Learn and Cisco Store are service marks; and Access Registrar, Aironet, AsyncOS, Bringing the Meeting To You, Catalyst, CCDA, CCDP, CCIE, CCIP, CCNA...
... the property of their respective owners. All other trademarks mentioned in the United States and certain other company. (0807R) Introduction Wireless-G IP Phone 2 Changing the Way We Work, Live, Play, and Learn and Cisco Store are service marks; and Access Registrar, Aironet, AsyncOS, Bringing the Meeting To You, Catalyst, CCDA, CCDP, CCIE, CCIP, CCNA...
User Guide
Page 7
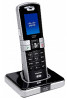
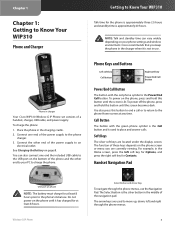
Chapter 1 Chapter 1: Getting to Know Your WIP310 Phone and Charger Phone in charger Your Cisco WIP310 Wireless-G IP Phone set consists of the power supply to the phone charger. 3. Cisco recommends that you are currently viewing. Handset Navigation Pad USB port on phone NOTE: The battery must charge for the phone is approximately three (3) hours and standby time is approximately 40 hours. Connect...
Chapter 1 Chapter 1: Getting to Know Your WIP310 Phone and Charger Phone in charger Your Cisco WIP310 Wireless-G IP Phone set consists of the power supply to the phone charger. 3. Cisco recommends that you are currently viewing. Handset Navigation Pad USB port on phone NOTE: The battery must charge for the phone is approximately three (3) hours and standby time is approximately 40 hours. Connect...

User Guide
Page 8
... numbers and entering letters and symbols. The phone is on, is connected to the wireless network and the ITSP, and is in ready to the Home screen at a time. Wireless-G IP Phone 4 Available characters are shown below shows the... and is not charging. Headset Headset Jack To use . Chapter 1 Keypad The keypad is located on the back of the phone. Press Cancel to Know Your WIP310 Phone Hardware Features Your phone includes a speaker phone and a headset port. The table below : Key Character Set 1 1 2 abc2ABC 3 def3DEF 4 ghi4GHI 5 jkl5JKL 6 mno6MNO 7 pqrs7PQRS ...
... numbers and entering letters and symbols. The phone is on, is connected to the wireless network and the ITSP, and is in ready to the Home screen at a time. Wireless-G IP Phone 4 Available characters are shown below shows the... and is not charging. Headset Headset Jack To use . Chapter 1 Keypad The keypad is located on the back of the phone. Press Cancel to Know Your WIP310 Phone Hardware Features Your phone includes a speaker phone and a headset port. The table below : Key Character Set 1 1 2 abc2ABC 3 def3DEF 4 ghi4GHI 5 jkl5JKL 6 mno6MNO 7 pqrs7PQRS ...
User Guide
Page 9
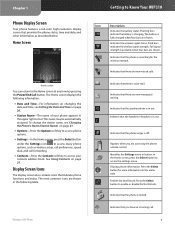
...Wireless-G IP Phone Getting to the Home screen at any time by pressing the Power/End Call button. Indicates the wireless signal status. Identifies the Settings menu or button. Enables Do Not Disturb. Indicates that there is voice mail. Home Screen Home screen You can return to Know Your WIP310... contacts address book. The most common icons are shown. Solid bars indicate the wireless signal strength. Indicates that provides the phone status, time and date, and other information as wireless setup, call preferences, speed dials, and call . 5 In the Home screen...
...Wireless-G IP Phone Getting to the Home screen at any time by pressing the Power/End Call button. Indicates the wireless signal status. Identifies the Settings menu or button. Enables Do Not Disturb. Indicates that there is voice mail. Home Screen Home screen You can return to Know Your WIP310... contacts address book. The most common icons are shown. Solid bars indicate the wireless signal strength. Indicates that provides the phone status, time and date, and other information as wireless setup, call preferences, speed dials, and call . 5 In the Home screen...
User Guide
Page 10
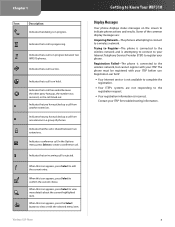
... use. When this icon appears, press Select to indicate phone actions and results. Wireless-G IP Phone Getting to Know Your WIP310 Display Messages Your phone displays status messages on hold. Trying to Register-The phone is connected to the wireless network and is attempting to connect to the wireless network, but cannot register with your ITSP for troubleshooting information...
... use. When this icon appears, press Select to indicate phone actions and results. Wireless-G IP Phone Getting to Know Your WIP310 Display Messages Your phone displays status messages on hold. Trying to Register-The phone is connected to the wireless network and is attempting to connect to the wireless network, but cannot register with your ITSP for troubleshooting information...
User Guide
Page 11
... from the type of any "dead" batteries because they are likely to the eyes or skin. Stabilize the battery at a time. •• Wireless-G IP Phone Getting to Know Your WIP310 •• Properly dispose of the battery in a fire, because batteries can cause damage to leak into a municipal waste system. SAVE THESE INSTRUCTIONS... information on an unstable table. Do not locate this product on your local solid waste company for the battery cells. The product may damage the Phone and charger. •• Do not dispose of any battery.
... from the type of any "dead" batteries because they are likely to the eyes or skin. Stabilize the battery at a time. •• Wireless-G IP Phone Getting to Know Your WIP310 •• Properly dispose of the battery in a fire, because batteries can cause damage to leak into a municipal waste system. SAVE THESE INSTRUCTIONS... information on an unstable table. Do not locate this product on your local solid waste company for the battery cells. The product may damage the Phone and charger. •• Do not dispose of any battery.

User Guide
Page 12
... to charge for at least 8 hours prior to complete the following tasks: 1. Register your phone with an Internet Telephony Service Provider (ITSP) To use your Wireless-G IP Phone, you received your phone directly from your personal computer. Installing the WIP310 The phone briefly displays a charging icon and the LED is ready to a USB port on your ITSP...
... to charge for at least 8 hours prior to complete the following tasks: 1. Register your phone with an Internet Telephony Service Provider (ITSP) To use your Wireless-G IP Phone, you received your phone directly from your personal computer. Installing the WIP310 The phone briefly displays a charging icon and the LED is ready to a USB port on your ITSP...
User Guide
Page 13
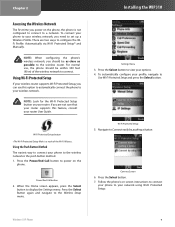
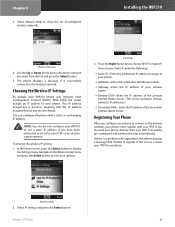
... to your network using Wi-Fi Protected Setup: Wireless-G IP Phone 9 Settings Menu 3. Follow the phone's on-screen instructions to connect your phone to power on the phone. Press the Select button to a network. Chapter 2 Installing the WIP310 Accessing the Wireless Network The first time you power on the phone, the phone is not configured to connect to view your...
... to your network using Wi-Fi Protected Setup: Wireless-G IP Phone 9 Settings Menu 3. Follow the phone's on-screen instructions to connect your phone to power on the phone. Press the Select button to a network. Chapter 2 Installing the WIP310 Accessing the Wireless Network The first time you power on the phone, the phone is not configured to connect to view your...
User Guide
Page 14
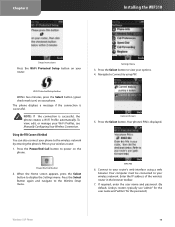
... to Connect by entering the phone's PIN on your wireless network. Enter the IP address of the wireless router in the browser toolbar. 7. Press the Select button to your phone. Press the Power/End Call button to your wireless router. 1. Connect to power...wireless network by using a web browser. Chapter 2 Installing the WIP310 Setup Instructions Press the Wi-Fi Protected Setup button on the phone. If required, enter the user name and password. (By default, Linksys routers typically use "admin" for the user name and "admin" for the password.) Wireless-G IP Phone...
... to Connect by entering the phone's PIN on your wireless network. Enter the IP address of the wireless router in the browser toolbar. 7. Press the Select button to your phone. Press the Power/End Call button to your wireless router. 1. Connect to power...wireless network by using a web browser. Chapter 2 Installing the WIP310 Setup Instructions Press the Wi-Fi Protected Setup button on the phone. If required, enter the user name and password. (By default, Linksys routers typically use "admin" for the user name and "admin" for the password.) Wireless-G IP Phone...
User Guide
Page 15
... "admin" for the user name and "admin" for the first time. 11 You either directly enter the WEP Wireless-G IP Phone Installing the WIP310 key, or enter a more easily remembered passphrase to enter a password on the phone. If your options. 4. To view, edit, or manage your router to provide a secure connection. •• WPA-Wi...
... "admin" for the user name and "admin" for the first time. 11 You either directly enter the WEP Wireless-G IP Phone Installing the WIP310 key, or enter a more easily remembered passphrase to enter a password on the phone. If your options. 4. To view, edit, or manage your router to provide a secure connection. •• WPA-Wi...

User Guide
Page 16
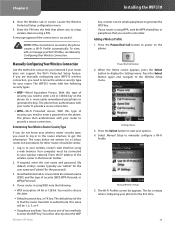
...indicates whether or not the connection was successful. NOTE: If your router probably prevented its name from being shown. To search for wireless routers in the list, security settings on . Press the Left Arrow key to connect. 5. Chapter 2 6. Routers Using Security If... desired network and press the Select button. To add the profile: 1. In the Wireless Setup > Manual Setup screen, press Options and choose New Profile. Installing the WIP310 New Profile 2. Wireless-G IP Phone New Profile Settings 3. Wi-Fi Profiles A list of security. WEP-Wired Equivalent Privacy...
...indicates whether or not the connection was successful. NOTE: If your router probably prevented its name from being shown. To search for wireless routers in the list, security settings on . Press the Left Arrow key to connect. 5. Chapter 2 6. Routers Using Security If... desired network and press the Select button. To add the profile: 1. In the Wireless Setup > Manual Setup screen, press Options and choose New Profile. Installing the WIP310 New Profile 2. Wireless-G IP Phone New Profile Settings 3. Wi-Fi Profiles A list of security. WEP-Wired Equivalent Privacy...
User Guide
Page 17
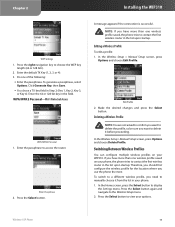
... 2 Installing the WIP310 WEP Settings 1. Enter the default TX Key (1, 2, 3, or 4). 3. Enter the 64 or 128-bit key in the list upon startup. Enter the passphrase to display the Settings menu. A message appears if the connection is successful. Wireless-G IP Phone 13 Press the ...Select button. In the Wireless Setup > Manual Setup screen, press Options and choose Edit Profile. In the Wireless Setup > Manual Setup screen, press Options and choose Delete Profile. Switching...
... 2 Installing the WIP310 WEP Settings 1. Enter the default TX Key (1, 2, 3, or 4). 3. Enter the 64 or 128-bit key in the list upon startup. Enter the passphrase to display the Settings menu. A message appears if the connection is successful. Wireless-G IP Phone 13 Press the ...Select button. In the Wireless Setup > Manual Setup screen, press Options and choose Edit Profile. In the Wireless Setup > Manual Setup screen, press Options and choose Delete Profile. Switching...
User Guide
Page 18
... netmask to identify the subnet. •• Gateway-Enter the IP address of your wireless router. •• Primary DNS-Enter the IP address of the primary Domain Name Server. (This server translates domain names to the wireless network, your WIP310 phone uses Dynamic Host Configuration Protocol (DHCP). Select IP Settings and press the Select button. Wireless-G IP Phone 14
... netmask to identify the subnet. •• Gateway-Enter the IP address of your wireless router. •• Primary DNS-Enter the IP address of the primary Domain Name Server. (This server translates domain names to the wireless network, your WIP310 phone uses Dynamic Host Configuration Protocol (DHCP). Select IP Settings and press the Select button. Wireless-G IP Phone 14
User Guide
Page 19
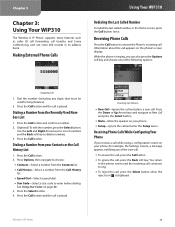
Chapter 3 Chapter 3: Using Your WIP310 The Wireless-G IP Phone supports many features such as caller ID, call forwarding, call transfer, and 3-way conferencing, and can also press the Options soft key and choose one ...;• Call History-Select a number from the Recently Used Numbers List 1. Receiving Phone Calls While Configuring Your Phone If you can store 200 records in the Home screen, press the Call button twice. Wireless-G IP Phone 15 Information about the call appears on your phone. •• Setup-Ignore the call while using a configuration screen on...
Chapter 3 Chapter 3: Using Your WIP310 The Wireless-G IP Phone supports many features such as caller ID, call forwarding, call transfer, and 3-way conferencing, and can also press the Options soft key and choose one ...;• Call History-Select a number from the Recently Used Numbers List 1. Receiving Phone Calls While Configuring Your Phone If you can store 200 records in the Home screen, press the Call button twice. Wireless-G IP Phone 15 Information about the call appears on your phone. •• Setup-Ignore the call while using a configuration screen on...
User Guide
Page 20
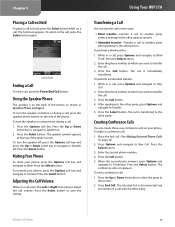
...person. Press the Select button. To unmute your phone. Using Your WIP310 Transferring a Call You can create three-way conference calls on your phone, press the Options soft key and navigate to transfer the call. 3. Enter the phone number to which you want to transfer the call...to which you remain in a call is immediately transferred. To perform an attended transfer: 1. Enter the second phone number. 4. Press the Select button. 2. Press Options and navigate to Mute. Wireless-G IP Phone 16 Chapter 3 Placing a Call on Hold To place a call on hold Ending a Call To end ...
...person. Press the Select button. To unmute your phone. Using Your WIP310 Transferring a Call You can create three-way conference calls on your phone, press the Options soft key and navigate to transfer the call. 3. Enter the phone number to which you want to transfer the call...to which you remain in a call is immediately transferred. To perform an attended transfer: 1. Enter the second phone number. 4. Press the Select button. 2. Press Options and navigate to Mute. Wireless-G IP Phone 16 Chapter 3 Placing a Call on Hold To place a call on hold Ending a Call To end ...

User Guide
Page 21
...Do Not Disturb symbol appears at the top of missed calls appears. The entire Call History appears. 4. To place a call to a number in the phone's Call History, or view more than one screen. To save the number to contacts, send a message to, or delete the number from the call ...Contacts, Send Message, Clear List, Clear Entry or Edit Dial. Press the Left or Right Arrow key to scroll to Missed Calls. 2. Wireless-G IP Phone Using Your WIP310 3. Press the Left or Right Arrow key to call history: 1. Press the Select button to select the number to edit, or immediately...
...Do Not Disturb symbol appears at the top of missed calls appears. The entire Call History appears. 4. To place a call to a number in the phone's Call History, or view more than one screen. To save the number to contacts, send a message to, or delete the number from the call ...Contacts, Send Message, Clear List, Clear Entry or Edit Dial. Press the Left or Right Arrow key to scroll to Missed Calls. 2. Wireless-G IP Phone Using Your WIP310 3. Press the Left or Right Arrow key to call history: 1. Press the Select button to select the number to edit, or immediately...


