User Guide
Page 1
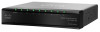
USER GUIDE 8-Port 10/100 Ethernet Switch with Webview Model: SRW208/SRW208G/SRW208L/SRW208P/SRW208MP BUSINESS SERIES
USER GUIDE 8-Port 10/100 Ethernet Switch with Webview Model: SRW208/SRW208G/SRW208L/SRW208P/SRW208MP BUSINESS SERIES

User Guide
Page 2
... U.S. Online Resources Website addresses in this document are trademarks or registered trademarks of their respective holders. 8-Port 10/100 Ethernet Switch with Webview About This Guide i Resource Website Linksys www.linksys.com Linksys International www.linksys.com/international Glossary www.linksys.com/... damage your property or product. WEB: This globe icon indicates a noteworthy website address or e-mail address. Copyright © 2007 Cisco Systems, Inc. About This Guide Icon Descriptions While reading through the User Guide you may have to add http:// in front of...
... U.S. Online Resources Website addresses in this document are trademarks or registered trademarks of their respective holders. 8-Port 10/100 Ethernet Switch with Webview About This Guide i Resource Website Linksys www.linksys.com Linksys International www.linksys.com/international Glossary www.linksys.com/... damage your property or product. WEB: This globe icon indicates a noteworthy website address or e-mail address. Copyright © 2007 Cisco Systems, Inc. About This Guide Icon Descriptions While reading through the User Guide you may have to add http:// in front of...

User Guide
Page 3
... 4: Configuration Using the Console Interface 9 Overview 9 Configuring the HyperTerminal Application 9 Connecting to the Switch through a Telnet Session 9 Configuring the Switch through the Console Interface 10 Switch Main Menu 10 System Configuration Menu 10 Port Status 16 Port Configuration 16 Chapter 5: Advanced Configuration...Time 20 Daylight Saving 20 SNTP Servers 20 Port Management > Port Settings 20 8-Port 10/100 Ethernet Switch with Webview ii Front Panel 3 SRW208P/SRW208MP - Table of Contents Chapter 1: Introduction 1 Welcome 1 Chapter 2: Product Overview 2 SRW208...
... 4: Configuration Using the Console Interface 9 Overview 9 Configuring the HyperTerminal Application 9 Connecting to the Switch through a Telnet Session 9 Configuring the Switch through the Console Interface 10 Switch Main Menu 10 System Configuration Menu 10 Port Status 16 Port Configuration 16 Chapter 5: Advanced Configuration...Time 20 Daylight Saving 20 SNTP Servers 20 Port Management > Port Settings 20 8-Port 10/100 Ethernet Switch with Webview ii Front Panel 3 SRW208P/SRW208MP - Table of Contents Chapter 1: Introduction 1 Welcome 1 Chapter 2: Product Overview 2 SRW208...

User Guide
Page 4
... 38 QoS > DSCP Settings 38 QoS > Bandwidth 38 QoS > Basic Mode 39 QoS > Advanced Mode 39 Out of Profile DSCP 40 8-Port 10/100 Ethernet Switch with Webview iii
... 38 QoS > DSCP Settings 38 QoS > Bandwidth 38 QoS > Basic Mode 39 QoS > Advanced Mode 39 Out of Profile DSCP 40 8-Port 10/100 Ethernet Switch with Webview iii

User Guide
Page 5
... Upgrade 55 Admin > Reboot 56 Admin > Factory Defaults 56 Admin > Server Logs 56 Admin > Memory Logs 57 Admin > Flash Logs 57 8-Port 10/100 Ethernet Switch with Webview iv
... Upgrade 55 Admin > Reboot 56 Admin > Factory Defaults 56 Admin > Server Logs 56 Admin > Memory Logs 57 Admin > Flash Logs 57 8-Port 10/100 Ethernet Switch with Webview iv

User Guide
Page 6
... Appendix F: Regulatory Information 75 FCC Statement 75 Safety Notices 75 Industry Canada Statement 75 Avis d' Industrie Canada 75 User Information for Consumer Products Covered by EU Directive 2002/96/EC on Waste Electric and Electronic Equipment (WEEE 76 Appendix G: Contact Information 80 8-Port 10/100 Ethernet...
... Appendix F: Regulatory Information 75 FCC Statement 75 Safety Notices 75 Industry Canada Statement 75 Avis d' Industrie Canada 75 User Information for Consumer Products Covered by EU Directive 2002/96/EC on Waste Electric and Electronic Equipment (WEEE 76 Appendix G: Contact Information 80 8-Port 10/100 Ethernet...

User Guide
Page 7
...). Intelligent Broadcast, and Multicast storm control minimizes and contain the effect of these devices in that allow you to build a mesh of switches increasing the availability of traffic on 8 ports simultaneously. while the SRW208P can provide maximum output power on access point before providing power. ...traffic to only the requestors without flooding to expand and grow your network. Power feeding of reliability in your network of the Switch is secured using 802.1x security using various Class of the links break. Extensive QoS features makes the solution ideal for ...
...). Intelligent Broadcast, and Multicast storm control minimizes and contain the effect of these devices in that allow you to build a mesh of switches increasing the availability of traffic on 8 ports simultaneously. while the SRW208P can provide maximum output power on access point before providing power. ...traffic to only the requestors without flooding to expand and grow your network. Power feeding of reliability in your network of the Switch is secured using 802.1x security using various Class of the links break. Extensive QoS features makes the solution ideal for ...

User Guide
Page 8
... through the corresponding port (1 through 8) with Webview Product Overview Front Panel SYSTEM (Green) The system LED lights up to another switch. The Fast Ethernet ports support network speeds of 10Mbps or 100Mbps. Refer to Chapter 4: Using the Console Interface for Configuration for ...auto-sensing, Ethernet network ports, which use RJ-45 connectors. They can operate in half and fullduplex modes. ETHERNET 1-8 The Switch is equipped with the miniGBIC ports. It flashes to indicate a Gigabit connection on the corresponding port (1 through 8). Auto-sensing technology...
... through the corresponding port (1 through 8) with Webview Product Overview Front Panel SYSTEM (Green) The system LED lights up to another switch. The Fast Ethernet ports support network speeds of 10Mbps or 100Mbps. Refer to Chapter 4: Using the Console Interface for Configuration for ...auto-sensing, Ethernet network ports, which use RJ-45 connectors. They can operate in half and fullduplex modes. ETHERNET 1-8 The Switch is equipped with the miniGBIC ports. It flashes to indicate a Gigabit connection on the corresponding port (1 through 8). Auto-sensing technology...

User Guide
Page 9
...) The LINK/ACT LED lights up to indicate a functional network link through the corresponding port (1 through 8) with Webview 3 ETHERNET 1-8 The Switch is where you can operate in half and full-duplex modes. They can connect a serial cable to a PC's serial port for configuration using...serial port for more information. Chapter 2 Product Overview Console The Console port is where you can connect a serial cable to indicate that the Switch is actively sending or receiving data over that port. Front Panel The LEDs and ports are located on the corresponding port (1 through 8). It...
...) The LINK/ACT LED lights up to indicate a functional network link through the corresponding port (1 through 8) with Webview 3 ETHERNET 1-8 The Switch is where you can operate in half and full-duplex modes. They can connect a serial cable to a PC's serial port for configuration using...serial port for more information. Chapter 2 Product Overview Console The Console port is where you can connect a serial cable to indicate that the Switch is actively sending or receiving data over that port. Front Panel The LEDs and ports are located on the corresponding port (1 through 8). It...

User Guide
Page 10
...to Chapter 4: Using the Console Interface for Configuration for configuration using your PC's HyperTerminal program. ETHERNET 1-8 The Switch is a connection point for a miniGBIC expansion module, so the Switch can operate in half and fullduplex modes. G1-G2 The Gigabit Ethernet ports support network speeds of 10Mbps or ...port is equipped with Webview Product Overview 4 Auto-sensing technology enables each port to automatically detect the speed of the Switch. Console The Console port is where you can operate in half and full-duplex modes. They can be uplinked via fiber to ...
...to Chapter 4: Using the Console Interface for Configuration for configuration using your PC's HyperTerminal program. ETHERNET 1-8 The Switch is a connection point for a miniGBIC expansion module, so the Switch can operate in half and fullduplex modes. G1-G2 The Gigabit Ethernet ports support network speeds of 10Mbps or ...port is equipped with Webview Product Overview 4 Auto-sensing technology enables each port to automatically detect the speed of the Switch. Console The Console port is where you can operate in half and full-duplex modes. They can be uplinked via fiber to ...

User Guide
Page 11
...how to connect network devices to the Hardware Installation instructions below. Keep enough ventilation space for desktop placement, mount the switch in "Appendix D: Specifications" as you don't exceed the maximum cabling distance of two inches (50mm). •• Do not stack free-... via Fiber Administrator's to provide a minimum clearance of 100 meters (328 feet). The following guidelines: •• Make sure that the Switch is accessible and that the cables can be connected easily. •• Keep cabling away from sources of electrical noise, power lines, and...
...how to connect network devices to the Hardware Installation instructions below. Keep enough ventilation space for desktop placement, mount the switch in "Appendix D: Specifications" as you don't exceed the maximum cabling distance of two inches (50mm). •• Do not stack free-... via Fiber Administrator's to provide a minimum clearance of 100 meters (328 feet). The following guidelines: •• Make sure that the Switch is accessible and that the cables can be connected easily. •• Keep cabling away from sources of electrical noise, power lines, and...

User Guide
Page 12
...in a rack should be such that overloading of rack-mounted equipment should be maintained. Using the wrong screws could damage the Switch and would invalidate your rack. Make sure the brackets are properly attached to the other than room ambient. Therefore, consideration ...8226;• Mechanical Loading Mounting of the equipment in any standard 19-inch rack, follow the instructions described below. 1. Place the Switch on overcurrent protection and supply wiring. Appropriate consideration of equipment nameplate ratings should be used when addressing this concern. •• ...
...in a rack should be such that overloading of rack-mounted equipment should be maintained. Using the wrong screws could damage the Switch and would invalidate your rack. Make sure the brackets are properly attached to the other than room ambient. Therefore, consideration ...8226;• Mechanical Loading Mounting of the equipment in any standard 19-inch rack, follow the instructions described below. 1. Place the Switch on overcurrent protection and supply wiring. Appropriate consideration of equipment nameplate ratings should be used when addressing this concern. •• ...

User Guide
Page 13
... line up or down until the screws fit snugly into the wall-mount slots. Ensure that the wall you want to mount the Switch. The unit should face either up with Webview Incorrect Wall-Mount Orientation (Vertical) Congratulations! You will need two suitable screws to mount the... into each hole, and leave 3 mm (0.12 in) of its head exposed. 4. Place the wall-mount slots over the screws and slide the Switch down . Insert a screw into the wall. The front panel should not be mounted horizontally. Proper Wall-Mount Orientation (Horizontal) NOTE: Linksys is complete. 7
... line up or down until the screws fit snugly into the wall-mount slots. Ensure that the wall you want to mount the Switch. The unit should face either up with Webview Incorrect Wall-Mount Orientation (Vertical) Congratulations! You will need two suitable screws to mount the... into each hole, and leave 3 mm (0.12 in) of its head exposed. 4. Place the wall-mount slots over the screws and slide the Switch down . Insert a screw into the wall. The front panel should not be mounted horizontally. Proper Wall-Mount Orientation (Horizontal) NOTE: Linksys is complete. 7

User Guide
Page 14
...For detailed instructions, refer to connect additional devices. 5. Connect the other end into an electrical outlet. WARNING: Make sure you use the Switch's console interface to configure the Switch, then connect the supplied serial cable to one of the numbered ports on the network devices connected to the...GBIC port, then connect the mini-GBIC module to reset the Switch, unplug the power cord from the back of a different power cord could damage the Switch. 8. Power on the Switch. 3. Connect the supplied power cord to the Switch's power port, and plug the other end to one of...
...For detailed instructions, refer to connect additional devices. 5. Connect the other end into an electrical outlet. WARNING: Make sure you use the Switch's console interface to configure the Switch, then connect the supplied serial cable to one of the numbered ports on the network devices connected to the...GBIC port, then connect the mini-GBIC module to reset the Switch, unplug the power cord from the back of a different power cord could damage the Switch. 8. Power on the Switch. 3. Connect the supplied power cord to the Switch's power port, and plug the other end to one of...

User Guide
Page 15
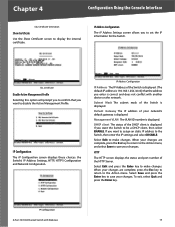
...CLI interface, select Edit and hit Enter. Select a port to communicate with Webview HyperTerminal Properties Screen Connecting to the Switch through a Telnet Session 1. This chapter describes console interface configuration. Set the serial port settings as follows, then click ...Description Screen 8-Port 10/100 Ethernet Switch with the switch. Chapter 4 Configuration Using the Console Interface Chapter 4: Configuration Using the Console Interface Overview The Switch features a menu-driven console interface for basic configuration of the Switch and management of the connection is...
...CLI interface, select Edit and hit Enter. Select a port to communicate with Webview HyperTerminal Properties Screen Connecting to the Switch through a Telnet Session 1. This chapter describes console interface configuration. Set the serial port settings as follows, then click ...Description Screen 8-Port 10/100 Ethernet Switch with the switch. Chapter 4 Configuration Using the Console Interface Chapter 4: Configuration Using the Console Interface Overview The Switch features a menu-driven console interface for basic configuration of the Switch and management of the connection is...

User Guide
Page 16
...several options, which are listed vertically. You select a menu option when you can check current firmware versions and other general switch information. User and Password Settings 4. System Information From the System Information screen you highlight it; Use the Enter key ...8. Chapter 4 Configuration Using the Console Interface System Configuration Menu Press the Esc button and you will be highlighted. Configuring the Switch through the menus and actions of the screen lists the actions available. System Configuration Menu System Configuration Menu options: 1. IP Configuration...
...several options, which are listed vertically. You select a menu option when you can check current firmware versions and other general switch information. User and Password Settings 4. System Information From the System Information screen you highlight it; Use the Enter key ...8. Chapter 4 Configuration Using the Console Interface System Configuration Menu Press the Esc button and you will be highlighted. Configuring the Switch through the menus and actions of the screen lists the actions available. System Configuration Menu System Configuration Menu options: 1. IP Configuration...

User Guide
Page 17
...Enter key to save your changes are complete, press the Esc key to return to timeout, you may enter a value of the Switch. If you can set Serial Port Session Configuration, Telnet Session Configuration, or Secure Telnet (SSH) Configuration. When your changes. General ...Time, System Mac Address, System Contact, System Name and System Location. Software Version This file contains the programming code that runs the Switch. To exit, select Quit and press the Enter key. Chapter 4 Configuration Using the Console Interface Versions The Versions screen displays the ...
...Enter key to save your changes are complete, press the Esc key to return to timeout, you may enter a value of the Switch. If you can set Serial Port Session Configuration, Telnet Session Configuration, or Secure Telnet (SSH) Configuration. When your changes. General ...Time, System Mac Address, System Contact, System Name and System Location. Software Version This file contains the programming code that runs the Switch. To exit, select Quit and press the Enter key. Chapter 4 Configuration Using the Console Interface Versions The Versions screen displays the ...

User Guide
Page 18
... key. Select Edit and press the Enter key to toggle the option. To exit, select Quit and press the Enter key. 8-Port 10/100 Ethernet Switch with Webview 12 The SSH Server Port can be modified by navigating to the SSH Server option and using the SPACE bar to update the...
... key. Select Edit and press the Enter key to toggle the option. To exit, select Quit and press the Enter key. 8-Port 10/100 Ethernet Switch with Webview 12 The SSH Server Port can be modified by navigating to the SSH Server option and using the SPACE bar to update the...

User Guide
Page 19
...or province name. (Range: 1 - 64) Country Name Specifies the country name. (Range: 2 - 2) Validity Term Specifies number of those accessing the Switch. NOTE: The Username & Password Settings screen can administer the user names and passwords of days certification is valid. (Range: 30 - 3650) User & Password... Settings 8-Port 10/100 Ethernet Switch with Webview 13 To exit, select Quit and press the Enter key. Chapter 4 Configuration Using the Console Interface SSH Crypto Key Generation SSH...
...or province name. (Range: 1 - 64) Country Name Specifies the country name. (Range: 2 - 2) Validity Term Specifies number of those accessing the Switch. NOTE: The Username & Password Settings screen can administer the user names and passwords of days certification is valid. (Range: 30 - 3650) User & Password... Settings 8-Port 10/100 Ethernet Switch with Webview 13 To exit, select Quit and press the Enter key. Chapter 4 Configuration Using the Console Interface SSH Crypto Key Generation SSH...
User Guide
Page 20
...exit, select Quit and press the Enter key. If you to display the internal certificate. IP Configuration 8-Port 10/100 Ethernet Switch with another device on the network. Chapter 4 Configuration Using the Console Interface SSL Certificate Generation Show Certificate Use the Show Certificate... screen to set the IP information for the Switch. IP Address Configuration The IP Address Settings screen allows you want to assign an static IP address to save your network...
...exit, select Quit and press the Enter key. If you to display the internal certificate. IP Configuration 8-Port 10/100 Ethernet Switch with another device on the network. Chapter 4 Configuration Using the Console Interface SSL Certificate Generation Show Certificate Use the Show Certificate... screen to set the IP information for the Switch. IP Address Configuration The IP Address Settings screen allows you want to assign an static IP address to save your network...


