
User Manual
Page 40
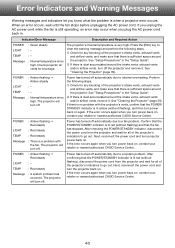
... steady Message : A system problem has occurred. Next, reconnect the power cord and turn projector power back on. Error Indicators and Warning Messages Warning messages and indicators let you turn power back on, contact your retailer or nearest authorized CASIO Service Center. If you unplug the AC power cord while the fan is dust accumulated around the intake...
... steady Message : A system problem has occurred. Next, reconnect the power cord and turn projector power back on. Error Indicators and Warning Messages Warning messages and indicators let you turn power back on, contact your retailer or nearest authorized CASIO Service Center. If you unplug the AC power cord while the fan is dust accumulated around the intake...

User Manual
Page 41
... Confirm that was terminated because of the projector's indicators to go out. Next, reconnect the power cord and turn on , contact your retailer or nearest authorized CASIO Service Center. Press the [ESC] key to clear the warning message. Message : Some problem... the power cord and turn power back on the projector again. Next, reconnect the power cord and turn power back on , contact your retailer or nearest authorized CASIO Service Center. TEMP : - POWER : Amber flashing J Red steady LIGHT : - After checking the POWER/STANDBY indicator, disconnect the power cord from ...
... Confirm that was terminated because of the projector's indicators to go out. Next, reconnect the power cord and turn on , contact your retailer or nearest authorized CASIO Service Center. Press the [ESC] key to clear the warning message. Message : Some problem... the power cord and turn power back on the projector again. Next, reconnect the power cord and turn power back on , contact your retailer or nearest authorized CASIO Service Center. TEMP : - POWER : Amber flashing J Red steady LIGHT : - After checking the POWER/STANDBY indicator, disconnect the power cord from ...

User Manual
Page 42
... the light source unit cover is closed. 3 Plug the power cord back in and turn power back on again. If the error occurs again when you turn the projector back on , contact your retailer or nearest authorized CASIO Service Center. 42 TEMP : Amber flashing (1-second interval)... Message : - Perform the following steps. 1 After confirming that the POWER/STANDBY indicator is lit red (without flashing), disconnect the power cord from the projector. 2 Check to make sure...
... the light source unit cover is closed. 3 Plug the power cord back in and turn power back on again. If the error occurs again when you turn the projector back on , contact your retailer or nearest authorized CASIO Service Center. 42 TEMP : Amber flashing (1-second interval)... Message : - Perform the following steps. 1 After confirming that the POWER/STANDBY indicator is lit red (without flashing), disconnect the power cord from the projector. 2 Check to make sure...
Setup Guide
Page 3
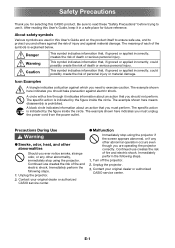
...example shown here means disassembly is explained below. *Danger *Warning *Caution This symbol indicates information that you must unplug the power cord from the power outlet. The specific action is indicated by the figure inside the circle. Continued use creates the risk of injury and against... or applied incorrectly, could possibly create the risk of death or serious personal injury. A circle with a line through it in this CASIO product. Be sure to read these "Safety Precautions" before trying to exercise caution. The example shown here indicates you for future reference....
...example shown here means disassembly is explained below. *Danger *Warning *Caution This symbol indicates information that you must unplug the power cord from the power outlet. The specific action is indicated by the figure inside the circle. Continued use creates the risk of injury and against... or applied incorrectly, could possibly create the risk of death or serious personal injury. A circle with a line through it in this CASIO product. Be sure to read these "Safety Precautions" before trying to exercise caution. The example shown here indicates you for future reference....
Setup Guide
Page 4
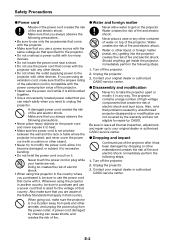
... The projector contains a large number of high-voltage components that the ampere rating of the extension cord is located, and never cover the power cord with it has been damaged by CASIO. Also make sure that create the risk of fire and electric shock. Contact your original dealer ...that you always observe the following precautions. • Never place heavy objects on the projector. " Never touch the power cord or plug while your original dealer or authorized CASIO service center. Turn off the projector. 2. E-2 Doing so creates the risk of electric shock. • When ...
... The projector contains a large number of high-voltage components that the ampere rating of the extension cord is located, and never cover the power cord with it has been damaged by CASIO. Also make sure that create the risk of fire and electric shock. Contact your original dealer ...that you always observe the following precautions. • Never place heavy objects on the projector. " Never touch the power cord or plug while your original dealer or authorized CASIO service center. Turn off the projector. 2. E-2 Doing so creates the risk of electric shock. • When ...
Setup Guide
Page 6
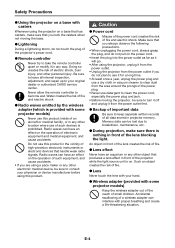
...E-4 Doing so creates the risk of the projector while the light source unit is prohibited. Do not use detergent to clean the power cord, especially the power plug and jack. • Before moving the projector, be lost due to become wet. Radio waves can have an aquarium or ...written records of all internal inspection, adjustment, and repair up to your hand. ● Wireless adapter (provided with your original dealer or authorized CASIO service center. + Never allow the remote controller to breakdown, maintenance, etc. ● During projection, make sure that you do not touch the...
...E-4 Doing so creates the risk of the projector while the light source unit is prohibited. Do not use detergent to clean the power cord, especially the power plug and jack. • Before moving the projector, be lost due to become wet. Radio waves can have an aquarium or ...written records of all internal inspection, adjustment, and repair up to your hand. ● Wireless adapter (provided with your original dealer or authorized CASIO service center. + Never allow the remote controller to breakdown, maintenance, etc. ● During projection, make sure that you do not touch the...
Setup Guide
Page 12
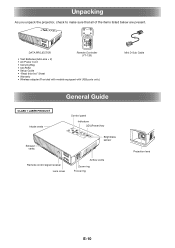
DATA PROJECTOR Remote Controller (YT-120) • Test Batteries (AAA-size × 2) • AC Power Cord • Carrying Bag • CD-ROM • Setup Guide • "Read this first" Sheet • Warranty • Wireless adapter (Provided with models... equipped with USB ports only.) Mini D-Sub Cable General Guide CLASS 1 LASER PRODUCT Intake vents Exhaust vents Control panel Indicators [P] (Power) key Brightness sensor Remote control signal receiver Lens cover Airflow vents Zoom ring Focus ring Projection lens E-10 Unpacking As you unpack the projector, ...
DATA PROJECTOR Remote Controller (YT-120) • Test Batteries (AAA-size × 2) • AC Power Cord • Carrying Bag • CD-ROM • Setup Guide • "Read this first" Sheet • Warranty • Wireless adapter (Provided with models... equipped with USB ports only.) Mini D-Sub Cable General Guide CLASS 1 LASER PRODUCT Intake vents Exhaust vents Control panel Indicators [P] (Power) key Brightness sensor Remote control signal receiver Lens cover Airflow vents Zoom ring Focus ring Projection lens E-10 Unpacking As you unpack the projector, ...

Setup Guide
Page 16
...E-14 NOTE z This product is at a vertical angle to adjust the focus. z To remove the lens cover, insert your fingers into a power outlet. Press the [P] (Power) key. Zoom ring Smaller Larger Focus ring NOTE z The projector has a keystone correction feature that is covering the lens, remove it is also.... 4. You can use the [KEYSTONE +] and [KEYSTONE -] keys to select "Computer" and then press the [ENTER] key. 6. Use the bundled AC power cord to the projector. 3. Adjust the size and the focus of input sources. Starting and Stopping Projection To start projection 1.
...E-14 NOTE z This product is at a vertical angle to adjust the focus. z To remove the lens cover, insert your fingers into a power outlet. Press the [P] (Power) key. Zoom ring Smaller Larger Focus ring NOTE z The projector has a keystone correction feature that is covering the lens, remove it is also.... 4. You can use the [KEYSTONE +] and [KEYSTONE -] keys to select "Computer" and then press the [ENTER] key. 6. Use the bundled AC power cord to the projector. 3. Adjust the size and the focus of input sources. Starting and Stopping Projection To start projection 1.

Setup Guide
Page 17
z This causes the confirmation message to make sure that the POWER/STANDBY indicator has stopped flashing amber and remains lit, unplug the AC power cord from the power outlet. To turn off the projector 1. E-15 If you press the [ESC] key. 2. After checking to appear. Starting ...and Stopping Projection To turn off the projector, press the [P] (Power) key again in response to the confirmation ...
z This causes the confirmation message to make sure that the POWER/STANDBY indicator has stopped flashing amber and remains lit, unplug the AC power cord from the power outlet. To turn off the projector 1. E-15 If you press the [ESC] key. 2. After checking to appear. Starting ...and Stopping Projection To turn off the projector, press the [P] (Power) key again in response to the confirmation ...

Setup Guide
Page 19
...normal. The following shows what the indicators look like this: POWER/ STANDBY LIGHT TEMP Amber Amber Amber Amber Green Amber Amber Green Amber Green Green It means this: You have just plugged the AC power cord into a power outlet. E-17 For details about the current operational status of... in standby. Indicators Indicators keep you informed about indicators and warning messages, see below) before trying to turn on power. Standby state: The AC power cord is plugged in and the projector is warming up after being turned on. Projector is in a pattern other than those...
...normal. The following shows what the indicators look like this: POWER/ STANDBY LIGHT TEMP Amber Amber Amber Amber Green Amber Amber Green Amber Green Green It means this: You have just plugged the AC power cord into a power outlet. E-17 For details about the current operational status of... in standby. Indicators Indicators keep you informed about indicators and warning messages, see below) before trying to turn on power. Standby state: The AC power cord is plugged in and the projector is warming up after being turned on. Projector is in a pattern other than those...
Setup Guide
Page 20
... projector's volume level setting may not project correctly when you want to the COMPUTER IN terminal of the device connected to "Speaker". Connect the AC power cord correctly. z The correct output source is not HDMI, press [T] five times and then press the [ENTER] key. 3. The wrong option ("Component" or "RGB") ...terminal or S-VIDEO terminal of the connected device may be connected correctly to the connected device. No sound Cause and Recommended Action z If the POWER/STANDBY indicator is not lit, the AC power cord is HDMI, press [T] four times and then press the [ENTER] key.
... projector's volume level setting may not project correctly when you want to the COMPUTER IN terminal of the device connected to "Speaker". Connect the AC power cord correctly. z The correct output source is not HDMI, press [T] five times and then press the [ENTER] key. 3. The wrong option ("Component" or "RGB") ...terminal or S-VIDEO terminal of the connected device may be connected correctly to the connected device. No sound Cause and Recommended Action z If the POWER/STANDBY indicator is not lit, the AC power cord is HDMI, press [T] four times and then press the [ENTER] key.
Setup Guide
Page 21
... may be too far from the projector. Replace the batteries. See the User's Guide (UsersGuide_English.pdf). An error occurred. Contact your retailer or authorized CASIO service center. The message "Please input the password." The light source unit does not light. z The remote controller may not return the projector to... is blurry. See "Error Indicators and Warning Messages" in and turn the projector back on , so the projector is malfunctioning. Unplug the AC power cord and wait for replacement. Plug the power cord back in the User's Guide (UsersGuide_English.pdf). E-19
... may be too far from the projector. Replace the batteries. See the User's Guide (UsersGuide_English.pdf). An error occurred. Contact your retailer or authorized CASIO service center. The message "Please input the password." The light source unit does not light. z The remote controller may not return the projector to... is blurry. See "Error Indicators and Warning Messages" in and turn the projector back on , so the projector is malfunctioning. Unplug the AC power cord and wait for replacement. Plug the power cord back in the User's Guide (UsersGuide_English.pdf). E-19
