

Wireless Function Guide
Page 1
...XJ-A135/XJ-A145/XJ-A235/ XJ-A245 Data Projector Wireless Function Guide Be sure to read the precautions in the User's Guide (Basic Operations) that comes with the Data Projector. Be sure to keep all user documentation handy for future reference. Microsoft, Windows, Windows Vista, and Aero are subject to use... to loss of data due to malfunction or maintenance of CASIO COMPUTER CO., LTD. CASIO COMPUTER CO., LTD. You are allowed to change without the permission of this manual. CASIO COMPUTER CO., LTD. shall not be held liable for ...
...XJ-A135/XJ-A145/XJ-A235/ XJ-A245 Data Projector Wireless Function Guide Be sure to read the precautions in the User's Guide (Basic Operations) that comes with the Data Projector. Be sure to keep all user documentation handy for future reference. Microsoft, Windows, Windows Vista, and Aero are subject to use... to loss of data due to malfunction or maintenance of CASIO COMPUTER CO., LTD. CASIO COMPUTER CO., LTD. You are allowed to change without the permission of this manual. CASIO COMPUTER CO., LTD. shall not be held liable for ...
Wireless Function Guide
Page 2
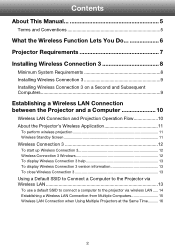
... 12 To display Wireless Connection 3 help 13 To display Wireless Connection 3 version information 13 To close Wireless Connection 3 13 Using a Default SSID to Connect a Computer to the Projector via Wireless LAN 13 To use a default SSID to connect a computer to the projector via wireless LAN ..... 14 Establishing a Wireless LAN Connection from Multiple...
... 12 To display Wireless Connection 3 help 13 To display Wireless Connection 3 version information 13 To close Wireless Connection 3 13 Using a Default SSID to Connect a Computer to the Projector via Wireless LAN 13 To use a default SSID to connect a computer to the projector via wireless LAN ..... 14 Establishing a Wireless LAN Connection from Multiple...

Wireless Function Guide
Page 4
Appendix 38 Using the Token Wizard 38 Installing Wireless Connection 3 on USB Memory 38 To use a USB token to connect a computer to the projector via wireless LAN ........ 39 Installing and Removing the Wireless Adapter 40 Wireless LAN Connection Troubleshooting 42 Wireless LAN Connection between the Projector and a Computer 42 Simultaneous Wireless LAN Connections with Multiple Projectors 43 System Admin Page 44 Performing Wireless Operations from a Computer 44 Error Messages 45 Wireless Connection 3 Error Messages 45 System Admin Page Error Messages 45 4
Appendix 38 Using the Token Wizard 38 Installing Wireless Connection 3 on USB Memory 38 To use a USB token to connect a computer to the projector via wireless LAN ........ 39 Installing and Removing the Wireless Adapter 40 Wireless LAN Connection Troubleshooting 42 Wireless LAN Connection between the Projector and a Computer 42 Simultaneous Wireless LAN Connections with Multiple Projectors 43 System Admin Page 44 Performing Wireless Operations from a Computer 44 Error Messages 45 Wireless Connection 3 Error Messages 45 System Admin Page Error Messages 45 4

Wireless Function Guide
Page 5
Terms and Conventions In this manual, there are special terms and conventions used in this manual to differentiate between a CASIO XJ-A135, XJ-A145, XJ-A235, or XJ-A245 Data Projector and a computer, and send computer screen contents to the projector for projection. About This Manual... The following are many procedures that is ...
Terms and Conventions In this manual, there are special terms and conventions used in this manual to differentiate between a CASIO XJ-A135, XJ-A145, XJ-A235, or XJ-A245 Data Projector and a computer, and send computer screen contents to the projector for projection. About This Manual... The following are many procedures that is ...

Wireless Function Guide
Page 7
...See "Installing and Removing the Wireless Adapter" (page 40) for details. The Wireless Connection 3 software that comes with a CASIO data projector or any third-party wireless LAN connection software. You will not provide proper operation. Any software other than Wireless.... Projector Requirements The projector must meet the following operations are not supported. Use of a CASIO YW-2L wireless adapter or a commercially available wireless LAN adapter in order to use a wireless LAN connection to establish a wireless LAN connection between your computer and the ...
...See "Installing and Removing the Wireless Adapter" (page 40) for details. The Wireless Connection 3 software that comes with a CASIO data projector or any third-party wireless LAN connection software. You will not provide proper operation. Any software other than Wireless.... Projector Requirements The projector must meet the following operations are not supported. Use of a CASIO YW-2L wireless adapter or a commercially available wireless LAN adapter in order to use a wireless LAN connection to establish a wireless LAN connection between your computer and the ...
Wireless Function Guide
Page 8
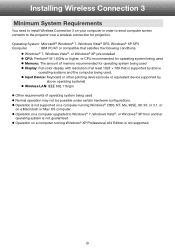
...Wireless Connection 3 on a computer running Windows® XP Professional x64 Edition is supported by above operating systems and the computer being used. Input Device: Keyboard or other pointing device (mouse or equivalent device supported by above operating systems) Wireless... LAN: IEEE 802.11b/g/n Other requirements of operating system being used Memory: The amount of memory recommended for projection. Operating System : Microsoft® Windows® 7, Windows Vista® SP2,...
...Wireless Connection 3 on a computer running Windows® XP Professional x64 Edition is supported by above operating systems and the computer being used. Input Device: Keyboard or other pointing device (mouse or equivalent device supported by above operating systems) Wireless... LAN: IEEE 802.11b/g/n Other requirements of operating system being used Memory: The amount of memory recommended for projection. Operating System : Microsoft® Windows® 7, Windows Vista® SP2,...

Wireless Function Guide
Page 9
... you do not want to establish a wireless LAN connection between the computer and projector at that appear on USB memory. For more information, see "Using the Token Wizard" (page 38). 9 Installing Wireless Connection 3 on each computer that comes with the projector into your computer's CD-ROM drive. ... with the projector over the wireless LAN. Place the CD-ROM that will automatically display the CD-ROM menu screen. 2. Note After you can use a default SSID to connect a computer to install Wireless Connection 3 on the screen. If you are running Windows 7 and the "User...
... you do not want to establish a wireless LAN connection between the computer and projector at that appear on USB memory. For more information, see "Using the Token Wizard" (page 38). 9 Installing Wireless Connection 3 on each computer that comes with the projector into your computer's CD-ROM drive. ... with the projector over the wireless LAN. Place the CD-ROM that will automatically display the CD-ROM menu screen. 2. Note After you can use a default SSID to connect a computer to install Wireless Connection 3 on the screen. If you are running Windows 7 and the "User...
Wireless Function Guide
Page 10
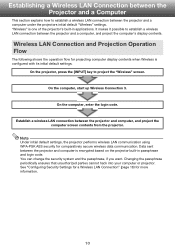
... between the projector and computer is encrypted based on the projector built-in applications. Note Under initial default settings, the projector performs wireless LAN communication using WPA-PSK AES security for more information. 10 Changing the passphrase periodically ensures that unauthorized parties cannot hack into your computer or projector. "Wireless" is...
... between the projector and computer is encrypted based on the projector built-in applications. Note Under initial default settings, the projector performs wireless LAN communication using WPA-PSK AES security for more information. 10 Changing the passphrase periodically ensures that unauthorized parties cannot hack into your computer or projector. "Wireless" is...

Wireless Function Guide
Page 11
... projection. SSID Projector's current SSID. Server IP Projector's current IP address. It makes it possible to new one of SSID, IP address, and other terms used above, see "System Admin Page Settings" (page 36). 11 Wireless Standby Screen The Wireless standby screen displays the information described below. Security Projector's current security...
... projection. SSID Projector's current SSID. Server IP Projector's current IP address. It makes it possible to new one of SSID, IP address, and other terms used above, see "System Admin Page Settings" (page 36). 11 Wireless Standby Screen The Wireless standby screen displays the information described below. Security Projector's current security...
Wireless Function Guide
Page 12
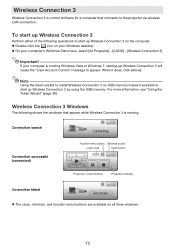
... to the projector via wireless LAN connection. Wireless Connection 3 Windows The following operations to start up Wireless Connection 3 by using the USB memory. For more information, see "Using the Token Wizard" (page 38). To start up Wireless Connection 3 Perform either of the following shows the windows that ...-click the icon on your Windows desktop. On your computer is running . If your computer's Windows Start menu, select [All Programs] - [CASIO] - [Wireless Connection 3]. Note Using the token wizard to install Wireless Connection 3 on all three windows. 12
... to the projector via wireless LAN connection. Wireless Connection 3 Windows The following operations to start up Wireless Connection 3 by using the USB memory. For more information, see "Using the Token Wizard" (page 38). To start up Wireless Connection 3 Perform either of the following shows the windows that ...-click the icon on your Windows desktop. On your computer is running . If your computer's Windows Start menu, select [All Programs] - [CASIO] - [Wireless Connection 3]. Note Using the token wizard to install Wireless Connection 3 on all three windows. 12

Wireless Function Guide
Page 13
... Wireless LAN This section explains how to the projector over a wireless LAN connection. For more information, see "Wireless LAN Connection when Using Multiple Projectors at the Same Time" (page 16). Important! Note that appears. To close Wireless Connection 3 Perform either ... "User Account Control" message (such as software installation, new hardware connection, etc.) while there is casiolpj_default1. When using multiple projectors for identification purposes. Audio data cannot be assigned a different SSID for simultaneous projection in the upper right corner of...
... Wireless LAN This section explains how to the projector over a wireless LAN connection. For more information, see "Wireless LAN Connection when Using Multiple Projectors at the Same Time" (page 16). Important! Note that appears. To close Wireless Connection 3 Perform either ... "User Account Control" message (such as software installation, new hardware connection, etc.) while there is casiolpj_default1. When using multiple projectors for identification purposes. Audio data cannot be assigned a different SSID for simultaneous projection in the upper right corner of...
Wireless Function Guide
Page 14
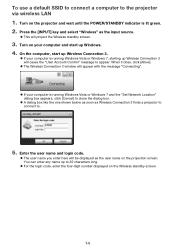
..., click [Cancel] to appear. On the computer, start up Wireless Connection 3. If your computer and start up to the projector via wireless LAN 1. To use a default SSID to connect a computer to 20 characters long. For the login code, enter the four-digit number displayed on your computer is lit...
..., click [Cancel] to appear. On the computer, start up Wireless Connection 3. If your computer and start up to the projector via wireless LAN 1. To use a default SSID to connect a computer to 20 characters long. For the login code, enter the four-digit number displayed on your computer is lit...
Wireless Function Guide
Page 15
... projector configured with the second and subsequent computers is updated to exit?" The login number is the same as the procedure from step 3 under "To use a default SSID to connect a computer to be projected from the projector. The following shows the Wireless Connection 3 window that the display contents of subsequently...
... projector configured with the second and subsequent computers is updated to exit?" The login number is the same as the procedure from step 3 under "To use a default SSID to connect a computer to be projected from the projector. The following shows the Wireless Connection 3 window that the display contents of subsequently...

Wireless Function Guide
Page 16
...source. This will project the Wireless standby screen. 2. Press the [MENU] key. 3. To close the dialog box, press the [ESC] key. 16 Use the [] key to move the highlighting to "Change SSID" and then press the [ENTER] key. This displays a dialog box like the one ... or casiolpj_default3, which projector it is casiolpj_default1. The initial default SSID for changing the SSID. 5. If there are two projectors being used at the Same Time When using two or more projectors in the same location, for example, the SSID of which are the other two available default SSIDs...
...source. This will project the Wireless standby screen. 2. Press the [MENU] key. 3. To close the dialog box, press the [ESC] key. 16 Use the [] key to move the highlighting to "Change SSID" and then press the [ENTER] key. This displays a dialog box like the one ... or casiolpj_default3, which projector it is casiolpj_default1. The initial default SSID for changing the SSID. 5. If there are two projectors being used at the Same Time When using two or more projectors in the same location, for example, the SSID of which are the other two available default SSIDs...
Wireless Function Guide
Page 17
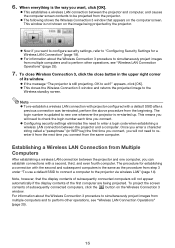
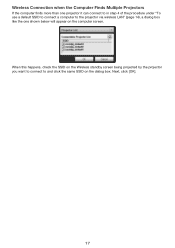
When this happens, check the SSID on the Wireless standby screen being projected by the projector you want to connect to the projector via wireless LAN" (page 14), a dialog box like the one projector it can connect to in step 4 of the procedure under "To use a default SSID to connect a computer to and click the same SSID on the computer screen. Next, click [OK]. 17 Wireless Connection when the Computer Finds Multiple Projectors If the computer finds more than one shown below will appear on the dialog box.
When this happens, check the SSID on the Wireless standby screen being projected by the projector you want to connect to the projector via wireless LAN" (page 14), a dialog box like the one projector it can connect to in step 4 of the procedure under "To use a default SSID to connect a computer to and click the same SSID on the computer screen. Next, click [OK]. 17 Wireless Connection when the Computer Finds Multiple Projectors If the computer finds more than one shown below will appear on the dialog box.
Wireless Function Guide
Page 18
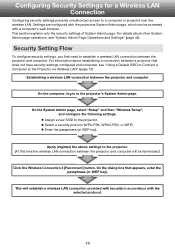
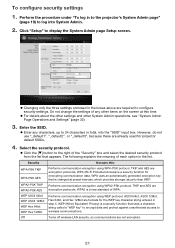
... Flow To configure security settings, you first need to the Projector via Wireless LAN" (page 13). For information about other System Admin page operations, see "Using a Default SSID to Connect a Computer to establish a wireless LAN connection between a projector that appears, enter the passphrase (or WEP key). This will be accessed with...
... Flow To configure security settings, you first need to the Projector via Wireless LAN" (page 13). For information about other System Admin page operations, see "Using a Default SSID to Connect a Computer to establish a wireless LAN connection between a projector that appears, enter the passphrase (or WEP key). This will be accessed with...

Wireless Function Guide
Page 19
... then click [Admin Screen] on the menu that appears, enter the password. The initial default password is "admin". 19 Perform the procedure under "To use a default SSID to connect a computer to the projector via wireless LAN" (page 14) up the computer's web browser and displays the projector's top System Admin...
... then click [Admin Screen] on the menu that appears, enter the password. The initial default password is "admin". 19 Perform the procedure under "To use a default SSID to connect a computer to the projector via wireless LAN" (page 14) up the computer's web browser and displays the projector's top System Admin...

Wireless Function Guide
Page 20
Note For security reasons, be sure to System Admin page from the default. For more information, see "To change the password you use to log in to change the System Admin login password" (page 32). 4. To log out of the projector's System Admin page Click "Logout" in to the top System Admin screen. 20 This returns to the System Admin page and displays the Status screen. Click the [Login] button. This logs in the upper right corner of the System Admin page.
Note For security reasons, be sure to System Admin page from the default. For more information, see "To change the password you use to log in to change the System Admin login password" (page 32). 4. To log out of the projector's System Admin page Click "Logout" in to the top System Admin screen. 20 This returns to the System Admin page and displays the Status screen. Click the [Login] button. This logs in the upper right corner of the System Admin page.
Wireless Function Guide
Page 21
...Admin Page Operations and Settings" (page 32). 3. WPA (Wi-Fi Protected Access) is changed at this : Performs communication encryption using WPA-PSK protocol. WPA uses an automatically generated encryption key that is a security function for projector default SSIDs. 4. TKIP and AES are not encrypted. 21... the list. Select the security protocol. Click the [] button to the right of WPA. TKIP and AES are already used for encrypting communication data. To configure security settings 1. WEP (Wired Equivalent Privacy) is a new standard of the "Security" box and ...
...Admin Page Operations and Settings" (page 32). 3. WPA (Wi-Fi Protected Access) is changed at this : Performs communication encryption using WPA-PSK protocol. WPA uses an automatically generated encryption key that is a security function for projector default SSIDs. 4. TKIP and AES are not encrypted. 21... the list. Select the security protocol. Click the [] button to the right of WPA. TKIP and AES are already used for encrypting communication data. To configure security settings 1. WEP (Wired Equivalent Privacy) is a new standard of the "Security" box and ...

Wireless Function Guide
Page 22
... procedure will project the Wireless standby screen at least eight and up to 63 singlebyte characters, or a hexadecimal value up to ensure that uses the security settings and a computer. Enter the passphrase (or WEP key). The passphrase or WEP key entered in the "Passphrase.../WEP Key" text box depends on the security protocol you selected in cases when you avoid using the "Off" setting except in step 4, as described below. Important! Example: 11223344556677889900AABBCC No input required. The character string you ...
... procedure will project the Wireless standby screen at least eight and up to 63 singlebyte characters, or a hexadecimal value up to ensure that uses the security settings and a computer. Enter the passphrase (or WEP key). The passphrase or WEP key entered in the "Passphrase.../WEP Key" text box depends on the security protocol you selected in cases when you avoid using the "Off" setting except in step 4, as described below. Important! Example: 11223344556677889900AABBCC No input required. The character string you ...
