

User Guide
Page 1
... product, or any other reason. The sample screens shown in part or its entirety, is forbidden. DATA PROJECTOR E XJ-A135/XJ-A145/XJ-A155/ XJ-A245/XJ-A255 Data Projector Wireless Function Guide Be sure to read the precautions in the User's Guide (Basic Operations) that comes with... names or trademarks of their respective owners. The contents of this manual are subject to malfunction or maintenance of CASIO COMPUTER CO., LTD. CASIO COMPUTER CO., LTD. shall not be held liable for your own personal use of this product, the included software or...
... product, or any other reason. The sample screens shown in part or its entirety, is forbidden. DATA PROJECTOR E XJ-A135/XJ-A145/XJ-A155/ XJ-A245/XJ-A255 Data Projector Wireless Function Guide Be sure to read the precautions in the User's Guide (Basic Operations) that comes with... names or trademarks of their respective owners. The contents of this manual are subject to malfunction or maintenance of CASIO COMPUTER CO., LTD. CASIO COMPUTER CO., LTD. shall not be held liable for your own personal use of this product, the included software or...

User Guide
Page 2
...Connection 3 on a Second and Subsequent Computers 9 Establishing a Wireless LAN Connection between the Projector and a Computer 10 Wireless LAN Connection and Projection Operation Flow 10 About the Projector's Wireless Application 11 To perform wireless projection 11 Wireless Standby Screen 11 Wireless Connection 3 12...close Wireless Connection 3 13 Using a Default SSID to Connect a Computer to the Projector via Wireless LAN 13 To use a default SSID to connect a computer to the projector via wireless LAN ..... 14 Establishing a Wireless LAN Connection from Multiple Computers 15 ...
...Connection 3 on a Second and Subsequent Computers 9 Establishing a Wireless LAN Connection between the Projector and a Computer 10 Wireless LAN Connection and Projection Operation Flow 10 About the Projector's Wireless Application 11 To perform wireless projection 11 Wireless Standby Screen 11 Wireless Connection 3 12...close Wireless Connection 3 13 Using a Default SSID to Connect a Computer to the Projector via Wireless LAN 13 To use a default SSID to connect a computer to the projector via wireless LAN ..... 14 Establishing a Wireless LAN Connection from Multiple Computers 15 ...

User Guide
Page 3
... settings 21 Establishing a Wireless LAN Connection after Configuring Security Settings 23 To establish a wireless LAN connection between the projector and a computer after configuring security settings 23 Establishing a Wireless LAN Connection with a Second and Subsequent Computers after Configuring......26 Displaying the User Name on the Projection Screen 28 Other Operations 28 Re-establishing a Wireless LAN Connection 28 Projector Information 28 Selecting display speed priority or resolution priority for projection 28 Terminating a Wireless LAN Connection 29 Initializing Wireless...
... settings 21 Establishing a Wireless LAN Connection after Configuring Security Settings 23 To establish a wireless LAN connection between the projector and a computer after configuring security settings 23 Establishing a Wireless LAN Connection with a Second and Subsequent Computers after Configuring......26 Displaying the User Name on the Projection Screen 28 Other Operations 28 Re-establishing a Wireless LAN Connection 28 Projector Information 28 Selecting display speed priority or resolution priority for projection 28 Terminating a Wireless LAN Connection 29 Initializing Wireless...

User Guide
Page 4
Appendix 38 Using the Token Wizard 38 Installing Wireless Connection 3 on USB Memory 38 To use a USB token to connect a computer to the projector via wireless LAN ........ 39 Installing and Removing the Wireless Adapter 40 Wireless LAN Connection Troubleshooting 42 Wireless LAN Connection between the Projector and a Computer 42 Simultaneous Wireless LAN Connections with Multiple Projectors 43 System Admin Page 44 Performing Wireless Operations from a Computer 44 Error Messages 45 Wireless Connection 3 Error Messages 45 System Admin Page Error Messages 45 4
Appendix 38 Using the Token Wizard 38 Installing Wireless Connection 3 on USB Memory 38 To use a USB token to connect a computer to the projector via wireless LAN ........ 39 Installing and Removing the Wireless Adapter 40 Wireless LAN Connection Troubleshooting 42 Wireless LAN Connection between the Projector and a Computer 42 Simultaneous Wireless LAN Connections with Multiple Projectors 43 System Admin Page 44 Performing Wireless Operations from a Computer 44 Error Messages 45 Wireless Connection 3 Error Messages 45 System Admin Page Error Messages 45 4

User Guide
Page 5
.... Projection area This is the entire rectangular area that require parallel operations on the Data Projector and your computer. 5 Terms and Conventions In this manual to differentiate between a CASIO XJ-A135, XJ-A145, XJ-A155, XJ-A245, or XJ-A255 Data Projector and a computer, and send computer screen contents to appear within the projection area. Computer...
.... Projection area This is the entire rectangular area that require parallel operations on the Data Projector and your computer. 5 Terms and Conventions In this manual to differentiate between a CASIO XJ-A135, XJ-A145, XJ-A155, XJ-A245, or XJ-A255 Data Projector and a computer, and send computer screen contents to appear within the projection area. Computer...
User Guide
Page 6
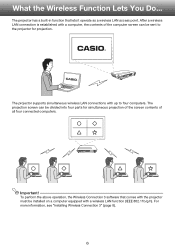
...the above operation, the Wireless Connection 3 software that lets it operate as a wireless LAN access point. The projector has a built-in function that comes with the projector must be sent to four computers. Important! After a wireless LAN connection is established with a computer, the contents... of all four connected computers. The projection screen can be installed on a computer equipped with up to the projector for simultaneous projection of the screen contents of the computer screen can be divided into four parts for projection. For more information...
...the above operation, the Wireless Connection 3 software that lets it operate as a wireless LAN access point. The projector has a built-in function that comes with the projector must be sent to four computers. Important! After a wireless LAN connection is established with a computer, the contents... of all four connected computers. The projection screen can be installed on a computer equipped with up to the projector for simultaneous projection of the screen contents of the computer screen can be divided into four parts for projection. For more information...

User Guide
Page 7
... software that the following conditions in the projector's USB port. Note that comes with the projector must be installed on the projector. Projector Requirements The projector must meet the following operations are not supported. Use of a CASIO YW-2L wireless adapter or a commercially ... connection to establish a wireless LAN connection between your computer and the projector using such software. 7 Such adapters will not be installed correctly on a computer equipped with a CASIO data projector or any third-party wireless LAN connection software. You will not provide...
... software that the following conditions in the projector's USB port. Note that comes with the projector must be installed on the projector. Projector Requirements The projector must meet the following operations are not supported. Use of a CASIO YW-2L wireless adapter or a commercially ... connection to establish a wireless LAN connection between your computer and the projector using such software. 7 Such adapters will not be installed correctly on a computer equipped with a CASIO data projector or any third-party wireless LAN connection software. You will not provide...
User Guide
Page 8
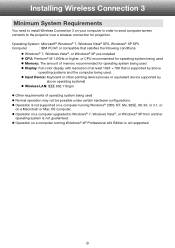
...;, or Windows® XP from another operating system is not guaranteed. Operation on your computer in order to send computer screen contents to the projector over a wireless connection for operating system being used Display: Full-color display with resolution of memory recommended for projection. Operating System : Microsoft® Windows...
...;, or Windows® XP from another operating system is not guaranteed. Operation on your computer in order to send computer screen contents to the projector over a wireless connection for operating system being used Display: Full-color display with resolution of memory recommended for projection. Operating System : Microsoft® Windows...

User Guide
Page 9
... to the USB port of "Wireless Connection 3". Follow the instructions on the dialog boxes that appear on each computer that comes with the projector over the wireless LAN. For more information, see "Using the Token Wizard" (page 38). 9 Place the CD-ROM that will connect with the... projector into your computer's CD-ROM drive. This will automatically display the CD-ROM menu screen. 2. On the menu screen, click the [Install] button ...
... to the USB port of "Wireless Connection 3". Follow the instructions on the dialog boxes that appear on each computer that comes with the projector over the wireless LAN. For more information, see "Using the Token Wizard" (page 38). 9 Place the CD-ROM that will connect with the... projector into your computer's CD-ROM drive. This will automatically display the CD-ROM menu screen. 2. On the menu screen, click the [Install] button ...

User Guide
Page 10
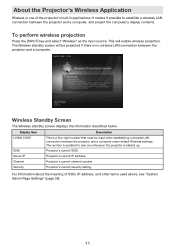
... ensures that unauthorized parties cannot hack into your computer or projector. Establishing a Wireless LAN Connection between the Projector and a Computer This section explains how to establish a wireless LAN connection between the projector and a computer, and project the computer's display contents....Connection and Projection Operation Flow The following shows the operation flow for projecting computer display contents when Wireless is one of the projector's built-in passphrase and login code. On the computer, start up Wireless Connection 3. See "Configuring Security Settings for ...
... ensures that unauthorized parties cannot hack into your computer or projector. Establishing a Wireless LAN Connection between the Projector and a Computer This section explains how to establish a wireless LAN connection between the projector and a computer, and project the computer's display contents....Connection and Projection Operation Flow The following shows the operation flow for projecting computer display contents when Wireless is one of the projector's built-in passphrase and login code. On the computer, start up Wireless Connection 3. See "Configuring Security Settings for ...
User Guide
Page 11
... the computer's display contents. The number is a four-digit number that must be projected if there is no wireless LAN connection between the projector and a computer. For information about the meaning of the projector's built-in applications. Display Item Description LOGIN CODE This is updated to establish a wireless LAN connection between the...
... the computer's display contents. The number is a four-digit number that must be projected if there is no wireless LAN connection between the projector and a computer. For information about the meaning of the projector's built-in applications. Display Item Description LOGIN CODE This is updated to establish a wireless LAN connection between the...

User Guide
Page 12
... Wireless Connection 3 will cause the "User Account Control" message to appear. If your computer's Windows Start menu, select [All Programs] - [CASIO] - [Wireless Connection 3]. Note Using the token wizard to install Wireless Connection 3 on USB memory makes it does, click [Allow]. When it... possible to start up Wireless Connection 3 Perform either of the following shows the windows that connects to the projector via wireless LAN connection. Important! For more information, see "Using the Token Wizard" (page 38). Wireless Connection 3 Wireless Connection 3...
... Wireless Connection 3 will cause the "User Account Control" message to appear. If your computer's Windows Start menu, select [All Programs] - [CASIO] - [Wireless Connection 3]. Note Using the token wizard to install Wireless Connection 3 on USB memory makes it does, click [Allow]. When it... possible to start up Wireless Connection 3 Perform either of the following shows the windows that connects to the projector via wireless LAN connection. Important! For more information, see "Using the Token Wizard" (page 38). Wireless Connection 3 Wireless Connection 3...

User Guide
Page 13
... same area operating simultaneously. To close Wireless Connection 3 Perform either of a Wireless Connection 3 window. Using a Default SSID to Connect a Computer to the Projector via Wireless LAN This section explains how to use one must be sent. If you are only three default SSIDs, you have up to... three projectors with default SSIDs in the upper right corner of the following operations. On a Wireless Connection 3 window, click the function menu button ...
... same area operating simultaneously. To close Wireless Connection 3 Perform either of a Wireless Connection 3 window. Using a Default SSID to Connect a Computer to the Projector via Wireless LAN This section explains how to use one must be sent. If you are only three default SSIDs, you have up to... three projectors with default SSIDs in the upper right corner of the following operations. On a Wireless Connection 3 window, click the function menu button ...

User Guide
Page 14
... [Cancel] to close the dialog box. A dialog box like the one shown below as soon as the user name on the projector and wait until the POWER/STANDBY indicator is running Windows Vista or Windows 7, starting up Wireless Connection 3 will be displayed as Wireless Connection 3 finds... a projector to connect to appear. You can enter any name up Windows. 4. Press the [INPUT] key and select "Wireless" as the input source. &#...
... [Cancel] to close the dialog box. A dialog box like the one shown below as soon as the user name on the projector and wait until the POWER/STANDBY indicator is running Windows Vista or Windows 7, starting up Wireless Connection 3 will be displayed as Wireless Connection 3 finds... a projector to connect to appear. You can enter any name up Windows. 4. Press the [INPUT] key and select "Wireless" as the input source. &#...
User Guide
Page 15
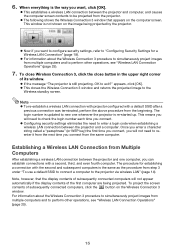
...however, that appears on the computer screen. To project the screen contents of its window. If the message "The projector is the way you will not need to check the login number each time you can establish connections with a default SSID after ...see "Wireless LAN Connection Operations" (page 25). 7. Establishing a Wireless LAN Connection from Multiple Computers After establishing a wireless LAN connection between the projector and computer, and causes the computer screen contents to be projected from the same computer. The procedure for a Wireless LAN Connection" (page 18...
...however, that appears on the computer screen. To project the screen contents of its window. If the message "The projector is the way you will not need to check the login number each time you can establish connections with a default SSID after ...see "Wireless LAN Connection Operations" (page 25). 7. Establishing a Wireless LAN Connection from Multiple Computers After establishing a wireless LAN connection between the projector and computer, and causes the computer screen contents to be projected from the same computer. The procedure for a Wireless LAN Connection" (page 18...

User Guide
Page 16
... set identifier) that lets each computer keep track of which are two projectors being used at the Same Time When using two or more projectors in the same location (same meeting room, etc.), each one shown below for the projector is connected to. Use the [] and [] keys to move...and then press the [ENTER] key. 6. The initial default SSID for changing the SSID. 5. Press the [MENU] key. 3. To change the default SSID of a projector 1. To close the dialog box, press the [ESC] key. 16 Press the [INPUT] key and select "Wireless" as the input source. This will ...
... set identifier) that lets each computer keep track of which are two projectors being used at the Same Time When using two or more projectors in the same location (same meeting room, etc.), each one shown below for the projector is connected to. Use the [] and [] keys to move...and then press the [ENTER] key. 6. The initial default SSID for changing the SSID. 5. Press the [MENU] key. 3. To change the default SSID of a projector 1. To close the dialog box, press the [ESC] key. 16 Press the [INPUT] key and select "Wireless" as the input source. This will ...
User Guide
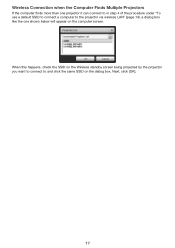
Page 17
Next, click [OK]. 17 When this happens, check the SSID on the Wireless standby screen being projected by the projector you want to connect to the projector via wireless LAN" (page 14), a dialog box like the one shown below will appear on the dialog box. Wireless Connection when the Computer Finds Multiple Projectors If the computer finds more than one projector it can connect to in step 4 of the procedure under "To use a default SSID to connect a computer to and click the same SSID on the computer screen.
Next, click [OK]. 17 When this happens, check the SSID on the Wireless standby screen being projected by the projector you want to connect to the projector via wireless LAN" (page 14), a dialog box like the one shown below will appear on the dialog box. Wireless Connection when the Computer Finds Multiple Projectors If the computer finds more than one projector it can connect to in step 4 of the procedure under "To use a default SSID to connect a computer to and click the same SSID on the computer screen.

User Guide
Page 18
...accordance with a computer's web browser. Security Setting Flow To configure security settings, you first need to establish a wireless LAN connection between a projector that appears, enter the passphrase (or WEP key). On the System Admin page, select "Setup" and then "Wireless Setup", and configure ...the following settings. Assign a new SSID to a computer or projector over the wireless LAN. On the dialog box that does not have security settings configured and computer, see "System Admin Page Operations and ...
...accordance with a computer's web browser. Security Setting Flow To configure security settings, you first need to establish a wireless LAN connection between a projector that appears, enter the passphrase (or WEP key). On the System Admin page, select "Setup" and then "Wireless Setup", and configure ...the following settings. Assign a new SSID to a computer or projector over the wireless LAN. On the dialog box that does not have security settings configured and computer, see "System Admin Page Operations and ...

User Guide
Page 19
... System Admin page. 3. Click "System Admin". Configuring Security Settings This section explains the procedure for logging in to the projector's System Admin page 1. On a Wireless Connection 3 window, click the function menu button and then click [Admin Screen] on the menu that appears, enter the ...password. The initial default password is "admin". 19 To log in to establish a wireless LAN connection between the projector and computer. 2. On the password input screen that appears. Function menu button This starts up to step 6 to the...
... System Admin page. 3. Click "System Admin". Configuring Security Settings This section explains the procedure for logging in to the projector's System Admin page 1. On a Wireless Connection 3 window, click the function menu button and then click [Admin Screen] on the menu that appears, enter the ...password. The initial default password is "admin". 19 To log in to establish a wireless LAN connection between the projector and computer. 2. On the password input screen that appears. Function menu button This starts up to step 6 to the...

User Guide
Page 20
For more information, see "To change the password you use to log in to the System Admin page and displays the Status screen. This returns to change the System Admin login password" (page 32). Click the [Login] button. This logs in the upper right corner of the projector's System Admin page Click "Logout" in to System Admin page from the default. To log out of the System Admin page. 4. Note For security reasons, be sure to the top System Admin screen. 20
For more information, see "To change the password you use to log in to the System Admin page and displays the Status screen. This returns to change the System Admin login password" (page 32). Click the [Login] button. This logs in the upper right corner of the projector's System Admin page Click "Logout" in to System Admin page from the default. To log out of the System Admin page. 4. Note For security reasons, be sure to the top System Admin screen. 20

