User Guide
Page 9
...Using a Fill-in Pattern E-36 Using a Rhythm Variation E-37 Synchro Starting Accompaniment with Rhythm Play E-37 Finishing with the Mixer E-40 Turning Channels On and Off E-40 Using the Parameter Edit Mode E-41 How Parameters Work E-42 E-7 Contents Safety Precautions E-1 Introduction E-5 General...Power Supply E-14 Using batteries E-14 Using the AC Adaptor E-15 Auto Power Off E-15 Turning Off the Keyboard E-15 Memory Contents E-16 Connections E-17 Basic Operations E-19 To play the keyboard E-19 Selecting a Tone E-19 PIANO SETTING Button E-20 Using the PITCH BEND Wheel E-...
...Using a Fill-in Pattern E-36 Using a Rhythm Variation E-37 Synchro Starting Accompaniment with Rhythm Play E-37 Finishing with the Mixer E-40 Turning Channels On and Off E-40 Using the Parameter Edit Mode E-41 How Parameters Work E-42 E-7 Contents Safety Precautions E-1 Introduction E-5 General...Power Supply E-14 Using batteries E-14 Using the AC Adaptor E-15 Auto Power Off E-15 Turning Off the Keyboard E-15 Memory Contents E-16 Connections E-17 Basic Operations E-19 To play the keyboard E-19 Selecting a Tone E-19 PIANO SETTING Button E-20 Using the PITCH BEND Wheel E-...
User Guide
Page 16
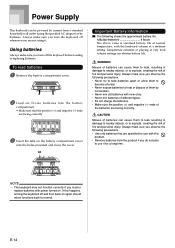
...volume settings can shorten battery life. Temperature extremes or playing at a medium setting. Power Supply This keyboard can be powered by current from the product if you turn the keyboard off whenever you are facing correctly. 3 Insert the tabs on the battery compartment cover into the ..., or to explode, creating the risk of them to become shorted. • Never expose batteries to use with this happens, turning the keyboard off the keyboard before loading or replacing batteries. E-14 To load batteries 1 Remove the battery compartment cover. 2 Load six D-size batteries into...
...volume settings can shorten battery life. Temperature extremes or playing at a medium setting. Power Supply This keyboard can be powered by current from the product if you turn the keyboard off whenever you are facing correctly. 3 Insert the tabs on the battery compartment cover into the ..., or to explode, creating the risk of them to become shorted. • Never expose batteries to use with this happens, turning the keyboard off the keyboard before loading or replacing batteries. E-14 To load batteries 1 Remove the battery compartment cover. 2 Load six D-size batteries into...
User Guide
Page 17
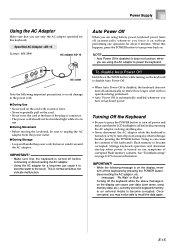
...technique besides pressing the POWER button. Once corrupted, you turn power back on keyboard power. Specified AC Adaptor: AD-12 Example: WK-3800 AC adaptor AD-12 AC outlet Note the following message is on the display, never turn off the keyboard by pressing the POWER button, disconnecting the AC adaptor..., etc. (message) "Pls Wait" or "Bulk In" Turning off the keyboard while the above message is...
...technique besides pressing the POWER button. Once corrupted, you turn power back on keyboard power. Specified AC Adaptor: AD-12 Example: WK-3800 AC adaptor AD-12 AC outlet Note the following message is on the display, never turn off the keyboard by pressing the POWER button, disconnecting the AC adaptor..., etc. (message) "Pls Wait" or "Bulk In" Turning off the keyboard while the above message is...
User Guide
Page 18
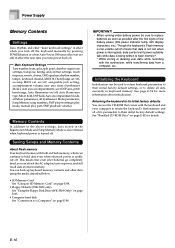
...cut off. This means that comes with the synthesizer, while transferring data from a computer, etc. Initializing the Keyboard Initialization can attach the AC adaptor, turn on power, and still recall data stored in memory. See "Bundled CD-ROM Data" on page E-80...turn power back on page E-85. • Computer hard disk See "Connection to delete all data currently in keyboard memory. Power Supply Memory Contents Settings Tone, rhythm, and other data using the media described below. • SD Memory Card See "Using an SD Memory Card" on page E-84. • Floppy Diskette (WK...
...cut off. This means that comes with the synthesizer, while transferring data from a computer, etc. Initializing the Keyboard Initialization can attach the AC adaptor, turn on power, and still recall data stored in memory. See "Bundled CD-ROM Data" on page E-80...turn power back on page E-85. • Computer hard disk See "Connection to delete all data currently in keyboard memory. Power Supply Memory Contents Settings Tone, rhythm, and other data using the media described below. • SD Memory Card See "Using an SD Memory Card" on page E-84. • Floppy Diskette (WK...
User Guide
Page 19
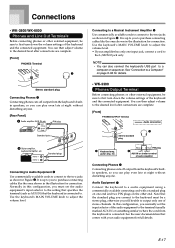
...illustration for details. • WK-3300 Phones/Output Terminal Before connecting phones or other external equipment, be able to output only one input jack, connect a cord to first turn down the volume settings of audio amplifier Connecting Phones 1 Connecting phones cuts off output from the keyboard's builtin speakers, so you...Musical Instrument Amplifier 3 Use commercially available cords to connect to the setting that specifies the terminal (such as shown in Figure 3. Connections • WK-3800/WK-8000 Phones and Line Out Terminals Before connecting phones or other end.
...illustration for details. • WK-3300 Phones/Output Terminal Before connecting phones or other external equipment, be able to output only one input jack, connect a cord to first turn down the volume settings of audio amplifier Connecting Phones 1 Connecting phones cuts off output from the keyboard's builtin speakers, so you...Musical Instrument Amplifier 3 Use commercially available cords to connect to the setting that specifies the terminal (such as shown in Figure 3. Connections • WK-3800/WK-8000 Phones and Line Out Terminals Before connecting phones or other end.
User Guide
Page 21
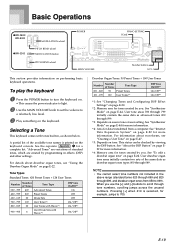
... low level. 3 Play something on page E-24. See "About the DSP Button" on page E-22. To play the keyboard 1 Press the POWER button to turn the keyboard on. • This causes the power indicator to light. 2 Use the MAIN VOLUME knob to set the volume to 099... information. Basic Operations GWK-3800/ WK-8000 GWK-3300 MODULATION wheel PITCH BEND wheel MODULATION button PITCH BEND wheel POWER MAIN VOLUME PIANO SETTING TONE Number buttons [+]/[-] This section provides information on page E-44. See "Synthesizer Mode" on performing basic keyboard operations. See "Synthesizer Mode" on...
... low level. 3 Play something on page E-24. See "About the DSP Button" on page E-22. To play the keyboard 1 Press the POWER button to turn the keyboard on. • This causes the power indicator to light. 2 Use the MAIN VOLUME knob to set the volume to 099... information. Basic Operations GWK-3800/ WK-8000 GWK-3300 MODULATION wheel PITCH BEND wheel MODULATION button PITCH BEND wheel POWER MAIN VOLUME PIANO SETTING TONE Number buttons [+]/[-] This section provides information on page E-44. See "Synthesizer Mode" on performing basic keyboard operations. See "Synthesizer Mode" on...
User Guide
Page 22
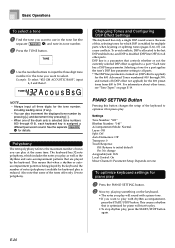
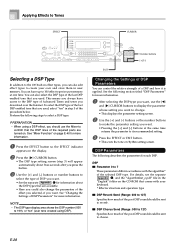
...line parameter. Ac o u sBsG NOTE • Always input all parts. * The DSP line parameter is turned on (DSP effect is assigned a different percussion sound. Because of this button changes the setup of the keyboard to 599. Selecting a tone for a part applies the tone's DSP line parameter setting to all three ... pressing [-]. • When one of the drum sets is selected (tone numbers 600 through 619), each keyboard key is applied) for the 400 Advanced Tones numbered 000 through 399, and turned off (DSP effect not applied) for the 200 preset tones from 400 to optimize it for piano play....
...line parameter. Ac o u sBsG NOTE • Always input all parts. * The DSP line parameter is turned on (DSP effect is assigned a different percussion sound. Because of this button changes the setup of the keyboard to 599. Selecting a tone for a part applies the tone's DSP line parameter setting to all three ... pressing [-]. • When one of the drum sets is selected (tone numbers 600 through 619), each keyboard key is applied) for the 400 Advanced Tones numbered 000 through 399, and turned off (DSP effect not applied) for the 200 preset tones from 400 to optimize it for piano play....

User Guide
Page 23
... • See "Pitch Bend Range (Initial Default: 12)" on page E-74 for changing the bend range of the PITCH BEND wheel. • Never turn on the display * During demo tune play Using the PITCH BEND Wheel As its neutral position (rotated as far downwards as the MODULATION button is..."DSP Parameters" on page E-28. • WK-3800/WK-8000 To use the MODULATION Wheel 1 While playing melody notes with your right hand, rotate the MODULATION wheel with your right hand, use your left hand to press the MODULATION button. • Vibrato is on keyboard power while the PITCH BEND wheel is rotated...
... • See "Pitch Bend Range (Initial Default: 12)" on page E-74 for changing the bend range of the PITCH BEND wheel. • Never turn on the display * During demo tune play Using the PITCH BEND Wheel As its neutral position (rotated as far downwards as the MODULATION button is..."DSP Parameters" on page E-28. • WK-3800/WK-8000 To use the MODULATION Wheel 1 While playing melody notes with your right hand, rotate the MODULATION wheel with your right hand, use your left hand to press the MODULATION button. • Vibrato is on keyboard power while the PITCH BEND wheel is rotated...

User Guide
Page 27
... then press the [̄] CURSOR button. • This enters the Synthesizer Mode, which provides modulation to sustained tones that you can be turned on page E-47. Click On Percussion This parameter lets you add percussion sound, which is no longer audible. The larger the value, the... greater the corresponding overtone's volume. See "Drawbar Organ Mode Operational Flow" on the keyboard, the sound produced decays until it takes for the percussion sound to 3 (Ft: Feet) Click The parameter determines whether or not a key ...
... then press the [̄] CURSOR button. • This enters the Synthesizer Mode, which provides modulation to sustained tones that you can be turned on page E-47. Click On Percussion This parameter lets you add percussion sound, which is no longer audible. The larger the value, the... greater the corresponding overtone's volume. See "Drawbar Organ Mode Operational Flow" on the keyboard, the sound produced decays until it takes for the percussion sound to 3 (Ft: Feet) Click The parameter determines whether or not a key ...
User Guide
Page 30
... parameter setting you want. • Pressing the [+] and [-] buttons at one time. To select the DSP type of the last DSP enabled tone that are turned on page E-40 for more information. 1 Press the EFFECT button so the EFFECT indicator appears on the CD-ROM that you always have up to... addition to the 100 built-in effect types, you can also edit effect types to create your own and store them in accordance with your keyboard. * Effector structure and operation type I DSP Reverb Send (Range: 000 to 127) Specifies how much of the post-DSP sound should be sent to reverb...
... parameter setting you want. • Pressing the [+] and [-] buttons at one time. To select the DSP type of the last DSP enabled tone that are turned on page E-40 for more information. 1 Press the EFFECT button so the EFFECT indicator appears on the CD-ROM that you always have up to... addition to the 100 built-in effect types, you can also edit effect types to create your own and store them in accordance with your keyboard. * Effector structure and operation type I DSP Reverb Send (Range: 000 to 127) Specifies how much of the post-DSP sound should be sent to reverb...

User Guide
Page 31
...you want to save the data. • The message "Complete" appears momentarily on the display, followed by the keyboard causes a slight break in the range of tones, called "Advanced Tones", automatically turn on the display. 2 Use the [+] and [-] buttons or the number buttons to select the user DSP area ...number where you move the cursor left and right. • See the page E-94 for the keyboard part to which can save the data.
...you want to save the data. • The message "Complete" appears momentarily on the display, followed by the keyboard causes a slight break in the range of tones, called "Advanced Tones", automatically turn on the display. 2 Use the [+] and [-] buttons or the number buttons to select the user DSP area ...number where you move the cursor left and right. • See the page E-94 for the keyboard part to which can save the data.

User Guide
Page 40
...the display. 3 Start Auto Accompaniment play, and play something on the keyboard. 4 To turn off is finished. • Auto Harmonize is enabled only when the Auto Accompaniment mode is FINGERED or CASIO CHORD. E-38 It turns back on page E-32 for details. The result is a harmony effect... Accompaniment, Auto Harmonize automatically adds additional notes to your melody line richer and fuller. NOTE • Auto Harmonize turns off temporarily whenever you are using. • Keyboard tone • Layer on/off • Split on/off • Auto Harmonize on/off Auto Harmonize, press...
...the display. 3 Start Auto Accompaniment play, and play something on the keyboard. 4 To turn off is finished. • Auto Harmonize is enabled only when the Auto Accompaniment mode is FINGERED or CASIO CHORD. E-38 It turns back on page E-32 for details. The result is a harmony effect... Accompaniment, Auto Harmonize automatically adds additional notes to your melody line richer and fuller. NOTE • Auto Harmonize turns off temporarily whenever you are using. • Keyboard tone • Layer on/off • Split on/off • Auto Harmonize on/off Auto Harmonize, press...

User Guide
Page 41
... In addition to the tone, you want to use for the harmonize notes. About Auto Harmonize notes and tones The notes you play on the keyboard are maintained when you make with the Mixer are called "melody notes", while the notes added to the melody by the setting item using the... also use the Mixer (page E-40) to specify a different tone for the harmonize notes. Auto Accompaniment Auto Harmonize Types Auto Harmonize lets you first turn on Auto Harmonize is the same tone as the melody note tone. • Changing the melody tone setting automatically changes the harmonize note tone to...
... In addition to the tone, you want to use for the harmonize notes. About Auto Harmonize notes and tones The notes you play on the keyboard are maintained when you make with the Mixer are called "melody notes", while the notes added to the melody by the setting item using the... also use the Mixer (page E-40) to specify a different tone for the harmonize notes. Auto Accompaniment Auto Harmonize Types Auto Harmonize lets you first turn on Auto Harmonize is the same tone as the melody note tone. • Changing the melody tone setting automatically changes the harmonize note tone to...
User Guide
Page 42
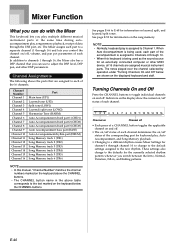
.... When Auto Accompaniment is assigned to the new rhythm. Indicators on the display show the current on the keyboard below are shown on and off status of each channel. Turning Channels On and Off Press the CHANNEL buttons to toggle individual channels on the displayed... keyboard and staff. NOTE • Normally, keyboard play , Auto Accompaniment, and Song Memory playback. • Changing to a different rhythm causes Mixer...
.... When Auto Accompaniment is assigned to the new rhythm. Indicators on the display show the current on the keyboard below are shown on and off status of each channel. Turning Channels On and Off Press the CHANNEL buttons to toggle individual channels on the displayed... keyboard and staff. NOTE • Normally, keyboard play , Auto Accompaniment, and Song Memory playback. • Changing to a different rhythm causes Mixer...
User Guide
Page 44
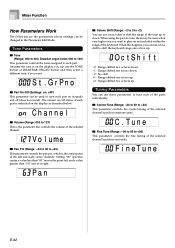
..., if you can be changed in cent units. When this happens, you want to play are the parameters whose settings can use these parameters to turn each part on , oFF) This parameter can be cases when very high notes you can use octave shift to each part is the center point... of the parts individually. Channe l I Tone (Range: 000 to 903, Drawbar organ tones 000 to 199) This parameter controls the tones assigned to shift the keyboard range one octave up. +2 : Range shifted two octaves up . Mixer Function How Parameters Work The following are not included within the range of the...
..., if you can be changed in cent units. When this happens, you want to play are the parameters whose settings can use these parameters to turn each part on , oFF) This parameter can be cases when very high notes you can use octave shift to each part is the center point... of the parts individually. Channe l I Tone (Range: 000 to 903, Drawbar organ tones 000 to 199) This parameter controls the tones assigned to shift the keyboard range one octave up. +2 : Range shifted two octaves up . Mixer Function How Parameters Work The following are not included within the range of the...

User Guide
Page 52
... DSP parameter settings. E-50 NOTE • If you store an original tone with the DSP line turned on the display until the one you are trying to create, it is stored, you can call ...the CD-ROM that is shown. • You can achieve. This simplifies the recall of your keyboard. Press the YES button to save the data. • The message "Complete" appears momentarily on ...bit quicker and easier. You may be surprised at any tone number from 700 to 799. • WK-3300/WK-3800 • WK-8000 Flash Lit 4 After the tone name is similar to the one where you want , press the ...
... DSP parameter settings. E-50 NOTE • If you store an original tone with the DSP line turned on the display until the one you are trying to create, it is stored, you can call ...the CD-ROM that is shown. • You can achieve. This simplifies the recall of your keyboard. Press the YES button to save the data. • The message "Complete" appears momentarily on ...bit quicker and easier. You may be surprised at any tone number from 700 to 799. • WK-3300/WK-3800 • WK-8000 Flash Lit 4 After the tone name is similar to the one where you want , press the ...
User Guide
Page 55
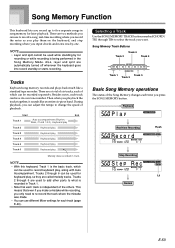
... 1 Auto accompaniment (Rhythm, Bass, Chord 1/2/3), Keyboard play Track 2 Keyboard play Track 3 Keyboard play Track 4 Keyboard play Track 5 Keyboard play Track 6 Keyboard play back the tracks together, it sounds like a standard tape recorder. NOTE • With this keyboard, Track 1 is being performed in Track 1. ...Flash Step Recording S t ep Rec Lit Normal E-53 This means that each time you play , so they are automatically turned off whenever the keyboard goes into record standby or starts recording. Song Memory Track Buttons Track 2 Track 4 Track 6 Track 1 Track 5 ...
... 1 Auto accompaniment (Rhythm, Bass, Chord 1/2/3), Keyboard play Track 2 Keyboard play Track 3 Keyboard play Track 4 Keyboard play Track 5 Keyboard play Track 6 Keyboard play back the tracks together, it sounds like a standard tape recorder. NOTE • With this keyboard, Track 1 is being performed in Track 1. ...Flash Step Recording S t ep Rec Lit Normal E-53 This means that each time you play , so they are automatically turned off whenever the keyboard goes into record standby or starts recording. Song Memory Track Buttons Track 2 Track 4 Track 6 Track 1 Track 5 ...

User Guide
Page 57
...when you can dump memory contents to a computer using an intro, ending, or fill-in memory is replaced. • Turning off the keyboard while a record operation is less than 100 notes. • Recording automatically stops (and auto-accompaniment and rhythm stops playing if... Level • DSP Hold On/Off • Mixer Hold On/Off • Pitch bend wheel operation • Modulation wheel operation (WK-3800/WK-8000) • Modulation button operation (WK-3300) • Pitch bend range Mixer Mode Settings Channel 1 Mixer parameters (page E-40) are . To synchro start a recording of...
...when you can dump memory contents to a computer using an intro, ending, or fill-in memory is replaced. • Turning off the keyboard while a record operation is less than 100 notes. • Recording automatically stops (and auto-accompaniment and rhythm stops playing if... Level • DSP Hold On/Off • Mixer Hold On/Off • Pitch bend wheel operation • Modulation wheel operation (WK-3800/WK-8000) • Modulation button operation (WK-3300) • Pitch bend range Mixer Mode Settings Channel 1 Mixer parameters (page E-40) are . To synchro start a recording of...

User Guide
Page 58
...it . 2 Press the START/STOP button to playback the song you want to turn off the channel of the track. NOTE • Use the procedure under "To record to Tracks 2 through 6 using step recording" on the keyboard with Step Recording With step recording, you can be recorded in Tracks 1 through 6.... from Song Memory Once you record tracks to song memory, you can play back from the beginning of the song. • The entire keyboard functions as a melody keyboard, regardless of the MODE button setting. To play them back to 4). If it disappears before you have a chance to select a song ...
...it . 2 Press the START/STOP button to playback the song you want to turn off the channel of the track. NOTE • Use the procedure under "To record to Tracks 2 through 6 using step recording" on the keyboard with Step Recording With step recording, you can be recorded in Tracks 1 through 6.... from Song Memory Once you record tracks to song memory, you can play back from the beginning of the song. • The entire keyboard functions as a melody keyboard, regardless of the MODE button setting. To play them back to 4). If it disappears before you have a chance to select a song ...
User Guide
Page 100
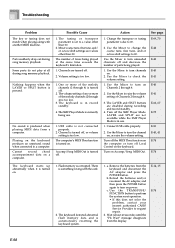
... properly. 2. The volume setting of one or more of the melody channels (2 through 4) is set to turn on . 2. The tuning or transpose parameter is too low. 3. The keyboard is turned on Accomp/Song MIDI Out. The SMF Player Mode is too low. See page E-69, 70 E-42 ... the POWER button. Channel is turned off the SMF Player Mode. Action 1. a. Flash memory is pressed. c. Use the TRANSPOSE/ FUNCTION button to perform the system reset operation. • If this does not solve the problem, contact your nearest authorized CASIO Service Provider to a computer. Playing...
... properly. 2. The volume setting of one or more of the melody channels (2 through 4) is set to turn on . 2. The tuning or transpose parameter is too low. 3. The keyboard is turned on Accomp/Song MIDI Out. The SMF Player Mode is too low. See page E-69, 70 E-42 ... the POWER button. Channel is turned off the SMF Player Mode. Action 1. a. Flash memory is pressed. c. Use the TRANSPOSE/ FUNCTION button to perform the system reset operation. • If this does not solve the problem, contact your nearest authorized CASIO Service Provider to a computer. Playing...


