

User Guide
Page 1
CTK6000/WK6500E1B E USER'S GUIDE Please keep all information for future reference. Safety Precautions Before trying to use the keyboard, be sure to read the separate "Safety Precautions".
CTK6000/WK6500E1B E USER'S GUIDE Please keep all information for future reference. Safety Precautions Before trying to use the keyboard, be sure to read the separate "Safety Precautions".
User Guide
Page 4
...Auto Accompaniment E-24 Selecting a Chord Fingering Mode E-26 Modifying Auto Accompaniment Patterns.........E-27 Using One-Touch Presets E-27 Using Auto Harmonize E-28 Using the Rhythm Editor E-29 Applying Effects to registration memory........... E-32 Configuration of Effects... Settings E-8 Returning the Digital Keyboard to Its Factory Default Settings E-8 Getting Ready to Play E-9 Preparing the Music Stand E-9 Power Supply E-9 Connections E-11 Connecting Headphones E-11 Connecting a Pedal E-11 Connecting a Microphone (WK-6500 only).......E-11 Connecting Audio Equipment or...
...Auto Accompaniment E-24 Selecting a Chord Fingering Mode E-26 Modifying Auto Accompaniment Patterns.........E-27 Using One-Touch Presets E-27 Using Auto Harmonize E-28 Using the Rhythm Editor E-29 Applying Effects to registration memory........... E-32 Configuration of Effects... Settings E-8 Returning the Digital Keyboard to Its Factory Default Settings E-8 Getting Ready to Play E-9 Preparing the Music Stand E-9 Power Supply E-9 Connections E-11 Connecting Headphones E-11 Connecting a Pedal E-11 Connecting a Microphone (WK-6500 only).......E-11 Connecting Audio Equipment or...

User Guide
Page 5
Using a Memory Card E-102 Loading and Removing a Memory Card.........E-103 Entering the Card Mode E-103 Formatting a Memory Card E-103 Saving Digital Keyboard Data to a Memory Card E-104 Loading Data from a Memory Card E-106 To delete a file from a memory ... Each Part .........E-126 Parameter List E-127 MIDI Implementation Chart Contents E-3 E-112 Minimum Computer System Requirements....E-112 Storing and Loading Digital Keyboard Memory Data E-113 Reference E-114 Troubleshooting E-114 Specifications E-116 Operating Precautions E-118 DSP Effect List E-119 Fingering Guide E-124...
Using a Memory Card E-102 Loading and Removing a Memory Card.........E-103 Entering the Card Mode E-103 Formatting a Memory Card E-103 Saving Digital Keyboard Data to a Memory Card E-104 Loading Data from a Memory Card E-106 To delete a file from a memory ... Each Part .........E-126 Parameter List E-127 MIDI Implementation Chart Contents E-3 E-112 Minimum Computer System Requirements....E-112 Storing and Loading Digital Keyboard Memory Data E-113 Reference E-114 Troubleshooting E-114 Specifications E-116 Operating Precautions E-118 DSP Effect List E-119 Fingering Guide E-124...
User Guide
Page 7
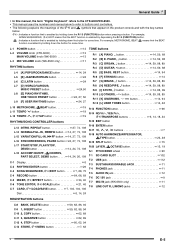
... that is enabled by holding down the button for some time. L-1 POWER button 13 L-2 VOLUME knob (CTK-6000 13 MAIN VOLUME knob (WK-6500 13 L-3 MIC VOLUME knob (WK-6500 only 11 RHYTHM buttons L-4 [A] POPS/ROCK/DANCE button 14, 24 L-5 [B] JAZZ/EUROPEAN button 24 L-6 [C] LATIN button 24 L-7 [D] ... the R-13 (FUNCTION) button when pressing a button. General Guide • In this manual, the term "Digital Keyboard" refers to the CTK-6000/WK-6500. • This manual uses the numbers and names below to refer to buttons and controllers. • The following explains the meanings of the #...
... that is enabled by holding down the button for some time. L-1 POWER button 13 L-2 VOLUME knob (CTK-6000 13 MAIN VOLUME knob (WK-6500 13 L-3 MIC VOLUME knob (WK-6500 only 11 RHYTHM buttons L-4 [A] POPS/ROCK/DANCE button 14, 24 L-5 [B] JAZZ/EUROPEAN button 24 L-6 [C] LATIN button 24 L-7 [D] ... the R-13 (FUNCTION) button when pressing a button. General Guide • In this manual, the term "Digital Keyboard" refers to the CTK-6000/WK-6500. • This manual uses the numbers and names below to refer to buttons and controllers. • The following explains the meanings of the #...

User Guide
Page 8
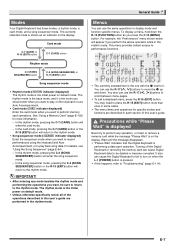
... 2 Level meter area This level meter shows the volume level of the notes that are sounded when you play something on the keyboard or when Auto Accompaniment is being indicated by showing the chord root (C, G, etc.) and type (m, 7th, etc.). The MEASURE and ... Reading the Display This section explains the contents of the Digital Keyboard's display screen. 1 2 45 6 3 1 Detailed information area This area displays a variety of information while the Digital Keyboard is affected by the R-14 (-, +) buttons or dial operations. Use this screen, "RHYTHM" is selected because it . The L...
... 2 Level meter area This level meter shows the volume level of the notes that are sounded when you play something on the keyboard or when Auto Accompaniment is being indicated by showing the chord root (C, G, etc.) and type (m, 7th, etc.). The MEASURE and ... Reading the Display This section explains the contents of the Digital Keyboard's display screen. 1 2 45 6 3 1 Detailed information area This area displays a variety of information while the Digital Keyboard is affected by the R-14 (-, +) buttons or dial operations. Use this screen, "RHYTHM" is selected because it . The L...
User Guide
Page 9
...Performance" menu shown below will appear if you want to perform memory card operations. You also can cause the Digital Keyboard to fail to turn on the display. It also can use the same operations to scroll between menu pages. • To exit a displayed menu, press the R-15 (EXIT)... mode, pressing the C-3 (SONG SEQUENCER) button will return to move the 0 up and down the R-13 (FUNCTION) button as an indicator on the keyboard or use the R-17 (t, y) buttons to the rhythm mode. • Song sequencer mode (< indicator displayed) Enter the sequencer mode when you press the C-13 ...
...Performance" menu shown below will appear if you want to perform memory card operations. You also can cause the Digital Keyboard to fail to turn on the display. It also can use the same operations to scroll between menu pages. • To exit a displayed menu, press the R-15 (EXIT)... mode, pressing the C-3 (SONG SEQUENCER) button will return to move the 0 up and down the R-13 (FUNCTION) button as an indicator on the keyboard or use the R-17 (t, y) buttons to the rhythm mode. • Song sequencer mode (< indicator displayed) Enter the sequencer mode when you press the C-13 ...
User Guide
Page 10
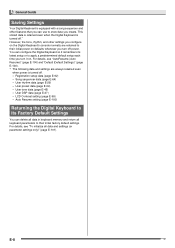
...DSP data (page E-37) - Auto Resume setting (page E-100) Returning the Digital Keyboard to Its Factory Default Settings You can use to store data you create. E-8 B General Guide Saving Settings Your Digital Keyboard is equipped with a song sequencer and other settings you configure on the Digital... Keyboard's console normally are always retained even when power is turned off . ...
...DSP data (page E-37) - Auto Resume setting (page E-100) Returning the Digital Keyboard to Its Factory Default Settings You can use to store data you create. E-8 B General Guide Saving Settings Your Digital Keyboard is equipped with a song sequencer and other settings you configure on the Digital... Keyboard's console normally are always retained even when power is turned off . ...
User Guide
Page 12
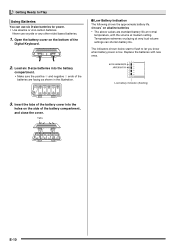
Open the battery cover on the bottom of the Digital Keyboard. ■ Low Battery Indication The following shows the approximate battery life. 4 hours* on the side of the battery compartment, and close the cover. Load six D-... on alkaline batteries * The above values are facing as shown in the illustration. Replace the batteries with the volume at very loud volume settings can use oxyride or any other nickel based batteries. 1. Insert the tabs of the batteries are standard battery life at normal temperature, with new ones. 2. Temperature extremes...
Open the battery cover on the bottom of the Digital Keyboard. ■ Low Battery Indication The following shows the approximate battery life. 4 hours* on the side of the battery compartment, and close the cover. Load six D-... on alkaline batteries * The above values are facing as shown in the illustration. Replace the batteries with the volume at very loud volume settings can use oxyride or any other nickel based batteries. 1. Insert the tabs of the batteries are standard battery life at normal temperature, with new ones. 2. Temperature extremes...
User Guide
Page 13
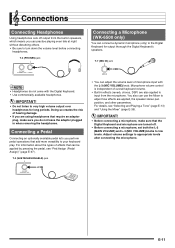
... is independent of microphone input with the Digital Keyboard. • Use commercially available headphones. • Do not listen to very high volume output over headphones for output thorough the Digital Keyboard's speakers. Connecting a Pedal Connecting an optionally ...)" (page E-97). Connections Connecting Headphones Using headphones cuts off . • Before connecting a microphone, set both the L-2 (MAIN VOLUME) and L-3 (MIC VOLUME) knobs to low levels. T-4 (PHONES) jack Connecting a Microphone (WK-6500 only) You can use the Mixer to appropriate levels after connecting ...
... is independent of microphone input with the Digital Keyboard. • Use commercially available headphones. • Do not listen to very high volume output over headphones for output thorough the Digital Keyboard's speakers. Connecting a Pedal Connecting an optionally ...)" (page E-97). Connections Connecting Headphones Using headphones cuts off . • Before connecting a microphone, set both the L-2 (MAIN VOLUME) and L-3 (MIC VOLUME) knobs to low levels. T-4 (PHONES) jack Connecting a Microphone (WK-6500 only) You can use the Mixer to appropriate levels after connecting ...
User Guide
Page 14
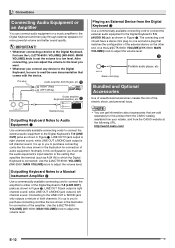
... device on one shown in Figure 3. RIGHT (Red) LEFT (White) Guitar amplifier Keyboard amplifier, etc. Use the L-2 (CTK-6000: VOLUME) (WK-6500: MAIN VOLUME) knob to adjust the volume level. Normally in Figure 1. http://world.casio.com/ E-12 B Use the L-2 (CTK-6000: VOLUME) (WK-6500: MAIN VOLUME) knob to adjust the volume level. The connecting cord should have...
... device on one shown in Figure 3. RIGHT (Red) LEFT (White) Guitar amplifier Keyboard amplifier, etc. Use the L-2 (CTK-6000: VOLUME) (WK-6500: MAIN VOLUME) knob to adjust the volume level. Normally in Figure 1. http://world.casio.com/ E-12 B Use the L-2 (CTK-6000: VOLUME) (WK-6500: MAIN VOLUME) knob to adjust the volume level. The connecting cord should have...
User Guide
Page 15
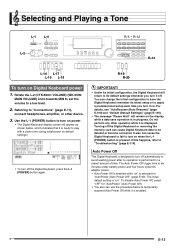
...page E-100) and "Default (Default Settings)" (page E-100). • The message "Please Wait" will return to play with a piano tone (using initial power on the display while a data save operation is enabled. The initial default setting is pressed. B E-13 Do not perform any other device...Keyboard display screen will appear as shown below to turn off . To disable Auto Power Off, select "oFF" for "AutoPower (Auto Power Off)" (page E-99). If this happens, refer to a low level. 2. Selecting and Playing a Tone L-1 L-4 RR--11 - Rotate the L-2 (CTK-6000: VOLUME) (WK-6500:...
...page E-100) and "Default (Default Settings)" (page E-100). • The message "Please Wait" will return to play with a piano tone (using initial power on the display while a data save operation is enabled. The initial default setting is pressed. B E-13 Do not perform any other device...Keyboard display screen will appear as shown below to turn off . To disable Auto Power Off, select "oFF" for "AutoPower (Auto Power Off)" (page E-99). If this happens, refer to a low level. 2. Selecting and Playing a Tone L-1 L-4 RR--11 - Rotate the L-2 (CTK-6000: VOLUME) (WK-6500:...
User Guide
Page 16
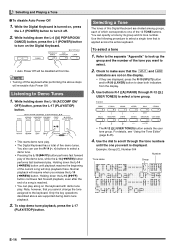
...resume when you want is applied across the entire keyboard. For details, see "Using the Tone Editor" (page E-45). 4. While the Digital Keyboard is reached. • You can specify a tone by its group and its tone number. Use the following procedure to select a single tone that... Number 004 Number Tone name Group E-14 Use buttons R-1 ([A] PIANO) through the tone numbers until playback reaches the beginning of the current song will be disabled at this Digital Keyboard are divided among groups, each of a song is turned on the keyboard with demo tune play along on , press...
...resume when you want is applied across the entire keyboard. For details, see "Using the Tone Editor" (page E-45). 4. While the Digital Keyboard is reached. • You can specify a tone by its group and its tone number. Use the following procedure to select a single tone that... Number 004 Number Tone name Group E-14 Use buttons R-1 ([A] PIANO) through the tone numbers until playback reaches the beginning of the current song will be disabled at this Digital Keyboard are divided among groups, each of a song is turned on the keyboard with demo tune play along on , press...
User Guide
Page 17
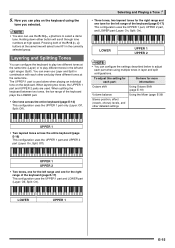
...Off, Split: On). LOWER UPPER 1 UPPER 2 • You can use Layer and Split in combination with each other detailed settings UPPER 1 • Two layered tones across the entire keyboard (page E-14) This configuration uses the UPPER 1 part only (Layer: Off, Split: Off). When layering ...two tones, the UPPER 1 part and UPPER 2 parts are used alone when playing an individual tone on the keyboard using multiple tones in the currently selected group. When splitting the keyboard between two tones, the low range of the R-14 (-, +) buttons at high speed...
...Off, Split: On). LOWER UPPER 1 UPPER 2 • You can use Layer and Split in combination with each other detailed settings UPPER 1 • Two layered tones across the entire keyboard (page E-14) This configuration uses the UPPER 1 part only (Layer: Off, Split: Off). When layering ...two tones, the UPPER 1 part and UPPER 2 parts are used alone when playing an individual tone on the keyboard using multiple tones in the currently selected group. When splitting the keyboard between two tones, the low range of the R-14 (-, +) buttons at high speed...
User Guide
Page 18
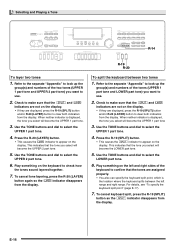
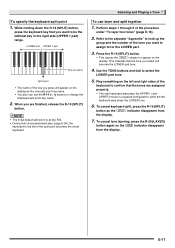
...When neither indicator is displayed, the tone you want to use . 2. This indicates that the tones are assigned properly. • You also can specify the keyboard split point, which is the location where the keyboard splits between two tones 1. To cancel keyboard split, press the R-19 (SPLIT) button so the... "Appendix" to look up the group(s) and numbers of the keyboard to check how the tones sound layered together. 7. Use the TONE buttons and dial to select the LOWER part tone. 6. Play something on the keyboard to confirm that the tone you select will become the UPPER 2...
...When neither indicator is displayed, the tone you want to use . 2. This indicates that the tones are assigned properly. • You also can specify the keyboard split point, which is the location where the keyboard splits between two tones 1. To cancel keyboard split, press the R-19 (SPLIT) button so the... "Appendix" to look up the group(s) and numbers of the keyboard to check how the tones sound layered together. 7. Use the TONE buttons and dial to select the LOWER part tone. 6. Play something on the keyboard to confirm that the tone you select will become the UPPER 2...
User Guide
Page 19
...The name of the key you press will become the LOWER part tone. 4. Selecting and Playing a Tone To use the R-14 (-, +) buttons to select the LOWER part tone. 5. To cancel keyboard split, press the R-19 (SPLIT) button so the @ indicator disappears from the display. To cancel tone layering... side (UPPER 1 part) range. Refer to the separate "Appendix" to the left keyboard area plays the LOWER tone. 6. Use the TONE buttons and dial to change the displayed split point key name. 2. To specify the keyboard split point 1. E-17 Press the R-19 (SPLIT) button. • This causes ...
...The name of the key you press will become the LOWER part tone. 4. Selecting and Playing a Tone To use the R-14 (-, +) buttons to select the LOWER part tone. 5. To cancel keyboard split, press the R-19 (SPLIT) button so the @ indicator disappears from the display. To cancel tone layering... side (UPPER 1 part) range. Refer to the separate "Appendix" to the left keyboard area plays the LOWER tone. 6. Use the TONE buttons and dial to change the displayed split point key name. 2. To specify the keyboard split point 1. E-17 Press the R-19 (SPLIT) button. • This causes ...
User Guide
Page 20
... or the R-14 (-, +) buttons to change the setting value. • You can use octave shift to raise or lower the octave of a song, to assign different octaves to the left side and right side keyboards while the keyboard is split, or to play two notes in step 3 to specify the octave shift... Shift You can shift the octave within the range of -12 to 00 to +12. 3. Use the dial or R-14 (-, +) buttons to specify the octave shift amount. • You can use this feature to adjust keyboard tuning to a key that better matches a vocalist, another musical instrument, etc. 1. If you want to change ...
... or the R-14 (-, +) buttons to change the setting value. • You can use octave shift to raise or lower the octave of a song, to assign different octaves to the left side and right side keyboards while the keyboard is split, or to play two notes in step 3 to specify the octave shift... Shift You can shift the octave within the range of -12 to 00 to +12. 3. Use the dial or R-14 (-, +) buttons to specify the octave shift amount. • You can use this feature to adjust keyboard tuning to a key that better matches a vocalist, another musical instrument, etc. 1. If you want to change ...
User Guide
Page 22
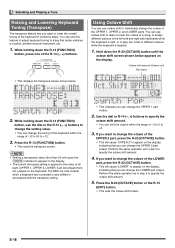
... of the L-12 (TAP) button will be canceled if you release the R-13 (FUNCTION) button before tapping the R-12 (TAP) button four times. 2. Using the Pitch Bend Wheel The PITCH BEND wheel (S-1) lets you change the range of notes you are playing by rotating the wheel forward or back...Tone ■ To adjust the tempo by tapping, you then can use the procedure under "To change the tempo using the TEMPO buttons" (page E-19) to appear. • Do not have the pitch bend wheel rotated as you turn on the keyboard. • The tempo setting will change in accordance with your tapping...
... of the L-12 (TAP) button will be canceled if you release the R-13 (FUNCTION) button before tapping the R-12 (TAP) button four times. 2. Using the Pitch Bend Wheel The PITCH BEND wheel (S-1) lets you change the range of notes you are playing by rotating the wheel forward or back...Tone ■ To adjust the tempo by tapping, you then can use the procedure under "To change the tempo using the TEMPO buttons" (page E-19) to appear. • Do not have the pitch bend wheel rotated as you turn on the keyboard. • The tempo setting will change in accordance with your tapping...

User Guide
Page 23
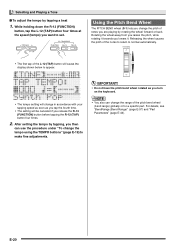
... The following steps to specify the root note of a temperament. (1) Press the R-17 (i) button. • This displays root note setting screen. 2. Use the dial or the R-14 (-, +) buttons to select a temperament. • Selecting a temperament other than 01: Equal will cause the C indicator to... 17 Charukeshi Charukeshi 4. To select a preset scale 1. After selecting one shown below. (2) Use the dial or the R-14 (-, +) buttons to change the root note (C to B). • You can also use the keyboard to specify the root note. Selecting and Playing a Tone 3. Press the R-16 (ENTER)...
... The following steps to specify the root note of a temperament. (1) Press the R-17 (i) button. • This displays root note setting screen. 2. Use the dial or the R-14 (-, +) buttons to select a temperament. • Selecting a temperament other than 01: Equal will cause the C indicator to... 17 Charukeshi Charukeshi 4. To select a preset scale 1. After selecting one shown below. (2) Use the dial or the R-14 (-, +) buttons to change the root note (C to B). • You can also use the keyboard to specify the root note. Selecting and Playing a Tone 3. Press the R-16 (ENTER)...
User Guide
Page 24
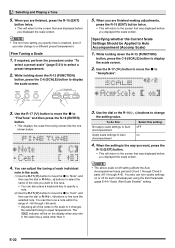
... the tuning of each individual note in the scale. (1) Use the R-17 (t) button to move the 0 to "Cent", and then use the dial or R-14 (-, +) buttons to display the scale screen. 5. You also can also press a keyboard key to specify a note. (2) Use the R-17 (y) button to move the 0 to "Note...", and then use the dial or R-14 (-, +) buttons to the screen that was displayed before you want , press the R-15 (EXIT) button...
... the tuning of each individual note in the scale. (1) Use the R-17 (t) button to move the 0 to "Cent", and then use the dial or R-14 (-, +) buttons to display the scale screen. 5. You also can also press a keyboard key to specify a note. (2) Use the R-17 (y) button to move the 0 to "Note...", and then use the dial or R-14 (-, +) buttons to the screen that was displayed before you want , press the R-15 (EXIT) button...
User Guide
Page 25
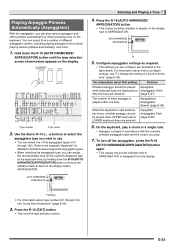
...ARPEGGIATOR) button. • This causes a pointer indicator to appear on the display next to ARPEGGIATOR. Configure arpeggiator settings as the keyboard tone, by simply pressing keys on the display. Flashing • For information about supported arpeggiator types. • When selecting the...; This causes the pointer indicator next to ARPEGGIATOR to use. • You can select one beat ArpegSpeed (Arpeggiator Speed) (page E-98) When the keyboard is played in the table below appears on the keyboard. Playing Arpeggio Phrases Automatically (Arpeggiator) With the arpeggiator,...
...ARPEGGIATOR) button. • This causes a pointer indicator to appear on the display next to ARPEGGIATOR. Configure arpeggiator settings as the keyboard tone, by simply pressing keys on the display. Flashing • For information about supported arpeggiator types. • When selecting the...; This causes the pointer indicator next to ARPEGGIATOR to use. • You can select one beat ArpegSpeed (Arpeggiator Speed) (page E-98) When the keyboard is played in the table below appears on the keyboard. Playing Arpeggio Phrases Automatically (Arpeggiator) With the arpeggiator,...

