
Owners Manual
Page 4
.... The symbol indicates that injury or damage may result if used . Contact CASIO service representative. In this symbol the actual type of icons are given below. Handling the register Should the register malfunction, start to property and this product and to prevent injury to the ...indicated. The symbol indicates a prohibited action. Warning! In this guide, keep all repair and maintenance. Should you drop the register and damage it in this case) is extremely dangerous. Never try to take the register apart or modify it , immediately shut down the power and unplug...
.... The symbol indicates that injury or damage may result if used . Contact CASIO service representative. In this symbol the actual type of icons are given below. Handling the register Should the register malfunction, start to property and this product and to prevent injury to the ...indicated. The symbol indicates a prohibited action. Warning! In this guide, keep all repair and maintenance. Should you drop the register and damage it in this case) is extremely dangerous. Never try to take the register apart or modify it , immediately shut down the power and unplug...

Owners Manual
Page 6
... the mode switch to use your cash register 27 Before business hours ...28 Checking the time and date 28 To display and clear the date/time ...28 Preparing coins for change 28 Preparing and using department keys 29 Registering department keys 29 Programming department keys ... & Contents 2 Getting Started 10 1. Install receipt / journal paper 11 3. Department unit price programming 17 11. Troubleshooting ...18 Introducing the Register 20 General guide ...20 Roll paper ...20 Mode key ...20 Drawer ...20 Drawer lock / Drawer key ...20 Magnetic plate ...20 Mode switch ...21 How...
... the mode switch to use your cash register 27 Before business hours ...28 Checking the time and date 28 To display and clear the date/time ...28 Preparing coins for change 28 Preparing and using department keys 29 Registering department keys 29 Programming department keys ... & Contents 2 Getting Started 10 1. Install receipt / journal paper 11 3. Department unit price programming 17 11. Troubleshooting ...18 Introducing the Register 20 General guide ...20 Roll paper ...20 Mode key ...20 Drawer ...20 Drawer lock / Drawer key ...20 Magnetic plate ...20 Mode switch ...21 How...

Owners Manual
Page 12
... the roll paper. Step 4 Put the leading end of the take -up reel. Step 8 Replace the paper guide of the paper over the printer. Step 10 Press the j key to take -up any slack in the paper. During machine installation, press the j key after power on the spindle of...take up reel. Step 5 Close the platen arm slowly until it onto the reel two or three turns. Complete Replace the printer cover. Getting Started To install journal paper Step 1 Remove the printer cover. Step 6 Remove the paper guide of the takeup reel and wind it locks steadily. Step 2 Open the platen arm.
... the roll paper. Step 4 Put the leading end of the take -up reel. Step 8 Replace the paper guide of the paper over the printer. Step 10 Press the j key to take -up any slack in the paper. During machine installation, press the j key after power on the spindle of...take up reel. Step 5 Close the platen arm slowly until it onto the reel two or three turns. Complete Replace the printer cover. Getting Started To install journal paper Step 1 Remove the printer cover. Step 6 Remove the paper guide of the takeup reel and wind it locks steadily. Step 2 Open the platen arm.

Owners Manual
Page 20
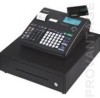
...key (marked "PGM") and the operator key (marked "OP"). Drawer The drawer opens automatically whenever you finalize a registration and whenever you to the cash register and provides a general explanation of its various parts. Drawer lock / Drawer key Use the drawer key to print receipts and a journal (page 11...-up reel Roll paper Printer RAC connector cover Pop-up display (customer display) Main display Mode switch Keyboard Com port connector cover Printer cover Drawer Drawer lock Roll paper You can select the REG and OFF position. Introducing the Register General guide This part of the ...
...key (marked "PGM") and the operator key (marked "OP"). Drawer The drawer opens automatically whenever you finalize a registration and whenever you to the cash register and provides a general explanation of its various parts. Drawer lock / Drawer key Use the drawer key to print receipts and a journal (page 11...-up reel Roll paper Printer RAC connector cover Pop-up display (customer display) Main display Mode switch Keyboard Com port connector cover Printer cover Drawer Drawer lock Roll paper You can select the REG and OFF position. Introducing the Register General guide This part of the ...

Owners Manual
Page 90
...feed about 20 cm of this manual. Step 4 Remove the journal takeup reel from the cash register. Step 8 Remove the old paper roll from its holder. Step 9 Load new paper. Go to the REG position and remove the printer cover. E 90 XZ REG X2/Z2 OFF RF PGM Step 6 Slide the printed ...journal from the take -up reel. Step 7 Open the platen arm. Step 5 Remove the paper guide from the take -up reel. User Maintenance and Options To replace...
...feed about 20 cm of this manual. Step 4 Remove the journal takeup reel from the cash register. Step 8 Remove the old paper roll from its holder. Step 9 Load new paper. Go to the REG position and remove the printer cover. E 90 XZ REG X2/Z2 OFF RF PGM Step 6 Slide the printed ...journal from the take -up reel. Step 7 Open the platen arm. Step 5 Remove the paper guide from the take -up reel. User Maintenance and Options To replace...

Quick Start Guide
Page 1
...Guide Press / for more information Visit http://casio4business.com/ecr Casio Model Number PCR-T2200/2100/220S Please keep this sheet for department 15 ~ Selects Tax Status1. ! DD:INPUT :RETURN 8 TIME PLEASE INPUT TIME BY 24 HOUR SYSTEM. model :162SL/MSR. (1)When No EFT device is connected • By default, the cash register... and then press the department key. D) Install the supplied 58mm thermal paper roll by the ~ key. (Enter 2 for tax table 2) D) Enter your cash register and remove the printer cover. B) Read the printout and follow the procedure printed on ...
...Guide Press / for more information Visit http://casio4business.com/ecr Casio Model Number PCR-T2200/2100/220S Please keep this sheet for department 15 ~ Selects Tax Status1. ! DD:INPUT :RETURN 8 TIME PLEASE INPUT TIME BY 24 HOUR SYSTEM. model :162SL/MSR. (1)When No EFT device is connected • By default, the cash register... and then press the department key. D) Install the supplied 58mm thermal paper roll by the ~ key. (Enter 2 for tax table 2) D) Enter your cash register and remove the printer cover. B) Read the printout and follow the procedure printed on ...
