
Owners Manual
Page 3
... manual. The main plug on hand for compliance could void the user's authority to CASIO Cash Register! Everything you have any questions about points not specifically covered in this equipment must be mastered without special training. Consult your selection of a CASIO Electronic Cash Register, which case the user will be easily accessible. 3E This equipment generates, uses...
... manual. The main plug on hand for compliance could void the user's authority to CASIO Cash Register! Everything you have any questions about points not specifically covered in this equipment must be mastered without special training. Consult your selection of a CASIO Electronic Cash Register, which case the user will be easily accessible. 3E This equipment generates, uses...

Owners Manual
Page 10
... them become shorted or try to operate. Getting Started This chapter shows how to setup the cash register and get it ready to take them apart. printer cover platen arm battery compartment cover 3. E 10 Note the (+) and (-) markings in the accessories. 4. Load a set ...of small children. Be sure to install these batteries. If your cash register's memory when there is included in the battery compartment. Close the platen arm and replace the printer cover. Important! These batteries protect information stored in your child should swallow a battery, ...
... them become shorted or try to operate. Getting Started This chapter shows how to setup the cash register and get it ready to take them apart. printer cover platen arm battery compartment cover 3. E 10 Note the (+) and (-) markings in the accessories. 4. Load a set ...of small children. Be sure to install these batteries. If your cash register's memory when there is included in the battery compartment. Close the platen arm and replace the printer cover. Important! These batteries protect information stored in your child should swallow a battery, ...

Owners Manual
Page 11
...paper Step 1 Remove the printer cover. Tear off the excess paper. 11 E Getting Started 2. Step 5 Close the platen arm slowly until it locks steadily. Install receipt / journal paper. Caution! (in handling the thermal paper) • Never touch the printer head and the platen. • Unpack the thermal paper just before your ...end of the paper through the cutter slot. Step 2 Open the platen arm. Step 3 Ensuring the paper is being fed from the printer and close the platen arm. Take away the head protection sheet from the bottom of the roll, lower the roll into the space ...
...paper Step 1 Remove the printer cover. Tear off the excess paper. 11 E Getting Started 2. Step 5 Close the platen arm slowly until it locks steadily. Install receipt / journal paper. Caution! (in handling the thermal paper) • Never touch the printer head and the platen. • Unpack the thermal paper just before your ...end of the paper through the cutter slot. Step 2 Open the platen arm. Step 3 Ensuring the paper is being fed from the printer and close the platen arm. Take away the head protection sheet from the bottom of the roll, lower the roll into the space ...

Owners Manual
Page 12
... or three turns. Step 10 Press the j key to take -up reel into place behind the printer. Step 3 Ensuring the paper is being fed from the bottom of the paper into the space behind the printer, above the roll paper. Step 4 Put the leading end of the take up reel. E 12 Step... the roll into the groove on . During machine installation, press the j key after power on the spindle of the take -up reel. Complete Replace the printer cover. Step 6 Remove the paper guide of the takeup reel and wind it locks steadily. Step 8 Replace the paper guide of the paper over the...
... or three turns. Step 10 Press the j key to take -up reel into place behind the printer. Step 3 Ensuring the paper is being fed from the bottom of the paper into the space behind the printer, above the roll paper. Step 4 Put the leading end of the take up reel. E 12 Step... the roll into the groove on . During machine installation, press the j key after power on the spindle of the take -up reel. Complete Replace the printer cover. Step 6 Remove the paper guide of the takeup reel and wind it locks steadily. Step 8 Replace the paper guide of the paper over the...

Owners Manual
Page 20
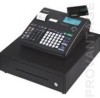
... "OP"). display drawer keyboard pop-up display printer cover take-up reel main operator customer Take-up reel Roll paper Printer RAC connector cover Pop-up display (customer display) Main display Mode switch Keyboard Com port connector cover Printer cover Drawer Drawer lock Roll paper You can use... key can select the REG and OFF position. Drawer lock / Drawer key Use the drawer key to the cash register and provides a general explanation of its various parts. E 20 Introducing the Register General guide This part of the manual introduces you issue a read or reset report.
... "OP"). display drawer keyboard pop-up display printer cover take-up reel main operator customer Take-up reel Roll paper Printer RAC connector cover Pop-up display (customer display) Main display Mode switch Keyboard Com port connector cover Printer cover Drawer Drawer lock Roll paper You can use... key can select the REG and OFF position. Drawer lock / Drawer key Use the drawer key to the cash register and provides a general explanation of its various parts. E 20 Introducing the Register General guide This part of the manual introduces you issue a read or reset report.

Owners Manual
Page 90
Step 5 Remove the paper guide from the cash register. Step 8 Remove the old paper roll from the take -up reel. Go to the step 3 described on page 12 of paper. Step 3 Cut the journal ... replace journal paper Step 1 Set the mode switch to feed about 20 cm of this manual. Step 2 Press j to the REG position and remove the printer cover.
Step 5 Remove the paper guide from the cash register. Step 8 Remove the old paper roll from the take -up reel. Go to the step 3 described on page 12 of paper. Step 3 Cut the journal ... replace journal paper Step 1 Set the mode switch to feed about 20 cm of this manual. Step 2 Press j to the REG position and remove the printer cover.

Owners Manual
Page 91
Step 3 Remove the old paper roll from moisture damage. Go to the REG position and remove the printer cover. Consult your CASIO dealer for details. 91 E Step 4 Load new paper. User Maintenance and Options To replace receipt paper Step 1 Set the mode switch to the step 3 described on page 11 of this manual. Step 2 Open the platen arm. XZ REG X2/Z2 OFF RF PGM User Maintenance and Options Options P-5880T roll paper WT-89 wetproof cover The optional wetproof cover protects the keyboard from the cash register.
Step 3 Remove the old paper roll from moisture damage. Go to the REG position and remove the printer cover. Consult your CASIO dealer for details. 91 E Step 4 Load new paper. User Maintenance and Options To replace receipt paper Step 1 Set the mode switch to the step 3 described on page 11 of this manual. Step 2 Open the platen arm. XZ REG X2/Z2 OFF RF PGM User Maintenance and Options Options P-5880T roll paper WT-89 wetproof cover The optional wetproof cover protects the keyboard from the cash register.
Owners Manual
Page 94
... price 32 preset tax status 32 price 24 print control 61, 62, 63, 64 printer 20 printer cover 20 program backup 16 program end key 53, 54 program key 20 program mode 20 ...program report 82 R rate 36 receipt 11, 26 receipt control 64 receipt on/off 24 received on account 24, 41, 69 reduction 24, 37, 70 refund 24, 40 refund mode 20 REG mode 20 register..., 71 tax status 31, 33, 36, 37 tax system 60 tax table 14 taxable status 68 thermal paper 11 time 28 time set 13 training clerk 72 U unit price 29, 31, 33 W ...
... price 32 preset tax status 32 price 24 print control 61, 62, 63, 64 printer 20 printer cover 20 program backup 16 program end key 53, 54 program key 20 program mode 20 ...program report 82 R rate 36 receipt 11, 26 receipt control 64 receipt on/off 24 received on account 24, 41, 69 reduction 24, 37, 70 refund 24, 40 refund mode 20 REG mode 20 register..., 71 tax status 31, 33, 36, 37 tax system 60 tax table 14 taxable status 68 thermal paper 11 time 28 time set 13 training clerk 72 U unit price 29, 31, 33 W ...

Quick Start Guide
Page 1
...products for tax table 2) D) Enter your cash register and remove the printer cover. MM:INPUT :RETURN 8 DAY PLEASE ...Casio Model Number PCR-T2200/2100/220S Please keep this sheet for department 15 ~ Selects Tax Status1. ! PGM OFF B) Plug the power cord into the compartment. model :162SL/MSR. (1)When No EFT device is connected • By default, the cash register... is called "Tax Status1". Department 16 - 25 are initialized as Taxable 1 and 2, others are initialized as non-taxable. B) Open battery compartment cover. D) Install the supplied 58mm thermal...
...products for tax table 2) D) Enter your cash register and remove the printer cover. MM:INPUT :RETURN 8 DAY PLEASE ...Casio Model Number PCR-T2200/2100/220S Please keep this sheet for department 15 ~ Selects Tax Status1. ! PGM OFF B) Plug the power cord into the compartment. model :162SL/MSR. (1)When No EFT device is connected • By default, the cash register... is called "Tax Status1". Department 16 - 25 are initialized as Taxable 1 and 2, others are initialized as non-taxable. B) Open battery compartment cover. D) Install the supplied 58mm thermal...
