Owners Manual
Page 4
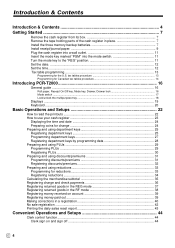
... PCR-T2000 16 General guide ...16 Roll paper, Receipt On/Off key, Mode key, Drawer, Drawer lock 16 Mode switch ...17 Lock/unlock the multipurpose tray ...18 Displays ...19 Keyboard ...20 Basic Operations and Setups 22 How to read the printouts ...22 How to use your cash register... 23 Displaying the time and date 24 Preparing coins for change 24 Preparing and using department keys 25 Registering department keys 25 Programming department keys 27 Registering department keys by programming data 28 Preparing and using PLUs 29 ...
... PCR-T2000 16 General guide ...16 Roll paper, Receipt On/Off key, Mode key, Drawer, Drawer lock 16 Mode switch ...17 Lock/unlock the multipurpose tray ...18 Displays ...19 Keyboard ...20 Basic Operations and Setups 22 How to read the printouts ...22 How to use your cash register... 23 Displaying the time and date 24 Preparing coins for change 24 Preparing and using department keys 25 Registering department keys 25 Programming department keys 27 Registering department keys by programming data 28 Preparing and using PLUs 29 ...
Owners Manual
Page 6
... the register Mode key (Operator/Program key) User's manual/ Drawer key Take-up reel Roll paper Memory backup batteries Welcome to provide years of reliable operation. WARNING: Changes or modifications not expressly approved by the party responsible for future reference. Congratulations upon your CASIO dealer if you need to know is designed to the CASIO PCR-T2000...
... the register Mode key (Operator/Program key) User's manual/ Drawer key Take-up reel Roll paper Memory backup batteries Welcome to provide years of reliable operation. WARNING: Changes or modifications not expressly approved by the party responsible for future reference. Congratulations upon your CASIO dealer if you need to know is designed to the CASIO PCR-T2000...

Owners Manual
Page 9
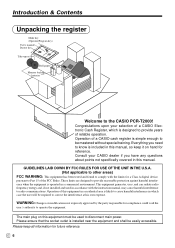
... • Avoid heat/direct sunlight. • Avoid dusty and humid places for storage. • Do not scratch the paper. • Do not keep the printed paper under the following circumstances: High humidity and temperature/direct sunlight/contact with glue, thinner or a rubber eraser. Step 4 Put... 5 Close the platen arm slowly until it locks steadily. Tear off the excess paper. 9E Install receipt/journal paper. Take away the head protection sheet from the bottom of the roll, lower the roll into the space behind the printer. Getting Started 4. Platen arm Platen Printer Important!...
... • Avoid heat/direct sunlight. • Avoid dusty and humid places for storage. • Do not scratch the paper. • Do not keep the printed paper under the following circumstances: High humidity and temperature/direct sunlight/contact with glue, thinner or a rubber eraser. Step 4 Put... 5 Close the platen arm slowly until it locks steadily. Tear off the excess paper. 9E Install receipt/journal paper. Take away the head protection sheet from the bottom of the roll, lower the roll into the space behind the printer. Getting Started 4. Platen arm Platen Printer Important!...
Owners Manual
Page 10
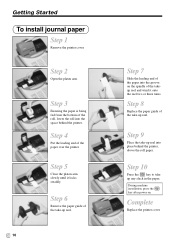
... the | key after power on the spindle of the take -up reel. Step 3 Ensuring the paper is being fed from the bottom of the paper into the space behind the printer, above the roll paper. Step 9 Place the take -up reel into place behind the printer. E 10 Step 7 Slide... the leading end of the roll, lower the roll into the groove on . Step 6 Remove the paper guide of the paper over the printer. Getting Started To install journal paper Step 1 Remove the printer cover. Complete Replace the printer cover. Step 2 Open the...
... the | key after power on the spindle of the take -up reel. Step 3 Ensuring the paper is being fed from the bottom of the paper into the space behind the printer, above the roll paper. Step 9 Place the take -up reel into place behind the printer. E 10 Step 7 Slide... the leading end of the roll, lower the roll into the groove on . Step 6 Remove the paper guide of the paper over the printer. Getting Started To install journal paper Step 1 Remove the printer cover. Complete Replace the printer cover. Step 2 Open the...
Owners Manual
Page 16
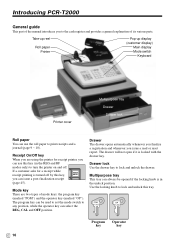
... whenever you finalize a registration and whenever you can use this key (in the unlock position. Drawer lock Use the drawer key to the cash register and provides a general explanation of its various parts. Multipurpose tray This tray can always be used to set the mode switch to turn the...Operator key key The drawer will not open if it is turned off . Introducing PCR-T2000 General guide This part of the manual introduces you to lock and unlock the drawer. The program key can use the roll paper to lock and unlock this key, ON/OFF you issue a read or reset report...
... whenever you finalize a registration and whenever you can use this key (in the unlock position. Drawer lock Use the drawer key to the cash register and provides a general explanation of its various parts. Multipurpose tray This tray can always be used to set the mode switch to turn the...Operator key key The drawer will not open if it is turned off . Introducing PCR-T2000 General guide This part of the manual introduces you to lock and unlock the drawer. The program key can use the roll paper to lock and unlock this key, ON/OFF you issue a read or reset report...
Owners Manual
Page 22
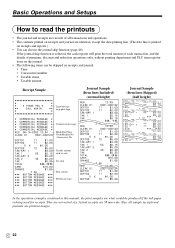
...printing line. (The date line is printed on receipts and reports.) • You can be produced if the roll paper is selected, the cash register will print the total amount of each transaction, and the details of all sample receipts and journals are printout ... Operations and Setups How to read the printouts • The journal and receipts are records of premium, discount and reduction operations only, without printing department and PLU item registrations on receipts and journal. • Time • Consecutive number • Taxable status • Taxable amount Receipt Sample ...
...printing line. (The date line is printed on receipts and reports.) • You can be produced if the roll paper is selected, the cash register will print the total amount of each transaction, and the details of all sample receipts and journals are printout ... Operations and Setups How to read the printouts • The journal and receipts are records of premium, discount and reduction operations only, without printing department and PLU item registrations on receipts and journal. • Time • Consecutive number • Taxable status • Taxable amount Receipt Sample ...
Owners Manual
Page 23
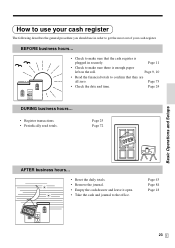
...8226; Remove the journal. • Empty the cash drawer and leave it open. • Take the cash and journal to get the most out of your cash register. BEFORE business hours... • Check to confirm that the cash register is enough paper left on the roll. Page 43 Page 84 Page 18 23 E... Page 9, 10 • Read the financial totals to make sure there is plugged in order to the office. Page 24 DURING business hours... • Register transactions. • Periodically ...
...8226; Remove the journal. • Empty the cash drawer and leave it open. • Take the cash and journal to get the most out of your cash register. BEFORE business hours... • Check to confirm that the cash register is enough paper left on the roll. Page 43 Page 84 Page 18 23 E... Page 9, 10 • Read the financial totals to make sure there is plugged in order to the office. Page 24 DURING business hours... • Register transactions. • Periodically ...
Owners Manual
Page 81
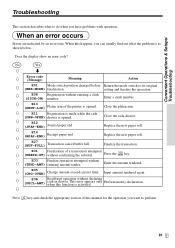
... an error code? Close the platen arm. 4 E11 Registration is made while the cash (DRW-OPEN) drawer is opened . Replace the new paper roll. Press the s key. Replace the new paper roll. E33 Finalize operation attempted without entering a clerk (SIGN-ON) number. When an ... E Enter a clerk number. 4 E10 (PRNT-LID) Platen arm of a transaction attempted without declaring cash in drawer. Close the cash drawer. 4 E12 (JPAP-END) Journal paper end 4 E14 (RPAP-END) Receipt paper end 4 E27 4 (BUF-FULL) Transaction cancel buffer full. Input amount tendered again. 4 E38 ...
... an error code? Close the platen arm. 4 E11 Registration is made while the cash (DRW-OPEN) drawer is opened . Replace the new paper roll. Press the s key. Replace the new paper roll. E33 Finalize operation attempted without entering a clerk (SIGN-ON) number. When an ... E Enter a clerk number. 4 E10 (PRNT-LID) Platen arm of a transaction attempted without declaring cash in drawer. Close the cash drawer. 4 E12 (JPAP-END) Journal paper end 4 E14 (RPAP-END) Receipt paper end 4 E27 4 (BUF-FULL) Transaction cancel buffer full. Input amount tendered again. 4 E38 ...
Owners Manual
Page 84
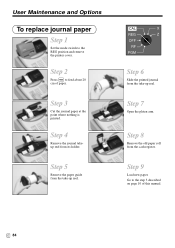
... the take -up reel. E 84 Step 5 Remove the paper guide from the take -up reel. Step 8 Remove the old paper roll from its holder. Go to feed about 20 cm of this manual. Step 4 Remove the journal takeup reel from the cash register. Step 3 Cut the journal paper at the point where nothing is printed. Step...
... the take -up reel. E 84 Step 5 Remove the paper guide from the take -up reel. Step 8 Remove the old paper roll from its holder. Go to feed about 20 cm of this manual. Step 4 Remove the journal takeup reel from the cash register. Step 3 Cut the journal paper at the point where nothing is printed. Step...
Owners Manual
Page 85
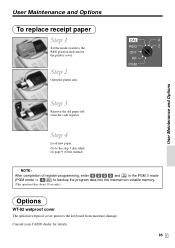
Go to the REG position and remove the printer cover. User Maintenance and Options To replace receipt paper Step 1 Set the mode switch to the step 3 described on page 9 of register programming, enter 6200 and s in the PGM 3 mode (PGM mode ⇒ 3s) to ...wetproof cover The optional wetproof cover protects the keyboard from the cash register. CAL X REG Z OFF RF PGM User Maintenance and Options Step 3 Remove the old paper roll from moisture damage. Consult your CASIO dealer for details. 85 E Step 4 Load new paper. NOTE: After completion of this manual. Step 2 Open...
Go to the REG position and remove the printer cover. User Maintenance and Options To replace receipt paper Step 1 Set the mode switch to the step 3 described on page 9 of register programming, enter 6200 and s in the PGM 3 mode (PGM mode ⇒ 3s) to ...wetproof cover The optional wetproof cover protects the keyboard from the cash register. CAL X REG Z OFF RF PGM User Maintenance and Options Step 3 Remove the old paper roll from moisture damage. Consult your CASIO dealer for details. 85 E Step 4 Load new paper. NOTE: After completion of this manual. Step 2 Open...
Owners Manual
Page 86
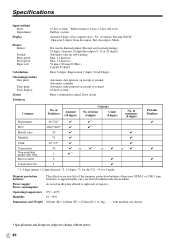
...design are subject to right side of register. 0°C ~ 40°C 10 ~ 90% 291mm (H) × 410mm (W) × 474mm (D) / 11.2kg ......... Specifications Input method Entry: Department: Display Printer Printer: Journal: Print speed: Feed speed: Paper roll: Calculations Chronological data Date print: Time ...58 mm × 80 mm Ø (Max.) CASIO P-5880T Entry 8 digits; of the memory protection batteries (three new SUM-3 or UM-3 type batteries) is approximately one year from installation into the machine. of customers (4 digits) Department 96*3/24*4 ✔ ✔ *1 PLU 1600*3/800...
...design are subject to right side of register. 0°C ~ 40°C 10 ~ 90% 291mm (H) × 410mm (W) × 474mm (D) / 11.2kg ......... Specifications Input method Entry: Department: Display Printer Printer: Journal: Print speed: Feed speed: Paper roll: Calculations Chronological data Date print: Time ...58 mm × 80 mm Ø (Max.) CASIO P-5880T Entry 8 digits; of the memory protection batteries (three new SUM-3 or UM-3 type batteries) is approximately one year from installation into the machine. of customers (4 digits) Department 96*3/24*4 ✔ ✔ *1 PLU 1600*3/800...

Owners Manual
Page 88
Index N negative department 57, 59, 60 no sale 20, 21, 42 non-add 21, 36 non-add/no sale key 20 non-resettable ... received on account 21, 39 reduction (minus) 20, 33 refund (return) 37, 38 refund key 20 refund mode 17 REG mode 17 register mode 17 repeat 19, 26, 30 report descriptor 50 report title 50, 51 reset mode 17 reset report 43, 72, 74, 75, ...76, 77 reset the consecutive number 47 return 37, 38 RF mode 17 roll paper installation 9 roll paper specification 86 S shift key 55 single item sale 25, 57, 58, 60, 61, 62 skip zero total lines 48 space key 55...
Index N negative department 57, 59, 60 no sale 20, 21, 42 non-add 21, 36 non-add/no sale key 20 non-resettable ... received on account 21, 39 reduction (minus) 20, 33 refund (return) 37, 38 refund key 20 refund mode 17 REG mode 17 register mode 17 repeat 19, 26, 30 report descriptor 50 report title 50, 51 reset mode 17 reset report 43, 72, 74, 75, ...76, 77 reset the consecutive number 47 return 37, 38 RF mode 17 roll paper installation 9 roll paper specification 86 S shift key 55 single item sale 25, 57, 58, 60, 61, 62 skip zero total lines 48 space key 55...


