
User Guide
Page 8
... you sound notes on both this keyboard and the connected device by playing on this keyboard. ❐ Microphone jack ( LK-45/46 Only ) • Connect a commercially available microphone and you can sing along practice. ❐ 3-Step Lesson System • Develop your musical skills by watching the keys light as they light. E-6 640A-E-008C Main Features ❐...
... you sound notes on both this keyboard and the connected device by playing on this keyboard. ❐ Microphone jack ( LK-45/46 Only ) • Connect a commercially available microphone and you can sing along practice. ❐ 3-Step Lesson System • Develop your musical skills by watching the keys light as they light. E-6 640A-E-008C Main Features ❐...

User Guide
Page 9
... the left hand part E-28 MIDI E-29 What is MIDI E-29 General MIDI E-29 Technical Reference E-32 Troubleshooting E-32 Specifications E-34 Care of Your Keyboard ....... E-35 Appendix A-1 GM Tone Map List A-1 Rhythm List A-2 Fingered Chord Charts A-3 MIDI Implementation Chart 640A-E-009C E-7 Contents Safety Precautions E-1 Main ...Auto Power Off E-13 Power On Alert E-13 Connections E-14 Phones/Output Jack E-14 Sustain Jack E-14 Using the Microphone Jack (LK-45/46 Only E-14 Basic Operations E-15 To switch power on and off E-15 To change tones E-15 Other Useful Functions ...
... the left hand part E-28 MIDI E-29 What is MIDI E-29 General MIDI E-29 Technical Reference E-32 Troubleshooting E-32 Specifications E-34 Care of Your Keyboard ....... E-35 Appendix A-1 GM Tone Map List A-1 Rhythm List A-2 Fingered Chord Charts A-3 MIDI Implementation Chart 640A-E-009C E-7 Contents Safety Precautions E-1 Main ...Auto Power Off E-13 Power On Alert E-13 Connections E-14 Phones/Output Jack E-14 Sustain Jack E-14 Using the Microphone Jack (LK-45/46 Only E-14 Basic Operations E-15 To switch power on and off E-15 To change tones E-15 Other Useful Functions ...

User Guide
Page 11
... buttons 7 : VOICE button : SPEAK button 8 KEY LIGHT button 9 Display 0 PART SELECT button A TONE button B RHYTHM button C ONE KEY PLAY buttons D SONG BANK button E Number buttons F DEMO button G 3-STEP LESSON buttons H TRANSPOSE/TUNE/LOCAL CONTROL operation guide I LK-45/46 P MIC jack Q MIC VOLUME knob * ...Rear Panel T UV RS R MIDI OUT terminal S MIDI IN terminal T SUSTAIN jack U DC 9V jack V PHONES/OUTPUT jack For connection of the keyboard as shown in the illustration. 640A-E-011C E-9...
... buttons 7 : VOICE button : SPEAK button 8 KEY LIGHT button 9 Display 0 PART SELECT button A TONE button B RHYTHM button C ONE KEY PLAY buttons D SONG BANK button E Number buttons F DEMO button G 3-STEP LESSON buttons H TRANSPOSE/TUNE/LOCAL CONTROL operation guide I LK-45/46 P MIC jack Q MIC VOLUME knob * ...Rear Panel T UV RS R MIDI OUT terminal S MIDI IN terminal T SUSTAIN jack U DC 9V jack V PHONES/OUTPUT jack For connection of the keyboard as shown in the illustration. 640A-E-011C E-9...
User Guide
Page 12
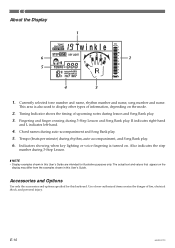
Indicators showing when key lighting or voice fingering is also used to display other types of information, depending on the mode. 2. Use of non-authorized items creates the danger of ... and name, rhythm number and name, song number and name. This area is turned on the display may differ from the examples shown in this keyboard. E-10 640A-E-012C Fingering and finger crossing during rhythm, auto-accompaniment, and Song Bank play . Tempo (beats per minute) during 3-Step Lesson and Song Bank...
Indicators showing when key lighting or voice fingering is also used to display other types of information, depending on the mode. 2. Use of non-authorized items creates the danger of ... and name, rhythm number and name, song number and name. This area is turned on the display may differ from the examples shown in this keyboard. E-10 640A-E-012C Fingering and finger crossing during rhythm, auto-accompaniment, and Song Bank play . Tempo (beats per minute) during 3-Step Lesson and Song Bank...

User Guide
Page 13
...you press. The keys that you need to press first flash. • Play in accordance with the fingerings that appear on the keyboard, pressing keys as they light. • Keep the key depressed as long as it stays lit. • If you selected any song from number 85 through... to the next note you need to play in time with the melody. • With Step 1, the correct melody note is played no matter which keyboard key you want to play will flash. • A f t e r y o u p re s s t h e c o r r e c t m e l o d y k e y, accompaniment proceeds to the next note. 640A-E-013A Fingering E-11 Play ...
...you press. The keys that you need to press first flash. • Play in accordance with the fingerings that appear on the keyboard, pressing keys as they light. • Keep the key depressed as long as it stays lit. • If you selected any song from number 85 through... to the next note you need to play in time with the melody. • With Step 1, the correct melody note is played no matter which keyboard key you want to play will flash. • A f t e r y o u p re s s t h e c o r r e c t m e l o d y k e y, accompaniment proceeds to the next note. 640A-E-013A Fingering E-11 Play ...

User Guide
Page 14
... be powered by current from a standard household wall outlet (using the specified AC adaptor) or by incineration. • Never mix old batteries with the keyboard volume at a medium setting. Temperature extremes or playing at normal temperature, with new ones. • Never mix batteries of different types.... not plan to heat or dispose of them by batteries. Always make sure you turn off whenever you use it . Load 6 AA-size batteries into the holes provided and close the cover. Important Battery Information I Any of the above values are specified for this product. &#...
... be powered by current from a standard household wall outlet (using the specified AC adaptor) or by incineration. • Never mix old batteries with the keyboard volume at a medium setting. Temperature extremes or playing at normal temperature, with new ones. • Never mix batteries of different types.... not plan to heat or dispose of them by batteries. Always make sure you turn off whenever you use it . Load 6 AA-size batteries into the holes provided and close the cover. Important Battery Information I Any of the above values are specified for this product. &#...

User Guide
Page 15
... modify the cord or subject it to the touch. Power On Alert Keyboard keys light to alert you if you observe the following precautions. • Be sure to use only ...; Should the electric cord or plug become warm to become damaged, contact your original retailer or authorized CASIO Service Provider. • Never touch the AC adaptor while your hands are using the AC adaptor. ... When this happens, move the POWER/MODE selector to the OFF position and then back to NORMAL, CASIO CHORD, or FINGERED to clear the power on alert. ❚ NOTE • Power on without performing...
... modify the cord or subject it to the touch. Power On Alert Keyboard keys light to alert you if you observe the following precautions. • Be sure to use only ...; Should the electric cord or plug become warm to become damaged, contact your original retailer or authorized CASIO Service Provider. • Never touch the AC adaptor while your hands are using the AC adaptor. ... When this happens, move the POWER/MODE selector to the OFF position and then back to NORMAL, CASIO CHORD, or FINGERED to clear the power on alert. ❚ NOTE • Power on without performing...

User Guide
Page 16
... available connecting cord to connect the keyboard to a musical instrument amplifier. ❚ NOTE • Be sure to use a commercially available microphone that has standard plugs on the microphone's ON/OFF switch. 3. SUSTAIN jack SP-20 Sustain Pedal • With piano tones, depressing the pedal causes notes...Phones/Output Jack Before connecting headphones or other end. Using the Microphone Jack (LK-45/46 Only) Connecting a commercially available microphone* to sing along with the keyboard's builtin tunes or with a standard plug on one end and two PIN plugs on the "MIN" side....
... available connecting cord to connect the keyboard to a musical instrument amplifier. ❚ NOTE • Be sure to use a commercially available microphone that has standard plugs on the microphone's ON/OFF switch. 3. SUSTAIN jack SP-20 Sustain Pedal • With piano tones, depressing the pedal causes notes...Phones/Output Jack Before connecting headphones or other end. Using the Microphone Jack (LK-45/46 Only) Connecting a commercially available microphone* to sing along with the keyboard's builtin tunes or with a standard plug on one end and two PIN plugs on the "MIN" side....
User Guide
Page 17
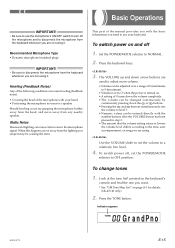
... a range of the manual provides you with the basic information you want. * See "GM Tone Map List" on page A-1 for details (LK-45/46 only). 2. Indicator appears Gr andPno 640A-E-017C E-15 Use the VOLUME slider to set the POWER/MODE selector to a relatively low level... . To switch power off 1. Press the keyboard keys. 3. Recommended Microphone Type • Dynamic microphone (standard plug) IMPORTANT! • Be sure to a speaker Should howling occur, try grasping the microphone further away from the head, and move away from the lighting you are not using . To change tones ...
... a range of the manual provides you with the basic information you want. * See "GM Tone Map List" on page A-1 for details (LK-45/46 only). 2. Indicator appears Gr andPno 640A-E-017C E-15 Use the VOLUME slider to set the POWER/MODE selector to a relatively low level... . To switch power off 1. Press the keyboard keys. 3. Recommended Microphone Type • Dynamic microphone (standard plug) IMPORTANT! • Be sure to a speaker Should howling occur, try grasping the microphone further away from the head, and move away from the lighting you are not using . To change tones ...

User Guide
Page 18
...and it is depressed, the tone does not change until you release the key and press a keyboard key again. • With certain tones (such as shown below. E-16 640A-E-018C BASS/PIANO (No.90) BASS PIANO SONG BANK Number buttons PERCUSSION (No.99) • PERCUSSION (Tone 99) assigns 35 percussion... quality, samples are taken in volume or sound quality for some tones when you change at different positions on the right of malfunction. [LK-45/46] VOLUME TEMPO TONE RHYTHM VOLUME POWER/MODE 3. If you enter only one digit, the display will automatically return to select. ...
...and it is depressed, the tone does not change until you release the key and press a keyboard key again. • With certain tones (such as shown below. E-16 640A-E-018C BASS/PIANO (No.90) BASS PIANO SONG BANK Number buttons PERCUSSION (No.99) • PERCUSSION (Tone 99) assigns 35 percussion... quality, samples are taken in volume or sound quality for some tones when you change at different positions on the right of malfunction. [LK-45/46] VOLUME TEMPO TONE RHYTHM VOLUME POWER/MODE 3. If you enter only one digit, the display will automatically return to select. ...

User Guide
Page 19
... BANK indicator is reduced. While in semitone increments. Other Useful Functions To change the key of the keyboard The transpose feature of this keyboard lets you tune the keyboard to another musical instrument. 1. This means you can easily match to suit someone's voice, and you press the DEMO...• The transpose setting is automatically set to C(0) whenever you can eliminate sharps and flats from music making it is one time, only the last four keyboard keys pressed light up to 12 notes at the same time. Polyphony The term polyphony refers to the maximum number of...
... BANK indicator is reduced. While in semitone increments. Other Useful Functions To change the key of the keyboard The transpose feature of this keyboard lets you tune the keyboard to another musical instrument. 1. This means you can easily match to suit someone's voice, and you press the DEMO...• The transpose setting is automatically set to C(0) whenever you can eliminate sharps and flats from music making it is one time, only the last four keyboard keys pressed light up to 12 notes at the same time. Polyphony The term polyphony refers to the maximum number of...

User Guide
Page 20
... the keyboard while a demo tune is being played. • VOLUME buttons/ VOLUME slider • Number buttons • START/STOP button • POWER/MODE selector (OFF) • DEMO button • KEY LIGHT button • VOICE button • You cannot change the tuning of the demo tune ...the number buttons to 00. • The tuning operation does not affect rhythm (99 PERCUSSION). START/STOP TEMPO RHYTHM DEMO POWER/MODE 2. Keyboard keys light to 00 whenever you select. You can set up for about five seconds without doing anything, the screen is automatically cleared. • ...
... the keyboard while a demo tune is being played. • VOLUME buttons/ VOLUME slider • Number buttons • START/STOP button • POWER/MODE selector (OFF) • DEMO button • KEY LIGHT button • VOICE button • You cannot change the tuning of the demo tune ...the number buttons to 00. • The tuning operation does not affect rhythm (99 PERCUSSION). START/STOP TEMPO RHYTHM DEMO POWER/MODE 2. Keyboard keys light to 00 whenever you select. You can set up for about five seconds without doing anything, the screen is automatically cleared. • ...

User Guide
Page 21
...digit value with one accompaniment key, it possible to the standard value of the TEMPO buttons changes the tempo setting at high speed. • To reset the tempo to play . To stop rhythm play of 040 to NORMAL. About the accompaniment keyboard The lower (left) 1.5 octaves are white or black...buttons to adjust the tempo of the rhythm. • Each time you press one of chords is called the melody keyboard. As you play . Using the CASIO CHORD system The CASIO CHORD system lets you normally do , the selected rhythm starts to another rhythm even while the current rhythm is marked...
...digit value with one accompaniment key, it possible to the standard value of the TEMPO buttons changes the tempo setting at high speed. • To reset the tempo to play . To stop rhythm play of 040 to NORMAL. About the accompaniment keyboard The lower (left) 1.5 octaves are white or black...buttons to adjust the tempo of the rhythm. • Each time you press one of chords is called the melody keyboard. As you play . Using the CASIO CHORD system The CASIO CHORD system lets you normally do , the selected rhythm starts to another rhythm even while the current rhythm is marked...

User Guide
Page 22
...; If you want to produce 7, m7, M7, add9, madd9, and mM7 chords. Select an auto-rhythm as the root. Using standard fingerings The FINGERED mode lets you can omit the fifth notes (which are shown inside parentheses in your chord progression. 6. E-20 640A-E-...POWER/MODE selector to play a wider variety of the accompaniment keyboard keys. Press either one or up to four keys on the accompaniment keyboard, and the corresponding accompaniment starts to play a rhythm" on the accompaniment keyboard to select CASIO CHORD. 2. SYNCHRO/FILL-IN START/STOP POWER/MODE To play...
...; If you want to produce 7, m7, M7, add9, madd9, and mM7 chords. Select an auto-rhythm as the root. Using standard fingerings The FINGERED mode lets you can omit the fifth notes (which are shown inside parentheses in your chord progression. 6. E-20 640A-E-...POWER/MODE selector to play a wider variety of the accompaniment keyboard keys. Press either one or up to four keys on the accompaniment keyboard, and the corresponding accompaniment starts to play a rhythm" on the accompaniment keyboard to select CASIO CHORD. 2. SYNCHRO/FILL-IN START/STOP POWER/MODE To play...

User Guide
Page 23
...one or two notes only in rhythm by pressing the SYNCHRO/ FILL-IN button while an auto-rhythm plays. Select an auto-rhythm. 3. Accompaniment keyboard • See the "Fingered Chord Charts" on page A-3 for example, produces the same C chord. Note that do , the autoaccompaniment pattern ... auto-accompaniment 1. Press the SYNCHRO/FILL-IN button. 4. The FINGERED mode requires a conventional three or four-note chord formation to the CASIO CHORD or FINGERED position. 2. Using Synchro start You can also use synchro start the rhythm and accompaniment pattern at the same time, with...
...one or two notes only in rhythm by pressing the SYNCHRO/ FILL-IN button while an auto-rhythm plays. Select an auto-rhythm. 3. Accompaniment keyboard • See the "Fingered Chord Charts" on page A-3 for example, produces the same C chord. Note that do , the autoaccompaniment pattern ... auto-accompaniment 1. Press the SYNCHRO/FILL-IN button. 4. The FINGERED mode requires a conventional three or four-note chord formation to the CASIO CHORD or FINGERED position. 2. Using Synchro start You can also use synchro start the rhythm and accompaniment pattern at the same time, with...
User Guide
Page 24
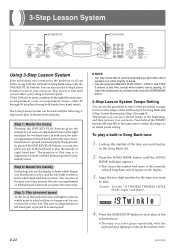
... • You may not be able to press. Step 2: Master the melody In this step, you use the display to learn which keyboard keys to see the keyboard keys light under direct sunlight or in Song Bank tune 1. To play . Input the two digit number for Song Bank and 3-Step Lesson System play... use the 3-Step Lesson System to play (Step 1 through 99 are able to play along with the following 3step lesson plan to master keyboard play , and the key light system to learn which notes to play . In place of the TEMPO buttons ( and ) at the beginning, and then increase it as you...
... • You may not be able to press. Step 2: Master the melody In this step, you use the display to learn which keyboard keys to see the keyboard keys light under direct sunlight or in Song Bank tune 1. To play . Input the two digit number for Song Bank and 3-Step Lesson System play... use the 3-Step Lesson System to play (Step 1 through 99 are able to play along with the following 3step lesson plan to master keyboard play , and the key light system to learn which notes to play . In place of the TEMPO buttons ( and ) at the beginning, and then increase it as you...

User Guide
Page 25
...8226; If you input the wrong first digit for playing the notes below with the FINGERED setting (page E-20). Key Lighting System Operation and Display Contents During Song Bank Play Keyboard keys light to show you have to cross fingers to play , press the START/ STOP button again. 6. At the same time,... Song Bank tune is disabled in which direction your fingers should cross under the index finger. Key Lighting During Song Bank Play When you want to play back a Song Bank tune, keyboard keys light to the normal mode first. If you play a rhythm, press the SONG BANK button to return...
...8226; If you input the wrong first digit for playing the notes below with the FINGERED setting (page E-20). Key Lighting System Operation and Display Contents During Song Bank Play Keyboard keys light to show you have to cross fingers to play , press the START/ STOP button again. 6. At the same time,... Song Bank tune is disabled in which direction your fingers should cross under the index finger. Key Lighting During Song Bank Play When you want to play back a Song Bank tune, keyboard keys light to the normal mode first. If you play a rhythm, press the SONG BANK button to return...

User Guide
Page 26
... and off Use the VOICE button (SPEAK button on the LK-45/46) to turn off and back on and off momentarily between the notes and lights again for each successive note. Voice fingering guide indicator Key light Flash Lit Flash Lit Lit Flash E-24 640A-E-026C Series ...when you the fingerings. In the case of Same Pitch Notes The keyboard key light turns off . Voice Fingering Guide Voice fingering guide uses a simulated human voice to be pressed lights. VOICE SPEAK TONE KEY LIGHT Key Lighting System Operation and Display Contents During 3-step Lesson Play Whenever you select...
... and off Use the VOICE button (SPEAK button on the LK-45/46) to turn off and back on and off momentarily between the notes and lights again for each successive note. Voice fingering guide indicator Key light Flash Lit Flash Lit Lit Flash E-24 640A-E-026C Series ...when you the fingerings. In the case of Same Pitch Notes The keyboard key light turns off . Voice Fingering Guide Voice fingering guide uses a simulated human voice to be pressed lights. VOICE SPEAK TONE KEY LIGHT Key Lighting System Operation and Display Contents During 3-step Lesson Play Whenever you select...

User Guide
Page 27
...• The above procedure can be anywhere from an eight note to a 32nd off . • Press the KEY LIGHT button again to turn key lighting back on the keyboard to stop the sustained note. 640A-E-027A E-25 Upcoming note timing Note played here • Each two-segment block can ... BANK button is currently assigned to the keyboard. 2. Timing is already in the currently selected part (R or L). Press the KEY LIGHT button. • The KEY LIGHT indicator disappears when the key light system is the same one or more notes, depending on the keyboard. Input a value to select the tone...
...• The above procedure can be anywhere from an eight note to a 32nd off . • Press the KEY LIGHT button again to turn key lighting back on the keyboard to stop the sustained note. 640A-E-027A E-25 Upcoming note timing Note played here • Each two-segment block can ... BANK button is currently assigned to the keyboard. 2. Timing is already in the currently selected part (R or L). Press the KEY LIGHT button. • The KEY LIGHT indicator disappears when the key light system is the same one or more notes, depending on the keyboard. Input a value to select the tone...

User Guide
Page 28
... plays the correct melody (right hand part) note. • Pressing more than one key at any of the keyboard keys to be played flashes, and lights when you play each note of the tune. • The accompaniment (left hand) part of the tune. E-26 640A-E-028A You do , the STEP 1 indicator... goes out. Tw i nk l e ONE KEY PLAY STEP 2 The correct note is counted as you play the melody (right hand) part. • The keyboard key...
... plays the correct melody (right hand part) note. • Pressing more than one key at any of the keyboard keys to be played flashes, and lights when you play each note of the tune. • The accompaniment (left hand) part of the tune. E-26 640A-E-028A You do , the STEP 1 indicator... goes out. Tw i nk l e ONE KEY PLAY STEP 2 The correct note is counted as you play the melody (right hand) part. • The keyboard key...


