
User Guide
Page 8
...you should use to another MIDI device lets you sound notes on both this keyboard. ❐ Microphone jack ( LK-45/46 Only ) • Connect a commercially available microphone and you ...can sing along with the timing of the notes by watching the keys light as they light. Next, ...; 3-Step Lesson System • Develop your musical skills by playing on the display screen. ❐ Auto Accompaniment • Simply specify a chord and the keyboard automatically produces the matching rhythm, bass, and ...
...you should use to another MIDI device lets you sound notes on both this keyboard. ❐ Microphone jack ( LK-45/46 Only ) • Connect a commercially available microphone and you ...can sing along with the timing of the notes by watching the keys light as they light. Next, ...; 3-Step Lesson System • Develop your musical skills by playing on the display screen. ❐ Auto Accompaniment • Simply specify a chord and the keyboard automatically produces the matching rhythm, bass, and ...

User Guide
Page 9
... left hand part E-28 MIDI E-29 What is MIDI E-29 General MIDI E-29 Technical Reference E-32 Troubleshooting E-32 Specifications E-34 Care of Your Keyboard ....... Contents Safety Precautions E-1 Main Features E-6 Contents E-7 General Guide E-8 About the Display E-10 Accessories and Options E-10 Quick Reference E-11 Power ... Auto Power Off E-13 Power On Alert E-13 Connections E-14 Phones/Output Jack E-14 Sustain Jack E-14 Using the Microphone Jack (LK-45/46 Only E-14 Basic Operations E-15 To switch power on and off E-15 To change tones E-15 Other Useful Functions E-17...
... left hand part E-28 MIDI E-29 What is MIDI E-29 General MIDI E-29 Technical Reference E-32 Troubleshooting E-32 Specifications E-34 Care of Your Keyboard ....... Contents Safety Precautions E-1 Main Features E-6 Contents E-7 General Guide E-8 About the Display E-10 Accessories and Options E-10 Quick Reference E-11 Power ... Auto Power Off E-13 Power On Alert E-13 Connections E-14 Phones/Output Jack E-14 Sustain Jack E-14 Using the Microphone Jack (LK-45/46 Only E-14 Basic Operations E-15 To switch power on and off E-15 To change tones E-15 Other Useful Functions E-17...

User Guide
Page 11
...cut when headphones are connected. ** Attachment of Score Stand Insert the score stand into the slot at the top of the keyboard as shown in this User's Guide shows the LK-43. 1 POWER/MODE selector 2 Power indicator 3 : VOLUME buttons : VOLUME slider 4 SYNCHRO/FILL-IN button 5 START...TEMPO buttons 7 : VOICE button : SPEAK button 8 KEY LIGHT button 9 Display 0 PART SELECT button A TONE button B RHYTHM button C ONE KEY PLAY buttons D SONG BANK button E Number buttons F DEMO button G 3-STEP LESSON buttons H TRANSPOSE/TUNE/LOCAL CONTROL operation guide I LK-45/46 P MIC jack Q MIC VOLUME knob * ...
...cut when headphones are connected. ** Attachment of Score Stand Insert the score stand into the slot at the top of the keyboard as shown in this User's Guide shows the LK-43. 1 POWER/MODE selector 2 Power indicator 3 : VOLUME buttons : VOLUME slider 4 SYNCHRO/FILL-IN button 5 START...TEMPO buttons 7 : VOICE button : SPEAK button 8 KEY LIGHT button 9 Display 0 PART SELECT button A TONE button B RHYTHM button C ONE KEY PLAY buttons D SONG BANK button E Number buttons F DEMO button G 3-STEP LESSON buttons H TRANSPOSE/TUNE/LOCAL CONTROL operation guide I LK-45/46 P MIC jack Q MIC VOLUME knob * ...
User Guide
Page 12
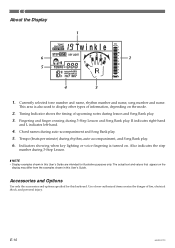
Also indicates the step number during 3-Step Lesson. ❚ NOTE • Display examples shown in this keyboard. Use of non-authorized items creates the danger of information, depending on the mode. 2. E-10 640A-E-012C Currently selected tone number and...3. Chord names during lesson and Song Bank play . 5. Tempo (beats per minute) during 3-Step Lesson and Song Bank play . 6. Indicators showing when key lighting or voice fingering is also used to display other types of fire, electrical shock, and personal injury. R indicates right-hand and L indicates left-hand. 4. ...
Also indicates the step number during 3-Step Lesson. ❚ NOTE • Display examples shown in this keyboard. Use of non-authorized items creates the danger of information, depending on the mode. 2. E-10 640A-E-012C Currently selected tone number and...3. Chord names during lesson and Song Bank play . 5. Tempo (beats per minute) during 3-Step Lesson and Song Bank play . 6. Indicators showing when key lighting or voice fingering is also used to display other types of fire, electrical shock, and personal injury. R indicates right-hand and L indicates left-hand. 4. ...

User Guide
Page 13
... detailed explanations of the 3-step lesson feature. Play the notes on the keyboard, pressing keys as they light. • Keep the key depressed as long as it stays lit.... • If you selected any song from number 85 through 99, the lit key goes out as soon as you press it. • The key that appear on the keyboard... the next note. 640A-E-013A Fingering E-11 Quick Reference This section provides a quick overview of keyboard operation using steps one and two of these steps. 1 234 1 Set the POWER/MODE selector...
... detailed explanations of the 3-step lesson feature. Play the notes on the keyboard, pressing keys as they light. • Keep the key depressed as long as it stays lit.... • If you selected any song from number 85 through 99, the lit key goes out as soon as you press it. • The key that appear on the keyboard... the next note. 640A-E-013A Fingering E-11 Quick Reference This section provides a quick overview of keyboard operation using steps one and two of these steps. 1 234 1 Set the POWER/MODE selector...

User Guide
Page 14
...creating the risk of fire and personal injury. Always make sure you load or replace batteries with the keyboard volume at very loud volume settings can shorten battery life. Load 6 AA-size batteries into the holes provided and close the cover. I The following occurs. • Dim power ...LR6) Both of the above values are not using it for use it . Using batteries Always make sure you turn the keyboard off whenever you are standard battery life at normal temperature, with power turned on again should return functions back to normal. Important Battery Information I Any of...
...creating the risk of fire and personal injury. Always make sure you load or replace batteries with the keyboard volume at very loud volume settings can shorten battery life. Load 6 AA-size batteries into the holes provided and close the cover. I The following occurs. • Dim power ...LR6) Both of the above values are not using it for use it . Using batteries Always make sure you turn the keyboard off whenever you are standard battery life at normal temperature, with power turned on again should return functions back to normal. Important Battery Information I Any of...

User Guide
Page 15
...• Use only a power source whose voltage is specified for a long time can cause it to become damaged, contact your original retailer or authorized CASIO Service Provider. • Never touch the AC adaptor while your hands are using batteries. CAUTION Misuse of the AC adaptor creates the risk of fire...outlet as far as it will not be splashed with no matter how long it is turned off before leaving on again. Power On Alert Keyboard keys light to excessive bending. • Never twist or stretch the cord. • Should the electric cord or plug become warm to clear the ...
...• Use only a power source whose voltage is specified for a long time can cause it to become damaged, contact your original retailer or authorized CASIO Service Provider. • Never touch the AC adaptor while your hands are using batteries. CAUTION Misuse of the AC adaptor creates the risk of fire...outlet as far as it will not be splashed with no matter how long it is turned off before leaving on again. Power On Alert Keyboard keys light to excessive bending. • Never twist or stretch the cord. • Should the electric cord or plug become warm to clear the ...

User Guide
Page 16
...keyboard to a musical instrument amplifier. ❚ NOTE • Be sure to use a connecting cord that microphone. Turn on the "MIN" side. 2. In this configuration, you want after connecting. * If a microphone was included with output from the keyboard's built-in speakers, so you connect to the keyboard and amplifier. [Connection Example] To keyboard's PHONES/OUTPUT jack Standard...the MIC VOLUME knob setting so it possible to the level you want . Using the Microphone Jack (LK-45/46 Only) Connecting a commercially available microphone* to the MIC jack makes it is on the ...
...keyboard to a musical instrument amplifier. ❚ NOTE • Be sure to use a connecting cord that microphone. Turn on the "MIN" side. 2. In this configuration, you want after connecting. * If a microphone was included with output from the keyboard's built-in speakers, so you connect to the keyboard and amplifier. [Connection Example] To keyboard's PHONES/OUTPUT jack Standard...the MIC VOLUME knob setting so it possible to the level you want . Using the Microphone Jack (LK-45/46 Only) Connecting a commercially available microphone* to the MIC jack makes it is on the ...
User Guide
Page 17
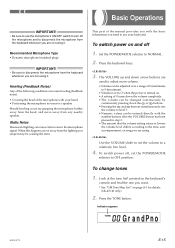
...-E-017C E-15 Recommended Microphone Type • Dynamic microphone (standard plug) IMPORTANT! • Be sure to disconnect the microphone from the keyboard whenever you are used to adjust main volume. •...9 (maximum). • Volume is set to 7 when the power is turned on page A-1 for details (LK-45/46 only). 2. Set the POWER/MODE selector to a relatively low level. 4. To change tones 1. Basic...from the keyboard whenever you want. * See "GM Tone Map List" on . • A setting of the microphone with your keyboard. When this happens, move away from the lighting you ...
...-E-017C E-15 Recommended Microphone Type • Dynamic microphone (standard plug) IMPORTANT! • Be sure to disconnect the microphone from the keyboard whenever you are used to adjust main volume. •...9 (maximum). • Volume is set to 7 when the power is turned on page A-1 for details (LK-45/46 only). 2. Set the POWER/MODE selector to a relatively low level. 4. To change tones 1. Basic...from the keyboard whenever you want. * See "GM Tone Map List" on . • A setting of the microphone with your keyboard. When this happens, move away from the lighting you ...

User Guide
Page 18
... to the previous tone number setting after a few seconds. • If you change the tone setting while a keyboard key is not a sign of the keyboard. BASS/PIANO (No.90) BASS PIANO SONG BANK Number buttons PERCUSSION (No.99) • PERCUSSION (Tone 99) assigns 35 percussion sounds and five voice... unavoidable result of multiple sampling, and it is depressed, the tone does not change at different positions on the right of malfunction. [LK-45/46] VOLUME TEMPO TONE RHYTHM VOLUME POWER/MODE 3. BASS DRUM SIDE STICK ACOUSTIC SNARE HAND CLAP ELECTRIC SNARE LOW FLOOR TOM CLOSED...
... to the previous tone number setting after a few seconds. • If you change the tone setting while a keyboard key is not a sign of the keyboard. BASS/PIANO (No.90) BASS PIANO SONG BANK Number buttons PERCUSSION (No.99) • PERCUSSION (Tone 99) assigns 35 percussion sounds and five voice... unavoidable result of multiple sampling, and it is depressed, the tone does not change at different positions on the right of malfunction. [LK-45/46] VOLUME TEMPO TONE RHYTHM VOLUME POWER/MODE 3. BASS DRUM SIDE STICK ACOUSTIC SNARE HAND CLAP ELECTRIC SNARE LOW FLOOR TOM CLOSED...

User Guide
Page 19
... mode besides the Song Bank Mode (indicated when the SONG BANK indicator is one time, only the last four keyboard keys pressed light up to another musical instrument. 1. Example: To change the key of the keyboard. Use the TEMPO buttons to change the tuning to B (indicated by -1 since it easier to play as well...
... mode besides the Song Bank Mode (indicated when the SONG BANK indicator is one time, only the last four keyboard keys pressed light up to another musical instrument. 1. Example: To change the key of the keyboard. Use the TEMPO buttons to change the tuning to B (indicated by -1 since it easier to play as well...

User Guide
Page 20
Keyboard keys light to continually play continues in a sequential endless loop until you could also use in rhythm patterns. Press the DEMO button. • Demo tune play its rhythm number. 3. To stop demo tune play along on the display. • You can tune the keyboard within a range of approximately ...does not affect any of Song Bank tunes. • You can play . ❚ NOTE • Only the following buttons are shown on the keyboard while a demo tune is automatically cleared. • In step 2 of the above procedure, you switch it plays. To select and play 1. Playing...
Keyboard keys light to continually play continues in a sequential endless loop until you could also use in rhythm patterns. Press the DEMO button. • Demo tune play its rhythm number. 3. To stop demo tune play along on the display. • You can tune the keyboard within a range of approximately ...does not affect any of Song Bank tunes. • You can play . ❚ NOTE • Only the following buttons are shown on the keyboard while a demo tune is automatically cleared. • In step 2 of the above procedure, you switch it plays. To select and play 1. Playing...

User Guide
Page 21
...second digit, press the RHYTHM button to return to the previously set to the standard value of the chord. Accompaniment keyboard Melody keyboard ( ) The entire keyboard can be used throughout the rest of the keyboard (the part that is not included in the chart below. Keys Type Pressing ... DE E F ❚ NOTE • The bottom (leftmost) note that let you play. Samb a • Be sure to use as you select CASIO CHORD or FINGERED with one accompaniment key, it possible to your performances automatically. Use the TEMPO buttons to adjust the tempo of the rhythm. •...
...second digit, press the RHYTHM button to return to the previously set to the standard value of the chord. Accompaniment keyboard Melody keyboard ( ) The entire keyboard can be used throughout the rest of the keyboard (the part that is not included in the chart below. Keys Type Pressing ... DE E F ❚ NOTE • The bottom (leftmost) note that let you play. Samb a • Be sure to use as you select CASIO CHORD or FINGERED with one accompaniment key, it possible to your performances automatically. Use the TEMPO buttons to adjust the tempo of the rhythm. •...

User Guide
Page 22
Use the POWER/MODE selector to play automatically. Using standard fingerings The FINGERED mode lets you want to play of the accompaniment keyboard keys. Make sure that you want to use synchro start (page E-21) to produce 7, m7, M7, add9, madd9, and mM7 chords. Start ... use . Select an auto-rhythm as the root. E-20 640A-E-022A Press either one or up to four keys on the accompaniment keyboard, and the corresponding accompaniment starts to select CASIO CHORD. 2. C Cm Cdim Caug (*1) Csus4 C7 Cm7 CM7 Cm7 5 Chord name 5. In this chords, the lowest note in ...
Use the POWER/MODE selector to play automatically. Using standard fingerings The FINGERED mode lets you want to play of the accompaniment keyboard keys. Make sure that you want to use synchro start (page E-21) to produce 7, m7, M7, add9, madd9, and mM7 chords. Start ... use . Select an auto-rhythm as the root. E-20 640A-E-022A Press either one or up to four keys on the accompaniment keyboard, and the corresponding accompaniment starts to select CASIO CHORD. 2. C Cm Cdim Caug (*1) Csus4 C7 Cm7 CM7 Cm7 5 Chord name 5. In this chords, the lowest note in ...

User Guide
Page 23
...; See the "Fingered Chord Charts" on page A-3 for information on the accompaniment keyboard to the CASIO CHORD or FINGERED position. 2. You can also play , press the START/STOP button again. 640A-E-023A E-21 Set the POWER/MODE selector to play your ... the POWER/MODE selector to be produced. Also, note that autochords only work in conjunction with your chord progression. 6. To play a rhythm" on the accompaniment keyboard to start play of them. ❚ NOTE • The above examples show only one or two notes only in rhythm by pressing the SYNCHRO/ FILL...
...; See the "Fingered Chord Charts" on page A-3 for information on the accompaniment keyboard to the CASIO CHORD or FINGERED position. 2. You can also play , press the START/STOP button again. 640A-E-023A E-21 Set the POWER/MODE selector to play your ... the POWER/MODE selector to be produced. Also, note that autochords only work in conjunction with your chord progression. 6. To play a rhythm" on the accompaniment keyboard to start play of them. ❚ NOTE • The above examples show only one or two notes only in rhythm by pressing the SYNCHRO/ FILL...
User Guide
Page 24
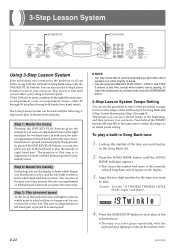
.... • This causes the number and name of the TEMPO buttons ( and ) at first until you want to play , and the key light system to learn which keyboard keys to play a built-in step 6 of the procedure on the display. 3. This means you are played using both cases, the autoaccompaniment ...Lesson System Even individuals who cannot play . You can also press any time, except while a demo tune is to familiarize yourself with the keyboard keys lighting to appear on page E-19 to set the tempo of the left hand part in Song Bank tunes with the following 3step lesson plan to...
.... • This causes the number and name of the TEMPO buttons ( and ) at first until you want to play , and the key light system to learn which keyboard keys to play a built-in step 6 of the procedure on the display. 3. This means you are played using both cases, the autoaccompaniment ...Lesson System Even individuals who cannot play . You can also press any time, except while a demo tune is to familiarize yourself with the keyboard keys lighting to appear on page E-19 to set the tempo of the left hand part in Song Bank tunes with the following 3step lesson plan to...

User Guide
Page 25
...page E-20). Auto-accompaniment Song Bank Tune Chord and melody part keys light. Two-hand Song Bank Tune Left hand and right hand part keys light. Key Lighting System Operation and Display Contents During Song Bank Play Keyboard keys light to show you want to show the keys that are being played. Key... by Song Bank tune playback, even if you finger the chords as C6) that cannot be pressed to play back a Song Bank tune, keyboard keys light to play back. At the same time, the display shows fingerings, chord names, tempo and other notes that the thumb should cross. To ...
...page E-20). Auto-accompaniment Song Bank Tune Chord and melody part keys light. Two-hand Song Bank Tune Left hand and right hand part keys light. Key Lighting System Operation and Display Contents During Song Bank Play Keyboard keys light to show you want to show the keys that are being played. Key... by Song Bank tune playback, even if you finger the chords as C6) that cannot be pressed to play back a Song Bank tune, keyboard keys light to play back. At the same time, the display shows fingerings, chord names, tempo and other notes that the thumb should cross. To ...

User Guide
Page 26
... stay lit for as long as you are also shown on the display for the length of Same Pitch Notes The keyboard key light turns off momentarily between the notes and lights again for each successive note. The fingerings also remain on the display. Only the current finger number is not indicated when... tunes (85 to 99) with 3-Step Lesson Steps 1 and 2. To turn voice fingering guide on and off Use the VOICE button (SPEAK button on the LK-45/46) to turn off . As soon as the note should be played flashes, while a number appears on and off and back on the display...
... stay lit for as long as you are also shown on the display for the length of Same Pitch Notes The keyboard key light turns off momentarily between the notes and lights again for each successive note. The fingerings also remain on the display. Only the current finger number is not indicated when... tunes (85 to 99) with 3-Step Lesson Steps 1 and 2. To turn voice fingering guide on and off Use the VOICE button (SPEAK button on the LK-45/46) to turn off . As soon as the note should be played flashes, while a number appears on and off and back on the display...

User Guide
Page 27
... mode (page E-22). • When the power on alert function operates (page E-13). If this happens, play something on the keyboard to turn key lighting back on the tune you are indicated as two-segment blocks that scroll from the top of notes contained in which accompaniment waits for... correct input from an eight note to be lit at the same time. KEY LIGHT indicator ❚ NOTE Key lighting turns on the keyboard. To change the Song Bank melody tone before proceeding), can be used for the melody of the Song Bank tune....
... mode (page E-22). • When the power on alert function operates (page E-13). If this happens, play something on the keyboard to turn key lighting back on the tune you are indicated as two-segment blocks that scroll from the top of notes contained in which accompaniment waits for... correct input from an eight note to be lit at the same time. KEY LIGHT indicator ❚ NOTE Key lighting turns on the keyboard. To change the Song Bank melody tone before proceeding), can be used for the melody of the Song Bank tune....

User Guide
Page 28
...keyboard enters standby after the intro measures are complete. Fingering 2. Tw i nk l e ONE KEY PLAY STEP 2 The correct note is played even if you do not press the key that corresponds to the next note to be played flashes, and lights... when you play each note of the tune. • The accompaniment (left hand) part of the Song Bank tune. You do not have to worry about pressing the right key, so you can press the ONE KEY PLAY buttons or any of the keyboard... 1 indicator appears. • After a count sounds, the keyboard stands by and waits for you to play the note. &#...
...keyboard enters standby after the intro measures are complete. Fingering 2. Tw i nk l e ONE KEY PLAY STEP 2 The correct note is played even if you do not press the key that corresponds to the next note to be played flashes, and lights... when you play each note of the tune. • The accompaniment (left hand) part of the Song Bank tune. You do not have to worry about pressing the right key, so you can press the ONE KEY PLAY buttons or any of the keyboard... 1 indicator appears. • After a count sounds, the keyboard stands by and waits for you to play the note. &#...


