User Guide
Page 6
...nearby dealer whenever you require servicing. • Note that the manufacturer shall not be held liable for any damages incurred as : • Variable tape sizes (6mm, 9mm, 12mm, 18mm, 24mm) • Attractive fonts (Sans-serif, Sans-serif-Italic, Sans-serif-rounded, Roman, Roman-Italic...sooner than normal. If printing becomes unclear, use of the CASIO KL-820 Label Printer. message to 95°F) • Battery capacity becomes lower at temperatures of its photo sensor. If this makes the CASIO Label Printer the perfect tool for future reference. Operating Precautions Observe the ...
...nearby dealer whenever you require servicing. • Note that the manufacturer shall not be held liable for any damages incurred as : • Variable tape sizes (6mm, 9mm, 12mm, 18mm, 24mm) • Attractive fonts (Sans-serif, Sans-serif-Italic, Sans-serif-rounded, Roman, Roman-Italic...sooner than normal. If printing becomes unclear, use of the CASIO KL-820 Label Printer. message to 95°F) • Battery capacity becomes lower at temperatures of its photo sensor. If this makes the CASIO Label Printer the perfect tool for future reference. Operating Precautions Observe the ...
User Guide
Page 7
... E-27 Bar Code Specifications E-27 Part 12 Creating and Printing a Tape Label with a Logo ....... E-28 Part 13 Memory E-29 Text Data E-29 Layout printing, Numbering, and Bar code Data E-30 Part 14 Configuring the Printer Setup E-31 Part 15 Reference E-32 Cleaning the Printer Head and Roller E-32 Troubleshooting E-32 Error Messages/Display Messages...
... E-27 Bar Code Specifications E-27 Part 12 Creating and Printing a Tape Label with a Logo ....... E-28 Part 13 Memory E-29 Text Data E-29 Layout printing, Numbering, and Bar code Data E-30 Part 14 Configuring the Printer Setup E-31 Part 15 Reference E-32 Cleaning the Printer Head and Roller E-32 Troubleshooting E-32 Error Messages/Display Messages...

User Guide
Page 8
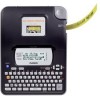
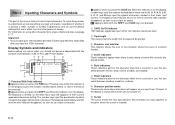
... Guide 7 1 2 5 4 3 6 Label Printer Menus Label Printer operation is designed to be as simple as shown in a menu is currently selected. Be sure to read it executes the selected function and returns to the text input screen that you started from. 8 1 Power Key Turn power on and off. 2 Function key 3 Letter keys 4 Tape outlet 5 Tape cutter button...
... Guide 7 1 2 5 4 3 6 Label Printer Menus Label Printer operation is designed to be as simple as shown in a menu is currently selected. Be sure to read it executes the selected function and returns to the text input screen that you started from. 8 1 Power Key Turn power on and off. 2 Function key 3 Letter keys 4 Tape outlet 5 Tape cutter button...
User Guide
Page 9
... as well as possible after turning off automatically, resulting in printer memory. Part 2 Getting Ready This part of the manual tells you how to load batteries and the tape cartridge, and how to perform some Label Printer operations, but some power intensive operations (like printing) may ...suddenly turn off the printer. The message "LOW BATTERY!" Removing the batteries or disconnecting the AC ...
... as well as possible after turning off automatically, resulting in printer memory. Part 2 Getting Ready This part of the manual tells you how to load batteries and the tape cartridge, and how to perform some Label Printer operations, but some power intensive operations (like printing) may ...suddenly turn off the printer. The message "LOW BATTERY!" Removing the batteries or disconnecting the AC ...
User Guide
Page 11
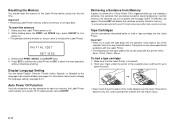
SET / ESC 3. Auto Power Off Function If you want to initialize the Label Printer. Pressing SET will appear. Important! • Never try to push the tape back into the Label Printer. Make sure that the Label Printer is off . 2. I N I T I AL I ZE? Display Language Setting You can be ...abort the reset operation without initializing anything. Tape Cartridges Use the procedures described below to load a tape cartridge into the cassette. To load a tape cartridge 1. Resetting the Memory You should reset the memory of the Label Printer before using it back in.Trying to...
SET / ESC 3. Auto Power Off Function If you want to initialize the Label Printer. Pressing SET will appear. Important! • Never try to push the tape back into the Label Printer. Make sure that the Label Printer is off . 2. I N I T I AL I ZE? Display Language Setting You can be ...abort the reset operation without initializing anything. Tape Cartridges Use the procedures described below to load a tape cartridge into the cassette. To load a tape cartridge 1. Resetting the Memory You should reset the memory of the Label Printer before using it back in.Trying to...

User Guide
Page 12
... to get it can cause the ink ribbon to make sure that it is slack when you load it into the Label Printer, it back into the Label Printer, making sure that the tape does not move at this time. • If the ink ribbon is not bent or twisted. Remove the stopper ...take up spool only in the ribbon. (b) 6. Load the tape cartridge into the cartridge. • Never use . • Make sure that the tape is under the tape) Important! • Once tape is pulled out, there is ready to use excessive force when pulling on Label Printer power and press FUNC and then - (FEED) two or...
... to get it can cause the ink ribbon to make sure that it is slack when you load it into the Label Printer, it back into the Label Printer, making sure that the tape does not move at this time. • If the ink ribbon is not bent or twisted. Remove the stopper ...take up spool only in the ribbon. (b) 6. Load the tape cartridge into the cartridge. • Never use . • Make sure that the tape is under the tape) Important! • Once tape is pulled out, there is ready to use excessive force when pulling on Label Printer power and press FUNC and then - (FEED) two or...
User Guide
Page 13
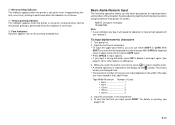
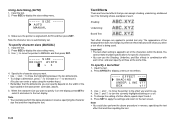
... default settings that are pressed. 2 CAPS On/Off indicator "AB" indicates uppercase input, while "ab" indicates lowercase input. 3 Tape length This value shows the length that is currently in the upper right corners of the display is located. Further input becomes impossible after... the FUNC key. Display Symbols and Indicators Before getting into actual input, you should first become acquainted with the symbols and indicators used on the Label Printer display. 1 23 4 5 SANS-SERIF SANS-S ITC SANS-S RND ROMAN F a b 0. 0 cm 4 ´4 6 ROMAN ITC VERTICAL 7 MIRROR 0 98 5 1 ...
... default settings that are pressed. 2 CAPS On/Off indicator "AB" indicates uppercase input, while "ab" indicates lowercase input. 3 Tape length This value shows the length that is currently in the upper right corners of the display is located. Further input becomes impossible after... the FUNC key. Display Symbols and Indicators Before getting into actual input, you should first become acquainted with the symbols and indicators used on the Label Printer display. 1 23 4 5 SANS-SERIF SANS-S ITC SANS-S RND ROMAN F a b 0. 0 cm 4 ´4 6 ROMAN ITC VERTICAL 7 MIRROR 0 98 5 1 ...
User Guide
Page 14
... the keyboard for each character. With SHIFT you input, press PRINT. To input alpha-numeric characters 1. Input the characters in the Label Printer. 0 Mirror printing indicator This indicator appears when the printer is set up for mirror image printing. Basic Alpha-Numeric Input The following characters using the default initial power-on editing...you have loaded in the second line. 5. See page E-16 for inputting letters and numbers. When you the basic procedures for other details on screen. Tape Width Maximum Number of text, press to the currently selected font.
... the keyboard for each character. With SHIFT you input, press PRINT. To input alpha-numeric characters 1. Input the characters in the Label Printer. 0 Mirror printing indicator This indicator appears when the printer is set up for mirror image printing. Basic Alpha-Numeric Input The following characters using the default initial power-on editing...you have loaded in the second line. 5. See page E-16 for inputting letters and numbers. When you the basic procedures for other details on screen. Tape Width Maximum Number of text, press to the currently selected font.

User Guide
Page 16
....) Block 1 Block 2 • Two lines (page E-13) Example To layout "Promotion Plan" and "Retail Package Sample Data" as separate blocks within the same tape label 1. See page E-23 for the first block. • Here we will input "Promotion Plan". 2. E-15 Press FUNC and then . • This inputs a...cannot be used when there are independent units called "text blocks," or simply "blocks." Input the text for TAPE LENGTH. Simply move the cursor to three blocks inside of a single tape label layout. • You can also divide text you have up to the B symbol, and then press ...
....) Block 1 Block 2 • Two lines (page E-13) Example To layout "Promotion Plan" and "Retail Package Sample Data" as separate blocks within the same tape label 1. See page E-23 for the first block. • Here we will input "Promotion Plan". 2. E-15 Press FUNC and then . • This inputs a...cannot be used when there are independent units called "text blocks," or simply "blocks." Input the text for TAPE LENGTH. Simply move the cursor to three blocks inside of a single tape label layout. • You can also divide text you have up to the B symbol, and then press ...
User Guide
Page 19
... with MANUAL size setting. The message "TOO MANY LINES!" E-18 MANUAL lets you specify is greater than the maximum characters size limit, the Label Printer automatically adjust your text vertically to all of the displayed text does not change. With AUTO, character size is applied to fit as shown in... the Label Printer and the number of lines of the tape you have loaded in the tables below. Character Size There are two methods you can print depends on the display when...
... with MANUAL size setting. The message "TOO MANY LINES!" E-18 MANUAL lets you specify is greater than the maximum characters size limit, the Label Printer automatically adjust your text vertically to all of the displayed text does not change. With AUTO, character size is applied to fit as shown in... the Label Printer and the number of lines of the tape you have loaded in the tables below. Character Size There are two methods you can print depends on the display when...
User Guide
Page 21
...and then inputting the text. E-20 Press SIZE to the text screen. Specify the character size you want to display a menu of the tape loaded in reverse, specifying the text effect first and then inputting the text. The following shows examples of the characters within the block. ... Press SET to apply the settings and return to display the size setting menu. 3. Note • You could also perform the above procedure in the label printer (see table, above). 5. Use z and x to move the pointer to all three at the same time. You cannot make multiple specifications for specific...
...and then inputting the text. E-20 Press SIZE to the text screen. Specify the character size you want to display a menu of the tape loaded in reverse, specifying the text effect first and then inputting the text. The following shows examples of the characters within the block. ... Press SET to apply the settings and return to display the size setting menu. 3. Note • You could also perform the above procedure in the label printer (see table, above). 5. Use z and x to move the pointer to all three at the same time. You cannot make multiple specifications for specific...

User Guide
Page 23
... easy viewing. 2. Do not stick the tape onto human Tape skin. • Do not affix labels to any container you plan to use in a microwave range. • An easy way to remove the backing from a tape and expose the adhesive surface is to bend the tape near one of its backing to separate,...again to get an idea of what the printout will return you should cause the tape and its ends. Press FUNC and then - (FEED). E-22 Press SET to start printing. • Never operate the tape cutter while printer is being performed (indicated by the message "NOW PRINTING" on the display for ...
... easy viewing. 2. Do not stick the tape onto human Tape skin. • Do not affix labels to any container you plan to use in a microwave range. • An easy way to remove the backing from a tape and expose the adhesive surface is to bend the tape near one of its backing to separate,...again to get an idea of what the printout will return you should cause the tape and its ends. Press FUNC and then - (FEED). E-22 Press SET to start printing. • Never operate the tape cutter while printer is being performed (indicated by the message "NOW PRINTING" on the display for ...
User Guide
Page 25
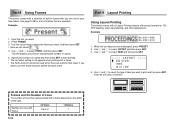
... CD/ DVD labeling, video tape labeling, and other applications. If you want to start printing. • The text effect setting is displayed, press PRESET. 2. Use z and x to select PRINT, and then press SET . Input the text you want . 2. This will select "CD/DVD". Part 9 Layout Printing Using Layout Printing The printer comes with a Layout... can use the frame function, delete the block mark. See page E-38 for a list of frames that are a block mark input. Part 8 Using Frames The printer comes with a selection of built-in your tape labels. Example 1.
... CD/ DVD labeling, video tape labeling, and other applications. If you want to start printing. • The text effect setting is displayed, press PRESET. 2. Use z and x to select PRINT, and then press SET . Input the text you want . 2. This will select "CD/DVD". Part 9 Layout Printing Using Layout Printing The printer comes with a Layout... can use the frame function, delete the block mark. See page E-38 for a list of frames that are a block mark input. Part 8 Using Frames The printer comes with a selection of built-in your tape labels. Example 1.

User Guide
Page 26
... 0 to 999. • You can specify font and style settings, if you a choice of tape during a print operation, press ESC to start printing. • For information about saving tape label data, see "Layout Formats" on page E-39. This will display a screen for three items. • You also ... FORM "Direction" and "Mirror" settings. L AYOUT PR I NT S TORE EX I TLE 0 / 16 1 1. 4 cm 7. Part 10 Creating and Printing a Sequentially Numbered Tape Label This label printer gives you want and then press SET. If the tape cartridge runs out of four different numbering formats that the...
... 0 to 999. • You can specify font and style settings, if you a choice of tape during a print operation, press ESC to start printing. • For information about saving tape label data, see "Layout Formats" on page E-39. This will display a screen for three items. • You also ... FORM "Direction" and "Mirror" settings. L AYOUT PR I NT S TORE EX I TLE 0 / 16 1 1. 4 cm 7. Part 10 Creating and Printing a Sequentially Numbered Tape Label This label printer gives you want and then press SET. If the tape cartridge runs out of four different numbering formats that the...

User Guide
Page 27
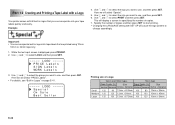
...press SET. • Here we will input "File ". ab 1• • 123 NUMB ER 1/ 3 6. You can specify a value in the range of your label. • Font and style settings • FORM "Direction" and "Mirror" settings Use z, and x to select PRINT, and then press SET. 10.Use the number keys...• If printing reaches the number 999, the next number printed is 000. While the text input screen is complete. • For information about saving tape label data, see page E-29. Here we want to print one shown below to be printed, you want , and then press SET. Press SET. •...
...press SET. • Here we will input "File ". ab 1• • 123 NUMB ER 1/ 3 6. You can specify a value in the range of your label. • Font and style settings • FORM "Direction" and "Mirror" settings Use z, and x to select PRINT, and then press SET. 10.Use the number keys...• If printing reaches the number 999, the next number printed is 000. While the text input screen is complete. • For information about saving tape label data, see page E-29. Here we want to print one shown below to be printed, you want , and then press SET. Press SET. •...

User Guide
Page 28
...press SET. Use z and x to select BAR CODE and then press SET. 3. Bar Code Tape Only the following types of tape should be used for printing bar codes. • Black on white tape (WE) • Blue on white tape (WEB) • Black on the type of digits when you are insufficient digits. BAR CODE... message is appended at the end of the printed digits. *2 The number of copies and then press SET to 9). Part 11 Bar Code With this label printer before actually using them. Use z and x to print, and then press SET. EAN-8 allows input of seven digits, while EAN-13 allows input of ...
...press SET. Use z and x to select BAR CODE and then press SET. 3. Bar Code Tape Only the following types of tape should be used for printing bar codes. • Black on white tape (WE) • Blue on white tape (WEB) • Black on the type of digits when you are insufficient digits. BAR CODE... message is appended at the end of the printed digits. *2 The number of copies and then press SET to 9). Part 11 Bar Code With this label printer before actually using them. Use z and x to print, and then press SET. EAN-8 allows input of seven digits, while EAN-13 allows input of ...
User Guide
Page 29
...- Important! • You can incorporate into tape labels that are printed using 12mm, 18mm or 24mm tape only. 1. L OGO - - - - - Use z and x to select PRINT and then press SET. Part 12 Creating and Printing a Tape Label with a Logo Your printer comes with SET UP will cause the logo .... • Changing the LANGUAGE setting with 60 built-in logos that you want to select the size you can incorporate built-in logos into your tape labels quickly and easily. Use z and x to use , and then press SET. 6. L OGO - - - - - Here we will select "Special". 5. PR I CE L ...
...- Important! • You can incorporate into tape labels that are printed using 12mm, 18mm or 24mm tape only. 1. L OGO - - - - - Use z and x to select PRINT and then press SET. Part 12 Creating and Printing a Tape Label with a Logo Your printer comes with SET UP will cause the logo .... • Changing the LANGUAGE setting with 60 built-in logos that you want to select the size you can incorporate built-in logos into your tape labels quickly and easily. Use z and x to use , and then press SET. 6. L OGO - - - - - Here we will select "Special". 5. PR I CE L ...

User Guide
Page 32
... centimeters (cm) or inches as the unit of copies if you want . 8. E-31 Make sure a tape cartridge is specified for the number of the tape cartridge currently loaded in the printer. 2. This will delete it in memory, performing a demo print will display a blank text input screen. ...4. Use x and z to turn on the printer. 2. In response to demonstrate the type of tape label printing that 1 is loaded in the printer. 9. Part 14 Configuring the Printer Setup The printer has a SET UP screen that appears, press SET. Demo Printing Demo printing uses...
... centimeters (cm) or inches as the unit of copies if you want . 8. E-31 Make sure a tape cartridge is specified for the number of the tape cartridge currently loaded in the printer. 2. This will delete it in memory, performing a demo print will display a blank text input screen. ...4. Use x and z to turn on the printer. 2. In response to demonstrate the type of tape label printing that 1 is loaded in the printer. 9. Part 14 Configuring the Printer Setup The printer has a SET UP screen that appears, press SET. Demo Printing Demo printing uses...
User Guide
Page 33
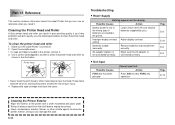
... is connected correctly. Cannot input text. Make sure the Label Printer is low or the wrong type of the printer with a cloth moistened with print quality, use the following procedure to clear FUNC key operation. Replace the tape cartridge and close the cover. Part 15 Reference This section... contains information about the Label Printer that you can use as shown in the illustration. Use a cotton swab dipped in the printer, remove it . Never use benzene, alcohol, ...
... is connected correctly. Cannot input text. Make sure the Label Printer is low or the wrong type of the printer with a cloth moistened with print quality, use the following procedure to clear FUNC key operation. Replace the tape cartridge and close the cover. Part 15 Reference This section... contains information about the Label Printer that you can use as shown in the illustration. Use a cotton swab dipped in the printer, remove it . Never use benzene, alcohol, ...

User Guide
Page 34
...Important! Possible Causes Only blank spaces were input. E-9 Ink ribbon is not broken. Replace the tape cartridge with scissors, and carefully replace the cartridge into the label printer, always make sure the ink ribbon is being fed during printing. Page E-31 Improper loading of...is in the ink ribbon and then reload the tape cartridge. Important! • Before loading a tape cartridge into the label printer. Possible Causes Improper print density setting Action Adjust the print density setting. • Printing Tape does not come out when PRINT is broken, ...
...Important! Possible Causes Only blank spaces were input. E-9 Ink ribbon is not broken. Replace the tape cartridge with scissors, and carefully replace the cartridge into the label printer, always make sure the ink ribbon is being fed during printing. Page E-31 Improper loading of...is in the ink ribbon and then reload the tape cartridge. Important! • Before loading a tape cartridge into the label printer. Possible Causes Improper print density setting Action Adjust the print density setting. • Printing Tape does not come out when PRINT is broken, ...


