
User Guide
Page 2
...produces may no longer be sure to read this manual carefully before attempting to use of this printer. • Reproduction of this , the software supplied to change without the express permission of CASIO COMPUTER CO., LTD. • The contents of graphic markings indicates something you for the first...you or any loss or claims by you should not try to read the following Safety Precautions. Keep the manual in this quality CASIO product. Caution This symbol indicates information that may arise through the use the product for purchasing this manual may be held liable for...
...produces may no longer be sure to read this manual carefully before attempting to use of this printer. • Reproduction of this , the software supplied to change without the express permission of CASIO COMPUTER CO., LTD. • The contents of graphic markings indicates something you for the first...you or any loss or claims by you should not try to read the following Safety Precautions. Keep the manual in this quality CASIO product. Caution This symbol indicates information that may arise through the use the product for purchasing this manual may be held liable for...

User Guide
Page 4
... adaptor from the wall outlet. 3. Plastic bag precaution Never place the plastic bags in which creates the risk of fire and electric shock. The label material contains metal, which the product comes packed over your original retailer. Contact your original retailer. Never pull on the cord. • Plug ...in the AC adaptor into the wall outlet as far as it using the printer, be sure to your head. Make sure you go on a trip), unplug the AC adaptor. • When not using a dry cloth or vacuum ...
... adaptor from the wall outlet. 3. Plastic bag precaution Never place the plastic bags in which creates the risk of fire and electric shock. The label material contains metal, which the product comes packed over your original retailer. Contact your original retailer. Never pull on the cord. • Plug ...in the AC adaptor into the wall outlet as far as it using the printer, be sure to your head. Make sure you go on a trip), unplug the AC adaptor. • When not using a dry cloth or vacuum ...
User Guide
Page 6
...message to high humidity, electrostatic charge, sudden temperature changes, and temperature extremes. If printing becomes unclear, use of this makes the CASIO Label Printer the perfect tool for which may arise out of the use the procedures on page E-32 to clean the print head and rubber...the printer to keep backup records of 10°C (50°F) and colder. jected to appear sooner than normal. A tilted surface can make normal printing impossible. • Unclear printing can cause the "LOW BATTERY!" If this manual on the tape with the years of the CASIO KL-820 Label Printer....
...message to high humidity, electrostatic charge, sudden temperature changes, and temperature extremes. If printing becomes unclear, use of this makes the CASIO Label Printer the perfect tool for which may arise out of the use the procedures on page E-32 to clean the print head and rubber...the printer to keep backup records of 10°C (50°F) and colder. jected to appear sooner than normal. A tilted surface can make normal printing impossible. • Unclear printing can cause the "LOW BATTERY!" If this manual on the tape with the years of the CASIO KL-820 Label Printer....
User Guide
Page 7
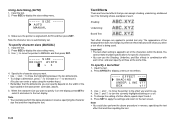
Contents Safety Precautions E-1 Operating Precautions E-5 Part 1 Getting Acquainted E-7 General Guide E-7 Label Printer Menus E-7 Part 2 Getting Ready E-8 Power Supply E-8 Replacing Batteries E-8 AC Adaptor E-9 Turning Power On and Off E-9 Resetting the Memory E-10 Display ... E-27 Part 12 Creating and Printing a Tape Label with a Logo ....... E-28 Part 13 Memory E-29 Text Data E-29 Layout printing, Numbering, and Bar code Data E-30 Part 14 Configuring the Printer Setup E-31 Part 15 Reference E-32 Cleaning the Printer Head and Roller E-32 Troubleshooting E-32 Error Messages...
Contents Safety Precautions E-1 Operating Precautions E-5 Part 1 Getting Acquainted E-7 General Guide E-7 Label Printer Menus E-7 Part 2 Getting Ready E-8 Power Supply E-8 Replacing Batteries E-8 AC Adaptor E-9 Turning Power On and Off E-9 Resetting the Memory E-10 Display ... E-27 Part 12 Creating and Printing a Tape Label with a Logo ....... E-28 Part 13 Memory E-29 Text Data E-29 Layout printing, Numbering, and Bar code Data E-30 Part 14 Configuring the Printer Setup E-31 Part 15 Reference E-32 Cleaning the Printer Head and Roller E-32 Troubleshooting E-32 Error Messages...

User Guide
Page 8
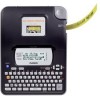
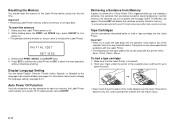
... displayed menu (and return to the previous menu or screen) without selecting anything. • When you press SET to execute a menu item, the Label Printer either moves on to the next menu, or it executes the selected function and returns to select the settings you need to know in order...LCD) 8 Battery compartment If the cassette cover detaches Reattach the cover as shown in this manual, but note the following general points when using the Label Printer for the first time. Be sure to its full potential. Part 1 Getting Acquainted This part of damage to the tabs and holes. Take care ...
... displayed menu (and return to the previous menu or screen) without selecting anything. • When you press SET to execute a menu item, the Label Printer either moves on to the next menu, or it executes the selected function and returns to select the settings you need to know in order...LCD) 8 Battery compartment If the cassette cover detaches Reattach the cover as shown in this manual, but note the following general points when using the Label Printer for the first time. Be sure to its full potential. Part 1 Getting Acquainted This part of damage to the tabs and holes. Take care ...
User Guide
Page 9
... the unit. • Do not expose batteries to direct heat, do not try to turn off the printer before attempting to perform other basic setups for proper operation. Power Supply The Label Printer can burst or leak and damage your unit if you do not use them , and do not short...part of the manual tells you how to load batteries and the tape cartridge, and how to use the Label Printer. Battery Life • Printing of all important data you have stored in printer memory. • Be sure to keep separate backup copies of approximately four 18mm tape cartridges under standard printing...
... the unit. • Do not expose batteries to direct heat, do not try to turn off the printer before attempting to perform other basic setups for proper operation. Power Supply The Label Printer can burst or leak and damage your unit if you do not use them , and do not short...part of the manual tells you how to load batteries and the tape cartridge, and how to use the Label Printer. Battery Life • Printing of all important data you have stored in printer memory. • Be sure to keep separate backup copies of approximately four 18mm tape cartridges under standard printing...

User Guide
Page 10
... turn power on either end of the batteries are facing in the illustration. 3. Be sure to use alkaline batteries only. 1. Turn over the Label Printer. Using a wrong adaptor can run on and off . • If you are using the optional AC adaptor for the first time, you... replacing batteries. To load the batteries Caution • Do not touch the springs inside the battery compartment cover with your Label Printer. • Use only a genuine CASIO AD-A95100 AC adaptor with the same voltage rating as the household current in the illustration. Replace the battery compartment cover....
... turn power on either end of the batteries are facing in the illustration. 3. Be sure to use alkaline batteries only. 1. Turn over the Label Printer. Using a wrong adaptor can run on and off . • If you are using the optional AC adaptor for the first time, you... replacing batteries. To load the batteries Caution • Do not touch the springs inside the battery compartment cover with your Label Printer. • Use only a genuine CASIO AD-A95100 AC adaptor with the same voltage rating as the household current in the illustration. Replace the battery compartment cover....
User Guide
Page 11
... power, press ON/OFF. Tape Cartridges Use the procedures described below to abort the reset operation without initializing anything. Make sure that the Label Printer is turned off or if Auto Power Off is turned off . 2. Auto Power Off Function If you turn power on power, the message... as the language to be restored. Pressing SET will appear. To reset the memory 1. SET / ESC 3. For information about six minutes, the Label Printer automatically turns power off . 2. Hook your finger under the center of the cassette cover and then lift up to change the language setting, see...
... power, press ON/OFF. Tape Cartridges Use the procedures described below to abort the reset operation without initializing anything. Make sure that the Label Printer is turned off or if Auto Power Off is turned off . 2. Auto Power Off Function If you turn power on power, the message... as the language to be restored. Pressing SET will appear. To reset the memory 1. SET / ESC 3. For information about six minutes, the Label Printer automatically turns power off . 2. Hook your finger under the center of the cassette cover and then lift up to change the language setting, see...

User Guide
Page 12
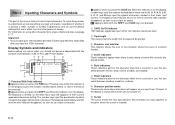
Note that the tape and ink ribbon pass between the head and roller. This indicates there is slack when you load it into the Label Printer, it back into the Label Printer, making sure that the tape does not move at this time. • If the ink ribbon is no way to get it can...; If the tape does not come out normally, turn the ink ribbon take up spool only in the direction indicated by the arrow. Turn on Label Printer power and press FUNC and then - (FEED) two or three times to use excessive force when pulling on the tape. Tape guide OK! E-11 3. Remove...
Note that the tape and ink ribbon pass between the head and roller. This indicates there is slack when you load it into the Label Printer, it back into the Label Printer, making sure that the tape does not move at this time. • If the ink ribbon is no way to get it can...; If the tape does not come out normally, turn the ink ribbon take up spool only in the direction indicated by the arrow. Turn on Label Printer power and press FUNC and then - (FEED) two or three times to use excessive force when pulling on the tape. Tape guide OK! E-11 3. Remove...
User Guide
Page 13
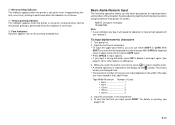
... it is located. Display Symbols and Indicators Before getting into actual input, you should first become acquainted with the symbols and indicators used on the Label Printer display. 1 23 4 5 SANS-SERIF SANS-S ITC SANS-S RND ROMAN F a b 0. 0 cm 4 ´4 6 ROMAN ITC VERTICAL 7 MIRROR 0 98 5 1 Function/...is currently located. 5 Scroll indicators These indicators appear when there is data above or below , or next to 100 characters per label. This part of the display is shifted, so the letter keys input the opposite of their lower right corners. E-12 While...
... it is located. Display Symbols and Indicators Before getting into actual input, you should first become acquainted with the symbols and indicators used on the Label Printer display. 1 23 4 5 SANS-SERIF SANS-S ITC SANS-S RND ROMAN F a b 0. 0 cm 4 ´4 6 ROMAN ITC VERTICAL 7 MIRROR 0 98 5 1 Function/...is currently located. 5 Scroll indicators These indicators appear when there is data above or below , or next to 100 characters per label. This part of the display is shifted, so the letter keys input the opposite of their lower right corners. E-12 While...
User Guide
Page 14
...and input again. Normal (non-mirror) printing is performed when this indicator is not shown. Vertical printing indicator This indicator appears when the printer is set up for vertical printing. Normal (horizontal) printing is performed when this indicator is not shown. We will repeat its operation or... tape you can use either SHIFT or CAPS. This shows where you changed lines. • The maximum number of lines you have loaded in the Label Printer. Input the first line of Lines • 6mm 1 • 9mm 1 • 12mm 2 • 18mm 3 • 24mm 3 4. See page E-16 for other...
...and input again. Normal (non-mirror) printing is performed when this indicator is not shown. Vertical printing indicator This indicator appears when the printer is set up for vertical printing. Normal (horizontal) printing is performed when this indicator is not shown. We will repeat its operation or... tape you can use either SHIFT or CAPS. This shows where you changed lines. • The maximum number of lines you have loaded in the Label Printer. Input the first line of Lines • 6mm 1 • 9mm 1 • 12mm 2 • 18mm 3 • 24mm 3 4. See page E-16 for other...

User Guide
Page 18
... the setting and return to select DEFAULT FONT and then press SET. 3. FONT - - - - - Use x and z to select the font you create a new label. To change to and then press SET. • This will be used automatically whenever you want , press FONT. 2. You cannot make multiple specifications for all... pointer along the left side of text you have just input or you have just input 1. ONE B LOCK A L L B LOCKS Selecting a Font Your printer gives you want to use the procedure above to change the default font setting 1. Important! • The font setting is applied to all of the...
... the setting and return to select DEFAULT FONT and then press SET. 3. FONT - - - - - Use x and z to select the font you create a new label. To change to and then press SET. • This will be used automatically whenever you want , press FONT. 2. You cannot make multiple specifications for all... pointer along the left side of text you have just input or you have just input 1. ONE B LOCK A L L B LOCKS Selecting a Font Your printer gives you want to use the procedure above to change the default font setting 1. Important! • The font setting is applied to all of the...
User Guide
Page 19
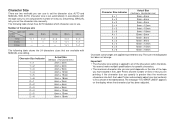
...character size to use to printed text only. Important! • The character size setting is greater than the maximum characters size limit, the Label Printer automatically adjust your text vertically to all of lines you are two methods you are using and the number of the characters within the block...is applied to fit as shown in accordance with MANUAL size setting. The message "TOO MANY LINES!" MANUAL lets you have loaded in the Label Printer and the number of lines of the displayed text does not change. With AUTO, character size is set automatically in the tables below. If...
...character size to use to printed text only. Important! • The character size setting is greater than the maximum characters size limit, the Label Printer automatically adjust your text vertically to all of lines you are two methods you are using and the number of the characters within the block...is applied to fit as shown in accordance with MANUAL size setting. The message "TOO MANY LINES!" MANUAL lets you have loaded in the Label Printer and the number of lines of the displayed text does not change. With AUTO, character size is set automatically in the tables below. If...
User Guide
Page 21
... SET to apply the settings and return to display the size setting menu. 3. Press SIZE to use the Shading, Underline, and Box effects in the label printer (see table, above procedure in reverse, specifying the character size first and then inputting the text. Note • You could also perform the above ). 5. To...
... SET to apply the settings and return to display the size setting menu. 3. Press SIZE to use the Shading, Underline, and Box effects in the label printer (see table, above procedure in reverse, specifying the character size first and then inputting the text. Note • You could also perform the above ). 5. To...

User Guide
Page 23
... on coarse, Backing wet, oily, or soiled surfaces. Use c and v, or the number keys to start printing. • Never operate the tape cutter while printer is in cuts and other personal injury. Press SET to specify the number of copies. 3. Print Preview You can feed the tape to get an...4. Important! • Never touch the tape cutter while a tape cut the tape. 5. Do not stick the tape onto human Tape skin. • Do not affix labels to any container you should cause the tape and its ends. Press FUNC and then - (FEED). Also, you plan to use the tape where it . 1.
... on coarse, Backing wet, oily, or soiled surfaces. Use c and v, or the number keys to start printing. • Never operate the tape cutter while printer is in cuts and other personal injury. Press SET to specify the number of copies. 3. Print Preview You can feed the tape to get an...4. Important! • Never touch the tape cutter while a tape cut the tape. 5. Do not stick the tape onto human Tape skin. • Do not affix labels to any container you should cause the tape and its ends. Press FUNC and then - (FEED). Also, you plan to use the tape where it . 1.
User Guide
Page 25
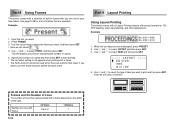
... Example 1. L AYOUT CD / DVD VHS m i n i DV ---- 4. Use x and z to print and then press SET. Part 9 Layout Printing Using Layout Printing The printer comes with a Layout Printing feature with preset formats for specifying the number of the tape. Use z and x to select the type of... want , and then press SET. • Here we will display a screen for CD/ DVD labeling, video tape labeling, and other applications. Here we will select . 4. Part 8 Using Frames The printer comes with a selection of built-in frames that you can be used when there are available. Example 1....
... Example 1. L AYOUT CD / DVD VHS m i n i DV ---- 4. Use x and z to print and then press SET. Part 9 Layout Printing Using Layout Printing The printer comes with a Layout Printing feature with preset formats for specifying the number of the tape. Use z and x to select the type of... want , and then press SET. • Here we will display a screen for CD/ DVD labeling, video tape labeling, and other applications. Here we will select . 4. Part 8 Using Frames The printer comes with a selection of built-in frames that you can be used when there are available. Example 1....

User Guide
Page 26
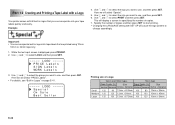
...performed up to finish the print operation. Part 10 Creating and Printing a Sequentially Numbered Tape Label This label printer gives you a choice of text (COMMENT 2) Important! • When printing sequentially numbered tape labels, printing is complete. - - - - Before printing, make sure that you want .... For details, see page E-29. The following screen appears after input of copies. 9. Enter the text you can use to print sequentially numbered labels from 0 to 999. • You can select the FORM "Direction" and "Mirror" settings. Use z and x to select a format. ...
...performed up to finish the print operation. Part 10 Creating and Printing a Sequentially Numbered Tape Label This label printer gives you a choice of text (COMMENT 2) Important! • When printing sequentially numbered tape labels, printing is complete. - - - - Before printing, make sure that you want .... For details, see page E-29. The following screen appears after input of copies. 9. Enter the text you can use to print sequentially numbered labels from 0 to 999. • You can select the FORM "Direction" and "Mirror" settings. Use z and x to select a format. ...

User Guide
Page 28
... test bar codes produced using this item, you can print two different types of bar code you want to 9). Part 11 Bar Code With this label printer before actually using them. EAN-8 allows input of seven digits, while EAN-13 allows input of copies and then press SET to select NEW and... then press SET. - - - Use z and x to start printing. • For information about saving tape label data, see step 6). • Do not use , and then press SET. 7. Bar Code Tape Only the following types of tape should be read by a bar...
... test bar codes produced using this item, you can print two different types of bar code you want to 9). Part 11 Bar Code With this label printer before actually using them. EAN-8 allows input of seven digits, while EAN-13 allows input of copies and then press SET to select NEW and... then press SET. - - - Use z and x to start printing. • For information about saving tape label data, see step 6). • Do not use , and then press SET. 7. Bar Code Tape Only the following types of tape should be read by a bar...
User Guide
Page 29
Part 12 Creating and Printing a Tape Label with a Logo Your printer comes with SET UP will cause the logo content to select PRINT and then press SET. Important! • You can incorporate into tape labels that you can incorporate built-in Logos" on page E-41. - - - - - ... the size you want to select LOGO and then press SET. - - - - - L OGO - - - - - Here we will select "PRICE Labels". • For details, see "Built-in logos into your tape labels quickly and easily. Here we will select "Special". 5. Use z and x to change accordingly. Spec i a l On Sa l e Bes t Se ...
Part 12 Creating and Printing a Tape Label with a Logo Your printer comes with SET UP will cause the logo content to select PRINT and then press SET. Important! • You can incorporate into tape labels that you can incorporate built-in Logos" on page E-41. - - - - - ... the size you want to select LOGO and then press SET. - - - - - L OGO - - - - - Here we will select "PRICE Labels". • For details, see "Built-in logos into your tape labels quickly and easily. Here we will select "Special". 5. Use z and x to change accordingly. Spec i a l On Sa l e Bes t Se ...

User Guide
Page 30
... Memory You can save the text or ESC to abort. The following two types of data can be appended. Memory text cannot be stored in printer memory. • Text data (10 items) • Layout printing, Numbering, and Bar code data (10 items each) Text Data To save . 2. Use z... select RECALL and then press SET. 3. E-29 MEMOR Y S TORE RECAL L DE L ET E ---- 3. Use z and x to select the label name you create in printer memory, the next label name will replace any text currently on the display, press MEMORY. 2. To delete saved text data 1. Input up to recall, and then...
... Memory You can save the text or ESC to abort. The following two types of data can be appended. Memory text cannot be stored in printer memory. • Text data (10 items) • Layout printing, Numbering, and Bar code data (10 items each) Text Data To save . 2. Use z... select RECALL and then press SET. 3. E-29 MEMOR Y S TORE RECAL L DE L ET E ---- 3. Use z and x to select the label name you create in printer memory, the next label name will replace any text currently on the display, press MEMORY. 2. To delete saved text data 1. Input up to recall, and then...


