
User Guide
Page 4
.... Doing so creates the risk of fire and electric shock. Doing so creates the risk of the product by incineration. Warning Do not affix labels to a container to your head. Contact your original retailer. Contact your original retailer. At least once a year, unplug the AC adaptor from... used in households where young children are present. Make sure you go on a trip), unplug the AC adaptor. • When not using the printer, be sure to unplug the AC adaptor from the wall outlet. 3. Immediately perform the following steps if liquid or a foreign object should ever become...
.... Doing so creates the risk of fire and electric shock. Doing so creates the risk of the product by incineration. Warning Do not affix labels to a container to your head. Contact your original retailer. Contact your original retailer. At least once a year, unplug the AC adaptor from... used in households where young children are present. Make sure you go on a trip), unplug the AC adaptor. • When not using the printer, be sure to unplug the AC adaptor from the wall outlet. 3. Immediately perform the following steps if liquid or a foreign object should ever become...
User Guide
Page 6
...; 6-language display messages (English, German, French, Italian, Spanish, Swedish) All of this makes the CASIO Label Printer the perfect tool for just about all of your selection of the CASIO KL-820 Label Printer. If printing becomes unclear, use of this happens, move the printer to strong light. If this product. • Note that is not exposed to a location...
...; 6-language display messages (English, German, French, Italian, Spanish, Swedish) All of this makes the CASIO Label Printer the perfect tool for just about all of your selection of the CASIO KL-820 Label Printer. If printing becomes unclear, use of this happens, move the printer to strong light. If this product. • Note that is not exposed to a location...
User Guide
Page 7
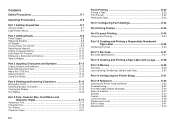
...Text Data E-29 Layout printing, Numbering, and Bar code Data E-30 Part 14 Configuring the Printer Setup E-31 Part 15 Reference E-32 Cleaning the Printer Head and Roller E-32 Troubleshooting E-32 Error Messages/Display Messages E-34 Alpha Characters E-37 ...Numbering Formats E-40 Built-in Logos E-41 Specifications E-43 Contents Safety Precautions E-1 Operating Precautions E-5 Part 1 Getting Acquainted E-7 General Guide E-7 Label Printer Menus E-7 Part 2 Getting Ready E-8 Power Supply E-8 Replacing Batteries E-8 AC Adaptor E-9 Turning Power On and Off E-9 Resetting the Memory...
...Text Data E-29 Layout printing, Numbering, and Bar code Data E-30 Part 14 Configuring the Printer Setup E-31 Part 15 Reference E-32 Cleaning the Printer Head and Roller E-32 Troubleshooting E-32 Error Messages/Display Messages E-34 Alpha Characters E-37 ...Numbering Formats E-40 Built-in Logos E-41 Specifications E-43 Contents Safety Precautions E-1 Operating Precautions E-5 Part 1 Getting Acquainted E-7 General Guide E-7 Label Printer Menus E-7 Part 2 Getting Ready E-8 Power Supply E-8 Replacing Batteries E-8 AC Adaptor E-9 Turning Power On and Off E-9 Resetting the Memory...

User Guide
Page 8
... currently selected. E-7 Be sure to read it executes the selected function and returns to the text input screen that you can use the Label Printer to its full potential. Each menu is described in detail in the sections that follow in this manual, but note the following general points... when using the Label Printer for the first time. Take care to avoid excessive bending of the cover, which creates the risk of the manual provides you with ...
... currently selected. E-7 Be sure to read it executes the selected function and returns to the text input screen that you can use the Label Printer to its full potential. Each menu is described in detail in the sections that follow in this manual, but note the following general points... when using the Label Printer for the first time. Take care to avoid excessive bending of the cover, which creates the risk of the manual provides you with ...
User Guide
Page 9
...should replace batteries as soon as possible after turning off automatically, resulting in loss of text you perform any case, you have stored in the Label Printer. • Remove the batteries if you do not try to take them correctly. In any of the following important points. • Be sure... switching between battery power and AC adaptor power, be sure to direct heat, do not short circuit them, and do not use the Label Printer for the Label Printer. Part 2 Getting Ready This part of the manual tells you connect the AC adaptor or load batteries. You should you how to load...
...should replace batteries as soon as possible after turning off automatically, resulting in loss of text you perform any case, you have stored in the Label Printer. • Remove the batteries if you do not try to take them correctly. In any of the following important points. • Be sure... switching between battery power and AC adaptor power, be sure to direct heat, do not short circuit them, and do not use the Label Printer for the Label Printer. Part 2 Getting Ready This part of the manual tells you connect the AC adaptor or load batteries. You should you how to load...

User Guide
Page 10
... also unplug it from the AC outlet whenever you should reset it first. Open the battery compartment cover as the household current in your Label Printer. • Be sure to use alkaline batteries. • Make sure the positive (+) and negative (-) ends of the AC adaptor. Turn... you connect the adaptor. AC Adaptor Note the following important precautions when using the Label Printer. To connect the AC adaptor Connect the adaptor to power your Label Printer. • Use only a genuine CASIO AD-A95100 AC adaptor with your fingers. The springs have sharp areas and can ...
... also unplug it from the AC outlet whenever you should reset it first. Open the battery compartment cover as the household current in your Label Printer. • Be sure to use alkaline batteries. • Make sure the positive (+) and negative (-) ends of the AC adaptor. Turn... you connect the adaptor. AC Adaptor Note the following important precautions when using the Label Printer. To connect the AC adaptor Connect the adaptor to power your Label Printer. • Use only a genuine CASIO AD-A95100 AC adaptor with your fingers. The springs have sharp areas and can ...
User Guide
Page 11
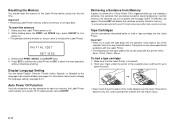
..., press ON/OFF. The next time you want to initialize the Label Printer. Important! • Never try to push the tape back into the Label Printer. Make sure that Label Printer power is saved temporarily in printer memory. Release the PRINT, SPACE, and ON/OFF keys. 4. ...cartridge 1. I N I T I AL I ZE? For information about six minutes, the Label Printer automatically turns power off or if Auto Power Off is turned off . Press SET to initialize the Label Printer or ESC to abort the reset operation without initializing anything. Retrieving a Sentence from Memory If ...
..., press ON/OFF. The next time you want to initialize the Label Printer. Important! • Never try to push the tape back into the Label Printer. Make sure that Label Printer power is saved temporarily in printer memory. Release the PRINT, SPACE, and ON/OFF keys. 4. ...cartridge 1. I N I T I AL I ZE? For information about six minutes, the Label Printer automatically turns power off or if Auto Power Off is turned off . Press SET to initialize the Label Printer or ESC to abort the reset operation without initializing anything. Retrieving a Sentence from Memory If ...

User Guide
Page 12
...; Make sure that the tape is under the tape) Important! • Once tape is pulled out, there is slack when you load it into the Label Printer, it is no slack in the illustration. Note that the tape does not move at this time. • If the ink ribbon is no way... to get it back into the Label Printer, making sure that it can cause the ink ribbon to use excessive force when pulling on Label Printer power and press FUNC and then - (FEED) two or three times to take up spool only in...
...; Make sure that the tape is under the tape) Important! • Once tape is pulled out, there is slack when you load it into the Label Printer, it is no slack in the illustration. Note that the tape does not move at this time. • If the ink ribbon is no way... to get it back into the Label Printer, making sure that it can cause the ink ribbon to use excessive force when pulling on Label Printer power and press FUNC and then - (FEED) two or three times to take up spool only in...
User Guide
Page 13
... This part of the display is always blank when you turn power on. 9 Cursor The cursor shows the next input position. For information on the Label Printer display. 1 23 4 5 SANS-SERIF SANS-S ITC SANS-S RND ROMAN F a b 0. 0 cm 4 ´4 6 ROMAN ITC VERTICAL 7 MIRROR 0 98 5 1 Function/Shift/Code... effect from the initial power-on the display causes the function marked above or below , or next to that key to 100 characters per label. appears when both the SHIFT and CODE keys are pressed. 2 CAPS On/Off indicator "AB" indicates uppercase input, while "ab" indicates...
... This part of the display is always blank when you turn power on. 9 Cursor The cursor shows the next input position. For information on the Label Printer display. 1 23 4 5 SANS-SERIF SANS-S ITC SANS-S RND ROMAN F a b 0. 0 cm 4 ´4 6 ROMAN ITC VERTICAL 7 MIRROR 0 98 5 1 Function/Shift/Code... effect from the initial power-on the display causes the function marked above or below , or next to that key to 100 characters per label. appears when both the SHIFT and CODE keys are pressed. 2 CAPS On/Off indicator "AB" indicates uppercase input, while "ab" indicates...
User Guide
Page 14
...where you changed lines. • The maximum number of lines you reach the end of a line of the tape you have loaded in the Label Printer. Normal (horizontal) printing is performed when this indicator is set up for other details on the width of text, press to input spaces. &#... press PRINT. To print the text that you must shift the keyboard for vertical printing. 0 Mirror printing indicator This indicator appears when the printer is not shown. Normal (non-mirror) printing is performed when this indicator is set up for each character. We will repeat its operation or...
...where you changed lines. • The maximum number of lines you reach the end of a line of the tape you have loaded in the Label Printer. Normal (horizontal) printing is performed when this indicator is set up for other details on the width of text, press to input spaces. &#... press PRINT. To print the text that you must shift the keyboard for vertical printing. 0 Mirror printing indicator This indicator appears when the printer is not shown. Normal (non-mirror) printing is performed when this indicator is set up for each character. We will repeat its operation or...

User Guide
Page 16
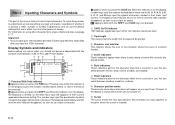
... locations.) Block 1 Block 2 • Two lines (page E-13) Example To layout "Promotion Plan" and "Retail Package Sample Data" as separate blocks within the same tape label 1. a b 2 5. 3 cm 4 ´4 P r omo t i o n P l a nB Re t a i l Pa c k age · · • To delete a block mark, move... mark Block marks appear on the tape. 3. They are independent units called "text blocks," or simply "blocks." Using Text Blocks In the example label shown below, "Promotion Plan" and "Retail Package Sample Data" are not printed on the display only. E-15 Input the text for the next ...
... locations.) Block 1 Block 2 • Two lines (page E-13) Example To layout "Promotion Plan" and "Retail Package Sample Data" as separate blocks within the same tape label 1. a b 2 5. 3 cm 4 ´4 P r omo t i o n P l a nB Re t a i l Pa c k age · · • To delete a block mark, move... mark Block marks appear on the tape. 3. They are independent units called "text blocks," or simply "blocks." Using Text Blocks In the example label shown below, "Promotion Plan" and "Retail Package Sample Data" are not printed on the display only. E-15 Input the text for the next ...

User Guide
Page 18
ONE B LOCK A L L B LOCKS Selecting a Font Your printer gives you a choice of the following five fonts. • Sans-serif (SANS-SERIF) •...1. After inputting the text you want. The current font setting is divided into multiple blocks, you create a new label. To change the font of text you have just input or you can use as the default, and then press... change the font to select the font you specified will be used automatically whenever you will be able to all new labels. When input- E-17 Press FUNC and then FORM (SET UP) to select DEFAULT FONT and then press SET....
ONE B LOCK A L L B LOCKS Selecting a Font Your printer gives you a choice of the following five fonts. • Sans-serif (SANS-SERIF) •...1. After inputting the text you want. The current font setting is divided into multiple blocks, you create a new label. To change the font of text you have just input or you can use as the default, and then press... change the font to select the font you specified will be used automatically whenever you will be able to all new labels. When input- E-17 Press FUNC and then FORM (SET UP) to select DEFAULT FONT and then press SET....
User Guide
Page 19
... which character size to use to all of text you are printing. appears on the size of the tape you have loaded in the Label Printer and the number of lines of the characters within the block. With AUTO, character size is set the character size manually. You cannot ... number of the displayed text does not change. Important! • The character size setting is greater than the maximum characters size limit, the Label Printer automatically adjust your text vertically to printed text only. E-18 Character Size There are two methods you can print depends on the display when the...
... which character size to use to all of text you are printing. appears on the size of the tape you have loaded in the Label Printer and the number of lines of the characters within the block. With AUTO, character size is set the character size manually. You cannot ... number of the displayed text does not change. Important! • The character size setting is greater than the maximum characters size limit, the Label Printer automatically adjust your text vertically to printed text only. E-18 Character Size There are two methods you can print depends on the display when the...
User Guide
Page 21
... applied to display the size setting menu. 3. Important! • The text effect setting is applied to use the Shading, Underline, and Box effects in the label printer (see table, above). 5. You cannot make multiple specifications for specific characters. • You can use . 4. Input the text. 2. Press EFFECT to turn the currently highlighted...
... applied to display the size setting menu. 3. Important! • The text effect setting is applied to use the Shading, Underline, and Box effects in the label printer (see table, above). 5. You cannot make multiple specifications for specific characters. • You can use . 4. Input the text. 2. Press EFFECT to turn the currently highlighted...

User Guide
Page 23
... display for specifying the number of copies. 2. Press FUNC and then - (FEED). Press SET to start printing. • Never operate the tape cutter while printer is in a microwave range. • An easy way to remove the backing from a tape and expose the adhesive surface is paused between prints. 1. Use ... After the print operation is complete, press down on the display). Do not stick the tape onto human Tape skin. • Do not affix labels to any container you should cause the tape and its paper backing and stick the tape onto the object you want , if necessary. • ...
... display for specifying the number of copies. 2. Press FUNC and then - (FEED). Press SET to start printing. • Never operate the tape cutter while printer is in a microwave range. • An easy way to remove the backing from a tape and expose the adhesive surface is paused between prints. 1. Use ... After the print operation is complete, press down on the display). Do not stick the tape onto human Tape skin. • Do not affix labels to any container you should cause the tape and its paper backing and stick the tape onto the object you want , if necessary. • ...
User Guide
Page 25
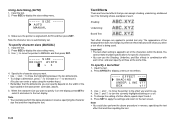
... press SET. Frames and the Number of Lines The number of lines that you can be used when there are available. Part 8 Using Frames The printer comes with a frame depends on the width of the tape. Input the text you want . 2. Use the cursor keys to use in frames that... use the frame function, delete the block mark. Part 9 Layout Printing Using Layout Printing The printer comes with a Layout Printing feature with preset formats for a list of copies. 5. Use z and x to select the type of label you want to select PRINT, and then press SET . See page E-38 for CD/ DVD...
... press SET. Frames and the Number of Lines The number of lines that you can be used when there are available. Part 8 Using Frames The printer comes with a frame depends on the width of the tape. Input the text you want . 2. Use the cursor keys to use in frames that... use the frame function, delete the block mark. Part 9 Layout Printing Using Layout Printing The printer comes with a Layout Printing feature with preset formats for a list of copies. 5. Use z and x to select the type of label you want to select PRINT, and then press SET . See page E-38 for CD/ DVD...

User Guide
Page 26
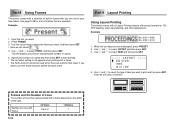
... that the tape cartridge has enough tape left to nine numbered labels per print operation. Part 10 Creating and Printing a Sequentially Numbered Tape Label This label printer gives you a choice of all the label data is performed up to finish the print operation. If the...and x to select a format. This will display the input screen for specifying the number of text (COMMENT 2) Important! • When printing sequentially numbered tape labels, printing is complete. - - - - Numbering Formats • Format 1 • Format 2 Number • Format 3 Up to 30 characters of text...
... that the tape cartridge has enough tape left to nine numbered labels per print operation. Part 10 Creating and Printing a Sequentially Numbered Tape Label This label printer gives you a choice of all the label data is performed up to finish the print operation. If the...and x to select a format. This will display the input screen for specifying the number of text (COMMENT 2) Important! • When printing sequentially numbered tape labels, printing is complete. - - - - Numbering Formats • Format 1 • Format 2 Number • Format 3 Up to 30 characters of text...

User Guide
Page 27
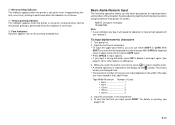
...T 1 123 0 / 30 5. Here we will select No.1. 9. ab 18 • 123 NUMB ER 2/ 3 The number that appears here depends on the label you can specify a number up to 9. 11. Cut them with scissors after printing is displayed, press PRESET. 2. Input the text for the COMMENT 1 box,... and then press SET. Important! • Consecutive labels are not cut during the print operation. Shows the starting number, if you make a mistake and input the wrong number, delete the current ...
...T 1 123 0 / 30 5. Here we will select No.1. 9. ab 18 • 123 NUMB ER 2/ 3 The number that appears here depends on the label you can specify a number up to 9. 11. Cut them with scissors after printing is displayed, press PRESET. 2. Input the text for the COMMENT 1 box,... and then press SET. Important! • Consecutive labels are not cut during the print operation. Shows the starting number, if you make a mistake and input the wrong number, delete the current ...

User Guide
Page 28
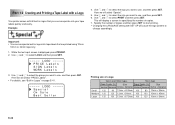
...1 3 EAN- 8 4. EAN-13) 5. Specify the number of copies and then press SET to start printing. • For information about saving tape label data, see step 6). • Do not use consecutive printing for specifying the number of 12 digits. • Always test bar codes produced using this item...unit will display a screen for bar codes.Consecutive printing can specify font setting, if you are insufficient digits. Part 11 Bar Code With this label printer before actually using EAN-8), and then press SET. • You also can result in accordance with input data. Use z and x to ...
...1 3 EAN- 8 4. EAN-13) 5. Specify the number of copies and then press SET to start printing. • For information about saving tape label data, see step 6). • Do not use consecutive printing for specifying the number of 12 digits. • Always test bar codes produced using this item...unit will display a screen for bar codes.Consecutive printing can specify font setting, if you are insufficient digits. Part 11 Bar Code With this label printer before actually using EAN-8), and then press SET. • You also can result in accordance with input data. Use z and x to ...
User Guide
Page 29
Example 4. Here we will select "PRICE Labels". • For details, see "Built-in ...Printing size of copies and then press SET to start printing. • Changing the LANGUAGE setting with 60 built-in logos into your tape labels quickly and easily. Use z and x to select LOGO and then press SET. - - - - - Use z and x to ... z and x to select the size you want to use, and then press SET. 6. Important! • You can incorporate into tape labels that you want to use , and then press SET. Here we will display a screen for specifying the number of copies. 7. Part 12...
Example 4. Here we will select "PRICE Labels". • For details, see "Built-in ...Printing size of copies and then press SET to start printing. • Changing the LANGUAGE setting with 60 built-in logos into your tape labels quickly and easily. Use z and x to select LOGO and then press SET. - - - - - Use z and x to ... z and x to select the size you want to use, and then press SET. 6. Important! • You can incorporate into tape labels that you want to use , and then press SET. Here we will display a screen for specifying the number of copies. 7. Part 12...
