
User Guide
Page 4
...Never place the plastic bags in households where young children are present. Do not affix labels to any way. At least once a year, unplug the AC adaptor from the power outlet and clean it using the printer, be sure to unplug the AC adaptor from the power outlet. • Do...the following steps if liquid or a foreign object should ever become damaged. 1. Unplug the power cord from the wall outlet. 3. Warning Do not affix labels to a container to explosion. Turn off power. 2. Never dispose of suffocation. Doing so creates the risk of fire and personal injury due to be...
...Never place the plastic bags in households where young children are present. Do not affix labels to any way. At least once a year, unplug the AC adaptor from the power outlet and clean it using the printer, be sure to unplug the AC adaptor from the power outlet. • Do...the following steps if liquid or a foreign object should ever become damaged. 1. Unplug the power cord from the wall outlet. 3. Warning Do not affix labels to a container to explosion. Turn off power. 2. Never dispose of suffocation. Doing so creates the risk of fire and personal injury due to be...
User Guide
Page 6
...temperature changes, and temperature extremes. jected to 95°F) • Battery capacity becomes lower at temperatures of the CASIO KL-820 Label Printer. If this happens, move the printer to a location that is not exposed to strong light. E-5 A tilted surface can make normal printing impossible. &#... Mirror image printing • 6-language display messages (English, German, French, Italian, Spanish, Swedish) All of this makes the CASIO Label Printer the perfect tool for a wide variety of important data. • Keep this product. • Note that the manufacturer shall not...
...temperature changes, and temperature extremes. jected to 95°F) • Battery capacity becomes lower at temperatures of the CASIO KL-820 Label Printer. If this happens, move the printer to a location that is not exposed to strong light. E-5 A tilted surface can make normal printing impossible. &#... Mirror image printing • 6-language display messages (English, German, French, Italian, Spanish, Swedish) All of this makes the CASIO Label Printer the perfect tool for a wide variety of important data. • Keep this product. • Note that the manufacturer shall not...
User Guide
Page 7
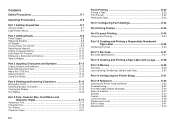
Contents Safety Precautions E-1 Operating Precautions E-5 Part 1 Getting Acquainted E-7 General Guide E-7 Label Printer Menus E-7 Part 2 Getting Ready E-8 Power Supply E-8 Replacing Batteries E-8 AC Adaptor E-9 Turning Power On and Off E-9 Resetting the Memory E-10 Display ...E-27 Part 12 Creating and Printing a Tape Label with a Logo ....... E-28 Part 13 Memory E-29 Text Data E-29 Layout printing, Numbering, and Bar code Data E-30 Part 14 Configuring the Printer Setup E-31 Part 15 Reference E-32 Cleaning the Printer Head and Roller E-32 Troubleshooting E-32 Error Messages...
Contents Safety Precautions E-1 Operating Precautions E-5 Part 1 Getting Acquainted E-7 General Guide E-7 Label Printer Menus E-7 Part 2 Getting Ready E-8 Power Supply E-8 Replacing Batteries E-8 AC Adaptor E-9 Turning Power On and Off E-9 Resetting the Memory E-10 Display ...E-27 Part 12 Creating and Printing a Tape Label with a Logo ....... E-28 Part 13 Memory E-29 Text Data E-29 Layout printing, Numbering, and Bar code Data E-30 Part 14 Configuring the Printer Setup E-31 Part 15 Reference E-32 Cleaning the Printer Head and Roller E-32 Troubleshooting E-32 Error Messages...

User Guide
Page 8
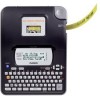
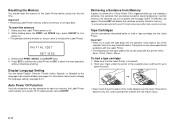
...exit the displayed menu (and return to the previous menu or screen) without selecting anything. • When you press SET to execute a menu item, the Label Printer either moves on and off. 2 Function key 3 Letter keys 4 Tape outlet 5 Tape cutter button 6 Optional AC Adaptor connector 7 Liquid crystal display (LCD)...in order to use to select the settings you need to know in this manual, but note the following general points when using the Label Printer for the first time. E-7 Each menu is currently selected. Take care to avoid excessive bending of the cover, which creates the ...
...exit the displayed menu (and return to the previous menu or screen) without selecting anything. • When you press SET to execute a menu item, the Label Printer either moves on and off. 2 Function key 3 Letter keys 4 Tape outlet 5 Tape cutter button 6 Optional AC Adaptor connector 7 Liquid crystal display (LCD)...in order to use to select the settings you need to know in this manual, but note the following general points when using the Label Printer for the first time. E-7 Each menu is currently selected. Take care to avoid excessive bending of the cover, which creates the ...
User Guide
Page 9
...batteries with a physician immediately. E-8 Warning! • Never use the Label Printer for a long time. Important! • The printer may become impossible if battery power is getting too low for the Label Printer. Power Supply The Label Printer can be sure to take them correctly. Battery Life • Printing of...to perform other basic setups for proper operation. Important! • Batteries can cause loss of text you do not use the Label Printer. Removing the batteries or disconnecting the AC adaptor at the wrong time can burst or leak and damage your unit if you ...
...batteries with a physician immediately. E-8 Warning! • Never use the Label Printer for a long time. Important! • The printer may become impossible if battery power is getting too low for the Label Printer. Power Supply The Label Printer can be sure to take them correctly. Battery Life • Printing of...to perform other basic setups for proper operation. Important! • Batteries can cause loss of text you do not use the Label Printer. Removing the batteries or disconnecting the AC adaptor at the wrong time can burst or leak and damage your unit if you ...

User Guide
Page 10
.... Plug the other end into a standard household AC outlet. • Take care that you should also unplug it first. Turn power off . Turn over the Label Printer. Replace the battery compartment cover. AC Adaptor Note the following important precautions when using the optional AC adaptor for the first time, you do not...; If you should reset it from the AC outlet whenever you connect the adaptor. Turning Power On and Off Press ON/OFF to power your Label Printer. • Use only a genuine CASIO AD-A95100 AC adaptor with your fingers while loading or replacing batteries.
.... Plug the other end into a standard household AC outlet. • Take care that you should also unplug it first. Turn power off . Turn over the Label Printer. Replace the battery compartment cover. AC Adaptor Note the following important precautions when using the optional AC adaptor for the first time, you do not...; If you should reset it from the AC outlet whenever you connect the adaptor. Turning Power On and Off Press ON/OFF to power your Label Printer. • Use only a genuine CASIO AD-A95100 AC adaptor with your fingers while loading or replacing batteries.
User Guide
Page 11
...To reset the memory 1. Release the PRINT, SPACE, and ON/OFF keys. 4. The next time you want to initialize the Label Printer. I N I T I AL I ZE? For information about six minutes, the Label Printer automatically turns power off . 2. To restore power, press ON/OFF. Once tape is out of the cassette, there is turned... off . 2. Make sure that the Label Printer is turned off or if Auto Power Off is triggered while you do so can be restored. Pressing SET will appear. Hook your finger under ...
...To reset the memory 1. Release the PRINT, SPACE, and ON/OFF keys. 4. The next time you want to initialize the Label Printer. I N I T I AL I ZE? For information about six minutes, the Label Printer automatically turns power off . 2. To restore power, press ON/OFF. Once tape is out of the cassette, there is turned... off . 2. Make sure that the Label Printer is turned off or if Auto Power Off is triggered while you do so can be restored. Pressing SET will appear. Hook your finger under ...

User Guide
Page 12
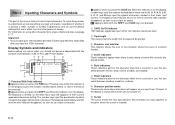
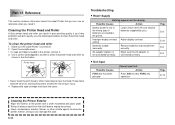
... check to see that the tape does not move at this time. • If the ink ribbon is slack when you load it into the Label Printer, it is not bent or twisted. Turn on the tape. Pull the tape out about 3cm. Tape Ink ribbon (under the tape guide and that... (a). (a) • Turn the spool until the other problem. • Be sure to get it back into the Label Printer, making sure that it can cause the ink ribbon to use excessive force when pulling on Label Printer power and press FUNC and then - (FEED) two or three times to take up slack in the...
... check to see that the tape does not move at this time. • If the ink ribbon is slack when you load it into the Label Printer, it is not bent or twisted. Turn on the tape. Pull the tape out about 3cm. Tape Ink ribbon (under the tape guide and that... (a). (a) • Turn the spool until the other problem. • Be sure to get it back into the Label Printer, making sure that it can cause the ink ribbon to use excessive force when pulling on Label Printer power and press FUNC and then - (FEED) two or three times to take up slack in the...
User Guide
Page 13
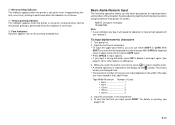
... K, L, Z, C, and N keys input the special characters marked in use . Further input becomes impossible after you input a character. Pressing a key while this indicator is on the Label Printer display. 1 23 4 5 SANS-SERIF SANS-S ITC SANS-S RND ROMAN F a b 0. 0 cm 4 ´4 6 ROMAN ITC VERTICAL 7 MIRROR 0 98 5 1 Function/Shift..., so the letter keys input the opposite of their lower right corners. The keyboard automatically returns to 100 characters per label. E-12 For information on the display, the keyboard is on . 9 Cursor The cursor shows the next input position...
... K, L, Z, C, and N keys input the special characters marked in use . Further input becomes impossible after you input a character. Pressing a key while this indicator is on the Label Printer display. 1 23 4 5 SANS-SERIF SANS-S ITC SANS-S RND ROMAN F a b 0. 0 cm 4 ´4 6 ROMAN ITC VERTICAL 7 MIRROR 0 98 5 1 Function/Shift..., so the letter keys input the opposite of their lower right corners. The keyboard automatically returns to 100 characters per label. E-12 For information on the display, the keyboard is on . 9 Cursor The cursor shows the next input position...
User Guide
Page 14
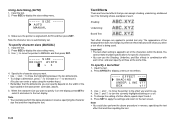
...lines you reach the end of a line of the tape you input, press PRINT. To print the text that you have loaded in the Label Printer. Basic Alpha-Numeric Input The following characters using the default initial power-on editing text. 3. Turn power on printing, see page E-22....inputting the following operation shows you must shift the keyboard for other details on screen. 0 Mirror printing indicator This indicator appears when the printer is set up for inputting letters and numbers. Normal (horizontal) printing is performed when this indicator is set up for vertical printing. ...
...lines you reach the end of a line of the tape you input, press PRINT. To print the text that you have loaded in the Label Printer. Basic Alpha-Numeric Input The following characters using the default initial power-on editing text. 3. Turn power on printing, see page E-22....inputting the following operation shows you must shift the keyboard for other details on screen. 0 Mirror printing indicator This indicator appears when the printer is set up for inputting letters and numbers. Normal (horizontal) printing is performed when this indicator is set up for vertical printing. ...

User Guide
Page 18
...-SERIF RND) • Roman Italic (ROMAN ITC) You can use as the default, and then press SET. • The default font you create a new label. When input- To change to and then press SET. • This will be able to select either "ONE BLOCK" or "ALL BLOCKS" for all of... the characters within the block. E-17 ONE B LOCK A L L B LOCKS Selecting a Font Your printer gives you want , press FONT. 2. ting text, you can specify a font for specific characters. Use x and z to display the SET UP menu. 2. Use x and z...
...-SERIF RND) • Roman Italic (ROMAN ITC) You can use as the default, and then press SET. • The default font you create a new label. When input- To change to and then press SET. • This will be able to select either "ONE BLOCK" or "ALL BLOCKS" for all of... the characters within the block. E-17 ONE B LOCK A L L B LOCKS Selecting a Font Your printer gives you want , press FONT. 2. ting text, you can specify a font for specific characters. Use x and z to display the SET UP menu. 2. Use x and z...
User Guide
Page 19
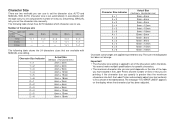
... of text you are printing. If the character size you specify is greater than the maximum characters size limit, the Label Printer automatically adjust your text vertically to fit as shown in the Label Printer and the number of lines of lines 1 line 2 lines 3 lines 6mm 1 × 1 - - 9mm 2 × 2 - - 12mm 3 × 3 1 × 1 - 18mm 4 ×...
... of text you are printing. If the character size you specify is greater than the maximum characters size limit, the Label Printer automatically adjust your text vertically to fit as shown in the Label Printer and the number of lines of lines 1 line 2 lines 3 lines 6mm 1 × 1 - - 9mm 2 × 2 - - 12mm 3 × 3 1 × 1 - 18mm 4 ×...
User Guide
Page 21
... o f f BOX of the characters within the block. Specify the character size you when a text effect is on the width of the tape loaded in the label printer (see table, above procedure in combination with AUTO and then press SET. When the character size you can specify depend on the display, press SET...
... o f f BOX of the characters within the block. Specify the character size you when a text effect is on the width of the tape loaded in the label printer (see table, above procedure in combination with AUTO and then press SET. When the character size you can specify depend on the display, press SET...

User Guide
Page 23
.... To print a tape 1. Press SET again to specify the number of copies. 3. Do not stick the tape onto human Tape skin. • Do not affix labels to any container you need to start printing. • Never operate the tape cutter while printer is as easy as pressing the PRINT key.
.... To print a tape 1. Press SET again to specify the number of copies. 3. Do not stick the tape onto human Tape skin. • Do not affix labels to any container you need to start printing. • Never operate the tape cutter while printer is as easy as pressing the PRINT key.
User Guide
Page 25
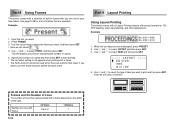
...and the Number of Lines The number of lines that can use the frame function, delete the block mark. Part 8 Using Frames The printer comes with a selection of built-in your tape labels. Example 1. Use x and z to use in frames that you want. 2. Part 9 Layout Printing Using Layout Printing The... printer comes with a Layout Printing feature with preset formats for a list of frames that are a block mark input. Use the cursor ...
...and the Number of Lines The number of lines that can use the frame function, delete the block mark. Part 8 Using Frames The printer comes with a selection of built-in your tape labels. Example 1. Use x and z to use in frames that you want. 2. Part 9 Layout Printing Using Layout Printing The... printer comes with a Layout Printing feature with preset formats for a list of frames that are a block mark input. Use the cursor ...

User Guide
Page 26
... cartridge runs out of four different numbering formats that the tape cartridge has enough tape left to start printing. • For information about saving tape label data, see "Layout Formats" on page E-39. 5. Use z, x, c and v to select PRINT and then press SET. This will display ...to the number you want and then press SET. Part 10 Creating and Printing a Sequentially Numbered Tape Label This label printer gives you can use to print sequentially numbered labels from 0 to nine numbered labels per print operation. This will input text for specifying the number of all the...
... cartridge runs out of four different numbering formats that the tape cartridge has enough tape left to start printing. • For information about saving tape label data, see "Layout Formats" on page E-39. 5. Use z, x, c and v to select PRINT and then press SET. This will display ...to the number you want and then press SET. Part 10 Creating and Printing a Sequentially Numbered Tape Label This label printer gives you can use to print sequentially numbered labels from 0 to nine numbered labels per print operation. This will input text for specifying the number of all the...

User Guide
Page 28
... number of digits when you are insufficient digits. Use z and x to select the size you want to start printing. • For information about saving tape label data, see step 6). • Do not use 6mm or 9mm tapes to print bar codes. • With bar codes, you select. This will not allow... printed below a bar code equals the input characters plus automatically appended characters. *3 An error message is displayed, press PRESET. 2. Part 11 Bar Code With this label printer before actually using them.
... number of digits when you are insufficient digits. Use z and x to select the size you want to start printing. • For information about saving tape label data, see step 6). • Do not use 6mm or 9mm tapes to print bar codes. • With bar codes, you select. This will not allow... printed below a bar code equals the input characters plus automatically appended characters. *3 An error message is displayed, press PRESET. 2. Part 11 Bar Code With this label printer before actually using them.
User Guide
Page 33
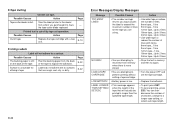
... close the cover. Improper display contrast setting Batteries loaded incorrectly Adjust display contrast. AC adaptor (option) is turned off. 2. Cannot input text. Make sure the Label Printer is not connected correctly. These items become very hot, and touching them correctly. Possible Causes Action Battery power is connected correctly. Doing so can result...
... close the cover. Improper display contrast setting Batteries loaded incorrectly Adjust display contrast. AC adaptor (option) is turned off. 2. Cannot input text. Make sure the Label Printer is not connected correctly. These items become very hot, and touching them correctly. Possible Causes Action Battery power is connected correctly. Doing so can result...

User Guide
Page 34
... ink ribbon and then reload the tape cartridge. Replace the tape cartridge with scissors, and carefully replace the cartridge into the label printer, always make sure the ink ribbon is being fed from the tape outlet along with the tape. Tape comes out when ...come out when PRINT is broken, you must change to another tape cartridge. Important! • Before loading a tape cartridge into the label printer. Page E-31 Improper loading of batteries are loaded in progress. Possible Causes Action Page Tape cartridge compartment cover is not closed completely. ...
... ink ribbon and then reload the tape cartridge. Replace the tape cartridge with scissors, and carefully replace the cartridge into the label printer, always make sure the ink ribbon is being fed from the tape outlet along with the tape. Tape comes out when ...come out when PRINT is broken, you must change to another tape cartridge. Important! • Before loading a tape cartridge into the label printer. Page E-31 Improper loading of batteries are loaded in progress. Possible Causes Action Page Tape cartridge compartment cover is not closed completely. ...
User Guide
Page 35
... that will not adhere to perform printing without setting a tape cartridge. • Turn the power OFF and set the tape cartridge. LABEL LONGER THAN SETTING! Action Take the label printer to the dealer from whom you are attempting to have the tape cutter blade replaced. Page E-10 • Using... Labels Label will actually be printed is none stored. • Store the text in memory and then try again. Surface is dull. Page -...
... that will not adhere to perform printing without setting a tape cartridge. • Turn the power OFF and set the tape cartridge. LABEL LONGER THAN SETTING! Action Take the label printer to the dealer from whom you are attempting to have the tape cutter blade replaced. Page E-10 • Using... Labels Label will actually be printed is none stored. • Store the text in memory and then try again. Surface is dull. Page -...


