

User Guide
Page 3
Be sure to perform the following procedure to load batteries, reset the calculator, and adjust the contrast before trying to the calculator and then turn on power and perform the memory reset operation. 2 i Load the four batteries that come with your finger at the location marked "BACK UP" ...accidently press the o key, attach the case to use the calculator for the first time. 1. Remove the back cover from the calculator by pulling with calculator. • Make sure that its tabs enter the holes marked 2 and turn the calculator front side up. Remove the insulating sheet at the point ...
Be sure to perform the following procedure to load batteries, reset the calculator, and adjust the contrast before trying to the calculator and then turn on power and perform the memory reset operation. 2 i Load the four batteries that come with your finger at the location marked "BACK UP" ...accidently press the o key, attach the case to use the calculator for the first time. 1. Remove the back cover from the calculator by pulling with calculator. • Make sure that its tabs enter the holes marked 2 and turn the calculator front side up. Remove the insulating sheet at the point ...
User Guide
Page 4
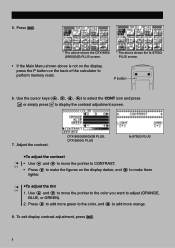
... c to move the pointer to perform memory reset. 5. CFX • Press e to make the figures on the back of the calculator to CONTRAST. P button 6. To exit display contrast adjustment, press m. Press m. * The above shows the CFX-9850 (9950)G(B) PLUS screen. * The above shows the fx-9750G PLUS screen. • If the Main... 8. Press e to add more green to the color, and d to display the contrast adjustment screen. 7. CFX-9850(9950)GB PLUS, CFX-9850G PLUS fx-9750G PLUS uTo adjust the contrast • Use f and c to move the pointer to the color you want to make them lighter.
... c to move the pointer to perform memory reset. 5. CFX • Press e to make the figures on the back of the calculator to CONTRAST. P button 6. To exit display contrast adjustment, press m. Press m. * The above shows the CFX-9850 (9950)G(B) PLUS screen. * The above shows the fx-9750G PLUS screen. • If the Main... 8. Press e to add more green to the color, and d to display the contrast adjustment screen. 7. CFX-9850(9950)GB PLUS, CFX-9850G PLUS fx-9750G PLUS uTo adjust the contrast • Use f and c to move the pointer to the color you want to make them lighter.
User Guide
Page 21
.... • Be sure that the power switch is set to OFF when replacing batteries. • If the calculator is used during that the problem is brought back to operate. In such a case, perform the Reset operation to clear the memory and restore normal key operation. • If the... calculator stops operating correctly for any damages, expenses, lost profits, lost savings or any other person for some reason, use a...
.... • Be sure that the power switch is set to OFF when replacing batteries. • If the calculator is used during that the problem is brought back to operate. In such a case, perform the Reset operation to clear the memory and restore normal key operation. • If the... calculator stops operating correctly for any damages, expenses, lost profits, lost savings or any other person for some reason, use a...
User Guide
Page 27
Circle and Tangents 418 5. Rotating a Figure 425 Appendix ...429 Appendix A Resetting the Calculator 430 Appendix B Power Supply 432 Appendix C Error Message Table 436 Appendix D Input Ranges 438 Appendix E Specifications 441 Index ...443 Command Index 449 ...389 Chapter 21 Data Communications 399 21-1 Connecting Two Units 400 21-2 Connecting the Unit with a Personal Computer 401 21-3 Connecting the Unit with a CASIO Label Printer 402 21-4 Before Performing a Data Communication Operation 403 21-5 Performing a Data Transfer Operation 404 21-6 Screen Send Function 408 21-7 Data...
Circle and Tangents 418 5. Rotating a Figure 425 Appendix ...429 Appendix A Resetting the Calculator 430 Appendix B Power Supply 432 Appendix C Error Message Table 436 Appendix D Input Ranges 438 Appendix E Specifications 441 Index ...443 Command Index 449 ...389 Chapter 21 Data Communications 399 21-1 Connecting Two Units 400 21-2 Connecting the Unit with a Personal Computer 401 21-3 Connecting the Unit with a CASIO Label Printer 402 21-4 Before Performing a Data Communication Operation 403 21-5 Performing a Data Transfer Operation 404 21-6 Screen Send Function 408 21-7 Data...


