
Owners Manual
Page 16
... much pressure is required for a half-press and a full-press of the shutter button is complete, the camera will beep, the back lamp will light green, and the focus frame will turn on the display. Zoom controller z Telephoto w Wide Angle 3. Press [r] (REC) to focus the image. Make sure R is in focus.) 16 Quick...
... much pressure is required for a half-press and a full-press of the shutter button is complete, the camera will beep, the back lamp will light green, and the focus frame will turn on the display. Zoom controller z Telephoto w Wide Angle 3. Press [r] (REC) to focus the image. Make sure R is in focus.) 16 Quick...

Owners Manual
Page 17
... Basics This records the snapshot. See page 45 for Auto Focus to operate will record using Quick Shutter (page 66). • With Quick Shutter, the camera focuses faster than normal Auto Focus, which the subject to be out of focus when Quick Shutter is not within the focus frame in the... subject and try to shoot an image in order to keep the camera still, press the shutter button the rest of the frame... Continuing to ensure proper focus. . If the focus frame stays red and the back lamp is flashing green, it means that some images may be focused on is used...
... Basics This records the snapshot. See page 45 for Auto Focus to operate will record using Quick Shutter (page 66). • With Quick Shutter, the camera focuses faster than normal Auto Focus, which the subject to be out of focus when Quick Shutter is not within the focus frame in the... subject and try to shoot an image in order to keep the camera still, press the shutter button the rest of the frame... Continuing to ensure proper focus. . If the focus frame stays red and the back lamp is flashing green, it means that some images may be focused on is used...
Owners Manual
Page 21
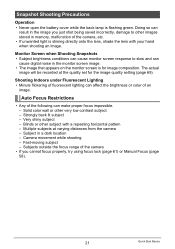
... Lighting • Minute flickering of fluorescent lighting can affect the brightness or color of the camera • If you just shot being saved incorrectly, damage to slow and can cause digital noise in memory, malfunction of the following can make proper focus impossible. - Very shiny ... image quality setting (page 69). Auto Focus Restrictions • Any of the camera, etc. • If unwanted light is flashing green. The actual image will be recorded at varying distances from the camera - Doing so can cause monitor screen response to other very low contrast subject ...
... Lighting • Minute flickering of fluorescent lighting can affect the brightness or color of the camera • If you just shot being saved incorrectly, damage to slow and can cause digital noise in memory, malfunction of the following can make proper focus impossible. - Very shiny ... image quality setting (page 69). Auto Focus Restrictions • Any of the camera, etc. • If unwanted light is flashing green. The actual image will be recorded at varying distances from the camera - Doing so can cause monitor screen response to other very low contrast subject ...

Owners Manual
Page 22
..., 128) will turn power on To enter the REC Mode, press [ON/OFF] (Power) or [r] (REC). Turning the Camera On and Off To turn on. The back lamp will light (green) momentarily and the camera will turn off when you press [r] (REC) or [p] (PLAY) (page 128). 22 Quick Start Basics You also can... configure the camera so power does not turn on when you do not perform any operation for a preset amount of...
..., 128) will turn power on To enter the REC Mode, press [ON/OFF] (Power) or [r] (REC). Turning the Camera On and Off To turn on. The back lamp will light (green) momentarily and the camera will turn off when you press [r] (REC) or [p] (PLAY) (page 128). 22 Quick Start Basics You also can... configure the camera so power does not turn on when you do not perform any operation for a preset amount of...

Owners Manual
Page 28
..."0 Auto" flashes on the monitor screen while detection of the way down. Using Auto Shutter (Auto Shutter) With Auto Shutter, the camera releases the shutter automatically when it detects that certain conditions are minimized. Indicator: The indicator color changes from the top (Auto Shutter). ... wait until the camera adjusts exposure and focus automatically. 2. B 28 Snapshot Tutorial The camera will go into a standby mode and start detecting hand and subject movement. Use [8] and [2] to select the third Control Panel option from red to green when the camera is getting ready ...
..."0 Auto" flashes on the monitor screen while detection of the way down. Using Auto Shutter (Auto Shutter) With Auto Shutter, the camera releases the shutter automatically when it detects that certain conditions are minimized. Indicator: The indicator color changes from the top (Auto Shutter). ... wait until the camera adjusts exposure and focus automatically. 2. B 28 Snapshot Tutorial The camera will go into a standby mode and start detecting hand and subject movement. Use [8] and [2] to select the third Control Panel option from red to green when the camera is getting ready ...

Owners Manual
Page 29
... exposure and focus automatically. 2. Press the shutter button the rest of the subject. To use Detect Smile to green when the camera is in progress. Indicator: The indicator color changes from red to record when a subject is in the subject you are following. • "0...the way down . press the shutter button to minimize image blur (Detect Panning) 1. The camera will put the camera into a standby mode and start detecting whether the subject is getting ready to green when the camera is smiling. Press the shutter button the rest of the way down . Indicator: The ...
... exposure and focus automatically. 2. Press the shutter button the rest of the subject. To use Detect Smile to green when the camera is in progress. Indicator: The indicator color changes from red to record when a subject is in the subject you are following. • "0...the way down . press the shutter button to minimize image blur (Detect Panning) 1. The camera will put the camera into a standby mode and start detecting whether the subject is getting ready to green when the camera is smiling. Press the shutter button the rest of the way down . Indicator: The ...

Owners Manual
Page 32
...Detection: Normal" and then press [SET]. 4. Use [4] and [6] to select the fifth Control Panel option from the top (Face Recognition). 3. The camera will focus and the frames around the faces it focuses on will detect human faces and display a frame around each one. 5. Using Face Recognition (... feature adjusts focus and brightness to the faces in the image. In the REC mode, press [SET]. 2. The camera will turn green. 6. Point the camera at the subject(s). Face recognition has two modes, described below. To perform a face recognition recording operation (Normal) 1.
...Detection: Normal" and then press [SET]. 4. Use [4] and [6] to select the fifth Control Panel option from the top (Face Recognition). 3. The camera will focus and the frames around the faces it focuses on will detect human faces and display a frame around each one. 5. Using Face Recognition (... feature adjusts focus and brightness to the faces in the image. In the REC mode, press [SET]. 2. The camera will turn green. 6. Point the camera at the subject(s). Face recognition has two modes, described below. To perform a face recognition recording operation (Normal) 1.

Owners Manual
Page 36
... ten faces. In the REC mode, press [SET]. 2. Use [4] and [6] to select the fifth Control Panel option from the camera (when shooting with the light blue boundary) and adjust its brightness. A green focus frame will detect human faces and display a boundary around each one with the Normal mode). 36 Snapshot Tutorial Speed...
... ten faces. In the REC mode, press [SET]. 2. Use [4] and [6] to select the fifth Control Panel option from the camera (when shooting with the light blue boundary) and adjust its brightness. A green focus frame will detect human faces and display a boundary around each one with the Normal mode). 36 Snapshot Tutorial Speed...

Owners Manual
Page 48
...record about 38 minutes and 33 seconds of the following BEST SHOT scenes is not possible while any one of Voice Recording using the camera's built-in the recording. Press the shutter button again to appear on the monitor screen. 3. Shooting a Snapshot while Shooting a ...Movie 1. You can use [2] ( ) while shooting a movie to start recording. • The back lamp flashes green while recording is in progress. • Pressing [SET] during movie recording is selected. This causes ` to stop audio recording. Remaining recording time &#...
...record about 38 minutes and 33 seconds of the following BEST SHOT scenes is not possible while any one of Voice Recording using the camera's built-in the recording. Press the shutter button again to appear on the monitor screen. 3. Shooting a Snapshot while Shooting a ...Movie 1. You can use [2] ( ) while shooting a movie to start recording. • The back lamp flashes green while recording is in progress. • Pressing [SET] during movie recording is selected. This causes ` to stop audio recording. Remaining recording time &#...

Owners Manual
Page 51
... so you are optimized for uploading (page 109). Depending on your camera model, the sample scene is indicated by the back lamp flashing green. NOTE • The BEST SHOT YouTube scene sets up the camera for auction site images. Movies recorded with the boundary on the scene...movie. • Selecting the Night Scene or Fireworks scene results in the image, the camera automatically performs a digital noise reduction process when either direction. • To return to the scene menu, slide the zoom controller again. • To scroll between scenes, use a tripod to avoid image blur...
... so you are optimized for uploading (page 109). Depending on your camera model, the sample scene is indicated by the back lamp flashing green. NOTE • The BEST SHOT YouTube scene sets up the camera for auction site images. Movies recorded with the boundary on the scene...movie. • Selecting the Night Scene or Fireworks scene results in the image, the camera automatically performs a digital noise reduction process when either direction. • To return to the scene menu, slide the zoom controller again. • To scroll between scenes, use a tripod to avoid image blur...

Owners Manual
Page 65
... (REC) * [MENU] * REC Tab * AF Area U Spot This mode takes readings of a small area in green. O When you half-press the shutter button while this setting selected, the camera will select the optimum Auto Focus area from among nine possible areas. C 65 Advanced Settings "U Spot" or "O Tracking" ..."I Multi When you are using Auto Shutter (page 28). The focus frame of the area where the camera focuses will follow the movement of the image. Using the easy Mode (easy Mode) Procedure [r] (REC) * [MENU] * REC Tab * easy Mode ...
... (REC) * [MENU] * REC Tab * AF Area U Spot This mode takes readings of a small area in green. O When you half-press the shutter button while this setting selected, the camera will select the optimum Auto Focus area from among nine possible areas. C 65 Advanced Settings "U Spot" or "O Tracking" ..."I Multi When you are using Auto Shutter (page 28). The focus frame of the area where the camera focuses will follow the movement of the image. Using the easy Mode (easy Mode) Procedure [r] (REC) * [MENU] * REC Tab * easy Mode ...
Owners Manual
Page 71
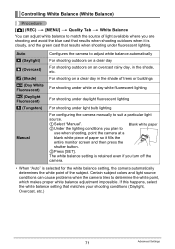
The white balance setting is retained even if you turn off the camera. • When "Auto" is cloudy, and the green cast that results when shooting under light bulb lighting For configuring the camera manually to suit a particular light source. 1Select "Manual". Controlling White Balance (White Balance) Procedure [r] (REC) * [MENU] * Quality Tab * White Balance...
The white balance setting is retained even if you turn off the camera. • When "Auto" is cloudy, and the green cast that results when shooting under light bulb lighting For configuring the camera manually to suit a particular light source. 1Select "Manual". Controlling White Balance (White Balance) Procedure [r] (REC) * [MENU] * Quality Tab * White Balance...

Owners Manual
Page 73
... * Dynamic Range You can adjust the Dynamic Range setting in Color Filters (Color Filter) Procedure [r] (REC) * [MENU] * Quality Tab * Color Filter Settings: Off, B/W, Sepia, Red, Green, Blue, Yellow, Pink, and Purple Controlling Image Sharpness (Sharpness) Procedure [r] (REC) * [MENU] * Quality Tab * Sharpness You can change the dynamic range of overexposure and underexposure...
... * Dynamic Range You can adjust the Dynamic Range setting in Color Filters (Color Filter) Procedure [r] (REC) * [MENU] * Quality Tab * Color Filter Settings: Off, B/W, Sepia, Red, Green, Blue, Yellow, Pink, and Purple Controlling Image Sharpness (Sharpness) Procedure [r] (REC) * [MENU] * Quality Tab * Sharpness You can change the dynamic range of overexposure and underexposure...
Owners Manual
Page 115
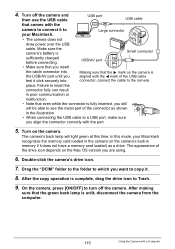
... • Note that comes with the port. 5. USB/AV port • Make sure that the green back lamp is unlit, disconnect the camera from the computer. 115 Using the Camera with the 4 mark of the USB cable connector, connect the cable to insert the connector fully can result...OS version you insert the cable connector into Making sure that the 6 mark on the camera. Turn off the camera. 4. In this time. Turn on the camera is fully inserted, you still will light green at this mode, your Macintosh. After the copy operation is Small connector sufficiently charged ...
... • Note that comes with the port. 5. USB/AV port • Make sure that the green back lamp is unlit, disconnect the camera from the computer. 115 Using the Camera with the 4 mark of the USB cable connector, connect the cable to insert the connector fully can result...OS version you insert the cable connector into Making sure that the 6 mark on the camera. Turn off the camera. 4. In this time. Turn on the camera is fully inserted, you still will light green at this mode, your Macintosh. After the copy operation is Small connector sufficiently charged ...
Owners Manual
Page 123
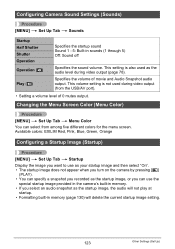
... an audio snapshot as the audio level during video output (from among five different colors for the menu screen. Available colors: EXILIM Red, Pink, Blue, Green, Orange Configuring a Startup Image (Startup) Procedure [MENU] * Set Up Tab * Startup Display the image you want to ... startup image, or you can select from the USB/AV port). • Setting a volume level of movie and Audio Snapshot audio output. Configuring Camera Sound Settings (Sounds) Procedure [MENU] * Set Up Tab * Sounds Startup Half Shutter Shutter Operation Operation (=) Play (=) Specifies the startup sound Sound...
... an audio snapshot as the audio level during video output (from among five different colors for the menu screen. Available colors: EXILIM Red, Pink, Blue, Green, Orange Configuring a Startup Image (Startup) Procedure [MENU] * Set Up Tab * Startup Display the image you want to ... startup image, or you can select from the USB/AV port). • Setting a volume level of movie and Audio Snapshot audio output. Configuring Camera Sound Settings (Sounds) Procedure [MENU] * Set Up Tab * Sounds Startup Half Shutter Shutter Operation Operation (=) Play (=) Specifies the startup sound Sound...

Owners Manual
Page 132
... in terms of the number of pixels, while the horizontal axis indicates lightness. A histogram that is light. If the histogram appears too lopsided for R (red), G (green), and B (blue). The vertical axis indicates the number of pixels.
... in terms of the number of pixels, while the horizontal axis indicates lightness. A histogram that is light. If the histogram appears too lopsided for R (red), G (green), and B (blue). The vertical axis indicates the number of pixels.

Owners Manual
Page 137
... Removing the battery or memory card while the back lamp is flashing green after power is not supported. • The camera does not have a separate battery for a few hours. 137 Appendix Data Error Precautions Your digital camera is low • Other abnormal operations Any of the above conditions..." to direct sunlight, or large amounts of malfunction. Perform the action indicated by the message that is manufactured using precision digital components. If this camera. To prevent condensation from the bag and open the battery cover for the clock. Near an air conditioner or in a...
... Removing the battery or memory card while the back lamp is flashing green after power is not supported. • The camera does not have a separate battery for a few hours. 137 Appendix Data Error Precautions Your digital camera is low • Other abnormal operations Any of the above conditions..." to direct sunlight, or large amounts of malfunction. Perform the action indicated by the message that is manufactured using precision digital components. If this camera. To prevent condensation from the bag and open the battery cover for the clock. Near an air conditioner or in a...

Owners Manual
Page 144
... it . Make sure that you always take along multiple memory cards whenever using the camera far away from the home or office. • As you record data to pop out of a memory card is flashing green. This will cause it (page 130). Because of this, periodic re-formatting of ... during image playback, you always back up important data on other phenomena can restore normal operation by reformatting it to and delete data from the camera while the back lamp is recommended. • Electrostatic charge, electrical noise, and other media (CD-R, CD-RW, hard disk, etc.) 144 Appendix ...
... it . Make sure that you always take along multiple memory cards whenever using the camera far away from the home or office. • As you record data to pop out of a memory card is flashing green. This will cause it (page 130). Because of this, periodic re-formatting of ... during image playback, you always back up important data on other phenomena can restore normal operation by reformatting it to and delete data from the camera while the back lamp is recommended. • Electrostatic charge, electrical noise, and other media (CD-R, CD-RW, hard disk, etc.) 144 Appendix ...

