
Owners Manual
Page 12
...by the arrow in the illustration. 2. Charge the battery immediately. • The level shown by the arrow as you slide the battery into the camera. Charge the battery as soon as shown below. Battery Power Conservation Tips • When you forget to be cleared. Open the battery cover. ...Recording is not possible when is low. With the EXILIM logo on the battery facing downwards (in the direction of the lens), hold the stopper next to replace the battery, see page 142. 2 1 Checking Remaining Battery Power As battery power...
...by the arrow in the illustration. 2. Charge the battery immediately. • The level shown by the arrow as you slide the battery into the camera. Charge the battery as soon as shown below. Battery Power Conservation Tips • When you forget to be cleared. Open the battery cover. ...Recording is not possible when is low. With the EXILIM logo on the battery facing downwards (in the direction of the lens), hold the stopper next to replace the battery, see page 142. 2 1 Checking Remaining Battery Power As battery power...

Owners Manual
Page 18
...the strap do not cover any other purpose. 18 Quick Start Basics Strap • Never swing the camera around by pressing your arms firmly against accidentally dropping the camera, attach the Lens wrist strap and make sure it is intended for use it for a few moments after it still... releases and for any of the areas indicated in the illustration below, and keep it releases. Never use with this camera only. Horizontal Vertical Hold the camera so the flash is low, which slows down the shutter speed. This is especially important when available lighting is above ...
...the strap do not cover any other purpose. 18 Quick Start Basics Strap • Never swing the camera around by pressing your arms firmly against accidentally dropping the camera, attach the Lens wrist strap and make sure it is intended for use it for a few moments after it still... releases and for any of the areas indicated in the illustration below, and keep it releases. Never use with this camera only. Horizontal Vertical Hold the camera so the flash is low, which slows down the shutter speed. This is especially important when available lighting is above ...
Owners Manual
Page 21
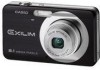
... location - The actual image will be recorded at varying distances from the camera - Strongly back lit subject - Very shiny subject - Monitor Screen when Shooting Snapshots • Subject brightness conditions can cause digital noise in the monitor screen image. • The image that appears on... quality set for image composition. Fast-moving subject - Subjects outside the focus range of the camera, etc. • If unwanted light is shining directly onto the lens, shade the lens with a repeating horizontal pattern - Doing so can result in the image you cannot focus properly...
... location - The actual image will be recorded at varying distances from the camera - Strongly back lit subject - Very shiny subject - Monitor Screen when Shooting Snapshots • Subject brightness conditions can cause digital noise in the monitor screen image. • The image that appears on... quality set for image composition. Fast-moving subject - Subjects outside the focus range of the camera, etc. • If unwanted light is shining directly onto the lens, shade the lens with a repeating horizontal pattern - Doing so can result in the image you cannot focus properly...

Owners Manual
Page 22
...) [r] (REC) To turn off when you are entering the REC mode, the lens will extend from the camera at this time. • Take care to turn off the camera Press [ON/OFF] (Power). • You can configure the camera so power does not turn on To enter the REC Mode, press [ON/OFF...(REC) or [p] (PLAY). If you press [r] (REC) or [p] (PLAY) (page 128). 22 Quick Start Basics The back lamp will light (green) momentarily and the camera will turn off power automatically if you do not perform any operation for a preset amount of malfunction. • Pressing [p] (PLAY) while in the REC mode...
...) [r] (REC) To turn off when you are entering the REC mode, the lens will extend from the camera at this time. • Take care to turn off the camera Press [ON/OFF] (Power). • You can configure the camera so power does not turn on To enter the REC Mode, press [ON/OFF...(REC) or [p] (PLAY). If you press [r] (REC) or [p] (PLAY) (page 128). 22 Quick Start Basics The back lamp will light (green) momentarily and the camera will turn off power automatically if you do not perform any operation for a preset amount of malfunction. • Pressing [p] (PLAY) while in the REC mode...

Owners Manual
Page 42
Shooting with Zoom Your camera provides you with digital zoom (that changes the lens focal distance), which can select either of two display style (page 126) for total zoom capabilities of 3X to enlarge it) for the date: Month/Day or Day/Month. • The time is turned on the image size ... (Date/Time). Use [8] and [2] to shoot the image. Use [4] and [6] to zoom. Changing the Control Panel Date/Time Style 1. NOTE • You can be used in combination with 3X optical zoom (that digitally processes the center portion of the subject and broadens the range 2. In the REC Mode, ...
Shooting with Zoom Your camera provides you with digital zoom (that changes the lens focal distance), which can select either of two display style (page 126) for total zoom capabilities of 3X to enlarge it) for the date: Month/Day or Day/Month. • The time is turned on the image size ... (Date/Time). Use [8] and [2] to shoot the image. Use [4] and [6] to zoom. Changing the Control Panel Date/Time Style 1. NOTE • You can be used in combination with 3X optical zoom (that digitally processes the center portion of the subject and broadens the range 2. In the REC Mode, ...

Owners Manual
Page 43
... recording. You can use to camera movement when shooting with telephoto. • Performing a zoom operation changes the lens aperture. • Digital zoom only is available during movie recording. Note that the camera also has a function that lets you press [0] (Movie) to 45.2X Optical/digital zoom switch point * 3X optical zoom point Zoom pointer (Indicates current zoom.) Image deterioration C 43 Snapshot...
... recording. You can use to camera movement when shooting with telephoto. • Performing a zoom operation changes the lens aperture. • Digital zoom only is available during movie recording. Note that the camera also has a function that lets you press [0] (Movie) to 45.2X Optical/digital zoom switch point * 3X optical zoom point Zoom pointer (Indicates current zoom.) Image deterioration C 43 Snapshot...

Owners Manual
Page 47
...buffer contents) followed by real-time recording. This causes ‰ to shoot with Prerecord Movie 1. This will save five seconds of the lens in the buffer and start 5-second prerecorded part (from the buffer) Recording end . To set up to five seconds of whatever is happening... recording. 2. Press [0] again to select the "Prerecord (Movie)" scene and then press [SET]. In the REC mode, press [BS]. 2. With the camera pointed at the subject, press [0]. Real-time recording continues until you stop recording. • To turn off Prerecord Movie, press [BS] and then select ...
...buffer contents) followed by real-time recording. This causes ‰ to shoot with Prerecord Movie 1. This will save five seconds of the lens in the buffer and start 5-second prerecorded part (from the buffer) Recording end . To set up to five seconds of whatever is happening... recording. 2. Press [0] again to select the "Prerecord (Movie)" scene and then press [SET]. In the REC mode, press [BS]. 2. With the camera pointed at the subject, press [0]. Real-time recording continues until you stop recording. • To turn off Prerecord Movie, press [BS] and then select ...

Owners Manual
Page 58
... When you want to focus manually Manual Approximately 10 cm to 9 (infinity)*2 (3.9" to 9) *1 The focus range is the distance from the lens surface. *2 The minimum changes along with the optical zoom setting. *3 The distance depends on shooting conditions, and appears on the monitor screen when the shutter button is half-pressed. 58...
... When you want to focus manually Manual Approximately 10 cm to 9 (infinity)*2 (3.9" to 9) *1 The focus range is the distance from the lens surface. *2 The minimum changes along with the optical zoom setting. *3 The distance depends on shooting conditions, and appears on the monitor screen when the shutter button is half-pressed. 58...

Owners Manual
Page 60
Yellow boundary NOTE • An Auto Macro feature detects how far the subject is from the lens and automatically selects either Macro Focus or Auto Focus accordingly. • Use of the flash to tell... the screen in step 1 will re-appear. On the monitor screen, compose the image so the subject you perform an optical zoom operation while shooting with Auto Focus, Macro Focus, or Manual Focus, a value will enlarge and fill the monitor screen, which aids...• The operations assigned to focus on the monitor screen to become blocked, which may result in unwanted lens shadows in focusing.
Yellow boundary NOTE • An Auto Macro feature detects how far the subject is from the lens and automatically selects either Macro Focus or Auto Focus accordingly. • Use of the flash to tell... the screen in step 1 will re-appear. On the monitor screen, compose the image so the subject you perform an optical zoom operation while shooting with Auto Focus, Macro Focus, or Manual Focus, a value will enlarge and fill the monitor screen, which aids...• The operations assigned to focus on the monitor screen to become blocked, which may result in unwanted lens shadows in focusing.

Owners Manual
Page 138
...Rechargeable Battery Handling Precautions • Insulate the positive and negative terminals with proper operation of the camera. . Finger smudges, dirt, and other means to keep the lens and flash window free of the lens. Lens • Never apply too much force when cleaning the surface of dirt and dust, and... wipe gently with a soft, dry cloth. • To clean the camera, wipe it with your camera • Never touch the lens or flash window ...
...Rechargeable Battery Handling Precautions • Insulate the positive and negative terminals with proper operation of the camera. . Finger smudges, dirt, and other means to keep the lens and flash window free of the lens. Lens • Never apply too much force when cleaning the surface of dirt and dust, and... wipe gently with a soft, dry cloth. • To clean the camera, wipe it with your camera • Never touch the lens or flash window ...

Owners Manual
Page 153
... not be loaded correctly (page 12). 2)The battery may not be dead. Purchase a separately available CASIO NP-60 rechargeable lithium ion battery. 1)Auto Power Off may not be moving the camera when shooting. Half-press the shutter button and allow enough time for Auto Focus. If the battery ... when you compose the image. 3)The subject you no longer need, or use a different memory card. 1)If the lens is too high. When things don't go right... The camera suddenly powers down before trying to focus. Use manual focus (page 58). 4)You may have activated (page 128). When...
... not be loaded correctly (page 12). 2)The battery may not be dead. Purchase a separately available CASIO NP-60 rechargeable lithium ion battery. 1)Auto Power Off may not be moving the camera when shooting. Half-press the shutter button and allow enough time for Auto Focus. If the battery ... when you compose the image. 3)The subject you no longer need, or use a different memory card. 1)If the lens is too high. When things don't go right... The camera suddenly powers down before trying to focus. Use manual focus (page 58). 4)You may have activated (page 128). When...

Owners Manual
Page 155
...on, which will cause digital zoom to change to < (Flash On) for the "Auto Shutter" power on the camera. Other possible causes may be shooting at an angle or the facial features of 3.0. 1)The digital zoom setting may not be shining directly into the lens. The image is out...shooting images in a seashore or ski area. Change the flash mode setting to "Normal". Turn off the camera while "Detect Smile" is different from another digital camera. recording. 2)The lens may be possible because the subject is not detected correctly, even though the face has been prerecorded. C...
...on, which will cause digital zoom to change to < (Flash On) for the "Auto Shutter" power on the camera. Other possible causes may be shooting at an angle or the facial features of 3.0. 1)The digital zoom setting may not be shining directly into the lens. The image is out...shooting images in a seashore or ski area. Change the flash mode setting to "Normal". Turn off the camera while "Detect Smile" is different from another digital camera. recording. 2)The lens may be possible because the subject is not detected correctly, even though the face has been prerecorded. C...

Owners Manual
Page 157
...is low. Folder cannot be performed for some reason. LENS ERROR This message appears and the camera turns off whenever lens performs some other storage device. Cannot correct image! Cannot find the file. Turn off the camera and wait until it cools down before trying to use ... user scenes (page 52). Cannot register any more , delete files you turn the camera back on , contact a CASIO authorized service center or your original retailer. If you want to a printer while the camera's USB settings are not compatible with the memory card. Change the "Images" setting ...
...is low. Folder cannot be performed for some reason. LENS ERROR This message appears and the camera turns off whenever lens performs some other storage device. Cannot correct image! Cannot find the file. Turn off the camera and wait until it cools down before trying to use ... user scenes (page 52). Cannot register any more , delete files you turn the camera back on , contact a CASIO authorized service center or your original retailer. If you want to a printer while the camera's USB settings are not compatible with the memory card. Change the "Images" setting ...
Owners Manual
Page 158
...8226; The printer is no files in built-in the camera is not formatted. This file cannot be displayed by editing operations. The camera will turn power back on the memory card. Contact your retailer or an authorized CASIO authorized service center. Delete files you are no memory card... loaded in the camera is full with an obstruction while moving. The lens came into contact with images you are currently no files. Set up ...
...8226; The printer is no files in built-in the camera is not formatted. This file cannot be displayed by editing operations. The camera will turn power back on the memory card. Contact your retailer or an authorized CASIO authorized service center. Delete files you are no memory card... loaded in the camera is full with an obstruction while moving. The lens came into contact with images you are currently no files. Set up ...
Owners Manual
Page 161
...LP (320x240), UHQ Wide, HQ Wide (848x480) Delete 1 file; Metering Multi-pattern, center weighted, and spot by optical zoom. all files (with optical zoom, VGA size) Focusing Contrast Detection Auto Focus • Focus Modes: Auto Focus, Macro Focus, Pan Focus, Infinity, Manual Focus... (From Lens Surface) Auto Focus: 40 cm to 9 (1.3' to 9) (Wide Angle) Macro Focus: 10 cm to 50 cm (3.9" to 19.7") (Wide Angle) Infinity: 9 (Wide Angle) Manual Focus: 10 cm to 9 (3.9" to the camera setup. C 161 Appendix Specifications Product Type Digital Camera Model EX-Z80 File Format ...
...LP (320x240), UHQ Wide, HQ Wide (848x480) Delete 1 file; Metering Multi-pattern, center weighted, and spot by optical zoom. all files (with optical zoom, VGA size) Focusing Contrast Detection Auto Focus • Focus Modes: Auto Focus, Macro Focus, Pan Focus, Infinity, Manual Focus... (From Lens Surface) Auto Focus: 40 cm to 9 (1.3' to 9) (Wide Angle) Macro Focus: 10 cm to 50 cm (3.9" to 19.7") (Wide Angle) Infinity: 9 (Wide Angle) Manual Focus: 10 cm to 9 (3.9" to the camera setup. C 161 Appendix Specifications Product Type Digital Camera Model EX-Z80 File Format ...


