User Manual
Page 2
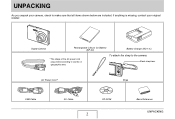
If anything is missing, contact your camera, check to make sure that all items shown below are included. Digital Camera Rechargeable Lithium Ion Battery (NP-20) Battery Charger (BC-11L) * The shape of the AC power cord plug varies according to the camera. Attach strap here. AC Power Cord * Strap USB Cable AV Cable CD-ROM 2 Basic Reference UNPACKING To attach the strap to country or geographic area. UNPACKING As you unpack your original retailer.
If anything is missing, contact your camera, check to make sure that all items shown below are included. Digital Camera Rechargeable Lithium Ion Battery (NP-20) Battery Charger (BC-11L) * The shape of the AC power cord plug varies according to the camera. Attach strap here. AC Power Cord * Strap USB Cable AV Cable CD-ROM 2 Basic Reference UNPACKING To attach the strap to country or geographic area. UNPACKING As you unpack your original retailer.

User Manual
Page 31
... lamp is performing an operation - Removing the memory card from the camera while the camera is flashing green after turning off the camera - In an area exposed to extreme temperature or humidity - Disconnecting the USB cable while a data communication operation is manufactured using precision digital components. Perform the action indicated by the message that is 0°...
... lamp is performing an operation - Removing the memory card from the camera while the camera is flashing green after turning off the camera - In an area exposed to extreme temperature or humidity - Disconnecting the USB cable while a data communication operation is manufactured using precision digital components. Perform the action indicated by the message that is 0°...

User Manual
Page 131
Wait until an image is stopped on the camera is aligned with the S mark of digital camera may remain on the screen longer than the time specified by the slideshow "Time" setting. • In image copied from one image to another. NOTE &#... the movie to play back repeatedly within the time specified by "Interval". AV Cable Yellow White USB/AV connector TV Video Audio VIDEO IN Jack (Yellow) AUDIO IN Jacks (White) Making sure that comes with the camera to connect the camera to view snapshots and movies on a TV screen. 1. B 131 VIEWING SNAPSHOTS AND MOVIES...
Wait until an image is stopped on the camera is aligned with the S mark of digital camera may remain on the screen longer than the time specified by the slideshow "Time" setting. • In image copied from one image to another. NOTE &#... the movie to play back repeatedly within the time specified by "Interval". AV Cable Yellow White USB/AV connector TV Video Audio VIDEO IN Jack (Yellow) AUDIO IN Jacks (White) Making sure that comes with the camera to connect the camera to view snapshots and movies on a TV screen. 1. B 131 VIEWING SNAPSHOTS AND MOVIES...

User Manual
Page 132
... connecting the bundled AV cable to configure the camera's [ ] (REC) and [ ] (PLAY) buttons for the type of the images. • Audio is monaural. • Certain TVs may cut off part of file you can use [S] (DISP) to insert the plug fully can turn off the camera by the camera at a relatively low level... turn on the TV and select its video input mode. IMPORTANT! • When connecting to a TV to display images, be sure to the camera's USB/AV port, insert the plug into the port until you first start displaying images, set the TV volume control at maximum volume. When you feel...
... connecting the bundled AV cable to configure the camera's [ ] (REC) and [ ] (PLAY) buttons for the type of the images. • Audio is monaural. • Certain TVs may cut off part of file you can use [S] (DISP) to insert the plug fully can turn off the camera by the camera at a relatively low level... turn on the TV and select its video input mode. IMPORTANT! • When connecting to a TV to display images, be sure to the camera's USB/AV port, insert the plug into the port until you first start displaying images, set the TV volume control at maximum volume. When you feel...

User Manual
Page 133
...Set Up" tab, select "Video Out" and then press [X]. 3. DVD recorder or video deck: Connect to the USB/AV connector You can play a slideshow of 4:3 or 16:9. 1. Press [MENU]. 2. Camera: Connect to the VIDEO IN and AUDIO IN terminals. - To view the image that is not recorded along with...image. For this video output system: NTSC 4:3 NTSC 16:9 PAL 4:3 PAL 16:9 133 VIEWING SNAPSHOTS AND MOVIES There are using the AV cable that comes with the camera. - You can record movies by selecting " Only" for connection using . ■ Selecting the Screen Aspect Ratio and Video Output System ...
...Set Up" tab, select "Video Out" and then press [X]. 3. DVD recorder or video deck: Connect to the USB/AV connector You can play a slideshow of 4:3 or 16:9. 1. Press [MENU]. 2. Camera: Connect to the VIDEO IN and AUDIO IN terminals. - To view the image that is not recorded along with...image. For this video output system: NTSC 4:3 NTSC 16:9 PAL 4:3 PAL 16:9 133 VIEWING SNAPSHOTS AND MOVIES There are using the AV cable that comes with the camera. - You can record movies by selecting " Only" for connection using . ■ Selecting the Screen Aspect Ratio and Video Output System ...

User Manual
Page 174
...■ Printing Precautions • See the documentation that comes with a card slot for new printer versions, etc. • Never disconnect cables or perform any camera operation while printing is either of the types described below, you want printed, the number of copies, and whether or not the images... Printer to find out if it directly into the printer's memory card slot. For details, see the user documentation that support PictBridge or USB DIRECT-PRINT ■ Printing on what type of printer you are using - Before taking in progress. B 174 PRINTING Doing so can use...
...■ Printing Precautions • See the documentation that comes with a card slot for new printer versions, etc. • Never disconnect cables or perform any camera operation while printing is either of the types described below, you want printed, the number of copies, and whether or not the images... Printer to find out if it directly into the printer's memory card slot. For details, see the user documentation that support PictBridge or USB DIRECT-PRINT ■ Printing on what type of printer you are using - Before taking in progress. B 174 PRINTING Doing so can use...

User Manual
Page 175
Press [MENU]. 2. Use [S] and [T] to select the setting that comes with the S mark of the USB cable plug, connect the cable to the camera. • When connecting the bundled USB cable to the camera's USB/AV port, insert the plug into the port until you feel it click securely into place. For this setting: Mass Storage PTP 4. Before connecting...
Press [MENU]. 2. Use [S] and [T] to select the setting that comes with the S mark of the USB cable plug, connect the cable to the camera. • When connecting the bundled USB cable to the camera's USB/AV port, insert the plug into the port until you feel it click securely into place. For this setting: Mass Storage PTP 4. Before connecting...

User Manual
Page 176
...printer. 7. Use [S] and [T] to the camera or your printer. 11. After that comes with your printer. B 176 PRINTING The date stamp will be printed when "On" is inserted correctly. • Take care when connecting the USB cable to select a paper size and then press... [SET]. • The following are shaped for proper positioning. 6. USB ports and cable plugs are the available paper sizes. 3.5" × 5", 5" × 7", 4" × ...
...printer. 7. Use [S] and [T] to the camera or your printer. 11. After that comes with your printer. B 176 PRINTING The date stamp will be printed when "On" is inserted correctly. • Take care when connecting the USB cable to select a paper size and then press... [SET]. • The following are shaped for proper positioning. 6. USB ports and cable plugs are the available paper sizes. 3.5" × 5", 5" × 7", 4" × ...

User Manual
Page 177
...card to print, the number of Copies DPOF (Digital Print Order Format) lets you specify which images you want to a professional print service. Printing will appear on or off the camera and then disconnect the USB cable from the camera. The settings you can repeat the procedure from ...step 11 to -remember files names, etc. After configuring settings you configure are using. 177 PRINTING Pressing any camera button will need to perform ...
...card to print, the number of Copies DPOF (Digital Print Order Format) lets you specify which images you want to a professional print service. Printing will appear on or off the camera and then disconnect the USB cable from the camera. The settings you can repeat the procedure from ...step 11 to -remember files names, etc. After configuring settings you configure are using. 177 PRINTING Pressing any camera button will need to perform ...

User Manual
Page 188
... of the connected components. • Some metal of the USB cable plug, connect the cable to the camera. • When connecting the bundled USB cable to the camera's USB/AV connector and your computer. From now on your computer (unless you change the camera's USB settings for proper positioning. 6. 5. USB ports and cable plugs are shaped for some reason). • With some...
... of the connected components. • Some metal of the USB cable plug, connect the cable to the camera. • When connecting the bundled USB cable to the camera's USB/AV connector and your computer. From now on your computer (unless you change the camera's USB settings for proper positioning. 6. 5. USB ports and cable plugs are shaped for some reason). • With some...

User Manual
Page 189
... first. Windows 2000/Me/98SE/98 users: Doubleclick "My Computer". 2. Double-click the folder that comes bundled with the camera to your computer. 2. Turn off the camera, and connect the USB cable that contains the image you want to your computer, you can corrupt image data. Windows Vista users: Click "Start" and then "Computer...
... first. Windows 2000/Me/98SE/98 users: Doubleclick "My Computer". 2. Double-click the folder that comes bundled with the camera to your computer. 2. Turn off the camera, and connect the USB cable that contains the image you want to your computer, you can corrupt image data. Windows Vista users: Click "Start" and then "Computer...

User Manual
Page 191
... in "My Documents", the next step will make it contains) into your computer. IMPORTANT! • Never use your computer. • Never unplug the USB cable or operate the camera while viewing or storing images. On the "My Document" "Edit" menu, select "Paste". Doing so can cause data to modify, delete, move , ...Documents". Whenever you already have a copy of the files that are stored on your "My Documents" folder. Doing so can cause problems with the camera's image management data, which will overwrite it . • If you want to become corrupted. 191 USING THE...
... in "My Documents", the next step will make it contains) into your computer. IMPORTANT! • Never use your computer. • Never unplug the USB cable or operate the camera while viewing or storing images. On the "My Document" "Edit" menu, select "Paste". Doing so can cause data to modify, delete, move , ...Documents". Whenever you already have a copy of the files that are stored on your "My Documents" folder. Doing so can cause problems with the camera's image management data, which will overwrite it . • If you want to become corrupted. 191 USING THE...

User Manual
Page 192
...ROM on your computer, and place the bundled CD-ROM into its CD-ROM drive. • Normally, this should cause the menu screen to the camera. On the menu screen, click the "Language" down arrow button and then select the language you need to select it and then click "Read ... A COMPUTER If your computer, you want. 3. After making sure that comes with HOT ALBUM 1. Next, disconnect the USB cable from the computer Windows Vista/XP/98SE/98 Users Press the camera's [ON/OFF] button. Transfer of Images on the Computer To manage images on your computer does not display the menu screen ...
...ROM on your computer, and place the bundled CD-ROM into its CD-ROM drive. • Normally, this should cause the menu screen to the camera. On the menu screen, click the "Language" down arrow button and then select the language you need to select it and then click "Read ... A COMPUTER If your computer, you want. 3. After making sure that comes with HOT ALBUM 1. Next, disconnect the USB cable from the computer Windows Vista/XP/98SE/98 Users Press the camera's [ON/OFF] button. Transfer of Images on the Computer To manage images on your computer does not display the menu screen ...

User Manual
Page 200
... the First Time 1. Use [S] and [T] to the camera's USB/AV connector and your Macintosh by connecting to a Macintosh running Mac OS 8.6 or lower, or Mac OS X 10.0. Turn off the camera, and connect the USB cable that comes with the camera to select "Mass Storage", and then press [SET].... 5. Connection is supported to the camera. Turn on your computer's USB port. 200 USING THE CAMERA WITH A COMPUTER Viewing and Storing Images on a ...
... the First Time 1. Use [S] and [T] to the camera's USB/AV connector and your Macintosh by connecting to a Macintosh running Mac OS 8.6 or lower, or Mac OS X 10.0. Turn off the camera, and connect the USB cable that comes with the camera to select "Mass Storage", and then press [SET].... 5. Connection is supported to the camera. Turn on your computer's USB port. 200 USING THE CAMERA WITH A COMPUTER Viewing and Storing Images on a ...

User Manual
Page 201
... plug is indicated by the camera's operation lamp lighting green. Camera-Macintosh Connection Pressing the camera's [ON/OFF] button puts it into place. The appearance of the USB cable plug, connect the cable to the camera. • When connecting the bundled USB cable to the camera's USB/AV port, insert the plug... you are shaped for the correct steps you need to perform to the camera or your computer. In this mode, your Macintosh (unless you change the camera's USB settings for some reason). USB Port USB Cable USB/AV connector Making sure that the T mark on , you will not have...
... plug is indicated by the camera's operation lamp lighting green. Camera-Macintosh Connection Pressing the camera's [ON/OFF] button puts it into place. The appearance of the USB cable plug, connect the cable to the camera. • When connecting the bundled USB cable to the camera's USB/AV port, insert the plug... you are shaped for the correct steps you need to perform to the camera or your computer. In this mode, your Macintosh (unless you change the camera's USB settings for some reason). USB Port USB Cable USB/AV connector Making sure that the T mark on , you will not have...

User Manual
Page 202
... so can view camera images on the camera. Turn off the camera, and connect the USB cable that contains the image you want to view. 4. Double-click the "DCIM" folder. 3. Double-click the file that comes bundled with the camera to the camera and your Macintosh. 202 USING THE CAMERA WITH A COMPUTER ...contains the image you want to view. Double-click the camera's drive icon. 2. Pressing the camera's [ON/OFF] button puts it into the USB mode, which is indicated by the camera's operation lamp lighting green. ■ Viewing Camera Images on an image to put it into the folder ...
... so can view camera images on the camera. Turn off the camera, and connect the USB cable that contains the image you want to view. 4. Double-click the "DCIM" folder. 3. Double-click the file that comes bundled with the camera to the camera and your Macintosh. 202 USING THE CAMERA WITH A COMPUTER ...contains the image you want to view. Double-click the camera's drive icon. 2. Pressing the camera's [ON/OFF] button puts it into the USB mode, which is indicated by the camera's operation lamp lighting green. ■ Viewing Camera Images on an image to put it into the folder ...

User Manual
Page 203
... it impossible to play back images on the camera and can cause data to become corrupted. ■ Disconnect the camera from the Macintosh. After making sure that have been copied to Trash. 2. Doing so can cause problems with your Macintosh. • Never unplug the USB cable or operate the camera while viewing or storing images.
... it impossible to play back images on the camera and can cause data to become corrupted. ■ Disconnect the camera from the Macintosh. After making sure that have been copied to Trash. 2. Doing so can cause problems with your Macintosh. • Never unplug the USB cable or operate the camera while viewing or storing images.

User Manual
Page 223
...transfer images over a USB connection. 1) The USB cable may be connected securely. Reinstall the USB driver correctly (page 186). 4) The wrong USB communication protocol may not be selected. Check the camera setup (pages 11, 165). 2) There may have been left with a dead battery. After that the camera's built-in the ...date and time (page 165). Install the USB driver (page 186). 3) The USB driver may be installed. If the language selection screen does not re-appear when you turn the camera on , contact your retailer or a CASIO service center. 223 APPENDIX The messages on ...
...transfer images over a USB connection. 1) The USB cable may be connected securely. Reinstall the USB driver correctly (page 186). 4) The wrong USB communication protocol may not be selected. Check the camera setup (pages 11, 165). 2) There may have been left with a dead battery. After that the camera's built-in the ...date and time (page 165). Install the USB driver (page 186). 3) The USB driver may be installed. If the language selection screen does not re-appear when you turn the camera on , contact your retailer or a CASIO service center. 223 APPENDIX The messages on ...

User Manual
Page 224
... that comes bundled with the camera. 224 APPENDIX This will need to re-install the camera's USB driver. If this happens, you have another type of driver installed. You may not be able to install the USB driver properly if you use the USB cable to connect the camera to a computer running Windows... 98SE/98 before installing the USB driver from the bundled ...
... that comes bundled with the camera. 224 APPENDIX This will need to re-install the camera's USB driver. If this happens, you have another type of driver installed. You may not be able to install the USB driver properly if you use the USB cable to connect the camera to a computer running Windows... 98SE/98 before installing the USB driver from the bundled ...

User Manual
Page 232
USB cable; Strap; The power cord used must comply with relevant national and/or international standards. B 232 APPENDIX Battery charger (BC-11L); Rechargeable lithium ion battery (... projections) Weight Approximately 58 g (2.0 oz) • Power cord precautions for use in Singapore The power cord set is not supplied. CDROM; AC power cord; AV Cable; Power Consumption . . . . .3.7 V DC Approximately 4.0 W Dimensions 95.4 (W) × 60.6 (H) × 19.6 (D) mm (3.8"(W) × 2.4"(H) × 0.77"(D)) (excluding projections; 16.2 mm (0.64") at thinnest point) Weight ...
USB cable; Strap; The power cord used must comply with relevant national and/or international standards. B 232 APPENDIX Battery charger (BC-11L); Rechargeable lithium ion battery (... projections) Weight Approximately 58 g (2.0 oz) • Power cord precautions for use in Singapore The power cord set is not supplied. CDROM; AC power cord; AV Cable; Power Consumption . . . . .3.7 V DC Approximately 4.0 W Dimensions 95.4 (W) × 60.6 (H) × 19.6 (D) mm (3.8"(W) × 2.4"(H) × 0.77"(D)) (excluding projections; 16.2 mm (0.64") at thinnest point) Weight ...


