User Manual
Page 1
K827PCM1DMX 1 E Digital Camera EX-Z75 User's Guide Thank you for purchasing this CASIO product. • Before using it, be sure to read the precautions contained in this User's Guide. • Keep the User's Guide in a safe place for future reference. • For the most up-to-date information about this product, visit the official EXILIM Website at http://www.exilim.com/.
K827PCM1DMX 1 E Digital Camera EX-Z75 User's Guide Thank you for purchasing this CASIO product. • Before using it, be sure to read the precautions contained in this User's Guide. • Keep the User's Guide in a safe place for future reference. • For the most up-to-date information about this product, visit the official EXILIM Website at http://www.exilim.com/.
User Manual
Page 2
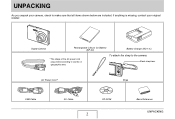
Digital Camera Rechargeable Lithium Ion Battery (NP-20) Battery Charger (BC-11L) * The shape of the AC power cord plug varies according to the camera. Attach strap here. AC Power Cord * Strap USB Cable AV Cable CD-ROM 2 Basic Reference UNPACKING If anything is missing, contact your camera, check to make sure that all items shown below are included. UNPACKING As you unpack your original retailer. To attach the strap to country or geographic area.
Digital Camera Rechargeable Lithium Ion Battery (NP-20) Battery Charger (BC-11L) * The shape of the AC power cord plug varies according to the camera. Attach strap here. AC Power Cord * Strap USB Cable AV Cable CD-ROM 2 Basic Reference UNPACKING If anything is missing, contact your camera, check to make sure that all items shown below are included. UNPACKING As you unpack your original retailer. To attach the strap to country or geographic area.

User Manual
Page 3
...9632; To charge the battery 34 ■ To load the battery 36 ■ Replacing the Battery 39 ■ Battery Precautions 39 Using the Camera in another Country 40 Turning Power On and Off 41 Using a Memory Card 44 ■ Supported Memory Cards 44 ■ Loading a Memory ...Card into the Camera 46 ■ Replacing the Memory Card 47 ■ Formatting a Memory Card 48 Using On-screen Menus 49 Configuring Monitor Screen Settings 51 ■...
...9632; To charge the battery 34 ■ To load the battery 36 ■ Replacing the Battery 39 ■ Battery Precautions 39 Using the Camera in another Country 40 Turning Power On and Off 41 Using a Memory Card 44 ■ Supported Memory Cards 44 ■ Loading a Memory ...Card into the Camera 46 ■ Replacing the Memory Card 47 ■ Formatting a Memory Card 48 Using On-screen Menus 49 Configuring Monitor Screen Settings 51 ■...

User Manual
Page 4
SHOOTING A SNAPSHOT 57 Holding the Camera Correctly 57 Shooting a Snapshot 58 ■ Specifying Image Size 61 ■ Specifying Image Quality 63 ■ Using the easy Mode 64 ■ Snapshot Shooting Precautions 66 ■ Auto Focus Restrictions 67 Shooting with Zoom 67 Using Flash 71 Using the Self-Timer 75 Using Continuous Shutter 77...
SHOOTING A SNAPSHOT 57 Holding the Camera Correctly 57 Shooting a Snapshot 58 ■ Specifying Image Size 61 ■ Specifying Image Quality 63 ■ Using the easy Mode 64 ■ Snapshot Shooting Precautions 66 ■ Auto Focus Restrictions 67 Shooting with Zoom 67 Using Flash 71 Using the Self-Timer 75 Using Continuous Shutter 77...
User Manual
Page 5
... Correcting Image Brightness (EV Shift 106 Controlling White Balance 108 Specifying ISO Sensitivity 110 Specifying the Metering Mode 112 Using the Camera's Filter Effects 113 Controlling Image Sharpness 114 Controlling Color Saturation 114 Adjusting Image Contrast 115 Date Stamping Snapshots 115 Using the ... 125 ■ Listening to the Audio of an Audio Snapshot 126 Viewing a Movie 127 Playing a Slideshow on the Camera 129 Viewing Camera Images on a TV 131 Zooming the Displayed Image 134 Using the 12-image Screen 135 Using the Calendar Screen 136 B CONTENTS 5
... Correcting Image Brightness (EV Shift 106 Controlling White Balance 108 Specifying ISO Sensitivity 110 Specifying the Metering Mode 112 Using the Camera's Filter Effects 113 Controlling Image Sharpness 114 Controlling Color Saturation 114 Adjusting Image Contrast 115 Date Stamping Snapshots 115 Using the ... 125 ■ Listening to the Audio of an Audio Snapshot 126 Viewing a Movie 127 Playing a Slideshow on the Camera 129 Viewing Camera Images on a TV 131 Zooming the Displayed Image 134 Using the 12-image Screen 135 Using the Calendar Screen 136 B CONTENTS 5

User Manual
Page 6
... Correct the Color of an Old Photograph 140 Editing the Date and Time of an Image 142 Rotating an Image 143 Editing a Movie on the Camera 144 Creating a Snapshot of a Movie Frame (MOTION PRINT 147 USING AUDIO 149 Adding Audio to a Snapshot 149 Recording Audio Only (Voice Recording 151 MANAGING YOUR...
... Correct the Color of an Old Photograph 140 Editing the Date and Time of an Image 142 Rotating an Image 143 Editing a Movie on the Camera 144 Creating a Snapshot of a Movie Frame (MOTION PRINT 147 USING AUDIO 149 Adding Audio to a Snapshot 149 Recording Audio Only (Voice Recording 151 MANAGING YOUR...

User Manual
Page 7
... Settings 162 Turning the Startup Screen On or Off 163 Specifying the File Name Serial Number Generation Rule 164 Changing the Camera Date and Time Setting . . . 165 Using World Time 168 ■ Configuring World Time Settings 168 Changing the Display Language 169 Changing the...to Specify Images to be Printed and the Number of Copies 177 ■ Date Stamping 180 Supported Protocols 181 USING THE CAMERA WITH A COMPUTER 182 What you can do 182 Using the Camera with a Windows Computer . . 183 ■ Viewing and Storing Images on a Computer 186 ■ Transfer of ...
... Settings 162 Turning the Startup Screen On or Off 163 Specifying the File Name Serial Number Generation Rule 164 Changing the Camera Date and Time Setting . . . 165 Using World Time 168 ■ Configuring World Time Settings 168 Changing the Display Language 169 Changing the...to Specify Images to be Printed and the Number of Copies 177 ■ Date Stamping 180 Supported Protocols 181 USING THE CAMERA WITH A COMPUTER 182 What you can do 182 Using the Camera with a Windows Computer . . 183 ■ Viewing and Storing Images on a Computer 186 ■ Transfer of ...

User Manual
Page 10
■ Loading the Battery into the camera. 3. Open the battery cover. Close the battery cover. While pressing lightly on the cover, slide it in the direction indicated by the arrow to open. 2. QUICK START BASICS 10 Load the battery into the Camera 1.
■ Loading the Battery into the camera. 3. Open the battery cover. Close the battery cover. While pressing lightly on the cover, slide it in the direction indicated by the arrow to open. 2. QUICK START BASICS 10 Load the battery into the Camera 1.

User Manual
Page 11
...DST) setting you want and then press [SET]. [] [] [BS] [] 3. The settings on this page are required the first time you turn on the camera after purchasing it. • If you make a mistake when configuring the language, date, and time settings, you want and then press [SET]. Use [S], ...(pages 165, 169). Use [S], [T], [W], and [X] to select the city where you will use the camera and then press [SET]. 4. Use [S] and [T] to select the area where you [] will use the camera and then press [SET]. [SET] 5. B QUICK START BASICS 11 Configuring Display Language, Date, and ...
...DST) setting you want and then press [SET]. [] [] [BS] [] 3. The settings on this page are required the first time you turn on the camera after purchasing it. • If you make a mistake when configuring the language, date, and time settings, you want and then press [SET]. Use [S], ...(pages 165, 169). Use [S], [T], [W], and [X] to select the city where you will use the camera and then press [SET]. 4. Use [S] and [T] to select the area where you [] will use the camera and then press [SET]. [SET] 5. B QUICK START BASICS 11 Configuring Display Language, Date, and ...

User Manual
Page 12
6. Use [S] and [T] to the procedure on the next page. QUICK START BASICS 12 Press [ON/OFF] to turn off the camera. • After finishing this option: YY/MM/DD DD/MM/YY MM/DD/YY 7. Use [W] and [X] to change the setting. Set the date and the ...
6. Use [S] and [T] to the procedure on the next page. QUICK START BASICS 12 Press [ON/OFF] to turn off the camera. • After finishing this option: YY/MM/DD DD/MM/YY MM/DD/YY 7. Use [W] and [X] to change the setting. Set the date and the ...

User Manual
Page 13
... can use built-in memory, skip this procedure and go to store more images, high-quality and large-size images, and longer movies. • The camera will store images in its built-in memory, using a memory card provides additional capacity you prefer to use to "Shooting a Snapshot" on page 15. •.... QUICK START BASICS 13 MEMCOARRYD MEMORY CARD Front Back With the front of the memory card facing upwards (towards the monitor screen side of the camera), slide it into the card slot and press until it in the direction indicated by the arrow to open. (page 44) 2. NOTE • Though ...
... can use built-in memory, skip this procedure and go to store more images, high-quality and large-size images, and longer movies. • The camera will store images in its built-in memory, using a memory card provides additional capacity you prefer to use to "Shooting a Snapshot" on page 15. •.... QUICK START BASICS 13 MEMCOARRYD MEMORY CARD Front Back With the front of the memory card facing upwards (towards the monitor screen side of the camera), slide it into the card slot and press until it in the direction indicated by the arrow to open. (page 44) 2. NOTE • Though ...

User Manual
Page 14
...8226; Formatting a memory card that already has snapshots or other abnormality, re-format the card. • Be sure to perform the following procedure on the camera to format the memory card. 1. However, if storing to select the "Set Up" tab. 4. Press [MENU]. 3. Please wait..." ■ Formatting ...a Memory Card Before you can use a memory card with your camera, you must format it , will delete its contents. Use [T] to format a memory card again. "Set Up" Tab [ON/OFF] (Power) [MENU] B QUICK...
...8226; Formatting a memory card that already has snapshots or other abnormality, re-format the card. • Be sure to perform the following procedure on the camera to format the memory card. 1. However, if storing to select the "Set Up" tab. 4. Press [MENU]. 3. Please wait..." ■ Formatting ...a Memory Card Before you can use a memory card with your camera, you must format it , will delete its contents. Use [T] to format a memory card again. "Set Up" Tab [ON/OFF] (Power) [MENU] B QUICK...

User Manual
Page 15
... AWB EV 15:37 Operation Lamp Shutter Button Focus Frame Monitor Screen [ ] (REC) 1. Continuing to keep the camera still, press the shutter button all the way down. When the image is in focus, the camera will beep, the operation lamp will light green, and the focus frame will be ready to turn... green. 4. press the shutter button. The recorded image will remain on the display for about one second, and then it will turn on the camera. (page 57) This enters the REC mode and displays " " (Auto icon) on the monitor screen. 2. Point the...
... AWB EV 15:37 Operation Lamp Shutter Button Focus Frame Monitor Screen [ ] (REC) 1. Continuing to keep the camera still, press the shutter button all the way down. When the image is in focus, the camera will beep, the operation lamp will light green, and the focus frame will be ready to turn... green. 4. press the shutter button. The recorded image will remain on the display for about one second, and then it will turn on the camera. (page 57) This enters the REC mode and displays " " (Auto icon) on the monitor screen. 2. Point the...

User Manual
Page 16
... you plan to use for printing your images. When you half-press the shutter button, the camera automatically adjusts exposure and focuses on a website, etc. Half-press Full-press Press lightly until the button stops. Click! All the way Beep-beep! The ...
... you plan to use for printing your images. When you half-press the shutter button, the camera automatically adjusts exposure and focuses on a website, etc. Half-press Full-press Press lightly until the button stops. Click! All the way Beep-beep! The ...

User Manual
Page 17
Viewing Snapshots [ ] (PLAY) (page 125) [W][X] 1. Press [ ] to ensure proper focus. Quick Shutter lets you capture exactly the moment you want. • With Quick Shutter, the camera uses high-speed Auto Focus, which means you can capture quick moving action more easily. Note, however, that some images may be out of focus ...
Viewing Snapshots [ ] (PLAY) (page 125) [W][X] 1. Press [ ] to ensure proper focus. Quick Shutter lets you capture exactly the moment you want. • With Quick Shutter, the camera uses high-speed Auto Focus, which means you can capture quick moving action more easily. Note, however, that some images may be out of focus ...

User Manual
Page 18
Press [ ] to stop recording. Press the shutter button to start to run low. Movie Image Quality Your camera lets you start shooting the movie. • Audio is a standard that determines the detail, smoothness, and clarity of the image during movie recording. 5. "... (page 81) 3. Reducing image quality let's you shoot longer, so you can switch to select the " " (Movie) scene and then press [SET]. For best camera performance, use the "HQ" (High Quality) setting for movies. Movie quality is also recorded during playback. B QUICK START BASICS 18 Use [S], [T], [W], and [X] to...
Press [ ] to stop recording. Press the shutter button to start to run low. Movie Image Quality Your camera lets you start shooting the movie. • Audio is a standard that determines the detail, smoothness, and clarity of the image during movie recording. 5. "... (page 81) 3. Reducing image quality let's you shoot longer, so you can switch to select the " " (Movie) scene and then press [SET]. For best camera performance, use the "HQ" (High Quality) setting for movies. Movie quality is also recorded during playback. B QUICK START BASICS 18 Use [S], [T], [W], and [X] to...

User Manual
Page 21
.... ■ A powerful collection of sample scenes. INTRODUCTION Features ■ BEST SHOT for beautiful shots simply by selecting a sample image built into the camera Simply select the scene that is similar to what you want to shoot (Night Scene Portrait, Flower, etc.), for beautiful portraits. ■ Direct Mode... you capture exactly the moment you want (page 103) • Movie recording (Motion JPEG Standard) (page 81) INTRODUCTION 21 Example: Select for instant camera setups. A dedicated [BS] button gives you direct access to power up in the PLAY power up in the REC mode.
.... ■ A powerful collection of sample scenes. INTRODUCTION Features ■ BEST SHOT for beautiful shots simply by selecting a sample image built into the camera Simply select the scene that is similar to what you want to shoot (Night Scene Portrait, Flower, etc.), for beautiful portraits. ■ Direct Mode... you capture exactly the moment you want (page 103) • Movie recording (Motion JPEG Standard) (page 81) INTRODUCTION 21 Example: Select for instant camera setups. A dedicated [BS] button gives you direct access to power up in the PLAY power up in the REC mode.

User Manual
Page 24
... • Any copying of the contents of the production process. Except for any damages or loss suffered by the screens and configuration of CASIO COMPUTER CO., LTD. is forbidden. INTRODUCTION 24 shall not be held liable for any damages or loss suffered by deletion of memory contents ...or malfunction of Photo Loader with HOT ALBUM and/or Photo Transport. • CASIO COMPUTER CO., LTD. • The contents of this manual are subject to change without the permission of the actual camera. Please contact us if you notice anything that the example screens and product ...
... • Any copying of the contents of the production process. Except for any damages or loss suffered by the screens and configuration of CASIO COMPUTER CO., LTD. is forbidden. INTRODUCTION 24 shall not be held liable for any damages or loss suffered by deletion of memory contents ...or malfunction of Photo Loader with HOT ALBUM and/or Photo Transport. • CASIO COMPUTER CO., LTD. • The contents of this manual are subject to change without the permission of the actual camera. Please contact us if you notice anything that the example screens and product ...

User Manual
Page 25
... fire the flash in the direction of the subject. INTRODUCTION 25 Doing so can damage your final image, shoot a test shot to ensure that the camera is recording correctly. ■ Avoid Use While In Motion • Never use the flash unit in motion creates the risk of eyesight. Doing so can... be present. Precautions during Use ■ Take test shots before shooting the final shot. • Before shooting your eyesight. ■ Flash • Never use the camera to record or play back images while operating an automobile or other bright light through the...
... fire the flash in the direction of the subject. INTRODUCTION 25 Doing so can damage your final image, shoot a test shot to ensure that the camera is recording correctly. ■ Avoid Use While In Motion • Never use the flash unit in motion creates the risk of eyesight. Doing so can... be present. Precautions during Use ■ Take test shots before shooting the final shot. • Before shooting your eyesight. ■ Flash • Never use the camera to record or play back images while operating an automobile or other bright light through the...

User Manual
Page 26
...else where operation of the above symptoms are not specified for at least 15 minutes and contact your dealer or nearest CASIO authorized service center. Connecting a non-specified device creates the risk of fire and electric shock. ■ Transport • Never operate ...the camera inside the panel. Turn off the camera. 2. Doing so creates the risk of fire and electric shock. Improper use creates the risk of serious accident. ■ Smoke, ...
...else where operation of the above symptoms are not specified for at least 15 minutes and contact your dealer or nearest CASIO authorized service center. Connecting a non-specified device creates the risk of fire and electric shock. ■ Transport • Never operate ...the camera inside the panel. Turn off the camera. 2. Doing so creates the risk of fire and electric shock. Improper use creates the risk of serious accident. ■ Smoke, ...


