
Owners Manual
Page 1
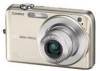
K847PCM1DMX 1 E Digital Camera EX-Z1050 User's Guide Thank you for purchasing this CASIO product. • Before using it, be sure to read the precautions contained in this User's Guide. • Keep the User's Guide in a safe place for future reference. • For the most up-to-date information about this product, visit the official EXILIM Website at http://www.exilim.com/.
K847PCM1DMX 1 E Digital Camera EX-Z1050 User's Guide Thank you for purchasing this CASIO product. • Before using it, be sure to read the precautions contained in this User's Guide. • Keep the User's Guide in a safe place for future reference. • For the most up-to-date information about this product, visit the official EXILIM Website at http://www.exilim.com/.
Owners Manual
Page 2
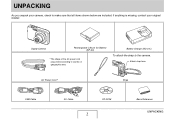
Digital Camera Rechargeable Lithium Ion Battery (NP-40) * The shape of the AC power cord plug varies according to make sure that all items shown below are included. Attach strap here. AC Power Cord * Strap USB Cable AV Cable CD-ROM 2 Basic Reference UNPACKING UNPACKING As you unpack your original retailer. Battery Charger (BC-31L) To attach the strap to the camera. If anything is missing, contact your camera, check to country or geographic area.
Digital Camera Rechargeable Lithium Ion Battery (NP-40) * The shape of the AC power cord plug varies according to make sure that all items shown below are included. Attach strap here. AC Power Cord * Strap USB Cable AV Cable CD-ROM 2 Basic Reference UNPACKING UNPACKING As you unpack your original retailer. Battery Charger (BC-31L) To attach the strap to the camera. If anything is missing, contact your camera, check to country or geographic area.
Owners Manual
Page 3
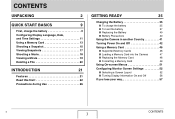
...9632; To charge the battery 35 ■ To load the battery 37 ■ Replacing the Battery 40 ■ Battery Precautions 40 Using the Camera in another Country 41 Turning Power On and Off 42 Using a Memory Card 45 ■ Supported Memory Cards 46 ■ Loading a Memory ...Card into the Camera 47 ■ Replacing the Memory Card 48 ■ Formatting a Memory Card 49 Using On-screen Menus 51 Configuring Monitor Screen Settings 52 ■...
...9632; To charge the battery 35 ■ To load the battery 37 ■ Replacing the Battery 40 ■ Battery Precautions 40 Using the Camera in another Country 41 Turning Power On and Off 42 Using a Memory Card 45 ■ Supported Memory Cards 46 ■ Loading a Memory ...Card into the Camera 47 ■ Replacing the Memory Card 48 ■ Formatting a Memory Card 49 Using On-screen Menus 51 Configuring Monitor Screen Settings 52 ■...

Owners Manual
Page 4
... Holding the Camera Correctly 59 Shooting a Snapshot 60 ■ Specifying Image Size 63 ■ Specifying Image Quality 65 ■ Turning Off the AF Assist Lamp 66 ■ Snapshot Shooting Precautions 67 ■ Auto Focus Restrictions 68 Shooting with Zoom 68 Using Flash... 79 ■ Recording with Normal-speed Continuous Shutter, High-speed Continuous Shutter, and Flash Continuous Shutter 79 ■ Recording with Zoom Continuous Shutter 80 ■ Continuous Shutter Precautions 81 Adding Audio to a Snapshot 82 SHOOTING A MOVIE 84 Movie Image Quality 84 ...
... Holding the Camera Correctly 59 Shooting a Snapshot 60 ■ Specifying Image Size 63 ■ Specifying Image Quality 65 ■ Turning Off the AF Assist Lamp 66 ■ Snapshot Shooting Precautions 67 ■ Auto Focus Restrictions 68 Shooting with Zoom 68 Using Flash... 79 ■ Recording with Normal-speed Continuous Shutter, High-speed Continuous Shutter, and Flash Continuous Shutter 79 ■ Recording with Zoom Continuous Shutter 80 ■ Continuous Shutter Precautions 81 Adding Audio to a Snapshot 82 SHOOTING A MOVIE 84 Movie Image Quality 84 ...
Owners Manual
Page 5
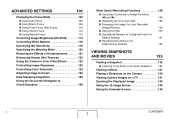
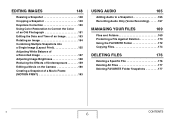
... ISO Sensitivity 118 Specifying the Metering Mode 120 Reducing the Effects of Underexposure 121 Enhancing Human Skin Textures 122 Using the Camera's Color Filter Effects 123 Controlling Image Sharpness 123 Controlling Color Saturation 124 Adjusting Image Contrast 124 Date Stamping Snapshots 125 Using... 135 ■ Listening to the Audio of an Audio Snapshot 136 Viewing a Movie 137 Playing a Slideshow on the Camera 139 Viewing Camera Images on a TV 141 Zooming the Displayed Image 144 Using the 12-image Screen 145 Using the Calendar Screen 146 B CONTENTS 5
... ISO Sensitivity 118 Specifying the Metering Mode 120 Reducing the Effects of Underexposure 121 Enhancing Human Skin Textures 122 Using the Camera's Color Filter Effects 123 Controlling Image Sharpness 123 Controlling Color Saturation 124 Adjusting Image Contrast 124 Date Stamping Snapshots 125 Using... 135 ■ Listening to the Audio of an Audio Snapshot 136 Viewing a Movie 137 Playing a Slideshow on the Camera 139 Viewing Camera Images on a TV 141 Zooming the Displayed Image 144 Using the 12-image Screen 145 Using the Calendar Screen 146 B CONTENTS 5
Owners Manual
Page 6
... Image (Layout Print 155 Adjusting White Balance of a Recorded Image 157 Adjusting Image Brightness 158 Reducing the Effects of Underexposure 159 Editing a Movie on the Camera 160 Creating a Snapshot of a Movie Frame (MOTION PRINT 163 USING AUDIO 165 Adding Audio to a Snapshot 165 Recording Audio Only (Voice Recording 167 MANAGING YOUR...
... Image (Layout Print 155 Adjusting White Balance of a Recorded Image 157 Adjusting Image Brightness 158 Reducing the Effects of Underexposure 159 Editing a Movie on the Camera 160 Creating a Snapshot of a Movie Frame (MOTION PRINT 163 USING AUDIO 165 Adding Audio to a Snapshot 165 Recording Audio Only (Voice Recording 167 MANAGING YOUR...
Owners Manual
Page 7
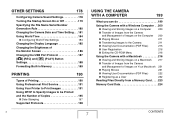
... Settings 178 Turning the Startup Screen On or Off 179 Specifying the File Name Serial Number Generation Rule 180 Changing the Camera Date and Time Setting . . . 181 Using World Time 184 ■ Configuring World Time Settings 184 Changing the Display Language 185 Changing the...to Specify Images to be Printed and the Number of Copies 195 ■ Date Stamping 197 Supported Protocols 198 USING THE CAMERA WITH A COMPUTER 199 What you can do 199 Using the Camera with a Windows Computer . . 200 ■ Viewing and Storing Images on a Computer 203 ■ Transfer of ...
... Settings 178 Turning the Startup Screen On or Off 179 Specifying the File Name Serial Number Generation Rule 180 Changing the Camera Date and Time Setting . . . 181 Using World Time 184 ■ Configuring World Time Settings 184 Changing the Display Language 185 Changing the...to Specify Images to be Printed and the Number of Copies 195 ■ Date Stamping 197 Supported Protocols 198 USING THE CAMERA WITH A COMPUTER 199 What you can do 199 Using the Camera with a Windows Computer . . 200 ■ Viewing and Storing Images on a Computer 203 ■ Transfer of ...
Owners Manual
Page 10
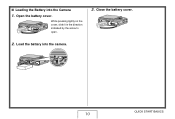
While pressing lightly on the cover, slide it in the direction indicated by the arrow to open. 3. Close the battery cover. 2. ■ Loading the Battery into the camera. QUICK START BASICS 10 Load the battery into the Camera 1. Open the battery cover.
While pressing lightly on the cover, slide it in the direction indicated by the arrow to open. 3. Close the battery cover. 2. ■ Loading the Battery into the camera. QUICK START BASICS 10 Load the battery into the Camera 1. Open the battery cover.

Owners Manual
Page 11
... you want and then press [SET]. [] [] [] [] [BS] [SET] The settings on this page are required the first time you turn on the camera after purchasing it. • If you make a mistake when configuring the language, date, and time settings, you will use the... camera and then press [SET]. 4. Press [ON/OFF] to select the language you want and then press [SET]. Use [S], [T], [W], and [X] to turn on the camera. 2. QUICK START BASICS 11 Configuring Display Language, Date, and Time Settings [ON...
... you want and then press [SET]. [] [] [] [] [BS] [SET] The settings on this page are required the first time you turn on the camera after purchasing it. • If you make a mistake when configuring the language, date, and time settings, you will use the... camera and then press [SET]. 4. Press [ON/OFF] to select the language you want and then press [SET]. Use [S], [T], [W], and [X] to turn on the camera. 2. QUICK START BASICS 11 Configuring Display Language, Date, and Time Settings [ON...
Owners Manual
Page 12
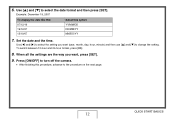
.../19 19/12/07 12/19/07 Select this procedure, advance to the procedure on the next page. Press [ON/OFF] to turn off the camera. • After finishing this option: YY/MM/DD DD/MM/YY MM/DD/YY 7. 6.
.../19 19/12/07 12/19/07 Select this procedure, advance to the procedure on the next page. Press [ON/OFF] to turn off the camera. • After finishing this option: YY/MM/DD DD/MM/YY MM/DD/YY 7. 6.
Owners Manual
Page 13
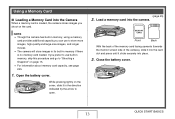
...With the back of the memory card facing upwards (towards the monitor screen side of the camera), slide it into place. 3. Open the battery cover. Using a Memory Card ■ Loading a Memory Card into the camera. If you shoot on the cover, slide it clicks securely into the card slot and press... until it in memory if there is no memory card loaded. Load a memory card into the Camera When a memory card is loaded, the camera stores images you prefer to use to store more images, high-quality and large-size images, and longer movies. • The...
...With the back of the memory card facing upwards (towards the monitor screen side of the camera), slide it into place. 3. Open the battery cover. Using a Memory Card ■ Loading a Memory Card into the camera. If you shoot on the cover, slide it clicks securely into the card slot and press... until it in memory if there is no memory card loaded. Load a memory card into the Camera When a memory card is loaded, the camera stores images you prefer to use to store more images, high-quality and large-size images, and longer movies. • The...
Owners Manual
Page 14
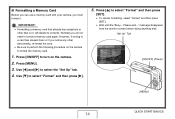
...! • Formatting a memory card that already has snapshots or other abnormality, re-format the card. • Be sure to perform the following procedure on the camera to format the memory card. 1. Press [ON/OFF] to a card has slowed down or if you notice any other files on the... camera. 2. message disappears from the monitor screen before doing anything else. Normally you do not need to select "Format" and then press [SET]. • To cancel ...
...! • Formatting a memory card that already has snapshots or other abnormality, re-format the card. • Be sure to perform the following procedure on the camera to format the memory card. 1. Press [ON/OFF] to a card has slowed down or if you notice any other files on the... camera. 2. message disappears from the monitor screen before doing anything else. Normally you do not need to select "Format" and then press [SET]. • To cancel ...

Owners Manual
Page 15
... icon Operation Lamp Shutter Button Focus Frame Monitor Screen [ ] (REC) 1. QUICK START BASICS 15 While taking care to keep the camera still, half- press the shutter button. Continuing to keep the camera still, press the shutter button all the way down. When the image is in memory. After that, the...be ready to turn green. 4. Press [ ] to shoot the next image. Point the camera at the subject. 3. The recorded image will remain on the display for about one second, and then it will turn on the camera. (page 59) This enters the REC mode and displays " " (Auto icon) on...
... icon Operation Lamp Shutter Button Focus Frame Monitor Screen [ ] (REC) 1. QUICK START BASICS 15 While taking care to keep the camera still, half- press the shutter button. Continuing to keep the camera still, press the shutter button all the way down. When the image is in memory. After that, the...be ready to turn green. 4. Press [ ] to shoot the next image. Point the camera at the subject. 3. The recorded image will remain on the display for about one second, and then it will turn on the camera. (page 59) This enters the REC mode and displays " " (Auto icon) on...

Owners Manual
Page 16
...shutter button is an important technique for publishing on the subject it lightly. QUICK START BASICS 16 Snapshot Image Size and Image Quality Your camera lets you press it is currently pointed at this point is called a "half-press". When you plan to use for printing your ...images. Mastering how much pressure is required for a half-press and a full-press of paper you half-press the shutter button, the camera automatically adjusts exposure and focuses on a website, etc. Stopping at . Half-press Full-press Press lightly until the button stops. Click! You ...
...shutter button is an important technique for publishing on the subject it lightly. QUICK START BASICS 16 Snapshot Image Size and Image Quality Your camera lets you press it is currently pointed at this point is called a "half-press". When you plan to use for printing your ...images. Mastering how much pressure is required for a half-press and a full-press of paper you half-press the shutter button, the camera automatically adjusts exposure and focuses on a website, etc. Stopping at . Half-press Full-press Press lightly until the button stops. Click! You ...

Owners Manual
Page 17
... scroll through them. ■ To return to ensure proper focus. Quick Shutter lets you capture exactly the moment you want. • With Quick Shutter, the camera uses high-speed Auto Focus, which means you can capture quick moving action more easily. QUICK START BASICS 17 ■ Fully pressing the shutter button...
... scroll through them. ■ To return to ensure proper focus. Quick Shutter lets you capture exactly the moment you want. • With Quick Shutter, the camera uses high-speed Auto Focus, which means you can capture quick moving action more easily. QUICK START BASICS 17 ■ Fully pressing the shutter button...

Owners Manual
Page 18
...(Movie) scene and then press [SET]. For details, see pages 84 and 246. Press the shutter button to start to run low. For best camera performance, use the "HQ" (High Quality) setting for movies. Reducing image quality let's you shoot longer, so you can switch to enter the ... memory capacity if you select from among three image quality settings (HQ, Normal, LP) for movie recording. Movie Image Quality Your camera lets you start shooting the movie. • Audio is a standard that determines the detail, smoothness, and clarity of the image during movie recording. 5.
...(Movie) scene and then press [SET]. For details, see pages 84 and 246. Press the shutter button to start to run low. For best camera performance, use the "HQ" (High Quality) setting for movies. Reducing image quality let's you shoot longer, so you can switch to enter the ... memory capacity if you select from among three image quality settings (HQ, Normal, LP) for movie recording. Movie Image Quality Your camera lets you start shooting the movie. • Audio is a standard that determines the detail, smoothness, and clarity of the image during movie recording. 5.

Owners Manual
Page 21
... you capture exactly the moment you want to shoot (Night Scene Portrait, Flower, etc.), for beautiful shots simply by selecting a sample image built into the camera Simply select the scene that is similar to what you want (page 111) • Movie recording (Motion JPEG Standard) (page 84) INTRODUCTION 21 REC mode...; Direct Mode Power On To view images, press To record, press [ ] [ ] to power up in the PLAY mode. INTRODUCTION Features ■ BEST SHOT for instant camera setups.
... you capture exactly the moment you want to shoot (Night Scene Portrait, Flower, etc.), for beautiful shots simply by selecting a sample image built into the camera Simply select the scene that is similar to what you want (page 111) • Movie recording (Motion JPEG Standard) (page 84) INTRODUCTION 21 REC mode...; Direct Mode Power On To view images, press To record, press [ ] [ ] to power up in the PLAY mode. INTRODUCTION Features ■ BEST SHOT for instant camera setups.

Owners Manual
Page 25
... any damages or loss caused by deletion of memory contents due to the use of Photo Loader with HOT ALBUM and/or Photo Transport. • CASIO COMPUTER CO., LTD. shall not be held liable for any other use of the contents of this manual without notice. • The content of this.... Please contact us if you or any damages or loss suffered by the screens and configuration of the actual camera. Except for any third party due to change without the permission of CASIO COMPUTER CO., LTD. • The contents of this manual are subject to the use or malfunction of this product...
... any damages or loss caused by deletion of memory contents due to the use of Photo Loader with HOT ALBUM and/or Photo Transport. • CASIO COMPUTER CO., LTD. shall not be held liable for any other use of the contents of this manual without notice. • The content of this.... Please contact us if you or any damages or loss suffered by the screens and configuration of the actual camera. Except for any third party due to change without the permission of CASIO COMPUTER CO., LTD. • The contents of this manual are subject to the use or malfunction of this product...

Owners Manual
Page 26
Doing so can damage your final image, shoot a test shot to ensure that the camera is recording correctly. ■ Avoid Use While In Motion • Never use the flash unit in motion creates the risk of a person operating a motor vehicle. ... shots before shooting the final shot. • Before shooting your eyesight. ■ Flash • Never use the camera to record or play back images while operating an automobile or other bright light through the cameras viewfinder. Doing so can interfere with the driver's vision and creates the risk of accident. • Never...
Doing so can damage your final image, shoot a test shot to ensure that the camera is recording correctly. ■ Avoid Use While In Motion • Never use the flash unit in motion creates the risk of a person operating a motor vehicle. ... shots before shooting the final shot. • Before shooting your eyesight. ■ Flash • Never use the camera to record or play back images while operating an automobile or other bright light through the cameras viewfinder. Doing so can interfere with the driver's vision and creates the risk of accident. • Never...
Owners Manual
Page 27
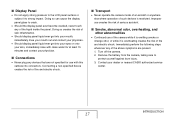
...aircraft or anywhere else where operation of the above symptoms are not specified for at least 15 minutes and contact your dealer or nearest CASIO authorized service center. Doing so can cause the display panel glass to crack. • Should the display panel ever become cracked, ... strong impact. INTRODUCTION 27 Connecting a non-specified device creates the risk of fire and electric shock. ■ Transport • Never operate the camera inside the panel. Contact your physician. ■ Connections • Never plug any of such devices is emitting smoke or strange odor, or while...
...aircraft or anywhere else where operation of the above symptoms are not specified for at least 15 minutes and contact your dealer or nearest CASIO authorized service center. Doing so can cause the display panel glass to crack. • Should the display panel ever become cracked, ... strong impact. INTRODUCTION 27 Connecting a non-specified device creates the risk of fire and electric shock. ■ Transport • Never operate the camera inside the panel. Contact your physician. ■ Connections • Never plug any of such devices is emitting smoke or strange odor, or while...


