
Owners Manual
Page 7
...Changing the Camera Date and Time Setting . . . 198 Using World Time 200 ■ Configuring World Time Settings 200 Changing the Display Language 201 Changing the Brightness of the Monitor Screen 202 Changing the USB Port Protocol 203 Configuring [ ] (PLAY) Button Settings . . . . . 204 Formatting Built-in Memory 205 PRINTING 206 Types of Printing 206 Using Professional Print Service 207 Using Your Printer to Print Images 208 Using DPOF to Specify Images to be Printed and the Number of Copies 211 ■ Date Stamping 214 Supported Protocols 215 USING THE CAMERA...
...Changing the Camera Date and Time Setting . . . 198 Using World Time 200 ■ Configuring World Time Settings 200 Changing the Display Language 201 Changing the Brightness of the Monitor Screen 202 Changing the USB Port Protocol 203 Configuring [ ] (PLAY) Button Settings . . . . . 204 Formatting Built-in Memory 205 PRINTING 206 Types of Printing 206 Using Professional Print Service 207 Using Your Printer to Print Images 208 Using DPOF to Specify Images to be Printed and the Number of Copies 211 ■ Date Stamping 214 Supported Protocols 215 USING THE CAMERA...

Owners Manual
Page 44
... time data to be held down for configuring screen text language, date, and time settings. ■ Turning Power Off Close the lens cover. • To turn on when you press [ ] (PLAY), or to require that [ ] be recorded with images. • If you make a mistake when configuring the language, date, and time settings, you load a battery into the camera, a screen appears for some time before the camera turns on (page 204). Use the procedure under "Configuring Display Language, Date, and Time Settings...
... time data to be held down for configuring screen text language, date, and time settings. ■ Turning Power Off Close the lens cover. • To turn on when you press [ ] (PLAY), or to require that [ ] be recorded with images. • If you make a mistake when configuring the language, date, and time settings, you load a battery into the camera, a screen appears for some time before the camera turns on (page 204). Use the procedure under "Configuring Display Language, Date, and Time Settings...

Owners Manual
Page 45
... amount of time. ■ Battery Power Conservation Features This camera is equipped with a sleep function and auto power off if no operation is a connection between the camera and computer or other device via the USB cradle - NOTE • When both sleep and Auto Power Off have the same time settings, Auto Power Off takes priority. • Sleep and Auto Power Off are disabled under the following conditions. - During movie recording and playback GETTING READY...
... amount of time. ■ Battery Power Conservation Features This camera is equipped with a sleep function and auto power off if no operation is a connection between the camera and computer or other device via the USB cradle - NOTE • When both sleep and Auto Power Off have the same time settings, Auto Power Off takes priority. • Sleep and Auto Power Off are disabled under the following conditions. - During movie recording and playback GETTING READY...
Owners Manual
Page 56
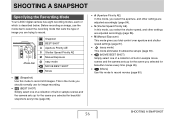
...Before recording an image, use for image recording. • (BEST SHOT) Simply select one of a collection of built-in sample scenes and the camera sets up for beautiful movies every time (page 96). • (Movie) Use this mode to record still images. Mode dial Snapshot BEST SHOT A Aperture Priority AE S Shutter Speed Priority AE M Manual Exposure easy mode MOVIE BEST SHOT Movie • (Snapshot) Use this mode to record movies (page 90). SHOOTING A SNAPSHOT 56 SHOOTING A SNAPSHOT Specifying the Recording Mode Your CASIO digital camera has eight recording modes, each...
...Before recording an image, use for image recording. • (BEST SHOT) Simply select one of a collection of built-in sample scenes and the camera sets up for beautiful movies every time (page 96). • (Movie) Use this mode to record still images. Mode dial Snapshot BEST SHOT A Aperture Priority AE S Shutter Speed Priority AE M Manual Exposure easy mode MOVIE BEST SHOT Movie • (Snapshot) Use this mode to record movies (page 90). SHOOTING A SNAPSHOT 56 SHOOTING A SNAPSHOT Specifying the Recording Mode Your CASIO digital camera has eight recording modes, each...

Owners Manual
Page 78
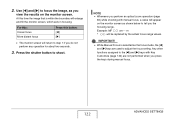
... shutter button. Instead, shooting starts after the preset time elapses. Normal-speed continuous shutter mode - Recording with High-speed Continuous Shutter or Flash Continuous Shutter B SHOOTING A SNAPSHOT 78 How long it shoots an image depends on the monitor screen between Triple Self-timer shots. "Layout" or "Auto Framing" BEST SHOT sample scene selected - Recording with certain BEST SHOT scenes (Business Cards and Documents, Whiteboard, etc., Old Photo) - AF Assist/REC light/ Self-timer Lamp NOTE • The indicator "1sec" appears on the image size and quality settings...
... shutter button. Instead, shooting starts after the preset time elapses. Normal-speed continuous shutter mode - Recording with High-speed Continuous Shutter or Flash Continuous Shutter B SHOOTING A SNAPSHOT 78 How long it shoots an image depends on the monitor screen between Triple Self-timer shots. "Layout" or "Auto Framing" BEST SHOT sample scene selected - Recording with certain BEST SHOT scenes (Business Cards and Documents, Whiteboard, etc., Old Photo) - AF Assist/REC light/ Self-timer Lamp NOTE • The indicator "1sec" appears on the image size and quality settings...
Owners Manual
Page 122
...: Closer focus More distant focus Press this time the image that is selected as you the focusing range. Any other functions assigned to tell you view the results on the monitor screen as shown below to the [W] and [X] keys with manual focus, a value will enlarge and fill the monitor screen, which aids in focusing. Use [W] and [X] to shoot. Press the shutter button to focus the image, as the focus mode...
...: Closer focus More distant focus Press this time the image that is selected as you the focusing range. Any other functions assigned to tell you view the results on the monitor screen as shown below to the [W] and [X] keys with manual focus, a value will enlarge and fill the monitor screen, which aids in focusing. Use [W] and [X] to shoot. Press the shutter button to focus the image, as the focus mode...

Owners Manual
Page 155
... screen also appear on the camera and enter the PLAY mode. When the camera turns on in the PLAY mode, an image will appear on the TV and select its video input mode. B 155 VIEWING SNAPSHOTS AND MOVIES Now you first start a slideshow (page 153). IMPORTANT! • When connecting to a TV to turn off part of the following. • Press the camera's [ ] button. • Press the USB cradle's [USB] button. 3. Turn on the TV screen...
... screen also appear on the camera and enter the PLAY mode. When the camera turns on in the PLAY mode, an image will appear on the TV and select its video input mode. B 155 VIEWING SNAPSHOTS AND MOVIES Now you first start a slideshow (page 153). IMPORTANT! • When connecting to a TV to turn off part of the following. • Press the camera's [ ] button. • Press the USB cradle's [USB] button. 3. Turn on the TV screen...

Owners Manual
Page 163
... [MENU]. 3. 4. This displays screen that shows all of square because it as candidates for keystone correction. • Note that is a snapshot displayed on an image causes a new (corrected) 2M (1600 × 1200 pixels) size image to extract. 5. Press [SET] to extract the displayed part and save it was recorded at any time before you want to be the same as a separate file. 1. In the PLAY mode, use...
... [MENU]. 3. 4. This displays screen that shows all of square because it as candidates for keystone correction. • Note that is a snapshot displayed on an image causes a new (corrected) 2M (1600 × 1200 pixels) size image to extract. 5. Press [SET] to extract the displayed part and save it was recorded at any time before you want to be the same as a separate file. 1. In the PLAY mode, use...

Owners Manual
Page 182
... you want to play back Voice Recording data on your computer using Windows Media Player or QuickTime. • Your camera supports the following audio data formats. - Audio Data: WAVE/ADPCM (.WAV extension) - Enter the PLAY mode, and then use [W] and [X] to start playback. 182 USING AUDIO 5. " " is displayed in place of an image for recording precautions. ■ Playing Back Voice Recording Data 1. Press [SET] to display the Voice Recording file you can also play . NOTE • You...
... you want to play back Voice Recording data on your computer using Windows Media Player or QuickTime. • Your camera supports the following audio data formats. - Audio Data: WAVE/ADPCM (.WAV extension) - Enter the PLAY mode, and then use [W] and [X] to start playback. 182 USING AUDIO 5. " " is displayed in place of an image for recording precautions. ■ Playing Back Voice Recording Data 1. Press [SET] to display the Voice Recording file you can also play . NOTE • You...

Owners Manual
Page 185
... PLAY mode, press [MENU]. 2. For details about how file names are displayed on the camera's monitor screen, see page 254. • The total number of folders and files that even if a file is allowed depends on your computer. On the "PLAY" tab, select "Protect" and then press [X]. 3. Protecting a File Against Deletion You can view folder and file names on the image size and quality, and capacity of the memory card being used for storage. IMPORTANT...
... PLAY mode, press [MENU]. 2. For details about how file names are displayed on the camera's monitor screen, see page 254. • The total number of folders and files that even if a file is allowed depends on your computer. On the "PLAY" tab, select "Protect" and then press [X]. 3. Protecting a File Against Deletion You can view folder and file names on the image size and quality, and capacity of the memory card being used for storage. IMPORTANT...

Owners Manual
Page 189
... a copied file image appears on your computer. 1. This makes it possible, for example, to perform the following steps to view FAVORITE folder contents on the full-month calendar screen, it was copied (page 160). 189 MANAGING YOUR FILES Remove the memory card from the camera. 2. Place the camera on the USB cradle (which is displayed on your computer to navigate to the camera's memory and display the FAVORITE folder contents. IMPORTANT...
... a copied file image appears on your computer. 1. This makes it possible, for example, to perform the following steps to view FAVORITE folder contents on the full-month calendar screen, it was copied (page 160). 189 MANAGING YOUR FILES Remove the memory card from the camera. 2. Place the camera on the USB cradle (which is displayed on your computer to navigate to the camera's memory and display the FAVORITE folder contents. IMPORTANT...

Owners Manual
Page 211
... Copies DPOF (Digital Print Order Format) lets you specify which images you want . 13. Printing will disappear after a short while, even though printing is turned on or off the camera. The message will start and the message "Busy... Using DPOF to Specify Images to be Printed and the Number of copies, and whether date stamping is still being performed. IMPORTANT! • Some printers may ignore time stamp settings or may support different printing protocols. Pressing any camera button...
... Copies DPOF (Digital Print Order Format) lets you specify which images you want . 13. Printing will disappear after a short while, even though printing is turned on or off the camera. The message will start and the message "Busy... Using DPOF to Specify Images to be Printed and the Number of copies, and whether date stamping is still being performed. IMPORTANT! • Some printers may ignore time stamp settings or may support different printing protocols. Pressing any camera button...

Owners Manual
Page 217
... USING THE CAMERA WITH A COMPUTER Though it can slow down data transfer and even cause operational problems. Using the Camera with a Windows Computer Install the required software in accordance with what you are different for Windows and the Macintosh. • Windows users should refer to "Using the Camera with a Windows Computer" on a computer Vista/XP/ 2000/Me 98SE/98 - (USB driver not required.) USB driver Type B (USB driver. Be sure to install this software: • Viewing images...
... USING THE CAMERA WITH A COMPUTER Though it can slow down data transfer and even cause operational problems. Using the Camera with a Windows Computer Install the required software in accordance with what you are different for Windows and the Macintosh. • Windows users should refer to "Using the Camera with a Windows Computer" on a computer Vista/XP/ 2000/Me 98SE/98 - (USB driver not required.) USB driver Type B (USB driver. Be sure to install this software: • Viewing images...
Owners Manual
Page 221
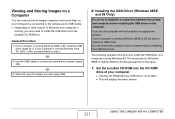
... 1) If your computer is running Windows Vista, XP, 2000, or Me, proceed directly to step 2. 2) Use the USB cradle to connect the camera and computer (page 222). 3) View and copy the images you may need to install the USB driver from the bundled CD-ROM first. If you do, the computer will display the menu screen. 221 USING THE CAMERA WITH A COMPUTER Set the bundled CD-ROM into the...
... 1) If your computer is running Windows Vista, XP, 2000, or Me, proceed directly to step 2. 2) Use the USB cradle to connect the camera and computer (page 222). 3) View and copy the images you may need to install the USB driver from the bundled CD-ROM first. If you do, the computer will display the menu screen. 221 USING THE CAMERA WITH A COMPUTER Set the bundled CD-ROM into the...

Owners Manual
Page 239
... supported. View the User's Guide OS 9/ OS X • Use Adobe Reader or Adobe Acrobat Reader, which images on your Macintosh OS X comes bundled with your operating - Viewing and Storing Images on a Macintosh You can view and store images (snapshot and movie files) on your Macintosh by connecting to a Macintosh running and what you are running Mac OS 8.6 or lower, or Mac OS X 10.0. Objective OS Version Install...
... supported. View the User's Guide OS 9/ OS X • Use Adobe Reader or Adobe Acrobat Reader, which images on your Macintosh OS X comes bundled with your operating - Viewing and Storing Images on a Macintosh You can view and store images (snapshot and movie files) on your Macintosh by connecting to a Macintosh running and what you are running Mac OS 8.6 or lower, or Mac OS X 10.0. Objective OS Version Install...
Owners Manual
Page 246
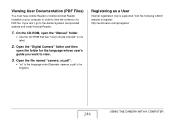
... CAMERA WITH A COMPUTER Open the "Digital Camera" folder and then open the "Manual" folder. • Use the CD-ROM that has "User's Guide included" on your computer in order to view. 3. Open the file named "camera_xx.pdf". • "xx" is the language code (Example: camera_e.pdf is supported. If you want to view the contents of a PDF file. Visit the following CASIO website to the Adobe Systems Incorporated website and install Acrobat Reader. 1. Viewing User Documentation (PDF Files...
... CAMERA WITH A COMPUTER Open the "Digital Camera" folder and then open the "Manual" folder. • Use the CD-ROM that has "User's Guide included" on your computer in order to view. 3. Open the file named "camera_xx.pdf". • "xx" is the language code (Example: camera_e.pdf is supported. If you want to view the contents of a PDF file. Visit the following CASIO website to the Adobe Systems Incorporated website and install Acrobat Reader. 1. Viewing User Documentation (PDF Files...

Owners Manual
Page 257
...- Favorites Show* / Save / Cancel DPOF Printing Select images* / All images / Cancel B 257 APPENDIX Set Up Tab Menu Screen Sounds Auto 2* / Auto 1 / +2 / +1 / 0 Startup* / Half Shutter / Shutter / Operation / Operation / Play Startup On (Selectable image) / Off* File No. Continue* / Reset World Time Home* / World Home Time setup (city, DST, etc.) World Time setup (city, DST, etc.) Timestamp Date / Date&Time / Off* Adjust Time setting Date Style YY/MM/DD / DD/MM/YY / MM/DD/YY Language Changes the screen text language. • The number and types of languages depend on...
...- Favorites Show* / Save / Cancel DPOF Printing Select images* / All images / Cancel B 257 APPENDIX Set Up Tab Menu Screen Sounds Auto 2* / Auto 1 / +2 / +1 / 0 Startup* / Half Shutter / Shutter / Operation / Operation / Play Startup On (Selectable image) / Off* File No. Continue* / Reset World Time Home* / World Home Time setup (city, DST, etc.) World Time setup (city, DST, etc.) Timestamp Date / Date&Time / Off* Adjust Time setting Date Style YY/MM/DD / DD/MM/YY / MM/DD/YY Language Changes the screen text language. • The number and types of languages depend on...

Owners Manual
Page 259
...state. IMPORTANT! • Never remove the memory card from the camera while the operation lamp is Flashing unformatted. / BEST SHOT setup cannot be lost. ■ PLAY mode Operation Lamp Color Status Meaning Lit Operational (Power on, recording enabled). AF assist/ REC light/ self-timer Lamp Meaning Color Status White Flashing Self-timer countdown. ■ REC Mode Operation Lamp Color Status Meaning Green Operational (Power on, recording enabled). / Lit Auto Focus operation was successful. / LCD is off or in progress: Delete, DPOF, protect, copy, format, resize, Flashing...
...state. IMPORTANT! • Never remove the memory card from the camera while the operation lamp is Flashing unformatted. / BEST SHOT setup cannot be lost. ■ PLAY mode Operation Lamp Color Status Meaning Lit Operational (Power on, recording enabled). AF assist/ REC light/ self-timer Lamp Meaning Color Status White Flashing Self-timer countdown. ■ REC Mode Operation Lamp Color Status Meaning Green Operational (Power on, recording enabled). / Lit Auto Focus operation was successful. / LCD is off or in progress: Delete, DPOF, protect, copy, format, resize, Flashing...

Owners Manual
Page 261
... dead. Image Recording Image is not recorded when the shutter button is pressed. Charge the battery (page 36). When composing the image, make sure the subject is charging, wait until the charge operation finishes. 3) If the message "Memory Full" appears, transfer images to be replaced. Power does not turn on . 2) The battery may be dead. Half-press the shutter button and allow enough time for Auto Focus to focus. Troubleshooting Guide Finding the Problem and Fixing It Problem Power Supply Power does not turn off...
... dead. Image Recording Image is not recorded when the shutter button is pressed. Charge the battery (page 36). When composing the image, make sure the subject is charging, wait until the charge operation finishes. 3) If the message "Memory Full" appears, transfer images to be replaced. Power does not turn on . 2) The battery may be dead. Half-press the shutter button and allow enough time for Auto Focus to focus. Troubleshooting Guide Finding the Problem and Fixing It Problem Power Supply Power does not turn off...
Owners Manual
Page 265
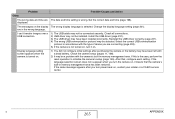
... date and time setting is turned on. Check all connections. 2) USB driver may be selected. Display language setting screen appears when the camera is wrong. Change the display language setting (page 201). 1) The USB cable may be a problem with a dead battery. Select the correct USB communication protocol in memory management area has been restored. After that the camera's built-in accordance with the type of device you turn power back on, contact your retailer or a CASIO service...
... date and time setting is turned on. Check all connections. 2) USB driver may be selected. Display language setting screen appears when the camera is wrong. Change the display language setting (page 201). 1) The USB cable may be a problem with a dead battery. Select the correct USB communication protocol in memory management area has been restored. After that the camera's built-in accordance with the type of device you turn power back on, contact your retailer or a CASIO service...


