
User Guide
Page 4
... by programming in display shows chord names, tempo setting, keyboard information, staff notation of notes played, and more for full support of them as user rhythms in tones. One-touch Presets instantly recalls the most suitable tone and tempo settings to match the rhythm you store your own original creations. 100 of the preset tones are "Advanced Tones," which are using the Auto Accompaniment function. ❐ Synthesizer Mode Edit built in memory, along with their tone, volume...
... by programming in display shows chord names, tempo setting, keyboard information, staff notation of notes played, and more for full support of them as user rhythms in tones. One-touch Presets instantly recalls the most suitable tone and tempo settings to match the rhythm you store your own original creations. 100 of the preset tones are "Advanced Tones," which are using the Auto Accompaniment function. ❐ Synthesizer Mode Edit built in memory, along with their tone, volume...

User Guide
Page 13
... Mode Settings E-48 Playing Back from Song Memory E-49 Recording Melody and Chords with Step Recording E-49 Recording Multiple Tracks E-52 Correcting Mistakes While Step Recording E-54 Editing Memory Contents E-55 Editing a Song E-57 Keyboard Settings E-59 Using Layer E-59 Using Split E-59 Using Layer and Split Together E-60 Using Touch Response E-61 Transposing the Keyboard E-62 Tuning the Keyboard E-62 Changing Other Settings E-63 MIDI E-66 What is MIDI E-66 General MIDI E-66 Sending and Receiving MIDI Messages .... E-67 MIDI Settings E-67 Using the Data Download Service...
... Mode Settings E-48 Playing Back from Song Memory E-49 Recording Melody and Chords with Step Recording E-49 Recording Multiple Tracks E-52 Correcting Mistakes While Step Recording E-54 Editing Memory Contents E-55 Editing a Song E-57 Keyboard Settings E-59 Using Layer E-59 Using Split E-59 Using Layer and Split Together E-60 Using Touch Response E-61 Transposing the Keyboard E-62 Tuning the Keyboard E-62 Changing Other Settings E-63 MIDI E-66 What is MIDI E-66 General MIDI E-66 Sending and Receiving MIDI Messages .... E-67 MIDI Settings E-67 Using the Data Download Service...
User Guide
Page 19
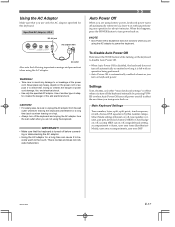
... adaptor to the touch. Main Keyboard Settings Tone number, layer, split, split point, touch response, reverb, chorus, DSP, equalizer, rhythm number, tempo, Mixer Mode settings (channel on/off, tone number, volume, pan pot), keyboard channel, MIDI In Chord Judge on/off, accomp MIDI out on a trip). • Always turn power back on . ❚ NOTE • Auto Power Off is normal and does not indicate malfunction. Use of another type of adaptor creates the danger of fire and electrical shock. Auto Power Off When you are using the AC adaptor...
... adaptor to the touch. Main Keyboard Settings Tone number, layer, split, split point, touch response, reverb, chorus, DSP, equalizer, rhythm number, tempo, Mixer Mode settings (channel on/off, tone number, volume, pan pot), keyboard channel, MIDI In Chord Judge on/off, accomp MIDI out on a trip). • Always turn power back on . ❚ NOTE • Auto Power Off is normal and does not indicate malfunction. Use of another type of adaptor creates the danger of fire and electrical shock. Auto Power Off When you are using the AC adaptor...
User Guide
Page 23
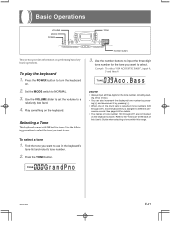
... assigned a different percussion sound. Basic Operations VOLUME MODE POWER TONE This section provides information on the keyboard. Set the MODE switch to a relatively low level. 4. Gr andPno Number buttons 3. Use the following procedure to select the tone you want to use . Example: To select "039 ACOUSTIC BASS", input 0, 3 and then 9. Refer to use in tones. To play the keyboard 1. Selecting a Tone This keyboard comes with 348 built-in the keyboard's tone list and note its tone number. 2. Press the TONE button.
... assigned a different percussion sound. Basic Operations VOLUME MODE POWER TONE This section provides information on the keyboard. Set the MODE switch to a relatively low level. 4. Gr andPno Number buttons 3. Use the following procedure to select the tone you want to use . Example: To select "039 ACOUSTIC BASS", input 0, 3 and then 9. Refer to use in tones. To play the keyboard 1. Selecting a Tone This keyboard comes with 348 built-in the keyboard's tone list and note its tone number. 2. Press the TONE button.

User Guide
Page 28
... keyboard causes a slight break in the sound when the effect changes. • A number of DSP Parameters You can select a user area DSP number in the user area for more information. • Playing a demo tune (page E-15) automatically changes the effect to the one that are cancelled, which the Advanced tone is assigned is turned on the display. 2. Use the [+] and [-] buttons to select the user area DSP number...
... keyboard causes a slight break in the sound when the effect changes. • A number of DSP Parameters You can select a user area DSP number in the user area for more information. • Playing a demo tune (page E-15) automatically changes the effect to the one that are cancelled, which the Advanced tone is assigned is turned on the display. 2. Use the [+] and [-] buttons to select the user area DSP number...

User Guide
Page 30
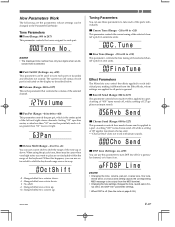
... keyboard's rhythm list and note its rhythm number. 2. Press the RHYTHM button. Set the MODE switch to select the rhythm you want to NORMAL. You can also increment the displayed rhythm number by pressing [+] and decrement it by pressing [-]. To select a rhythm 1. See "Using the Data Download Service" on page E-68 for the melody notes you finger. The bass and chord parts are played using sounds and tones that you want to 255 beats per minute. All of the TEMPO buttons...
... keyboard's rhythm list and note its rhythm number. 2. Press the RHYTHM button. Set the MODE switch to select the rhythm you want to NORMAL. You can also increment the displayed rhythm number by pressing [+] and decrement it by pressing [-]. To select a rhythm 1. See "Using the Data Download Service" on page E-68 for the melody notes you finger. The bass and chord parts are played using sounds and tones that you want to 255 beats per minute. All of the TEMPO buttons...

User Guide
Page 37
... Split tone Layered/split tone Harmonize Tone Auto Accompaniment chord part 1 Auto Accompaniment chord part 2 Auto Accompaniment chord part 3 Auto Accompaniment bass part Auto Accompaniment rhythm part Memory track 1 Memory track 2 Memory track 3 Memory track 4 Memory track 5 Memory track 6 See page E-59 and E-60 for information on /off selection screen. Turning Channels On and Off Turning a channel off 1. Press [̄] (ENTER) and then [̈] (CURSOR) to display the on layered, split, and layered/split tones. Channe l 703A-E-037A E-35 When Auto Accompaniment is being used...
... Split tone Layered/split tone Harmonize Tone Auto Accompaniment chord part 1 Auto Accompaniment chord part 2 Auto Accompaniment chord part 3 Auto Accompaniment bass part Auto Accompaniment rhythm part Memory track 1 Memory track 2 Memory track 3 Memory track 4 Memory track 5 Memory track 6 See page E-59 and E-60 for information on /off selection screen. Turning Channels On and Off Turning a channel off 1. Press [̄] (ENTER) and then [̈] (CURSOR) to display the on layered, split, and layered/split tones. Channe l 703A-E-037A E-35 When Auto Accompaniment is being used...
User Guide
Page 39
... not work with drum sounds. DSP L i ne ❚ NOTE • Changing the tone, volume, pan pot, coarse tune, fine tune, reverb send, or chorus send setting causes the corresponding MIDI message to be cases when very high notes you want to play are applied to all parts in general. Cho Send I Octave Shift (Range: -2 to 0 to +2) You can be used to turn each part on (sounds) and off for a particular channel...
... not work with drum sounds. DSP L i ne ❚ NOTE • Changing the tone, volume, pan pot, coarse tune, fine tune, reverb send, or chorus send setting causes the corresponding MIDI message to be cases when very high notes you want to play are applied to all parts in general. Cho Send I Octave Shift (Range: -2 to 0 to +2) You can be used to turn each part on (sounds) and off for a particular channel...

User Guide
Page 48
...you play Melody data recorded in Track 1. • Note that each track is the basic track, which can adjust the tempo to change the speed of playback. Song Memory Track Buttons Track 4 Track 2 Track 6 BANK STORE Track 1 Track 5 Track 3 Basic Song Memory operations The status of the Song Memory changes each time you can be used to record keyboard play back the tracks together, it sounds like a standard tape recorder. Tracks Keyboard song memory records and plays back much like an entire six-piece band. Start End Track 1 Auto accompaniment (Rhythm, Bass, Chord...
...you play Melody data recorded in Track 1. • Note that each track is the basic track, which can adjust the tempo to change the speed of playback. Song Memory Track Buttons Track 4 Track 2 Track 6 BANK STORE Track 1 Track 5 Track 3 Basic Song Memory operations The status of the Song Memory changes each time you can be used to record keyboard play back the tracks together, it sounds like a standard tape recorder. Tracks Keyboard song memory records and plays back much like an entire six-piece band. Start End Track 1 Auto accompaniment (Rhythm, Bass, Chord...
User Guide
Page 49
... recorded. Press the CHORD/TR1 button, which tracks are recorded as you can use the SONG MEMORY button again to keyboard notes and accompaniment chords, the following settings. • Tone number • Rhythm number • Tempo • MODE switch 5. Press the START/STOP button to make a mistake while recording, you can stop the record operation and begin over again from step 1, or you play on the keyboard are already recorded. Press the SONG MEMORY button twice to select a song num- To record with the MODE switch. • Optional pedal operation...
... recorded. Press the CHORD/TR1 button, which tracks are recorded as you can use the SONG MEMORY button again to keyboard notes and accompaniment chords, the following settings. • Tone number • Rhythm number • Tempo • MODE switch 5. Press the START/STOP button to make a mistake while recording, you can stop the record operation and begin over again from step 1, or you play on the keyboard are already recorded. Press the SONG MEMORY button twice to select a song num- To record with the MODE switch. • Optional pedal operation...

User Guide
Page 50
... recording will start Auto Accompaniment. G To start recording without rhythm Skip step 5. Because of this, the number of step 5, press the SYNCHRO/FILL-IN NEXT button and then play a chord on the melody keyboard to 32) can use when recording to Track 1. G To record using real-time recording. SONG MEMORY SYNCHRO/FILL-IN NEXT START/STOP Mixer Mode Settings Channel 1 Mixer parameters (page E-36) are dead cuts off the keyboard while a record operation is user rhythm data stored in memory. Unplugging the AC adaptor when batteries...
... recording will start Auto Accompaniment. G To start recording without rhythm Skip step 5. Because of this, the number of step 5, press the SYNCHRO/FILL-IN NEXT button and then play a chord on the melody keyboard to 32) can use when recording to Track 1. G To record using real-time recording. SONG MEMORY SYNCHRO/FILL-IN NEXT START/STOP Mixer Mode Settings Channel 1 Mixer parameters (page E-36) are dead cuts off the keyboard while a record operation is user rhythm data stored in memory. Unplugging the AC adaptor when batteries...

User Guide
Page 51
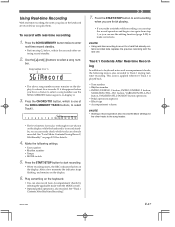
... to record. The following settings. • Rhythm number • MODE switch 3. S t ep Rec Flash 2. After a few moments the indicator stops flashing, and remains on how to record to Tracks 2 through 6: Keyboard play back from the beginning of the song. • The entire keyboard functions as the song number. Press the SYNCHRO/FILL-IN NEXT button. 703A-E-051A E-49 To play With step recording, first record the chords and Auto-Accompaniment in Track 1. Use the SONG MEMORY button to enter play them...
... to record. The following settings. • Rhythm number • MODE switch 3. S t ep Rec Flash 2. After a few moments the indicator stops flashing, and remains on how to record to Tracks 2 through 6: Keyboard play back from the beginning of the song. • The entire keyboard functions as the song number. Press the SYNCHRO/FILL-IN NEXT button. 703A-E-051A E-49 To play With step recording, first record the chords and Auto-Accompaniment in Track 1. Use the SONG MEMORY button to enter play them...

User Guide
Page 52
... chord type input keyboard to correct input mistakes you have just recorded. • To play them. See "Specifying Chords in step 3 of a Note" on this time, press the START/ STOP button. ❚ NOTE • Use the procedure under "Correcting Mistakes While Step Recording" on page E-54 to specify the chord type. This chord specification method can add on to a track that already contains recorded data by the current MODE switch setting (FINGERED, CASIO CHORD, etc.). • When the MODE switch is also recorded...
... chord type input keyboard to correct input mistakes you have just recorded. • To play them. See "Specifying Chords in step 3 of a Note" on this time, press the START/ STOP button. ❚ NOTE • Use the procedure under "Correcting Mistakes While Step Recording" on page E-54 to specify the chord type. This chord specification method can add on to a track that already contains recorded data by the current MODE switch setting (FINGERED, CASIO CHORD, etc.). • When the MODE switch is also recorded...

User Guide
Page 53
... inputting the chord. G To add chord accompaniment part way through rhythm play starts after the SYNCHRO/FILL-IN NEXT button. Then in In step 5, press VARIATION/FILL-IN 1 or VARIATION/ FILL-IN 2 button at the start accompaniment with step recording" on page E-49. G Note lengths Use number buttons [1] through [9] to specify the length of these variations are using step recording. G Dots ( ) and triplicates ( ) While holding down key to specify chord root. (m7) Press key to specify chord type...
... inputting the chord. G To add chord accompaniment part way through rhythm play starts after the SYNCHRO/FILL-IN NEXT button. Then in In step 5, press VARIATION/FILL-IN 1 or VARIATION/ FILL-IN 2 button at the start accompaniment with step recording" on page E-49. G Note lengths Use number buttons [1] through [9] to specify the length of these variations are using step recording. G Dots ( ) and triplicates ( ) While holding down key to specify chord root. (m7) Press key to specify chord type...

User Guide
Page 57
... add more data to a recording. • You cannot move to se- Press the SONG MEMORY button three times to enter step recording standby, and then use to a different location within the recording. • Note lengths cannot be changed. See "Editing Techniques and Display Contents" on page E-56 for Track 1 using step recording. • In the case of a recording to change rhythm numbers you later can be edited. • Note intensity • Notes • Chords • Tone numbers...
... add more data to a recording. • You cannot move to se- Press the SONG MEMORY button three times to enter step recording standby, and then use to a different location within the recording. • Note lengths cannot be changed. See "Editing Techniques and Display Contents" on page E-56 for Track 1 using step recording. • In the case of a recording to change rhythm numbers you later can be edited. • Note intensity • Notes • Chords • Tone numbers...

User Guide
Page 58
... NEXT button operations Press the rhythm controller button you want to change a chord Use the chord fingering method selected by the MODE switch (FINGERED, CASIO CHORD, etc.) to input a chord. I n t /End1 E-56 703A-E-058A Cho r d [̇]/[̈] CURSOR YES ENTER G To change a tone number Use the number buttons or [+] and [-] buttons to change a note so it is reflected in the keyboard and the notes shown in the staff on the keyboard or use to change the pitch of a note Use the number buttons or...
... NEXT button operations Press the rhythm controller button you want to change a chord Use the chord fingering method selected by the MODE switch (FINGERED, CASIO CHORD, etc.) to input a chord. I n t /End1 E-56 703A-E-058A Cho r d [̇]/[̈] CURSOR YES ENTER G To change a tone number Use the number buttons or [+] and [-] buttons to change a note so it is reflected in the keyboard and the notes shown in the staff on the keyboard or use to change the pitch of a note Use the number buttons or...
User Guide
Page 68
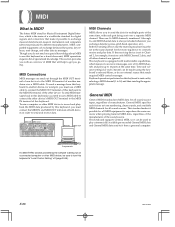
... all sound source types, regardless of this keyboard. MIDI IN MIDI OUT FULL RANGE CHORD FINGERED CASIO CHORD NORMAL MAX MIN PLAY RECORD STEP RECORD BANK STORE (TIE) 3 REST /NO /YES MIDI IN MIDI OUT MIDI Channels MIDI allows you must use a computer or other device. If a MIDI THRU function provided by different manufacturers. The letters MIDI stand for Musical Instrument Digital Interface, which means it from this keyboard to another machine over a MIDI cable. General MIDI General MIDI standardizes MIDI data for...
... all sound source types, regardless of this keyboard. MIDI IN MIDI OUT FULL RANGE CHORD FINGERED CASIO CHORD NORMAL MAX MIN PLAY RECORD STEP RECORD BANK STORE (TIE) 3 REST /NO /YES MIDI IN MIDI OUT MIDI Channels MIDI allows you must use a computer or other device. If a MIDI THRU function provided by different manufacturers. The letters MIDI stand for Musical Instrument Digital Interface, which means it from this keyboard to another machine over a MIDI cable. General MIDI General MIDI standardizes MIDI data for...
User Guide
Page 70
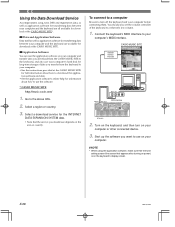
... RANGE CHORD FINGERED CASIO CHORD NORMAL MAX MIN PLAY RECORD STEP RECORD BANK STORE (TIE) 3 REST /NO /YES CTK-671 2. I Application Software You can run the application software on the keyboard's display screen. I Data and Application Software Data itself as well as application software for transferring data between your computer and the keyboard are all available for download at the CASIO MUSIC SITE*. Select a region or country. 3. E-68 703A-E-070A You should use the software. * CASIO MUSIC SITE http://music.casio...
... RANGE CHORD FINGERED CASIO CHORD NORMAL MAX MIN PLAY RECORD STEP RECORD BANK STORE (TIE) 3 REST /NO /YES CTK-671 2. I Application Software You can run the application software on the keyboard's display screen. I Data and Application Software Data itself as well as application software for transferring data between your computer and the keyboard are all available for download at the CASIO MUSIC SITE*. Select a region or country. 3. E-68 703A-E-070A You should use the software. * CASIO MUSIC SITE http://music.casio...

User Guide
Page 72
... record chord accompani- The tuning or transpose parameter is set to select Page E-47 ment or rhythm. Page E-62 Page E-37 Parts suddenly drop out during recording and record standby. Page E-35 song memory playback. Channels are melody tracks. Page E-35 2. A track other than Track 1 is Turn off Local Control on . Nothing happens when the LAYER or SPLIT button is produced when playing MIDI data from a computer. 1. Use the Mixer to turn off the MIDI Thru function on...
... record chord accompani- The tuning or transpose parameter is set to select Page E-47 ment or rhythm. Page E-62 Page E-37 Parts suddenly drop out during recording and record standby. Page E-35 song memory playback. Channels are melody tracks. Page E-35 2. A track other than Track 1 is Turn off Local Control on . Nothing happens when the LAYER or SPLIT button is produced when playing MIDI data from a computer. 1. Use the Mixer to turn off the MIDI Thru function on...
User Guide
Page 73
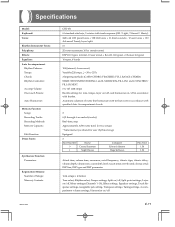
...Specifications Model: Keyboard: Tones: Rhythm Instrument Tones: Polyphony: Effects: Equalizer: Auto Accompaniment Rhythm Patterns: Tempo: Chords: Rhythm Controller: Accomp Volume: One-touch Presets: Auto Harmonize: Memory Function Songs: Recording Tracks: Recording Methods: Memory Capacity: Edit Function: Demo Tunes: Synthesizer Function Parameters: Registration Memory Number of notes that harmonize with melody note in accordance with specified Auto Accompaniment chords. 2 6 (2 through 6 are melody tracks) Real-time, step Approximately 3,500 notes (total for two songs) * Same memory...
...Specifications Model: Keyboard: Tones: Rhythm Instrument Tones: Polyphony: Effects: Equalizer: Auto Accompaniment Rhythm Patterns: Tempo: Chords: Rhythm Controller: Accomp Volume: One-touch Presets: Auto Harmonize: Memory Function Songs: Recording Tracks: Recording Methods: Memory Capacity: Edit Function: Demo Tunes: Synthesizer Function Parameters: Registration Memory Number of notes that harmonize with melody note in accordance with specified Auto Accompaniment chords. 2 6 (2 through 6 are melody tracks) Real-time, step Approximately 3,500 notes (total for two songs) * Same memory...


