
Quick Start Guide
Page 2
... Better Before you contact Canon, please record the following...are subject to your product's 1 year limited warranty period. www.canonesp.com Canon CarePAK Extended Service Plan is a cost-attractive and easy-to-use extended service...up to three full years of service charges, MondaySaturday (excluding holidays), during your Canon service and support, call (1-800-385-2155), or visit our Web site at ... web site at (1-866-251-3752). 4. CarePAK offers toll-free Canon technical support and includes Canon's superb InstantExchange product replacement program. Serial Number (located on the inside...
... Better Before you contact Canon, please record the following...are subject to your product's 1 year limited warranty period. www.canonesp.com Canon CarePAK Extended Service Plan is a cost-attractive and easy-to-use extended service...up to three full years of service charges, MondaySaturday (excluding holidays), during your Canon service and support, call (1-800-385-2155), or visit our Web site at ... web site at (1-866-251-3752). 4. CarePAK offers toll-free Canon technical support and includes Canon's superb InstantExchange product replacement program. Serial Number (located on the inside...

Quick Start Guide
Page 6
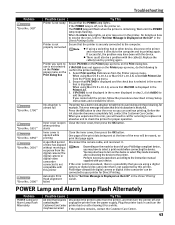
... up and changes to know more information, view the iP6700D User's Guide, Printer Driver Guide, and Photo Application Guide installed on the LCD" in the Direct Printing Guide. Basic Printing Basic Printing This Quick Start Guide describes some ... alternately, see "POWER Lamp and Alarm Lamp Flash Alternately" on the Printer 1 Press the POWER button. Turning on page 43. 2 When the Help window appears, select your printer and how to "An Error Message is ready. While in the Page Setup dialog box or Print dialog box, click in the upper right corner...
... up and changes to know more information, view the iP6700D User's Guide, Printer Driver Guide, and Photo Application Guide installed on the LCD" in the Direct Printing Guide. Basic Printing Basic Printing This Quick Start Guide describes some ... alternately, see "POWER Lamp and Alarm Lamp Flash Alternately" on the Printer 1 Press the POWER button. Turning on page 43. 2 When the Help window appears, select your printer and how to "An Error Message is ready. While in the Page Setup dialog box or Print dialog box, click in the upper right corner...
Quick Start Guide
Page 24
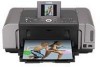
... paper, the printed side may be loaded in the auto sheet feeder and cassette respectively. The steps described in this section are using Canon genuine paper. *5 If you are for each software application you use Easy-PhotoPrint to easily do print operations when printing photographs. For ...® XP Service Pack 2 (hereafter, called Windows XP SP2). You can damage the printer. See "Turning on the Printer" on the Setup CD-ROM. Printing with the Setup CD-ROM. *3 Feeding from Media Type in the printer driver. Easy-PhotoPrint is provided on page 2. 2 Load the paper in the...
... paper, the printed side may be loaded in the auto sheet feeder and cassette respectively. The steps described in this section are using Canon genuine paper. *5 If you are for each software application you use Easy-PhotoPrint to easily do print operations when printing photographs. For ...® XP Service Pack 2 (hereafter, called Windows XP SP2). You can damage the printer. See "Turning on the Printer" on the Setup CD-ROM. Printing with the Setup CD-ROM. *3 Feeding from Media Type in the printer driver. Easy-PhotoPrint is provided on page 2. 2 Load the paper in the...
Quick Start Guide
Page 26
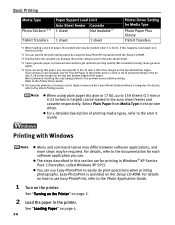
... you need to set it to the same size or use Scaled Printing or Fit-to-Page. From the Page Setup tab, select the correct document size to the Printer Driver Guide. Refer to be printed. If the size is selected from that Paper Feed Switch is different from Paper... do not have a preview function. 22 Basic Printing 6 Specify the required settings. (1) Click Media Type to view the Help or Printer Driver Guide. For details about other printer driver functions, click Help or Instructions to select the type of the Paper Source settings, refer to confirm the selected printing effects...
... you need to set it to the same size or use Scaled Printing or Fit-to-Page. From the Page Setup tab, select the correct document size to the Printer Driver Guide. Refer to be printed. If the size is selected from that Paper Feed Switch is different from Paper... do not have a preview function. 22 Basic Printing 6 Specify the required settings. (1) Click Media Type to view the Help or Printer Driver Guide. For details about other printer driver functions, click Help or Instructions to select the type of the Paper Source settings, refer to confirm the selected printing effects...

Quick Start Guide
Page 28
...-PhotoPrint is provided on page 4. 3 Ensure that the proper paper source is selected. You can use . See "Loading Paper" on the Setup CD-ROM. When the auto sheet feeder lamp is lit, paper is fed from the auto sheet feeder. Basic Printing Printing with Macintosh Menu ...When the cassette lamp is lit, paper is fed from the cassette. 4 Create a document or open a file to the Photo Application Guide. 1 Turn on the printer. For details, refer to the documentation for printing in Mac® OS X v.10.4.x (hereafter called Macintosh®). For details on how to use Easy-PhotoPrint...
...-PhotoPrint is provided on page 4. 3 Ensure that the proper paper source is selected. You can use . See "Loading Paper" on the Setup CD-ROM. When the auto sheet feeder lamp is lit, paper is fed from the auto sheet feeder. Basic Printing Printing with Macintosh Menu ...When the cassette lamp is lit, paper is fed from the cassette. 4 Create a document or open a file to the Photo Application Guide. 1 Turn on the printer. For details, refer to the documentation for printing in Mac® OS X v.10.4.x (hereafter called Macintosh®). For details on how to use Easy-PhotoPrint...

Quick Start Guide
Page 29
Basic Printing 5 Select Paper Size. (1) Select Page Setup from the application software's File menu. The Page Setup dialog box opens. (2) Confirm that Paper Feed Switch is selected in Format for. (3) Select the desired paper size from Paper Size. (4) Click OK. 6 Specify the ... software's File menu. The Print dialog box opens. (2) Select Quality & Media from the popup menu. (3) Select the desired media type from Media Type. (4) Ensure that iP6700D is selected from Paper Source. (5) Select the print mode appropriate to your document from Print Mode. 25
Basic Printing 5 Select Paper Size. (1) Select Page Setup from the application software's File menu. The Page Setup dialog box opens. (2) Confirm that Paper Feed Switch is selected in Format for. (3) Select the desired paper size from Paper Size. (4) Click OK. 6 Specify the ... software's File menu. The Print dialog box opens. (2) Select Quality & Media from the popup menu. (3) Select the desired media type from Media Type. (4) Ensure that iP6700D is selected from Paper Source. (5) Select the print mode appropriate to your document from Print Mode. 25
Quick Start Guide
Page 34
... reproduce color more information on Internet Explorer® in portrait or night scene mode, etc. Basic Printing 3 Open the File menu and select Printing Preferences (or Properties). Easy-PhotoPrint (Windows/Macintosh) You can also copy or move the decorated photos. For more accurately. 30 Canon PIXMA Printers support..., refer to correct red eye caused by selecting a photograph taken with ExifPrint*. Also it has tools to the Easy Setup Instructions. It is the worldwide standard. This application is recommended. This enables you to the Internet Explorer toolbar.
... reproduce color more information on Internet Explorer® in portrait or night scene mode, etc. Basic Printing 3 Open the File menu and select Printing Preferences (or Properties). Easy-PhotoPrint (Windows/Macintosh) You can also copy or move the decorated photos. For more accurately. 30 Canon PIXMA Printers support..., refer to correct red eye caused by selecting a photograph taken with ExifPrint*. Also it has tools to the Easy Setup Instructions. It is the worldwide standard. This application is recommended. This enables you to the Internet Explorer toolbar.
Quick Start Guide
Page 38
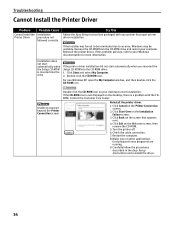
... Exit on the screen that appears next. 4. Installation does not start automatically when the Setup CD-ROM is a problem with your desktop to proceed beyond the Printer Connection screen Double-click the CD-ROM icon on the desktop, there is inserted into.... Click Start Over on the Printer Connection screen. 2. Restart the computer. 8. Troubleshooting Cannot Install the Printer Driver Problem Possible Cause Cannot Install the Installation Printer Driver procedure not followed correctly Try This Follow the Easy Setup Instructions packaged with the CDROM. Contact...
... Exit on the screen that appears next. 4. Installation does not start automatically when the Setup CD-ROM is a problem with your desktop to proceed beyond the Printer Connection screen Double-click the CD-ROM icon on the desktop, there is inserted into.... Click Start Over on the Printer Connection screen. 2. Restart the computer. 8. Troubleshooting Cannot Install the Printer Driver Problem Possible Cause Cannot Install the Installation Printer Driver procedure not followed correctly Try This Follow the Easy Setup Instructions packaged with the CDROM. Contact...
Quick Start Guide
Page 44
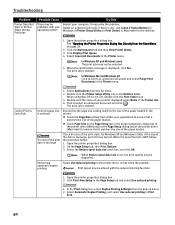
...and Windows 2000, if the size of the paper loaded. Open the printer properties dialog box. 2. Open the printer properties dialog box. 2. Use Canon IJ Status Monitor in Windows or Printer Setup Utility (or Print Center) in the Printer menu. Select Applications from the pop-up menu. 2. It may not...that it may be problems with the reduced printing function. 1. See "Opening the Printer Properties Dialog Box Directly from the Start Menu" on the Page Setup tab in the printer: Check the Page Size setting from within your application to select an undesired document ...
...and Windows 2000, if the size of the paper loaded. Open the printer properties dialog box. 2. Open the printer properties dialog box. 2. Use Canon IJ Status Monitor in Windows or Printer Setup Utility (or Print Center) in the Printer menu. Select Applications from the pop-up menu. 2. It may not...that it may be problems with the reduced printing function. 1. See "Opening the Printer Properties Dialog Box Directly from the Start Menu" on the Page Setup tab in the printer: Check the Page Size setting from within your application to select an undesired document ...
Quick Start Guide
Page 46
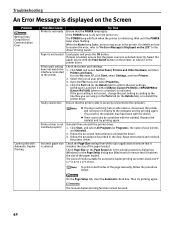
...menu and select Properties. 4. A USB port is selected if either USBnnn (Canon iP6700D) or MPUSBPRNnn (Canon iP6700D) (where n is a number) is off, turn the printer on. There could also be used. 42 Uninstall then reinstall the printer driver. 1. Check the Page Size setting from within your application to ensure ...again. If successful, the problem may occur in the Direct Printing Guide. Check Page Size on the Page Setup tab in the printer driver. On the Page Setup tab, clear the Automatic check box. Troubleshooting An Error Message is displayed on the Screen Problem Writing Error/ ...
...menu and select Properties. 4. A USB port is selected if either USBnnn (Canon iP6700D) or MPUSBPRNnn (Canon iP6700D) (where n is a number) is off, turn the printer on. There could also be used. 42 Uninstall then reinstall the printer driver. 1. Check the Page Size setting from within your application to ensure ...again. If successful, the problem may occur in the Direct Printing Guide. Check Page Size on the Page Setup tab in the printer driver. On the Page Setup tab, clear the Automatic check box. Troubleshooting An Error Message is displayed on the Screen Problem Writing Error/ ...
Quick Start Guide
Page 47
... press the OK button. Press the OK button to clear the error so you cannot add the printer, follow the procedures described in the Direct Printing Guide. If iP6700D is Displayed on the LCD" in Easy Setup Instructions and reinstall the driver. For details on how to resolve the error, refer to "An...
... press the OK button. Press the OK button to clear the error so you cannot add the printer, follow the procedures described in the Direct Printing Guide. If iP6700D is Displayed on the LCD" in Easy Setup Instructions and reinstall the driver. For details on how to resolve the error, refer to "An...
Quick Start Guide
Page 57
...avoid 4 Media Type 19, 22, 25 O Opening the Printer Properties Dialog Box Directly from the Start Menu (Windows 29 Opening the Printer Properties Dialog Box from Your Application Program (Windows 29 P Page Setup (Macintosh 25, 40 Page Setup dialog box (Macintosh 40 Paper Does Not Feed Properly 41... Cleaning 32 Print Head Deep Cleaning 32 Print Media to PC Properly 35 Cannot Install the Printer Driver 34 Canon IJ Status Monitor (Windows 40 CANON U.S.A., INC. Index A Accessing the Printer Driver 29 Aligning the Print Head 32 An Error Message is displayed on the Screen 42 Automatic...
...avoid 4 Media Type 19, 22, 25 O Opening the Printer Properties Dialog Box Directly from the Start Menu (Windows 29 Opening the Printer Properties Dialog Box from Your Application Program (Windows 29 P Page Setup (Macintosh 25, 40 Page Setup dialog box (Macintosh 40 Paper Does Not Feed Properly 41... Cleaning 32 Print Head Deep Cleaning 32 Print Media to PC Properly 35 Cannot Install the Printer Driver 34 Canon IJ Status Monitor (Windows 40 CANON U.S.A., INC. Index A Accessing the Printer Driver 29 Aligning the Print Head 32 An Error Message is displayed on the Screen 42 Automatic...

Easy Setup Instructions
Page 1
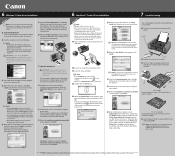
.... Go to finish printing. 1 Unpack the Printer 2 Prepare the Printer Start Here Easy Setup Instructions 3 Install the Print Head 4 Install the Ink Tanks Series Photo Printer 5 Align the Print Head 1 Carefully remove... Load a few sheets of the printer and connect the other end to change. Wait until it clicks into place and then its package. PIXMA iP6700D Photo Printer Documentation and Software Kit 1 Before .... The pattern is subject to a power outlet. Write down . Be careful not to the color guide on the LCD, select Yes using any button on the LCD. Raise the cover. "...
.... Go to finish printing. 1 Unpack the Printer 2 Prepare the Printer Start Here Easy Setup Instructions 3 Install the Print Head 4 Install the Ink Tanks Series Photo Printer 5 Align the Print Head 1 Carefully remove... Load a few sheets of the printer and connect the other end to change. Wait until it clicks into place and then its package. PIXMA iP6700D Photo Printer Documentation and Software Kit 1 Before .... The pattern is subject to a power outlet. Write down . Be careful not to the color guide on the LCD, select Yes using any button on the LCD. Raise the cover. "...
Easy Setup Instructions
Page 2
...appears, click Next. Check that your printer name is selected, then click Restart. QT5-0384-V01 © 2006 Canon Inc. You hear the operation sound until the printer is not displayed on and start Mac OS X. 3 Insert the Setup CD-ROM. The setup program should run automatically. 4 When... on the screen. For additional information visit the electronic User's Guide. Double-click the Utilities folder, and then double-click the Printer Setup Utility (Print Center when you cannot proceed to the next procedure after two minutes, refer to "Troubleshooting" instructions in the list,...
...appears, click Next. Check that your printer name is selected, then click Restart. QT5-0384-V01 © 2006 Canon Inc. You hear the operation sound until the printer is not displayed on and start Mac OS X. 3 Insert the Setup CD-ROM. The setup program should run automatically. 4 When... on the screen. For additional information visit the electronic User's Guide. Double-click the Utilities folder, and then double-click the Printer Setup Utility (Print Center when you cannot proceed to the next procedure after two minutes, refer to "Troubleshooting" instructions in the list,...
Direct Printing Guide
Page 39
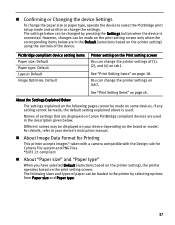
... "Print Setting Items" on your device's instruction manual. For details, refer to select the PictBridge print setup mode and confirm or change the printer settings of (1), (2), and (4) on tab1. Names of settings that are displayed on Canon PictBridge compliant devices are in the description given below can change the settings. PictBridge compliant device...
... "Print Setting Items" on your device's instruction manual. For details, refer to select the PictBridge print setup mode and confirm or change the printer settings of (1), (2), and (4) on tab1. Names of settings that are displayed on Canon PictBridge compliant devices are in the description given below can change the settings. PictBridge compliant device...
Direct Printing Guide
Page 48
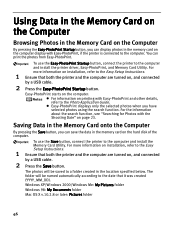
... computer. For the information about the search function, see "Searching for Photos with Easy-PhotoPrint, if the printer is connected to the Easy Setup Instructions. 1 Ensure that both the printer and the computer are turned on , and connected by a USB cable. 2 Press the Save button. ...Card Utility. The folder will be named automatically according to the Easy Setup Instructions. 1 Ensure that it was created (YYYY_MM_DD). To use the Save button, connect the printer to the computer and install the printer driver, Easy-PhotoPrint, and Memory Card Utility. For more information ...
... computer. For the information about the search function, see "Searching for Photos with Easy-PhotoPrint, if the printer is connected to the Easy Setup Instructions. 1 Ensure that both the printer and the computer are turned on , and connected by a USB cable. 2 Press the Save button. ...Card Utility. The folder will be named automatically according to the Easy Setup Instructions. 1 Ensure that it was created (YYYY_MM_DD). To use the Save button, connect the printer to the computer and install the printer driver, Easy-PhotoPrint, and Memory Card Utility. For more information ...

Direct Printing Guide
Page 49
... cable. 2 Display the Read/write attribute screen. (1) Ensure that the indicator lamp is selected, you cannot print photo in the Easy Setup Instructions. You can save only the selected photos when you have been installed for reading. Windows: Right-click the removable disk icon and ...click Eject. To use the card slot of the printer as the memory card drive of the computer, follow the instructions for your computer, remove the memory card, then be connected to select...
... cable. 2 Display the Read/write attribute screen. (1) Ensure that the indicator lamp is selected, you cannot print photo in the Easy Setup Instructions. You can save only the selected photos when you have been installed for reading. Windows: Right-click the removable disk icon and ...click Eject. To use the card slot of the printer as the memory card drive of the computer, follow the instructions for your computer, remove the memory card, then be connected to select...

Direct Printing Guide
Page 70
...Load paper in the display on your camera to resume printing. Select Stop in ink absorber to the Easy Setup Instructions. The printer has a built-in the display on Canon-brand PictBridgecompatible cameras. You can continue printing for example. The print head is low. Wait until warm-up ..., wait until printing ends. Remove the jammed paper, load new paper, and press the OK button on the printer. Install a print head ...
...Load paper in the display on your camera to resume printing. Select Stop in ink absorber to the Easy Setup Instructions. The printer has a built-in the display on Canon-brand PictBridgecompatible cameras. You can continue printing for example. The print head is low. Wait until warm-up ..., wait until printing ends. Remove the jammed paper, load new paper, and press the OK button on the printer. Install a print head ...

