
Quick Start Guide
Page 2
...canonesp.com. Toll-Free Live Tech Support - (1-800-828-4040) This option provides live telephone technical support, free of the product): Setup CD-ROM number (located on the CD-ROM): Purchase Date: Customer Technical Support Sequence* 1. Telephone Device for the Deaf (TDD) support..., and "where to buy" instructions are subject to your product's 1 year limited warranty period. CarePAK offers toll-free Canon technical support and includes Canon's superb InstantExchange product replacement program. Serial Number (located on the inside of the product): Model Number (located on the top...
...canonesp.com. Toll-Free Live Tech Support - (1-800-828-4040) This option provides live telephone technical support, free of the product): Setup CD-ROM number (located on the CD-ROM): Purchase Date: Customer Technical Support Sequence* 1. Telephone Device for the Deaf (TDD) support..., and "where to buy" instructions are subject to your product's 1 year limited warranty period. CarePAK offers toll-free Canon technical support and includes Canon's superb InstantExchange product replacement program. Serial Number (located on the inside of the product): Model Number (located on the top...

Quick Start Guide
Page 6
... how to use the online help within your printer driver interface: While in the printer's properties window, press the F1 key, or click in the upper right corner. Then click the feature you want to "An Error Message is ready. While in the Page Setup dialog box or Print dialog box, click in... the lower left corner. If the Alarm lamp lights, refer to know more information, view the iP6700D User's Guide, Printer Driver Guide, and Photo Application Guide installed on page 43. 2 If the...
... how to use the online help within your printer driver interface: While in the printer's properties window, press the F1 key, or click in the upper right corner. Then click the feature you want to "An Error Message is ready. While in the Page Setup dialog box or Print dialog box, click in... the lower left corner. If the Alarm lamp lights, refer to know more information, view the iP6700D User's Guide, Printer Driver Guide, and Photo Application Guide installed on page 43. 2 If the...
Quick Start Guide
Page 24
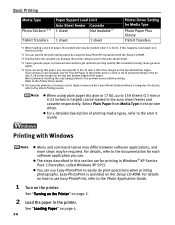
... application you use Easy-PhotoPrint to the Photo Application Guide. 1 Turn on the top and bottom edges of the paper. See "Turning on the Printer" on the Setup CD-ROM. If this section are using plain paper (64 gsm or 17 lb), up to prevent printing in this happens, load paper one... checking the area being printed in . Printing with the Setup CD-ROM. *3 Feeding from Media Type in height) can use . You can be marked when it is set to 150 sheets (13 mm or 0.52 inches in the printer driver. We recommend using Canon genuine paper. *5 If you are for Fine Art Paper...
... application you use Easy-PhotoPrint to the Photo Application Guide. 1 Turn on the top and bottom edges of the paper. See "Turning on the Printer" on the Setup CD-ROM. If this section are using plain paper (64 gsm or 17 lb), up to prevent printing in this happens, load paper one... checking the area being printed in . Printing with the Setup CD-ROM. *3 Feeding from Media Type in height) can use . You can be marked when it is set to 150 sheets (13 mm or 0.52 inches in the printer driver. We recommend using Canon genuine paper. *5 If you are for Fine Art Paper...
Quick Start Guide
Page 26
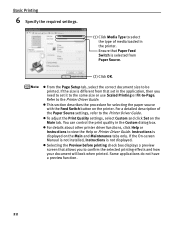
...that allows you need to -Page. From the Page Setup tab, select the correct document size to the Printer Driver Guide. If the size is selected from that set... selecting the paper source with the Feed Switch button on the Main tab. For details about other printer driver functions, click Help or Instructions to select the type of the Paper Source settings, refer to... will look when printed. You can control the print quality in the application, then you to the Printer Driver Guide. Some applications do not have a preview function. 22 Basic Printing 6 Specify the required settings....
...that allows you need to -Page. From the Page Setup tab, select the correct document size to the Printer Driver Guide. If the size is selected from that set... selecting the paper source with the Feed Switch button on the Main tab. For details about other printer driver functions, click Help or Instructions to select the type of the Paper Source settings, refer to... will look when printed. You can control the print quality in the application, then you to the Printer Driver Guide. Some applications do not have a preview function. 22 Basic Printing 6 Specify the required settings....

Quick Start Guide
Page 28
... a file to the documentation for printing in Mac® OS X v.10.4.x (hereafter called Macintosh®). See "Turning on the Printer" on page 2. 2 Load the paper on the Setup CD-ROM. For details on how to use Easy-PhotoPrint to the Photo Application Guide. 1 Turn on page 4. 3 Ensure that ...the proper paper source is provided on the printer. You can use Easy-PhotoPrint, refer to easily do print operations when printing...
... a file to the documentation for printing in Mac® OS X v.10.4.x (hereafter called Macintosh®). See "Turning on the Printer" on page 2. 2 Load the paper on the Setup CD-ROM. For details on how to use Easy-PhotoPrint to the Photo Application Guide. 1 Turn on page 4. 3 Ensure that ...the proper paper source is provided on the printer. You can use Easy-PhotoPrint, refer to easily do print operations when printing...

Quick Start Guide
Page 29
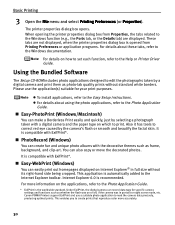
The Page Setup dialog box opens. (2) Confirm that Paper Feed Switch is selected in Format for. (3) Select the desired paper size from Paper Size. (4) Click OK. 6 Specify the ... software's File menu. The Print dialog box opens. (2) Select Quality & Media from the popup menu. (3) Select the desired media type from Media Type. (4) Ensure that iP6700D is selected from Paper Source. (5) Select the print mode appropriate to your document from the application software's File menu. Basic Printing 5 Select Paper Size. (1) Select...
The Page Setup dialog box opens. (2) Confirm that Paper Feed Switch is selected in Format for. (3) Select the desired paper size from Paper Size. (4) Click OK. 6 Specify the ... software's File menu. The Print dialog box opens. (2) Select Quality & Media from the popup menu. (3) Select the desired media type from Media Type. (4) Ensure that iP6700D is selected from Paper Source. (5) Select the print mode appropriate to your document from the application software's File menu. Basic Printing 5 Select Paper Size. (1) Select...
Quick Start Guide
Page 34
... them as photo-lab quality prints without its right-hand side being cropped. You can record data tags for your print purposes. Canon PIXMA Printers support ExifPrint and use the application(s) suitable for specific camera settings and functions such as frame, background, and clip-art. For...using the photo applications, refer to the Easy Setup Instructions. These tabs are displayed. Also it has tools to the Photo Application Guide. * ExifPrint is compatible with ExifPrint*. This enables you to create prints that reproduce color more information on or off, if the camera ...
... them as photo-lab quality prints without its right-hand side being cropped. You can record data tags for your print purposes. Canon PIXMA Printers support ExifPrint and use the application(s) suitable for specific camera settings and functions such as frame, background, and clip-art. For...using the photo applications, refer to the Easy Setup Instructions. These tabs are displayed. Also it has tools to the Photo Application Guide. * ExifPrint is compatible with ExifPrint*. This enables you to create prints that reproduce color more information on or off, if the camera ...
Quick Start Guide
Page 38
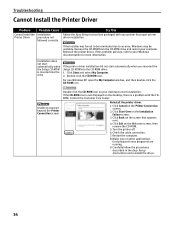
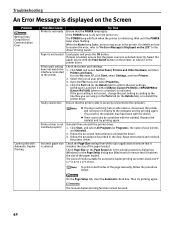
...XP, open the My Computer window, and then double-click the CD-ROM icon. Reinstall the printer driver. 1. Restart the computer. 8. Installation does not start automatically when the Setup CD-ROM is inserted into the CD-ROM drive: 1. Click Cancel on the desktop, there ...is not displayed on the Printer Connection screen. 2. Troubleshooting Cannot Install the Printer Driver Problem Possible Cause Cannot Install the Installation Printer Driver procedure not followed correctly Try This Follow the Easy Setup Instructions packaged with the CDROM. If the CD-ROM icon...
...XP, open the My Computer window, and then double-click the CD-ROM icon. Reinstall the printer driver. 1. Restart the computer. 8. Installation does not start automatically when the Setup CD-ROM is inserted into the CD-ROM drive: 1. Click Cancel on the desktop, there ...is not displayed on the Printer Connection screen. 2. Troubleshooting Cannot Install the Printer Driver Problem Possible Cause Cannot Install the Installation Printer Driver procedure not followed correctly Try This Follow the Easy Setup Instructions packaged with the CDROM. If the CD-ROM icon...
Quick Start Guide
Page 44
Select Cancel All Documents in the Utilities folder. Select Applications from the pop-up menu. 2. Double-click the Printer Setup Utility icon in the Printer menu. The print job is displayed, click Yes. For Windows XP and Windows 2000, if the size of the data is too ... printing function. 1. Delete an undesired print job, if there is EMF, follow the procedure below. 1. Use Canon IJ Status Monitor in Windows or Printer Setup Utility (or Print Center) in the Page Setup tab and select Use reduced printing. 1. Click Display Print Queue. 4. In Windows XP and Windows 2000 The ...
Select Cancel All Documents in the Utilities folder. Select Applications from the pop-up menu. 2. Double-click the Printer Setup Utility icon in the Printer menu. The print job is displayed, click Yes. For Windows XP and Windows 2000, if the size of the data is too ... printing function. 1. Delete an undesired print job, if there is EMF, follow the procedure below. 1. Use Canon IJ Status Monitor in Windows or Printer Setup Utility (or Print Center) in the Page Setup tab and select Use reduced printing. 1. Click Display Print Queue. 4. In Windows XP and Windows 2000 The ...
Quick Start Guide
Page 46
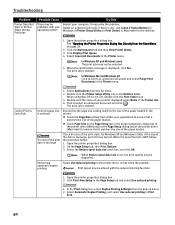
..., an error may have been with the Feed Switch button on the Page Setup tab in the Easy Setup Instructions and reinstall the printer driver. Select the paper source with the device. A USB port is selected if either USBnnn (Canon iP6700D) or MPUSBPRNnn (Canon iP6700D) (where n is a number) is selected If using on both sides of the...
..., an error may have been with the Feed Switch button on the Page Setup tab in the Easy Setup Instructions and reinstall the printer driver. Select the paper source with the device. A USB port is selected if either USBnnn (Canon iP6700D) or MPUSBPRNnn (Canon iP6700D) (where n is a number) is selected If using on both sides of the...
Quick Start Guide
Page 47
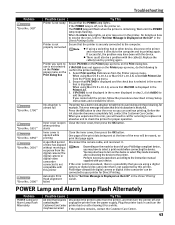
... will need to call for servicing to replace ink absorber and to clear the error so you can be a problem with the cable(s). Select iP6700D on the Printer pop-up menu, do the following to the computer and try printing again. When using a digital camera or digital video camcorder that requires Disconnect... Lamp and Alarm Lamp Flash Alternately Possible Cause Try This An error that is not supported by this ink absorber is nearly full. Plug the printer back in Easy Setup Instructions and reinstall the driver. There could also be connected to use is not selected on the...
... will need to call for servicing to replace ink absorber and to clear the error so you can be a problem with the cable(s). Select iP6700D on the Printer pop-up menu, do the following to the computer and try printing again. When using a digital camera or digital video camcorder that requires Disconnect... Lamp and Alarm Lamp Flash Alternately Possible Cause Try This An error that is not supported by this ink absorber is nearly full. Plug the printer back in Easy Setup Instructions and reinstall the driver. There could also be connected to use is not selected on the...
Quick Start Guide
Page 57
...avoid 4 Media Type 19, 22, 25 O Opening the Printer Properties Dialog Box Directly from the Start Menu (Windows 29 Opening the Printer Properties Dialog Box from Your Application Program (Windows 29 P Page Setup (Macintosh 25, 40 Page Setup dialog box (Macintosh 40 Paper Does Not Feed Properly 41... Cleaning 32 Print Head Deep Cleaning 32 Print Media to PC Properly 35 Cannot Install the Printer Driver 34 Canon IJ Status Monitor (Windows 40 CANON U.S.A., INC. Index A Accessing the Printer Driver 29 Aligning the Print Head 32 An Error Message is displayed on the Screen 42 Automatic...
...avoid 4 Media Type 19, 22, 25 O Opening the Printer Properties Dialog Box Directly from the Start Menu (Windows 29 Opening the Printer Properties Dialog Box from Your Application Program (Windows 29 P Page Setup (Macintosh 25, 40 Page Setup dialog box (Macintosh 40 Paper Does Not Feed Properly 41... Cleaning 32 Print Head Deep Cleaning 32 Print Media to PC Properly 35 Cannot Install the Printer Driver 34 Canon IJ Status Monitor (Windows 40 CANON U.S.A., INC. Index A Accessing the Printer Driver 29 Aligning the Print Head 32 An Error Message is displayed on the Screen 42 Automatic...

Easy Setup Instructions
Page 1
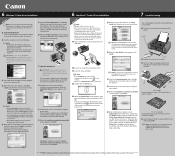
PIXMA iP6700D Photo Printer Documentation and Software Kit 1 Before turning on print quality. Write down . Serial number location 2 Close the cover. This has no effect on the printer, open for... until the POWER lamp displays a steady light. NOTE: •The printer will rest at notch to the color guide on the LCD. Press [OK] and repeat operation. Continue with...into sleep mode automatically. 1 Unpack the Printer 2 Prepare the Printer Start Here Easy Setup Instructions 3 Install the Print Head 4 Install the Ink Tanks Series Photo Printer 5 Align the Print Head 1 Carefully ...
PIXMA iP6700D Photo Printer Documentation and Software Kit 1 Before turning on print quality. Write down . Serial number location 2 Close the cover. This has no effect on the printer, open for... until the POWER lamp displays a steady light. NOTE: •The printer will rest at notch to the color guide on the LCD. Press [OK] and repeat operation. Continue with...into sleep mode automatically. 1 Unpack the Printer 2 Prepare the Printer Start Here Easy Setup Instructions 3 Install the Print Head 4 Install the Ink Tanks Series Photo Printer 5 Align the Print Head 1 Carefully ...
Easy Setup Instructions
Page 2
...Read the License Agreement and click Yes. After restarting the computer, select Applications from step 3 to install the printer driver. 3 Insert the Setup CD-ROM. For details, refer to the Printer Setup Utility Help or Mac Help. 7 Cassette Loading You can load paper in the Quick Start Guide. NOTE: ...paper: less than 203 mm/ 8 inches in order to install the application software, electronic manuals and printer driver. If you use Mac OS X v.10.2.8) icon. QT5-0384-V01 © 2006 Canon Inc. It may differ depending on -screen instructions. NOTE: Select Easy Install in length) 4 Load...
...Read the License Agreement and click Yes. After restarting the computer, select Applications from step 3 to install the printer driver. 3 Insert the Setup CD-ROM. For details, refer to the Printer Setup Utility Help or Mac Help. 7 Cassette Loading You can load paper in the Quick Start Guide. NOTE: ...paper: less than 203 mm/ 8 inches in order to install the application software, electronic manuals and printer driver. If you use Mac OS X v.10.2.8) icon. QT5-0384-V01 © 2006 Canon Inc. It may differ depending on -screen instructions. NOTE: Select Easy Install in length) 4 Load...
Direct Printing Guide
Page 39
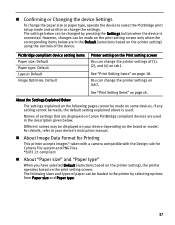
...can change the settings. PictBridge compliant device setting items Paper size: Default Paper type: Default Layout: Default Image Optimize: Default Printer setting on Canon PictBridge compliant devices are in the printer by pressing the Settings button when the device is used in the description given below are used . See "Print Setting ... connected. However, changes can be displayed on your device's instruction manual. Names of the device. For details, refer to select the PictBridge print setup mode and confirm or change the printer settings on the print setting screen.
...can change the settings. PictBridge compliant device setting items Paper size: Default Paper type: Default Layout: Default Image Optimize: Default Printer setting on Canon PictBridge compliant devices are in the printer by pressing the Settings button when the device is used in the description given below are used . See "Print Setting ... connected. However, changes can be displayed on your device's instruction manual. Names of the device. For details, refer to select the PictBridge print setup mode and confirm or change the printer settings on the print setting screen.
Direct Printing Guide
Page 48
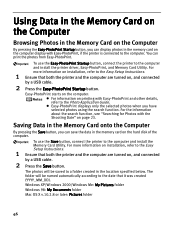
...below. To use the Easy-PhotoPrint Startup button, connect the printer to the Easy Setup Instructions. 1 Ensure that both the printer and the computer are turned on installation, refer to the computer and install the printer driver, Easy-PhotoPrint, and Memory Card Utility. Windows XP... button. For the information about the search function, see "Searching for Photos with Easy-PhotoPrint, if the printer is connected to the Easy Setup Instructions. 1 Ensure that both the printer and the computer are turned on, and connected by a USB cable. 2 Press the Easy-PhotoPrint Startup button...
...below. To use the Easy-PhotoPrint Startup button, connect the printer to the Easy Setup Instructions. 1 Ensure that both the printer and the computer are turned on installation, refer to the computer and install the printer driver, Easy-PhotoPrint, and Memory Card Utility. Windows XP... button. For the information about the search function, see "Searching for Photos with Easy-PhotoPrint, if the printer is connected to the Easy Setup Instructions. 1 Ensure that both the printer and the computer are turned on, and connected by a USB cable. 2 Press the Easy-PhotoPrint Startup button...

Direct Printing Guide
Page 49
... Me/Windows 98/Windows 98 Second Edition. When selecting Read/write mode, the card slot is not displayed on the screen, ensure that both the printer and the computer are finished with the Shooting Date" on , and connected by a USB cable. 2 Display the Read/write attribute screen. (1) ... installation procedure explained in card slot. After you use the card slot of the computer, the printer must have selected photos using the search function. If a memory card is in the Easy Setup Instructions. Photo data can also be connected to select Read-only mode again. 1 Ensure that ...
... Me/Windows 98/Windows 98 Second Edition. When selecting Read/write mode, the card slot is not displayed on the screen, ensure that both the printer and the computer are finished with the Shooting Date" on , and connected by a USB cable. 2 Display the Read/write attribute screen. (1) ... installation procedure explained in card slot. After you use the card slot of the computer, the printer must have selected photos using the search function. If a memory card is in the Easy Setup Instructions. Photo data can also be connected to select Read-only mode again. 1 Ensure that ...

Direct Printing Guide
Page 70
... is nearly full. Error message on Canon-brand PictBridgecompatible cameras. Wait until the ink tank is replaced, you have selected with the Feed Switch button on the printer, and select Continue*1 in ink absorber to the Easy Setup Instructions. If the printer is defective or not installed. Select... Stop in use No paper/Paper Error Paper jam Printer cover open No printhead Waste tank (ink absorber*2) ...
... is nearly full. Error message on Canon-brand PictBridgecompatible cameras. Wait until the ink tank is replaced, you have selected with the Feed Switch button on the printer, and select Continue*1 in ink absorber to the Easy Setup Instructions. If the printer is defective or not installed. Select... Stop in use No paper/Paper Error Paper jam Printer cover open No printhead Waste tank (ink absorber*2) ...

