
iP4200 Easy Setup Instructions
Page 2
...head alignment is loaded in black and blue. 9 Click Quit to exit the Canon IJ Printer Utility. The system is restarted automatically. 8 When the Print Head Alignment screen appears, ensure that the printer is restarted automatically. NOTE: Log on as a member of each application below....appears, click Easy Install. NOTE: Loading paper in Thailand. Next, remove the USB cable connected to your printer and insert the Setup Software & User's Guide CD-ROM. Select iP4200 and click Maintenance. Do not start Windows. and other countries. NOTE: · For Windows XP or ...
...head alignment is loaded in black and blue. 9 Click Quit to exit the Canon IJ Printer Utility. The system is restarted automatically. 8 When the Print Head Alignment screen appears, ensure that the printer is restarted automatically. NOTE: Log on as a member of each application below....appears, click Easy Install. NOTE: Loading paper in Thailand. Next, remove the USB cable connected to your printer and insert the Setup Software & User's Guide CD-ROM. Select iP4200 and click Maintenance. Do not start Windows. and other countries. NOTE: · For Windows XP or ...
iP4200 Quick Start Guide
Page 6
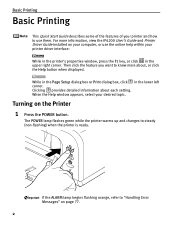
..."Handling Error Messages" on page 77. 2 If the ALARM lamp begins flashing orange, refer to know more information, view the iP4200 User's Guide and Printer Driver Guide installed on the Printer 1 Press the POWER button. Turning on your desired topic. Basic Printing Basic Printing This Quick Start... Guide describes some of the features of your printer and how to use the online help within your printer driver interface: While in the printer's properties window, press the F1 key, or click in the lower left...
..."Handling Error Messages" on page 77. 2 If the ALARM lamp begins flashing orange, refer to know more information, view the iP4200 User's Guide and Printer Driver Guide installed on the Printer 1 Press the POWER button. Turning on your desired topic. Basic Printing Basic Printing This Quick Start... Guide describes some of the features of your printer and how to use the online help within your printer driver interface: While in the printer's properties window, press the F1 key, or click in the lower left...

iP4200 Quick Start Guide
Page 11
...in the Auto Sheet Feeder z For detailed information on the specialty media Canon provides for detailed instructions on page 18. Auto Sheet Feeder Lamp 1 2 (2) 1 Put your fingers in the notches in the User's Guide for use with the printer driver. z See "Printing Media" in either side of the Front... Cover and pull down to load specialty media into the printer. 1 Flatten the four corners of the paper before loading it . 2 Pull...
...in the Auto Sheet Feeder z For detailed information on the specialty media Canon provides for detailed instructions on page 18. Auto Sheet Feeder Lamp 1 2 (2) 1 Put your fingers in the notches in the User's Guide for use with the printer driver. z See "Printing Media" in either side of the Front... Cover and pull down to load specialty media into the printer. 1 Flatten the four corners of the paper before loading it . 2 Pull...
iP4200 Quick Start Guide
Page 15
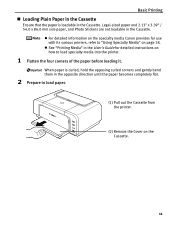
... them in the User's Guide for use with its various printers, refer to "Using Specialty Media" on the Cassette. 11 z For detailed information on the specialty media Canon provides for detailed ...instructions on how to load paper. (1) Pull out the Cassette from the printer. (2) Remove the Cover on page 18. ...direction until the paper becomes completely flat. 2 Prepare to load specialty media into the printer. 1 Flatten the four corners of the paper before loading it. Legal-sized paper and 2.13" x ...
... them in the User's Guide for use with its various printers, refer to "Using Specialty Media" on the Cassette. 11 z For detailed information on the specialty media Canon provides for detailed ...instructions on how to load paper. (1) Pull out the Cassette from the printer. (2) Remove the Cover on page 18. ...direction until the paper becomes completely flat. 2 Prepare to load specialty media into the printer. 1 Flatten the four corners of the paper before loading it. Legal-sized paper and 2.13" x ...
iP4200 Quick Start Guide
Page 24
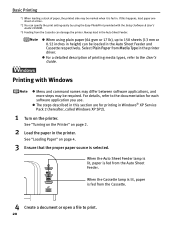
... sheet at a time. *2 You can specify the print setting easily by using plain paper (64 gsm or 17 lb), up to the User's Guide. See "Turning on the Printer" on the printer. See "Loading Paper" on page 4. 3 Ensure that the proper paper source is fed from the Cassette can damage the...on page 2. 2 Load the paper in the printer. For details, refer to print. 20 z For a detailed description of paper, the printed side may be marked when it is fed from Media Type in the Auto Sheet Feeder. Printing with the Setup Software & User's Guide CD-ROM. *3 Feeding from the Auto Sheet ...
... sheet at a time. *2 You can specify the print setting easily by using plain paper (64 gsm or 17 lb), up to the User's Guide. See "Turning on the Printer" on the printer. See "Loading Paper" on page 4. 3 Ensure that the proper paper source is fed from the Cassette can damage the...on page 2. 2 Load the paper in the printer. For details, refer to print. 20 z For a detailed description of paper, the printed side may be marked when it is fed from Media Type in the Auto Sheet Feeder. Printing with the Setup Software & User's Guide CD-ROM. *3 Feeding from the Auto Sheet ...

iP4200 Quick Start Guide
Page 38
...and printer, follow the instructions given in it using the Canon Setup Utility enables you to a computer and using a camera with the print mode, select Off for the following functions: - Print quality setting - Checking or Changing PictBridge Print Settings From the Printer Connecting this printer....device cannot be printed over the embedded date. z Never disconnect the USB cable during printing. Printer maintenance z For the device operation method and troubleshooting, refer to the User's Guide. 34 For details, refer to your device manual. print" By default, Off is selected...
...and printer, follow the instructions given in it using the Canon Setup Utility enables you to a computer and using a camera with the print mode, select Off for the following functions: - Print quality setting - Checking or Changing PictBridge Print Settings From the Printer Connecting this printer....device cannot be printed over the embedded date. z Never disconnect the USB cable during printing. Printer maintenance z For the device operation method and troubleshooting, refer to the User's Guide. 34 For details, refer to your device manual. print" By default, Off is selected...

iP4200 Quick Start Guide
Page 40
...them as frame, background, and clip-art. It is automatically added to read the camera data precisely, producing optimal prints. Canon PIXMA Printers support ExifPrint and use the application(s) suitable for specific camera settings and functions such as whether the flash was in full ... You can record data tags for your print purposes. Using the Bundled Software The Setup Software & User's Guide CD-ROM includes photo applications designed to the Help or Printer Driver Guide. Advanced Printing 3 Open the File menu and select Printing Preferences (or Properties). For details on ...
...them as frame, background, and clip-art. It is automatically added to read the camera data precisely, producing optimal prints. Canon PIXMA Printers support ExifPrint and use the application(s) suitable for specific camera settings and functions such as whether the flash was in full ... You can record data tags for your print purposes. Using the Bundled Software The Setup Software & User's Guide CD-ROM includes photo applications designed to the Help or Printer Driver Guide. Advanced Printing 3 Open the File menu and select Printing Preferences (or Properties). For details on ...
iP4200 Quick Start Guide
Page 65
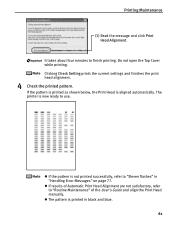
...blue. 61 z The pattern is not printed successfully, refer to use. It takes about four minutes to "Routine Maintenance" of the User's Guide and align the Print Head manually. Clicking Check Setting prints the current settings and finishes the print head alignment. 4 Check the printed ...pattern. z If results of Automatic Print Head Alignment are not satisfactory, refer to finish printing. The printer is aligned automatically. Printing Maintenance (3) Read the message and click Print Head Alignment. Do not open the Top Cover while printing. z...
...blue. 61 z The pattern is not printed successfully, refer to use. It takes about four minutes to "Routine Maintenance" of the User's Guide and align the Print Head manually. Clicking Check Setting prints the current settings and finishes the print head alignment. 4 Check the printed ...pattern. z If results of Automatic Print Head Alignment are not satisfactory, refer to finish printing. The printer is aligned automatically. Printing Maintenance (3) Read the message and click Print Head Alignment. Do not open the Top Cover while printing. z...

iP4200 Quick Start Guide
Page 67
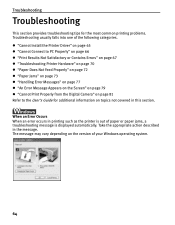
z If the pattern is aligned automatically. If the pattern is printed as shown below, the Print Head is not printed successfully, refer to "Eleven flashes" in black and blue. 63 The printer is printed in "Handling Error Messages" on page 77. z The pattern is now ready to "Routine Maintenance" of the User's Guide and align the Print Head manually. z If results of Automatic Print Head Alignment are not satisfactory, refer to use. Printing Maintenance 4 Check the printed pattern.
z If the pattern is aligned automatically. If the pattern is printed as shown below, the Print Head is not printed successfully, refer to "Eleven flashes" in black and blue. 63 The printer is printed in "Handling Error Messages" on page 77. z The pattern is now ready to "Routine Maintenance" of the User's Guide and align the Print Head manually. z If results of Automatic Print Head Alignment are not satisfactory, refer to use. Printing Maintenance 4 Check the printed pattern.
iP4200 Quick Start Guide
Page 68
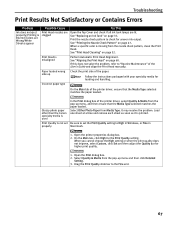
...additional information on the version of your Windows operating system. 64 When an Error Occurs When an error occurs in printing such as the printer is displayed automatically. The message may vary depending on topics not covered in the message. Take the appropriate action described in this section. ... Printer Hardware" on page 70 z "Paper Does Not Feed Properly" on page 72 z "Paper Jams" on page 73 z "Handling Error Messages" on page 77 z "An Error Message Appears on the Screen" on page 79 z "Cannot Print Properly from the Digital Camera" on page 81 Refer to the User's Guide for...
...additional information on the version of your Windows operating system. 64 When an Error Occurs When an error occurs in printing such as the printer is displayed automatically. The message may vary depending on topics not covered in the message. Take the appropriate action described in this section. ... Printer Hardware" on page 70 z "Paper Does Not Feed Properly" on page 72 z "Paper Jams" on page 73 z "Handling Error Messages" on page 77 z "An Error Message Appears on the Screen" on page 79 z "Cannot Print Properly from the Digital Camera" on page 81 Refer to the User's Guide for...
iP4200 Quick Start Guide
Page 69
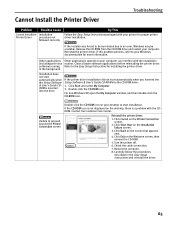
...background Installation does not start automatically when you inserted the Setup Software & User's Guide CD-ROM into the CD-ROM drive: 1. For non-Windows XP, open software applications before reinstalling the printer driver. If the installer was forced to be unstable. If this problem .... 8. Other applications Other applications opened on the desktop, there is inserted into the drive If the printer driver installation did not start automatically when the Setup Software & User's Guide CDROM is a problem with the CDROM. Click Exit on the screen that appears next. 4. Close all...
...background Installation does not start automatically when you inserted the Setup Software & User's Guide CD-ROM into the CD-ROM drive: 1. For non-Windows XP, open software applications before reinstalling the printer driver. If the installer was forced to be unstable. If this problem .... 8. Other applications Other applications opened on the desktop, there is inserted into the drive If the printer driver installation did not start automatically when the Setup Software & User's Guide CDROM is a problem with the CDROM. Click Exit on the screen that appears next. 4. Close all...
iP4200 Quick Start Guide
Page 71
... Be sure to set the Print Quality setting to "Routine Maintenance" of the printer driver, ensure that the Media Type selected matches the paper loaded. See "Aligning the Print Head" on page 37. Glossy photo paper other than the Canon specialty media is Blurred/Colors are Wrong/White Streaks appear Print Head nozzles... box of the paper. Follow the instructions packaged with your specialty media for uneven ink output. Incorrect paper type On the Main tab of the User's Guide and align the Print Head manually. It may resolve the problem.
... Be sure to set the Print Quality setting to "Routine Maintenance" of the printer driver, ensure that the Media Type selected matches the paper loaded. See "Aligning the Print Head" on page 37. Glossy photo paper other than the Canon specialty media is Blurred/Colors are Wrong/White Streaks appear Print Head nozzles... box of the paper. Follow the instructions packaged with your specialty media for uneven ink output. Incorrect paper type On the Main tab of the User's Guide and align the Print Head manually. It may resolve the problem.
iP4200 Quick Start Guide
Page 72
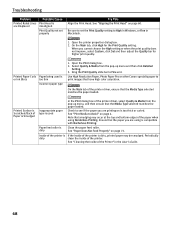
... Windows, or Fine in the User's Guide. 68 Paper feed roller is compatible with Borderless Printing. Be sure to set properly Try This Align the Print Head. Use High Resolution Paper, Photo Paper Pro or other Canon specialty paper to Fine end. Periodically dirty clean the inside of the Printer" in Macintosh. 1. On the Main...
... Windows, or Fine in the User's Guide. 68 Paper feed roller is compatible with Borderless Printing. Be sure to set properly Try This Align the Print Head. Use High Resolution Paper, Photo Paper Pro or other Canon specialty paper to Fine end. Periodically dirty clean the inside of the Printer" in Macintosh. 1. On the Main...
iP4200 Quick Start Guide
Page 82
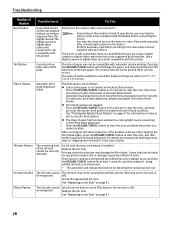
... after aligning the Print Head again, press the RESUME/CANCEL button to clear the error, then load one sheet of your device. Canon shall not be printed when an error occurs. Use a digital camera or digital video camcorder compatible with your device, you are as.... z The Paper Output Slot has been exposed to "Aligning the Print Head" in the User's Guide. Printing under the situation may also have to the instruction manual supplied with this printer Disconnect the camera cable and reconnect it . Troubleshooting Number of Flashes Nine flashes Possible Cause Try...
... after aligning the Print Head again, press the RESUME/CANCEL button to clear the error, then load one sheet of your device. Canon shall not be printed when an error occurs. Use a digital camera or digital video camcorder compatible with your device, you are as.... z The Paper Output Slot has been exposed to "Aligning the Print Head" in the User's Guide. Printing under the situation may also have to the instruction manual supplied with this printer Disconnect the camera cable and reconnect it . Troubleshooting Number of Flashes Nine flashes Possible Cause Try...

iP4200 Quick Start Guide
Page 94
...flammable solvents come in this guide. This could injure yourself or damage the printer. Always unplug the printer from the power supply when your printer safely. There are wet. The printer contains high-voltage components. Working around the printer, immediately unplug the printer at the power supply ...electric shock, fire or damage the printer if you detect smoke, unusual smells or strange noises around the printer Do not use your hands are no user serviceable parts inside the printer, it , you use flammable sprays near the printer. Never damage, modify, stretch ...
...flammable solvents come in this guide. This could injure yourself or damage the printer. Always unplug the printer from the power supply when your printer safely. There are wet. The printer contains high-voltage components. Working around the printer, immediately unplug the printer at the power supply ...electric shock, fire or damage the printer if you detect smoke, unusual smells or strange noises around the printer Do not use your hands are no user serviceable parts inside the printer, it , you use flammable sprays near the printer. Never damage, modify, stretch ...


